前言
状态管理 / 路由管理 / 依赖管理
这三部分之间存在联系
参考文章
建议看官网文章,很详细 ,pub.dev搜索get
pub.dev的文档
状态管理文章相关链接
状态管理
案例
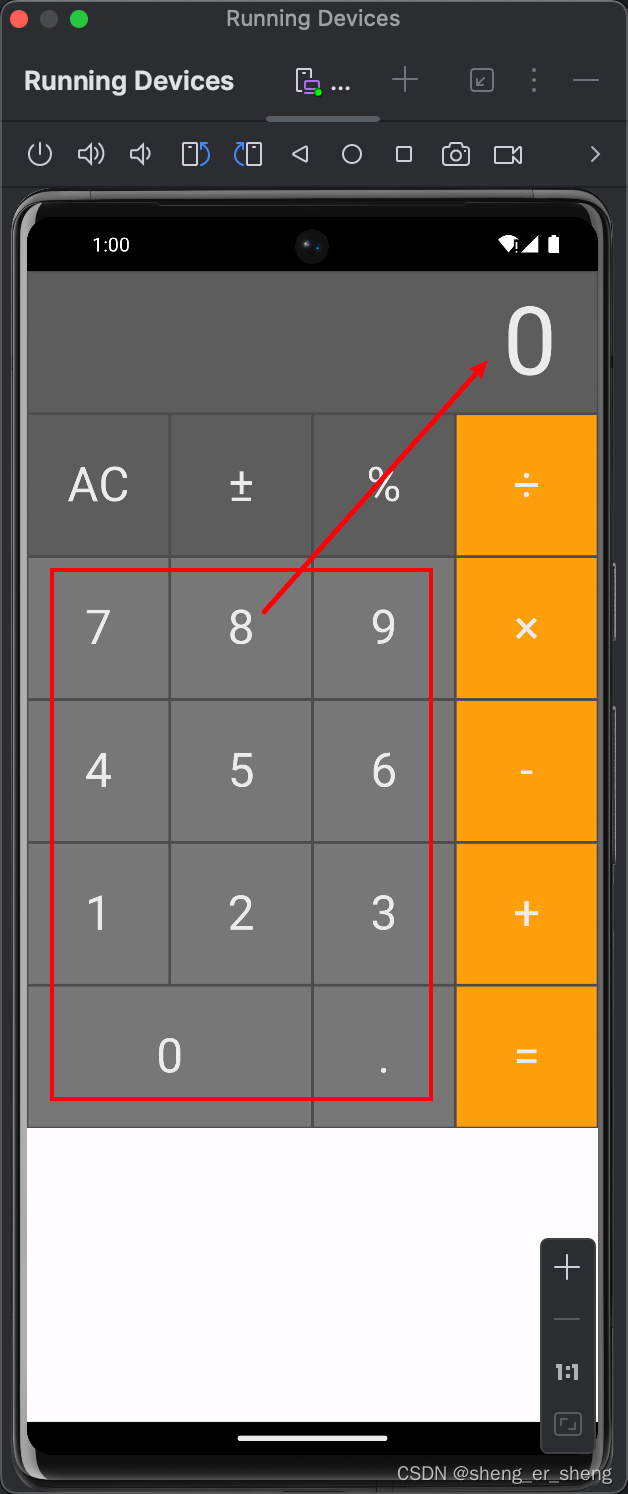
实现一个计算器,运用GetX去管理它
构建界面
构建一个计算器界面
flutter_screenutil: ^5.9.0
import 'package:flutter/material.dart';
import 'package:flutter_screenutil/flutter_screenutil.dart';
void main() {
runApp(App());
}
class App extends StatelessWidget {
Widget build(BuildContext context) {
return ScreenUtilInit(
builder: (_, child) {
return MaterialApp(
debugShowCheckedModeBanner: false,
home: child,
);
},
child: Main(),
);
}
}
class Main extends StatelessWidget {
final Color operatorColor = const Color.fromRGBO(93, 93, 93, 1);
final Color numberColor = const Color.fromRGBO(119, 119, 119, 1);
final Color operatorColorTwo = const Color.fromRGBO(242, 163, 60, 1);
final Color borderColor = const Color.fromRGBO(76, 76, 76, 1);
const Main({super.key});
Widget build(BuildContext context) {
return SafeArea(
child: Scaffold(
body: Column(
children: [
buildUserButton(
text: '0',
bgColor: operatorColor,
width: 1.sw,
alignment: Alignment.centerRight,
fontSize: 60.r,
padding: EdgeInsets.symmetric(horizontal: 25.r),
),
Row(
children: [
buildUserButton(text: 'AC', bgColor: operatorColor),
buildUserButton(text: '±', bgColor: operatorColor),
buildUserButton(text: '%', bgColor: operatorColor),
buildUserButton(text: '÷', bgColor: operatorColorTwo),
],
),
Row(
children: [
buildUserButton(text: '7', bgColor: numberColor),
buildUserButton(text: '8', bgColor: numberColor),
buildUserButton(text: '9', bgColor: numberColor),
buildUserButton(text: '×', bgColor: operatorColorTwo),
],
),
Row(
children: [
buildUserButton(text: '4', bgColor: numberColor),
buildUserButton(text: '5', bgColor: numberColor),
buildUserButton(text: '6', bgColor: numberColor),
buildUserButton(text: '-', bgColor: operatorColorTwo),
],
),
Row(
children: [
buildUserButton(text: '1', bgColor: numberColor),
buildUserButton(text: '2', bgColor: numberColor),
buildUserButton(text: '3', bgColor: numberColor),
buildUserButton(text: '+', bgColor: operatorColorTwo),
],
),
Row(
children: [
buildUserButton(
text: '0',
bgColor: numberColor,
width: 1.sw / 2,
),
buildUserButton(text: '.', bgColor: numberColor),
buildUserButton(text: '=', bgColor: operatorColorTwo),
],
),
],
),
),
);
}
Widget buildUserButton({
required String text,
required Color bgColor,
double? width,
Alignment? alignment,
double? fontSize,
EdgeInsetsGeometry? padding,
}) {
return Container(
alignment: alignment ?? Alignment.center,
width: width ?? 1.sw / 4,
height: 1.sw / 4,
decoration: BoxDecoration(
color: bgColor,
border: Border.all(color: borderColor),
),
padding: padding ?? EdgeInsets.all(10.r),
child: Text(
text,
style: TextStyle(
color: const Color.fromRGBO(235, 235, 235, 1),
fontSize: fontSize ?? 30.r,
),
),
);
}
}
采用GetX实现
引入getX
get: ^4.6.6
.obs 和 Obx(() => View())
计算器输入数字
说明:需要跟踪的变量加上后缀.obs。这样的写法,我说明一下。其实是源于dart语言的extension,即扩展。比如:对文本进行扩展,那么文本类型的数据就会有你定义的功能。见下
extension MyStringExtension on String {
  String get sayHello {
    String words = "$this say hello!!!";
    return words;
  }
}

void main() {
  print("阿笙".sayHello);
  /// 阿笙 say hello!!!
}
同样的.obs,就是对各种数据类型进行扩展
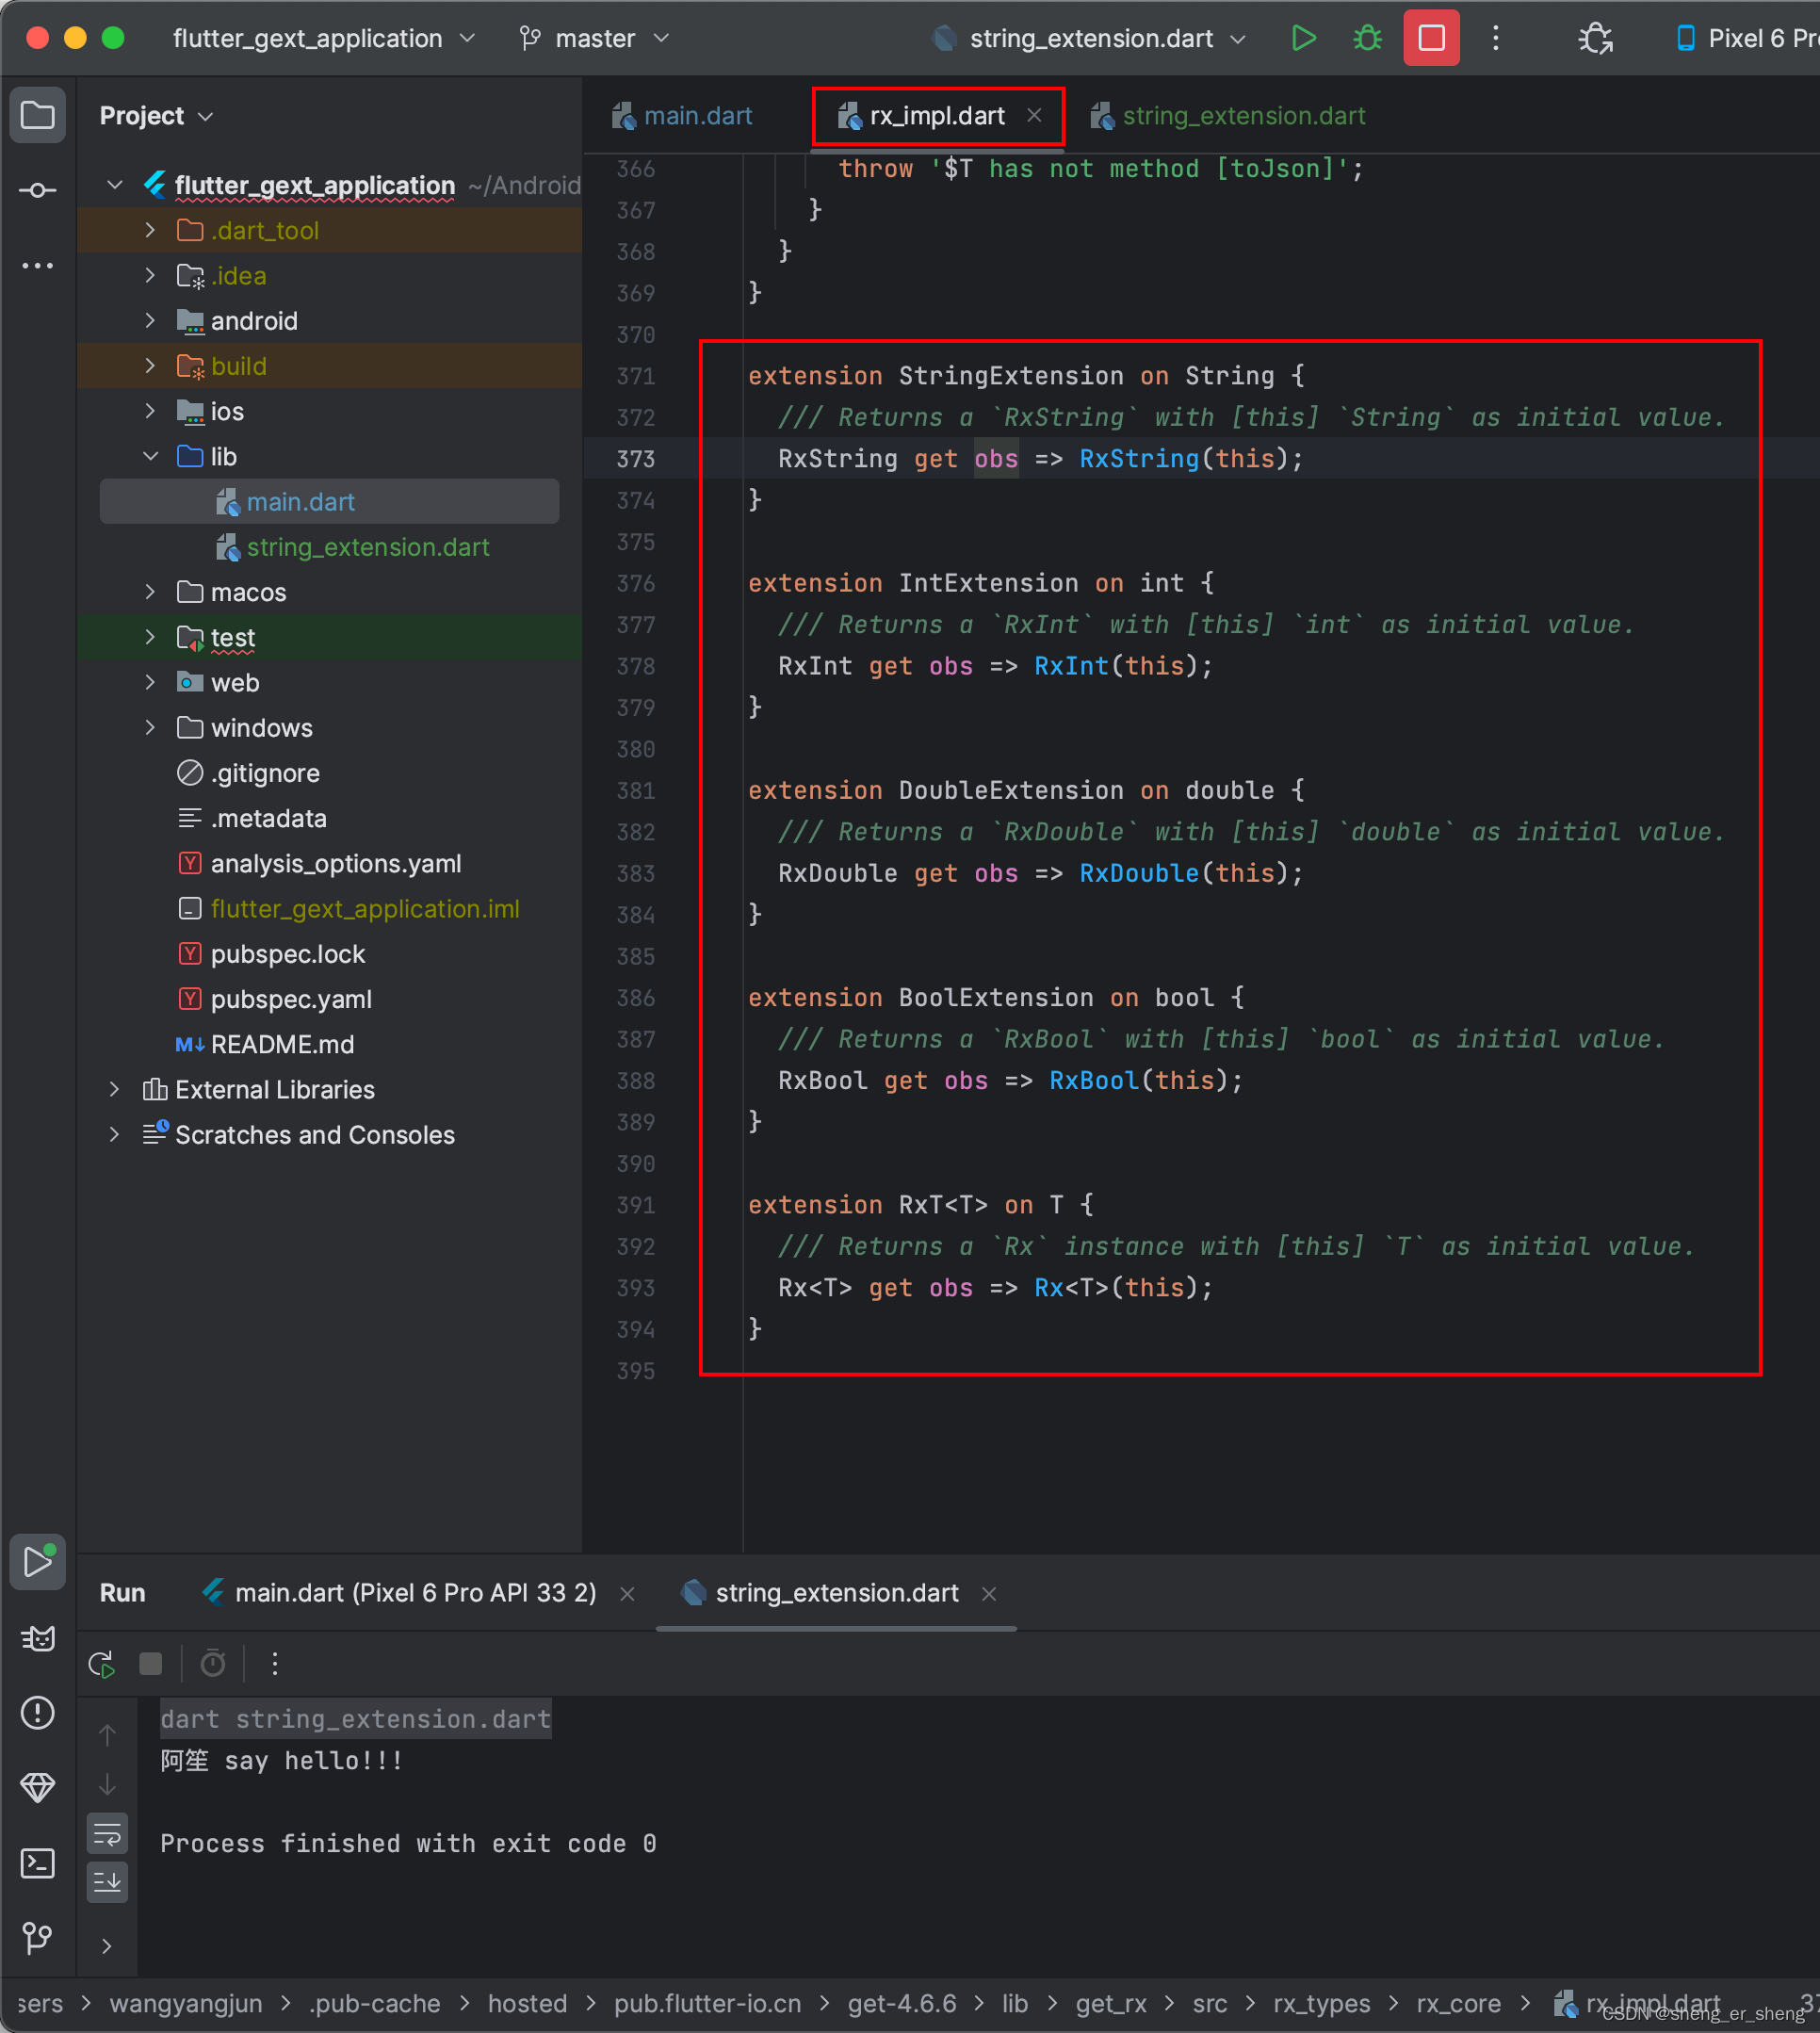
显然,不止文本一个,还有很多,这里一一列举/使用,可以参考官网的说明文档
String / bool / double / int 这四个写法类似。
响应式变量相关
- Rx{类型}
- 传入泛型
- 利用扩展函数(推荐👍)
  /// 文本类型
  final stringType1 = RxString('');
  final stringType2 = Rx<String>('');
  final stringType3 = ''.obs;
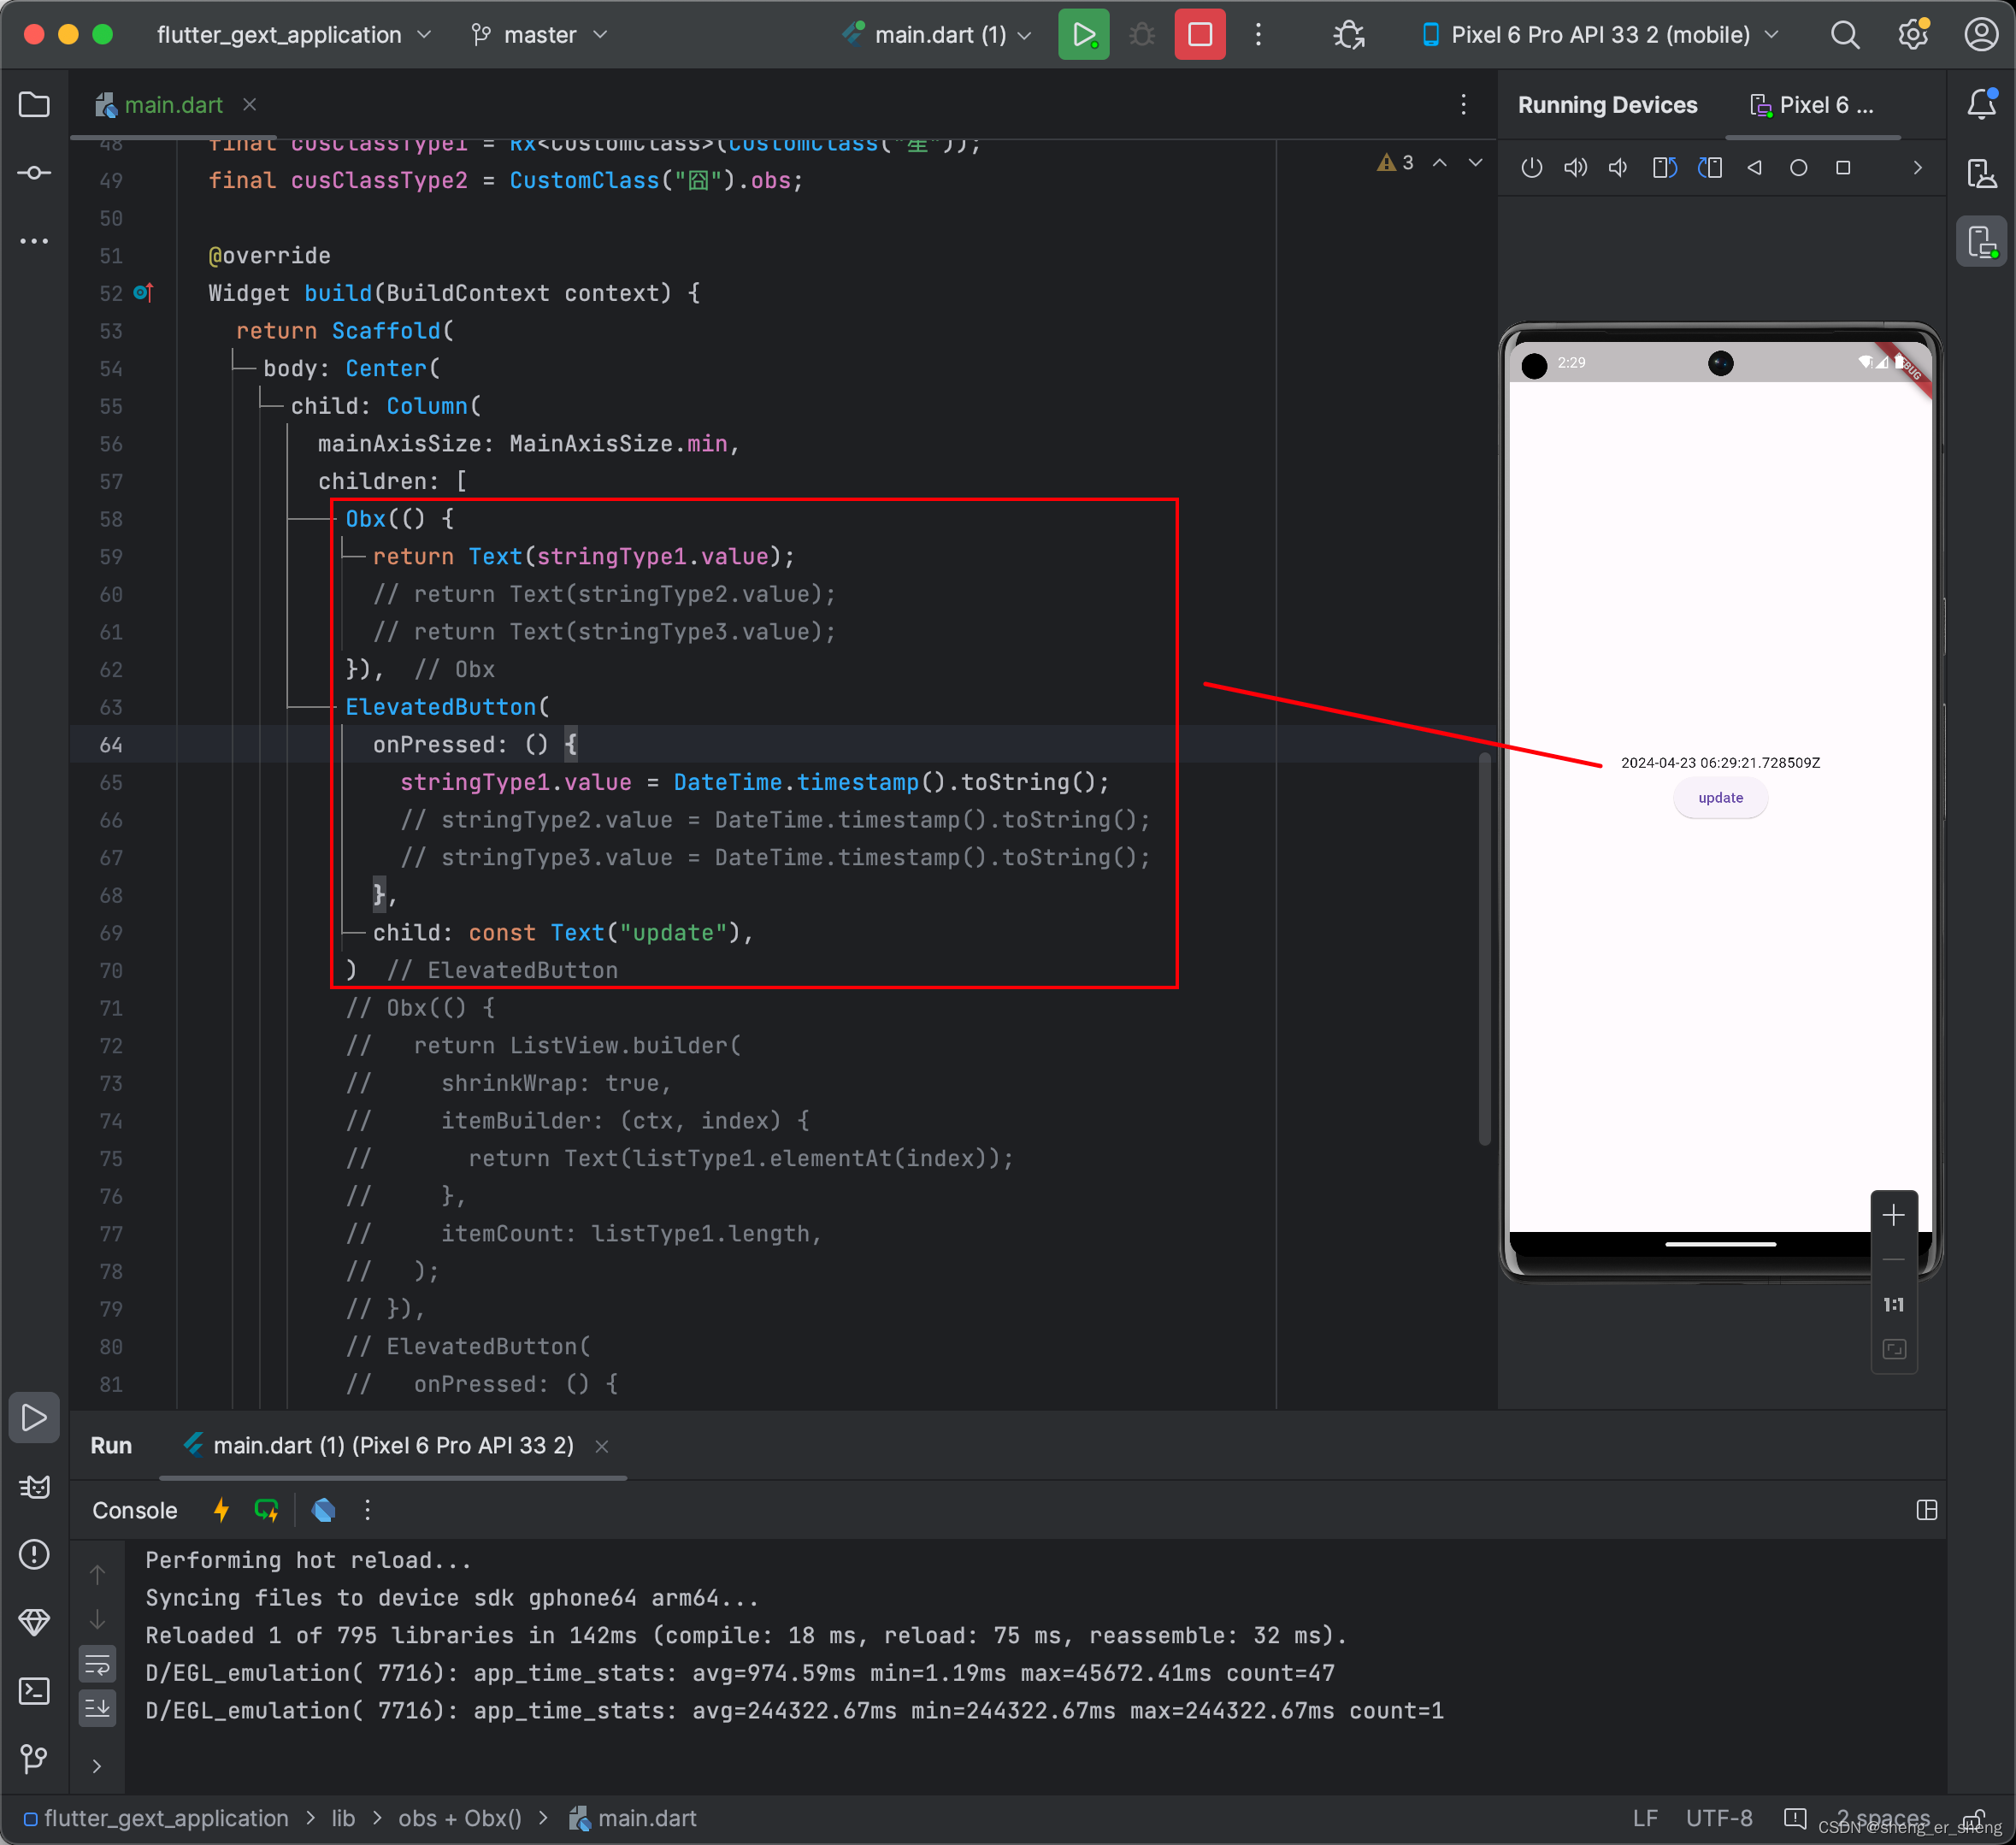
            Obx(() {
              return Text(stringType1.value);
              // return Text(stringType2.value);
              // return Text(stringType3.value);
            }),
            ElevatedButton(
              onPressed: () {
                stringType1.value = DateTime.timestamp().toString();
                // stringType2.value = DateTime.timestamp().toString();
                // stringType3.value = DateTime.timestamp().toString();
              },
              child: const Text("update"),
            )
只需在需要变化的界面中,嵌套Obx()
这里提一句Obx()是自动刷新界面,即当响应式变量变化时,重构包裹内的界面;区别于之后会提到的GetBuilder(),GetBuilder()是手动更新界面。具体使用哪一个,请根据应用场景。
写法都类似
  /// 布尔
  final boolType1 = RxBool(true);
  final boolType2 = Rx<bool>(true);
  final boolType3 = true.obs;

  /// 整型
  final intType1 = RxInt(0);
  final intType2 = Rx<int>(0);
  final intType3 = 0.obs;

  /// 浮点
  final doubleType1 = RxDouble(0.0);
  final doubleType2 = Rx<double>(0.0);
  final doubleType3 = 0.0.obs;
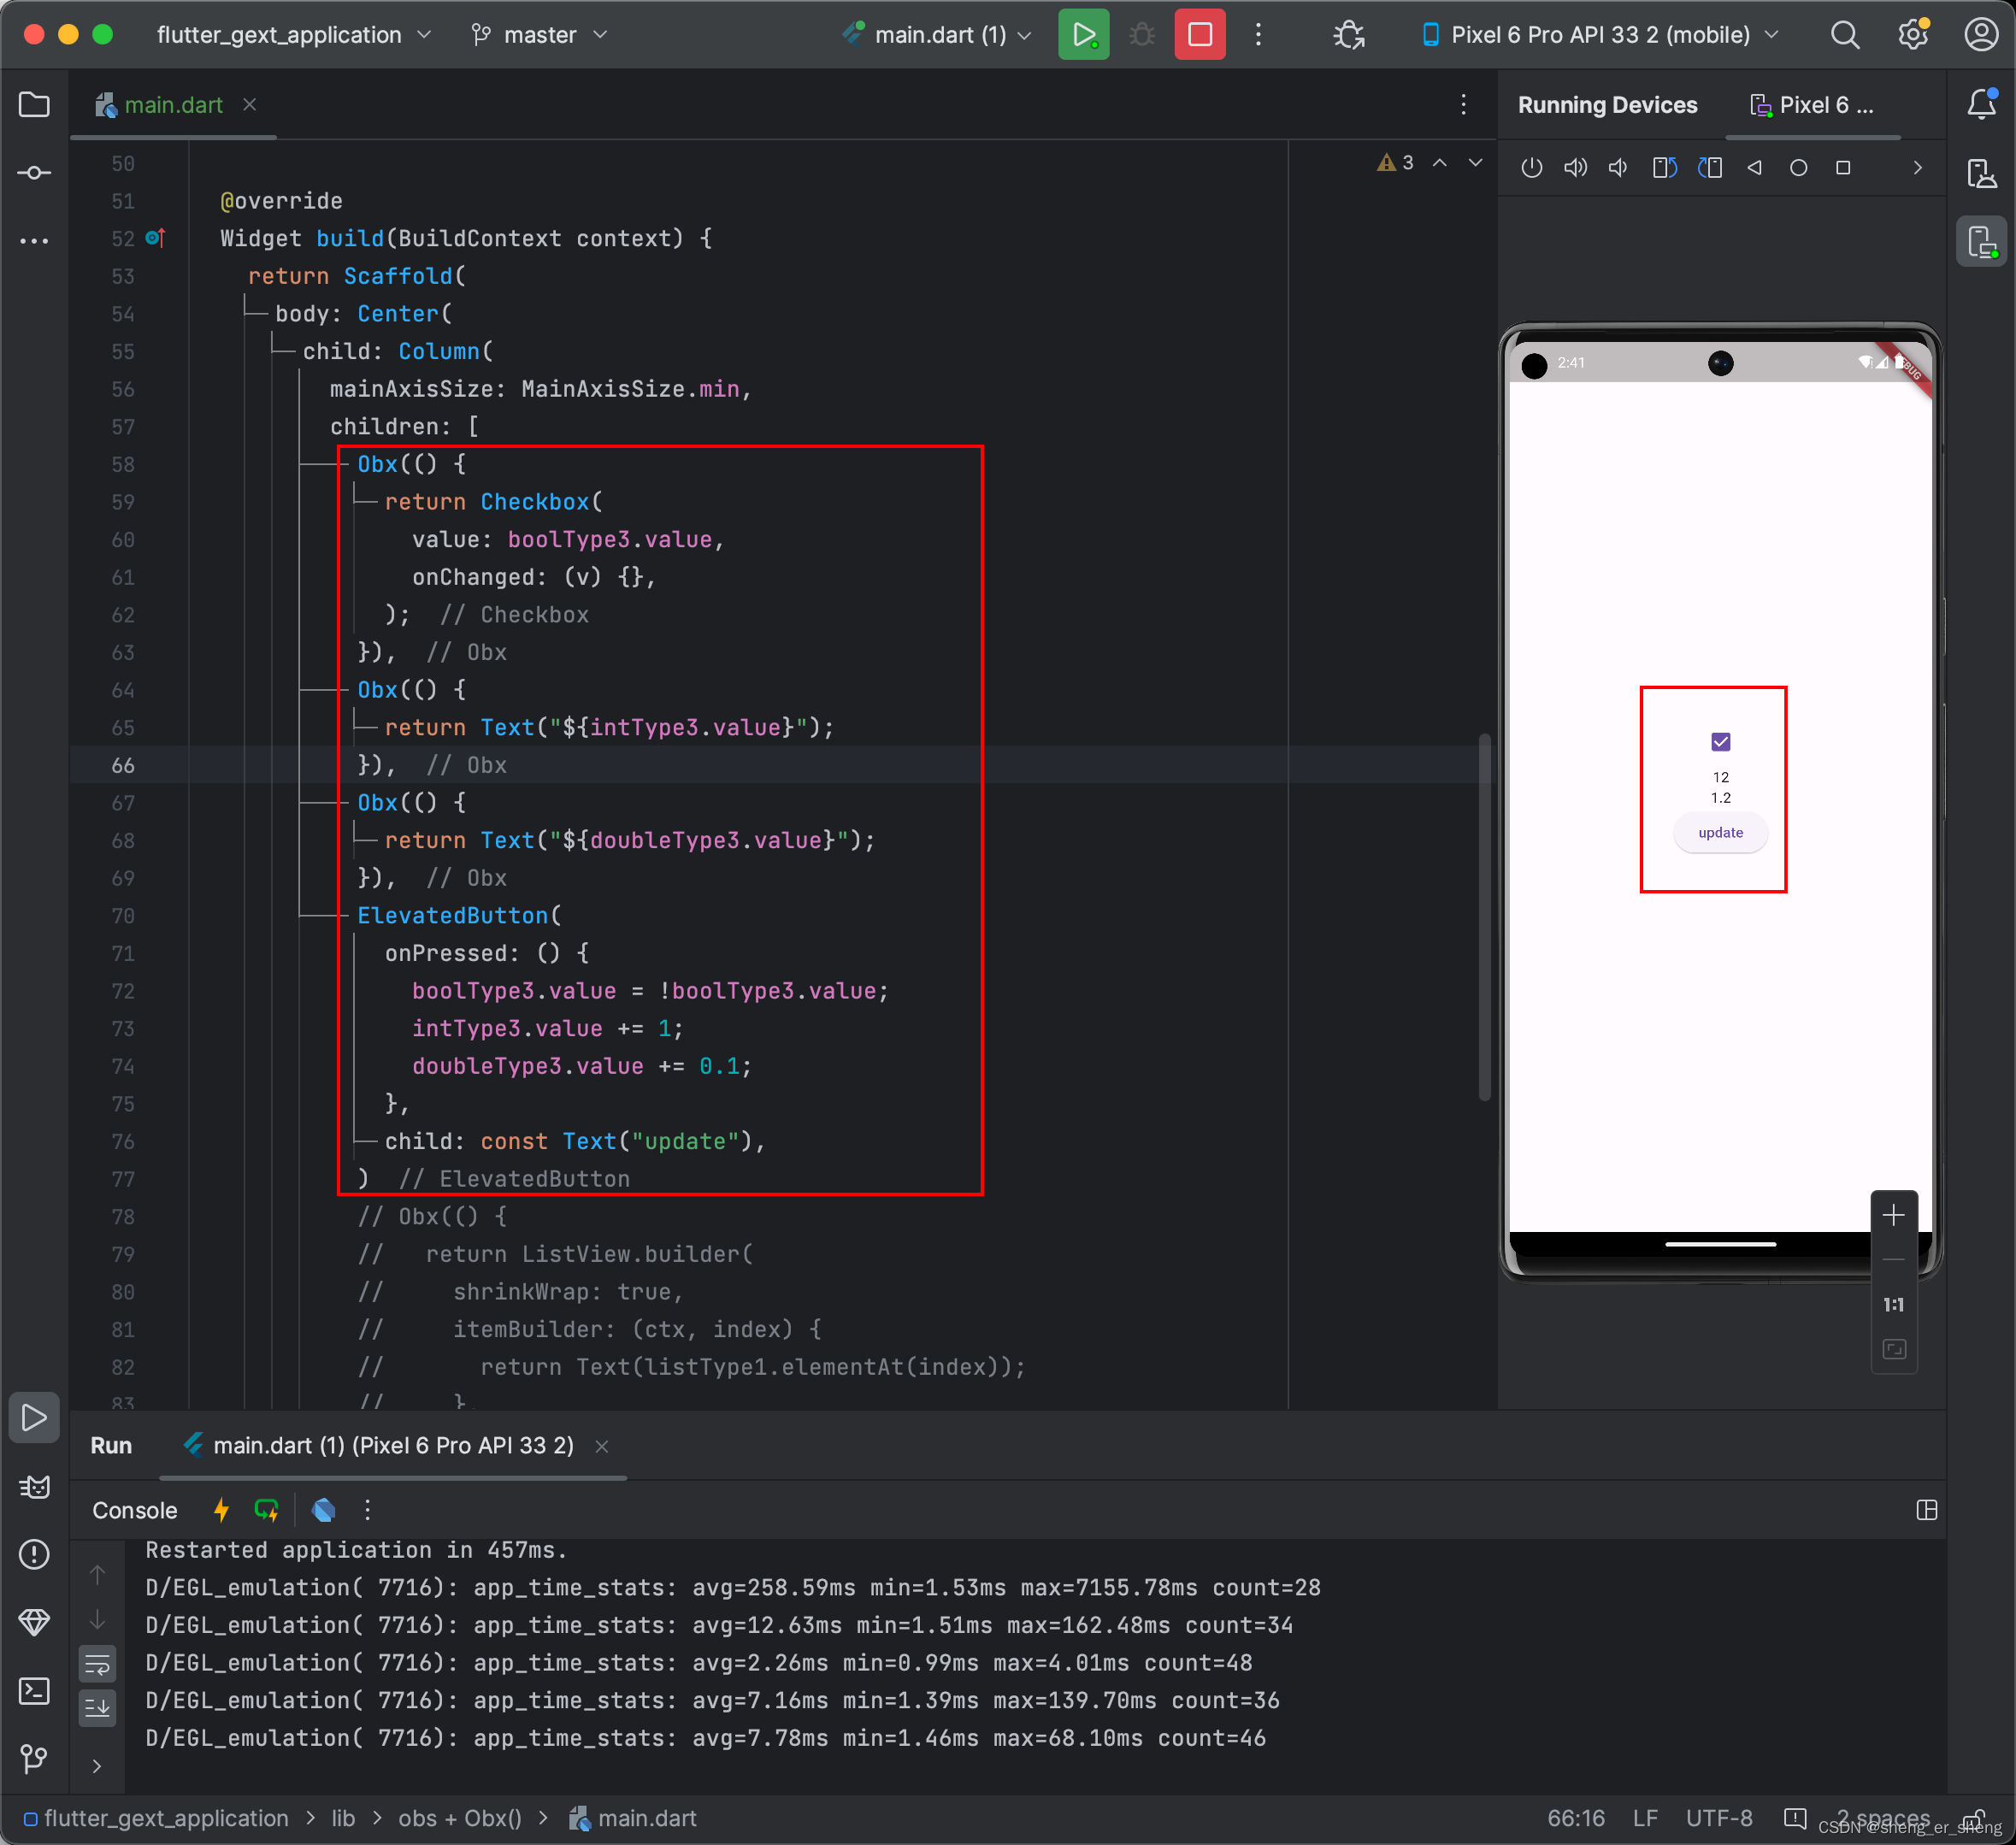
Obx(() {
              return Checkbox(
                value: boolType3.value,
                onChanged: (v) {},
              );
            }),
            Obx(() {
              return Text("${intType3.value}");
            }),
            Obx(() {
              return Text("${doubleType3.value}");
            }),
            ElevatedButton(
              onPressed: () {
                boolType3.value = !boolType3.value;
                intType3.value += 1;
                doubleType3.value += 0.1;
              },
              child: const Text("update"),
            )
List的写法稍有不同
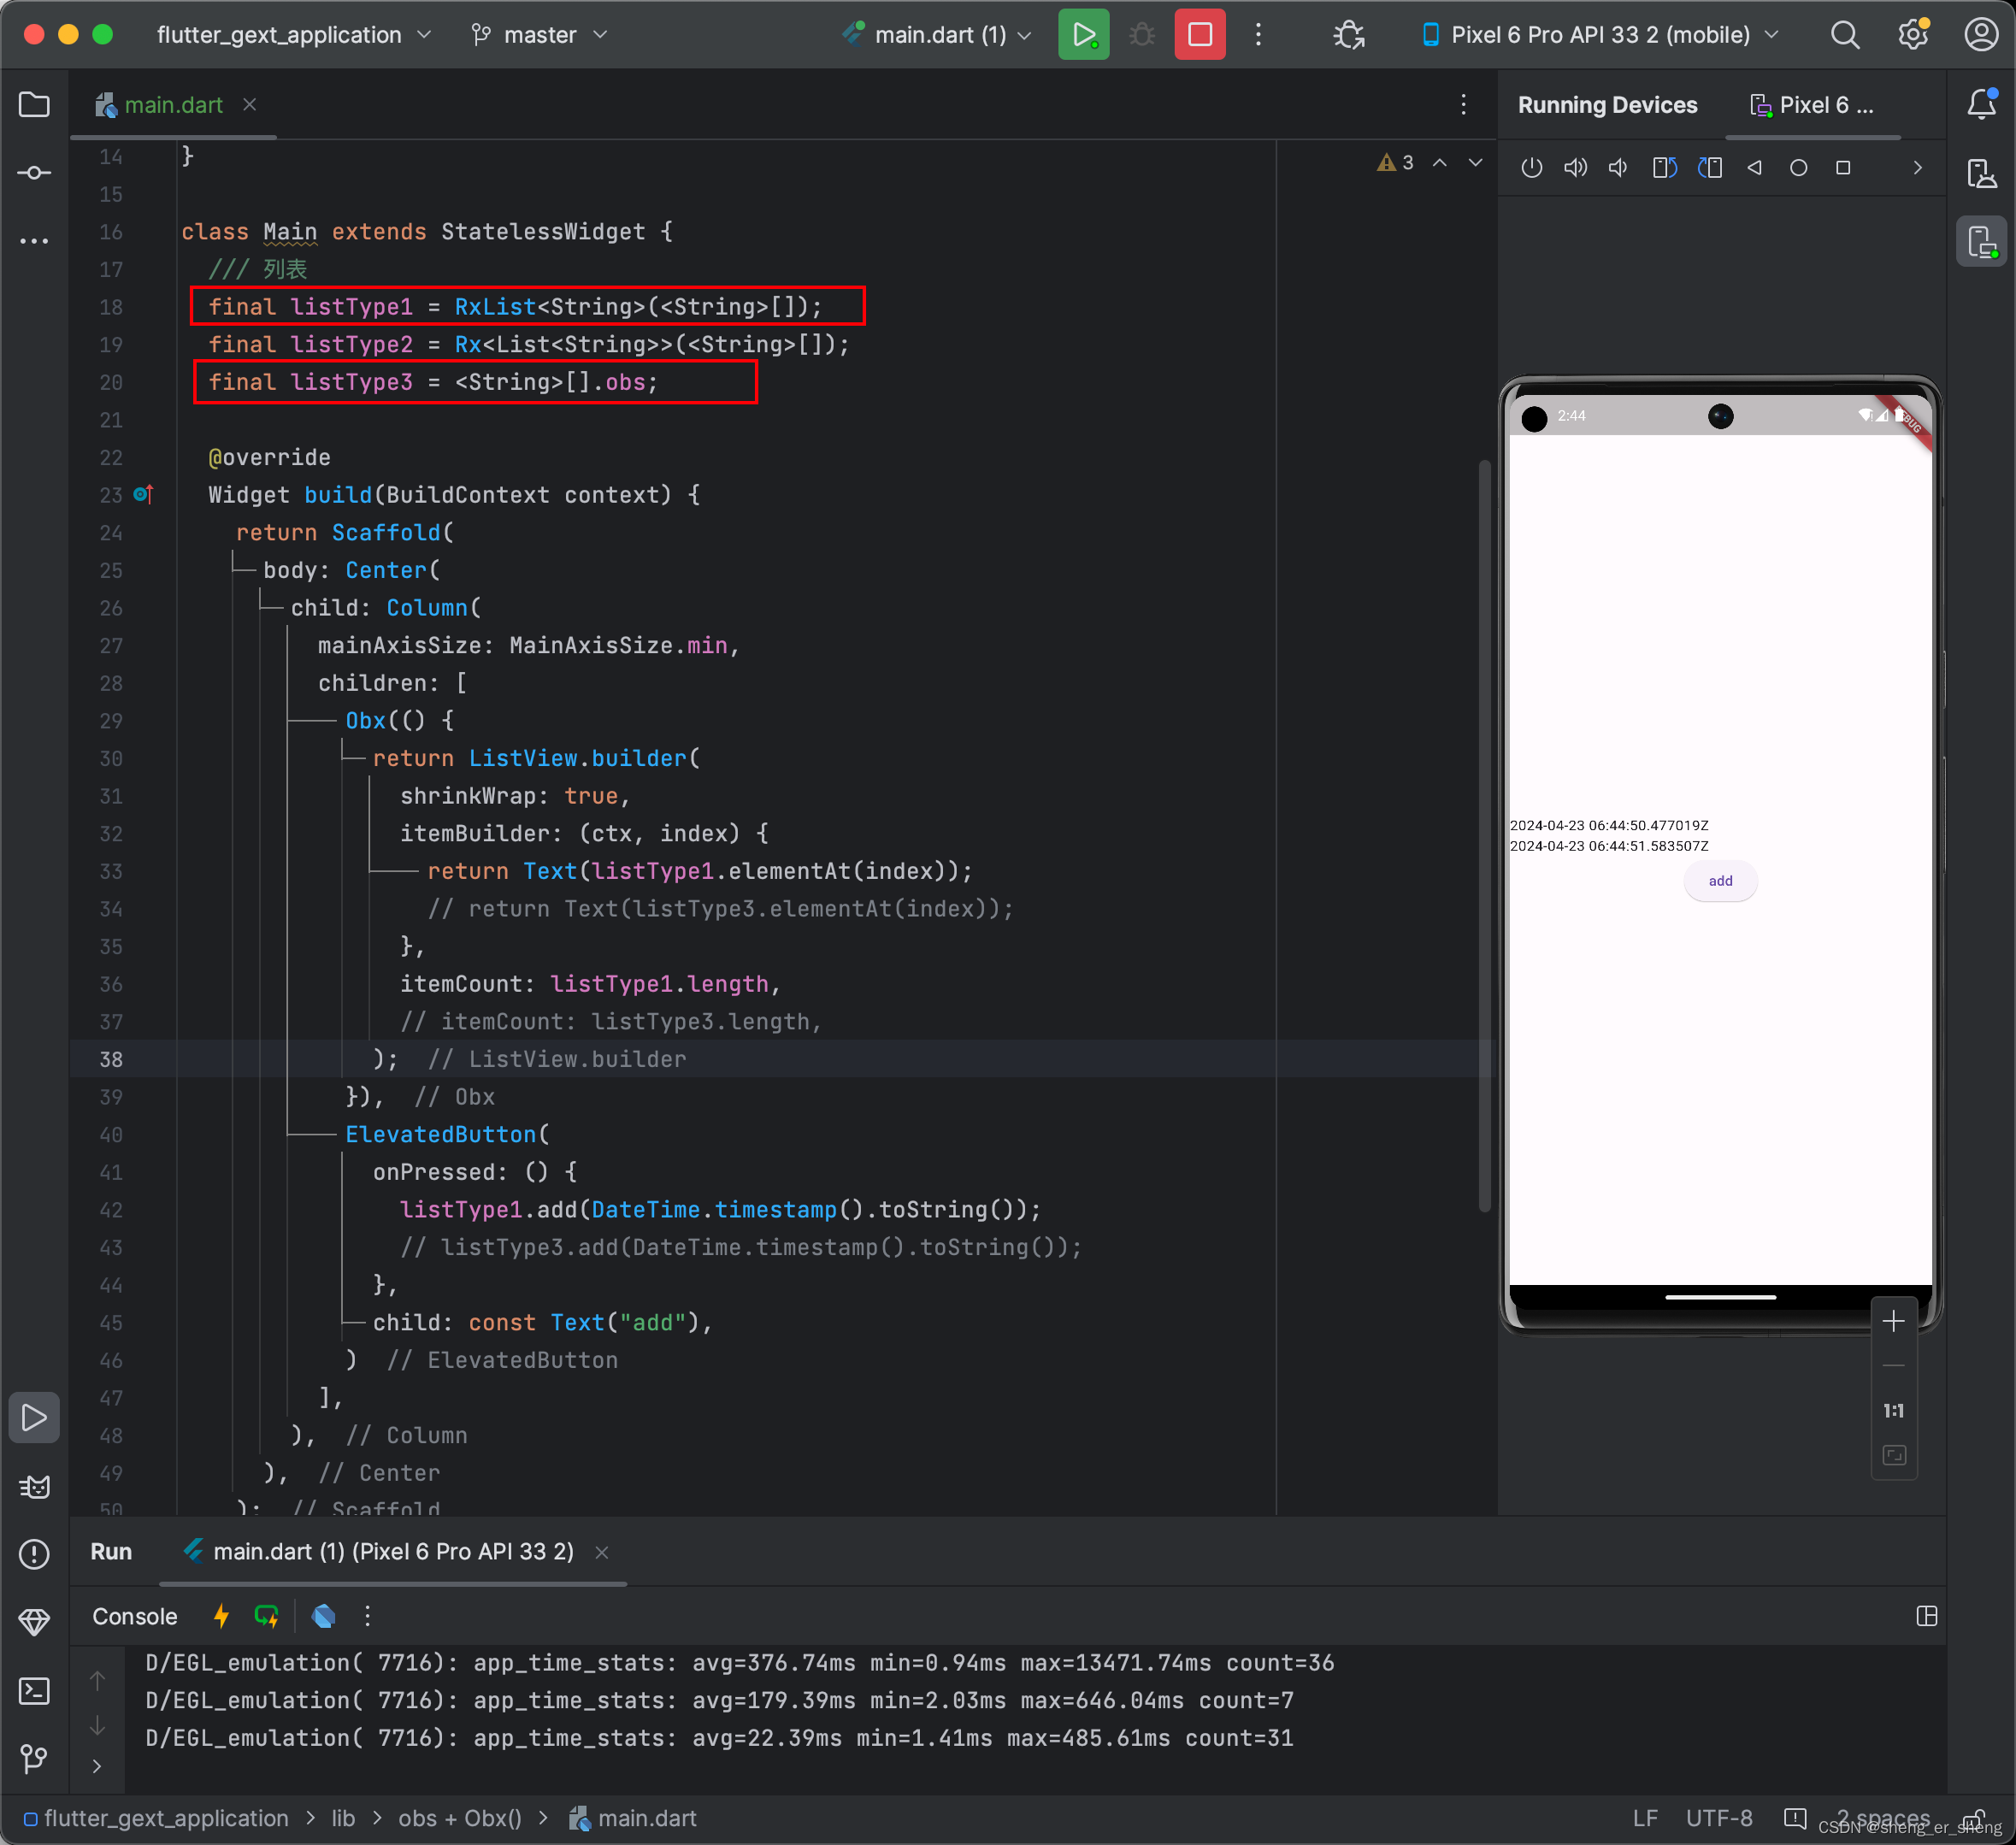
  /// 列表
  final listType1 = RxList<String>(<String>[]);
  final listType3 = <String>[].obs;
Obx(() {
              return ListView.builder(
                shrinkWrap: true,
                itemBuilder: (ctx, index) {
                  return Text(listType1.elementAt(index));
                  // return Text(listType3.elementAt(index));
                },
                itemCount: listType1.length,
                // itemCount: listType3.length,
              );
            }),
            ElevatedButton(
              onPressed: () {
                listType1.add(DateTime.timestamp().toString());
                // listType3.add(DateTime.timestamp().toString());
              },
              child: const Text("add"),
            )
第二种申明方式
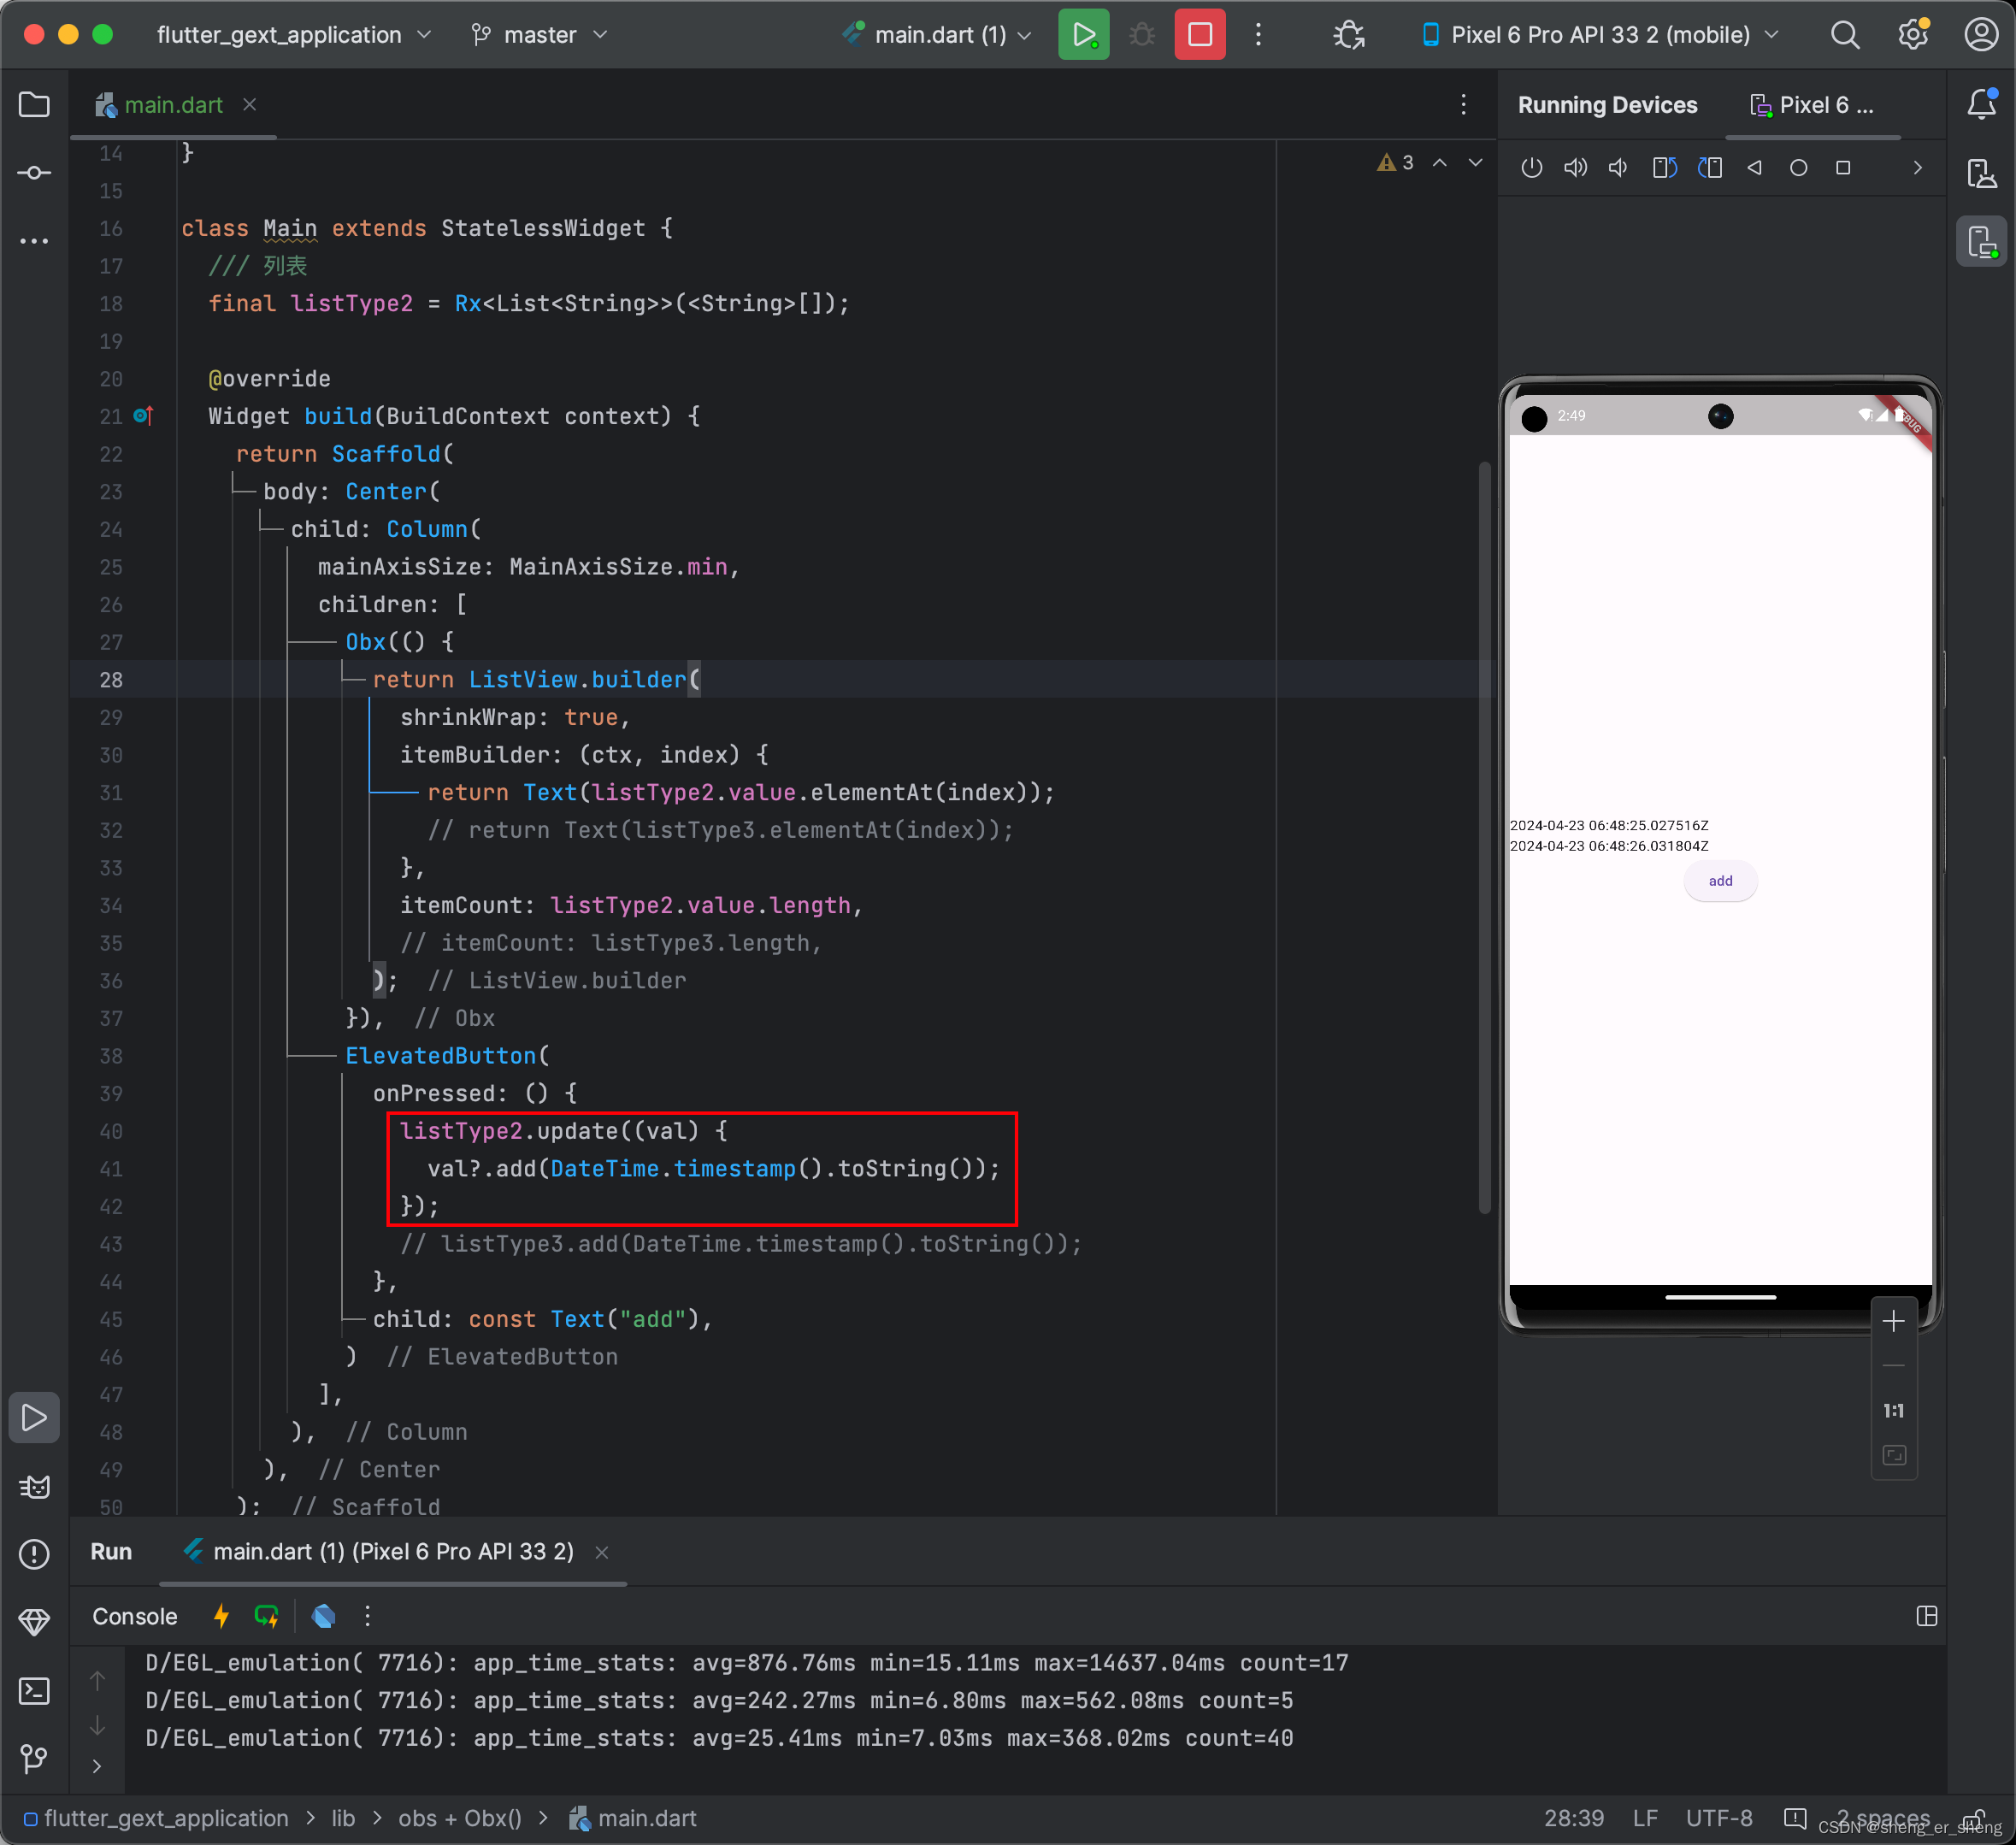
            Obx(() {
              return ListView.builder(
                shrinkWrap: true,
                itemBuilder: (ctx, index) {
                  return Text(listType2.value.elementAt(index));
                  // return Text(listType3.elementAt(index));
                },
                itemCount: listType2.value.length,
                // itemCount: listType3.length,
              );
            }),
            ElevatedButton(
              onPressed: () {
                listType2.update((val) {
                  val?.add(DateTime.timestamp().toString());
                });
                // listType3.add(DateTime.timestamp().toString());
              },
              child: const Text("add"),
            )
Map响应式变量,用法也各有不同,写的不对的话,Obx()内的界面不会更新
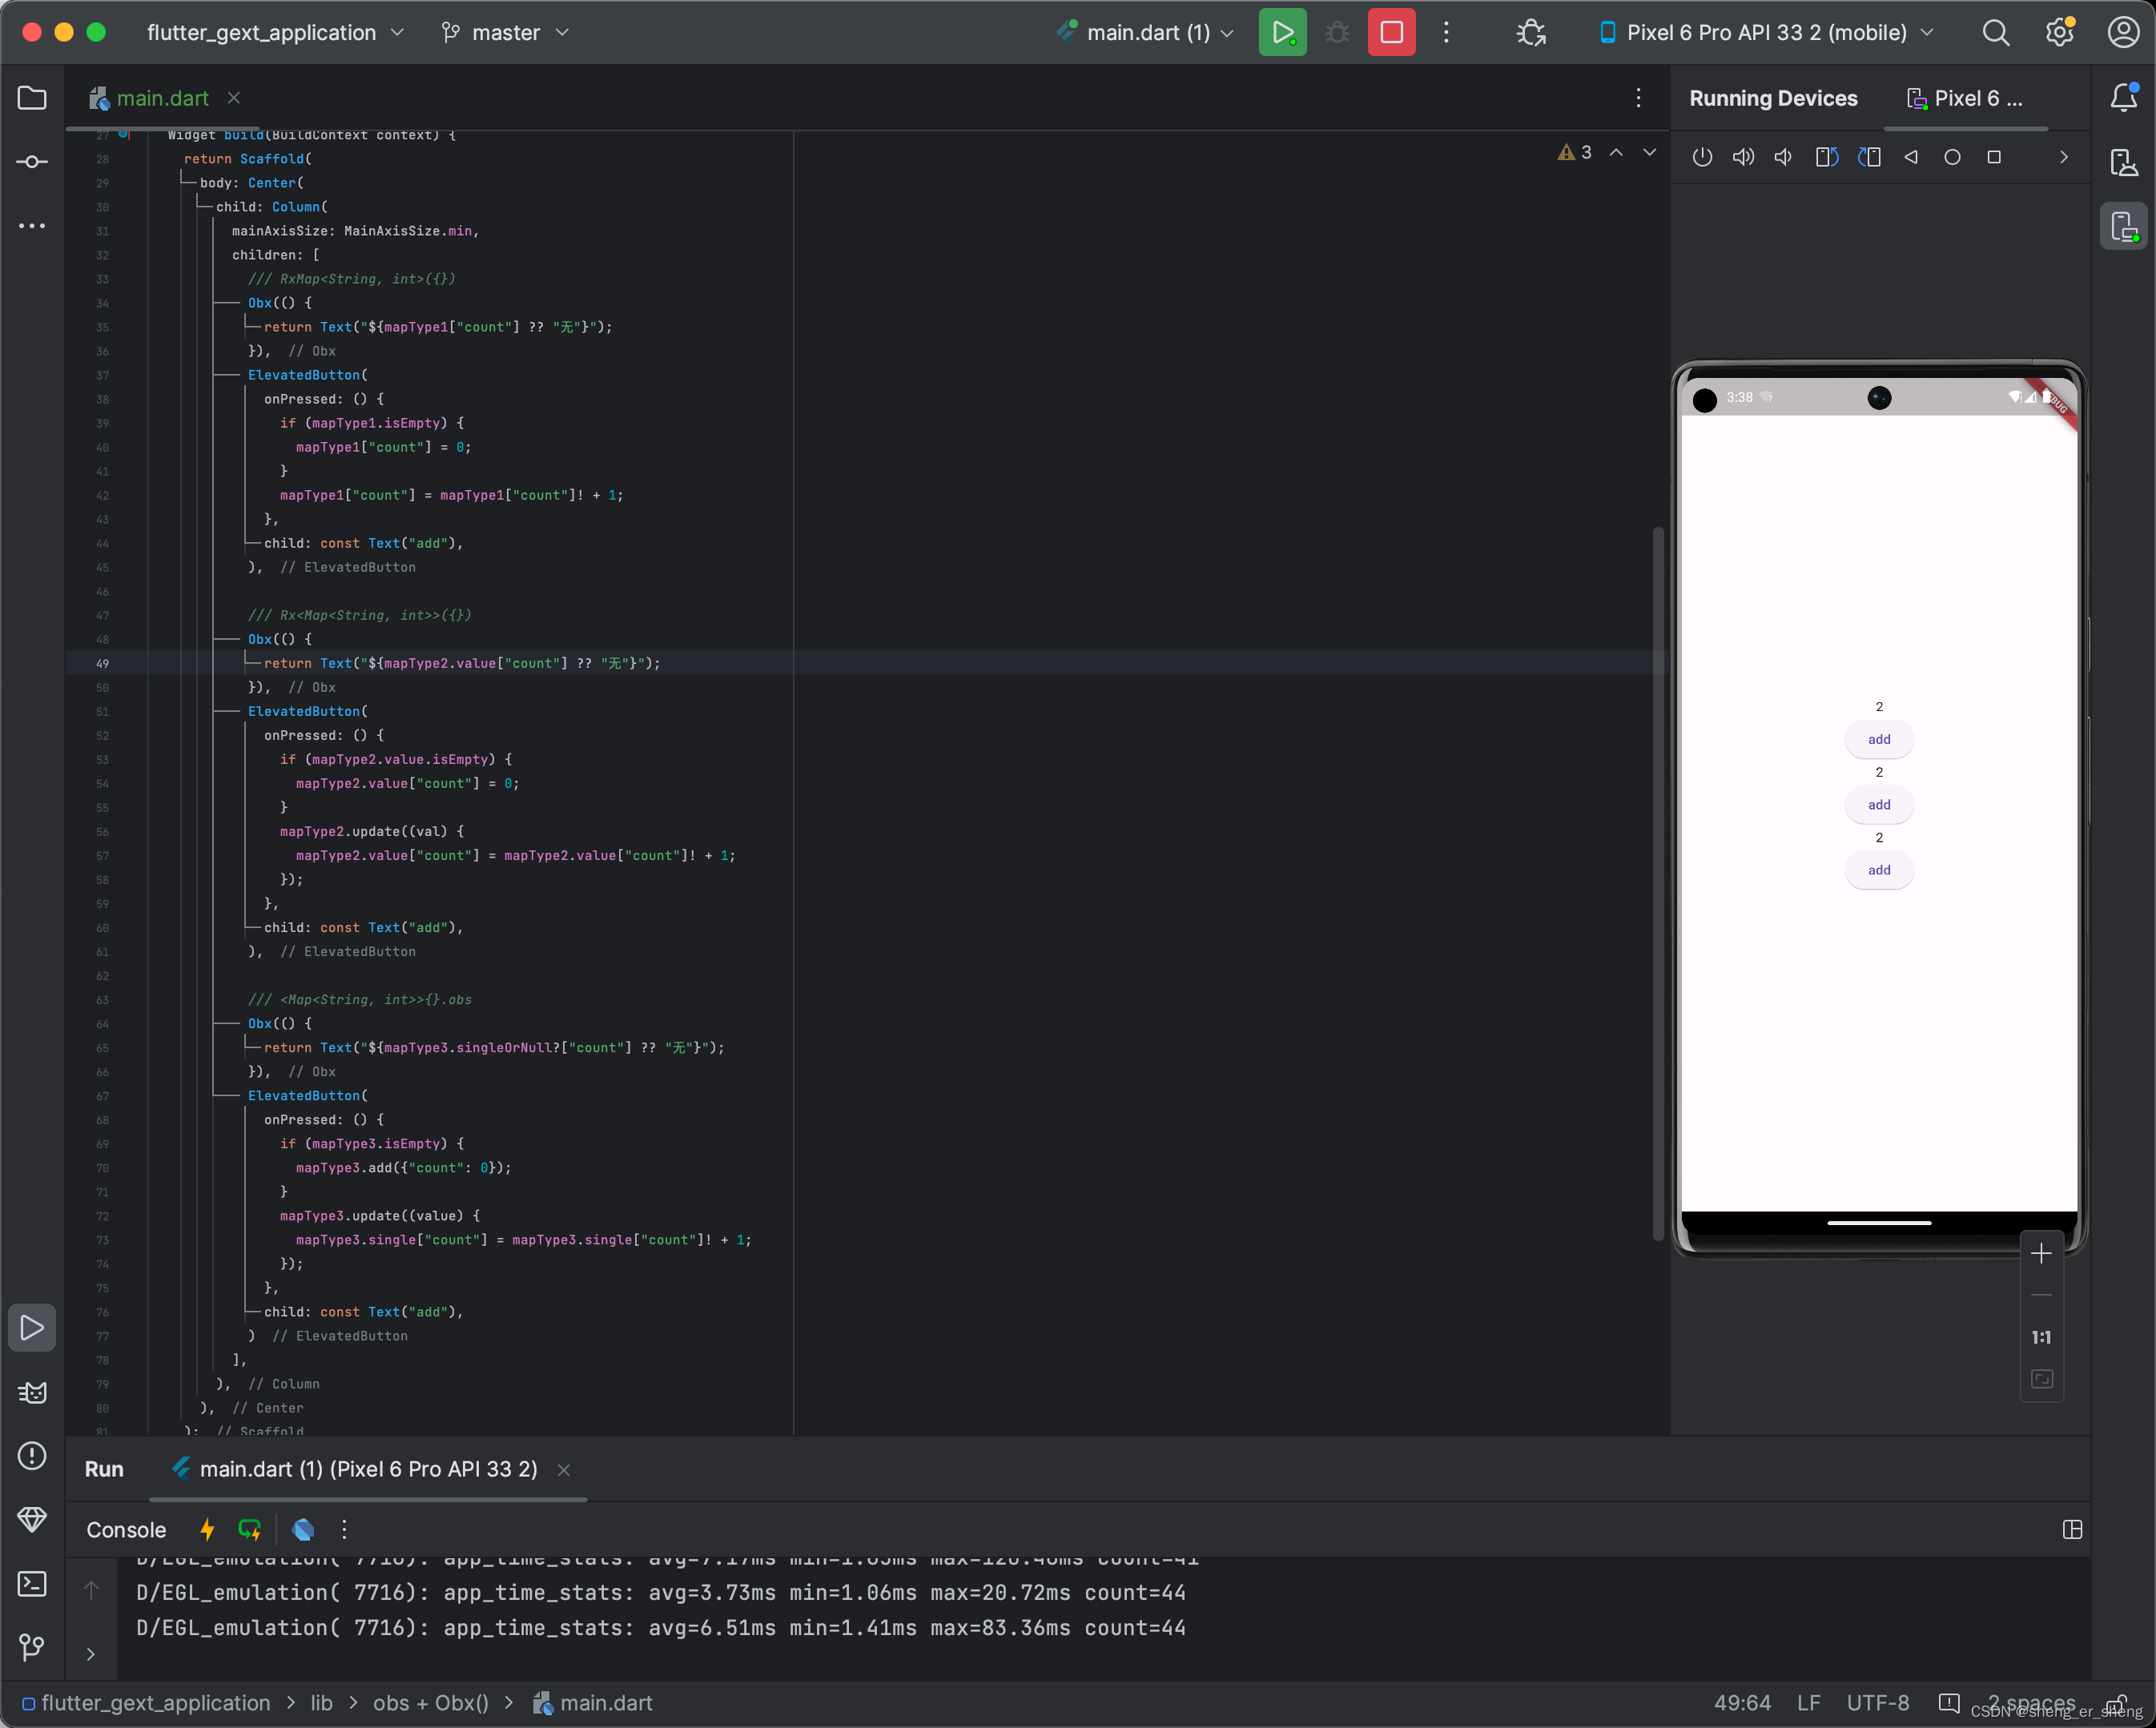
  /// 键值对
  final mapType1 = RxMap<String, int>({});
  final mapType2 = Rx<Map<String, int>>({});
  final mapType3 = <Map<String, int>>{}.obs;
/// RxMap<String, int>({})
            Obx(() {
              return Text("${mapType1["count"] ?? "无"}");
            }),
            ElevatedButton(
              onPressed: () {
                if (mapType1.isEmpty) {
                  mapType1["count"] = 0;
                }
                mapType1["count"] = mapType1["count"]! + 1;
              },
              child: const Text("add"),
            ),

            /// Rx<Map<String, int>>({})
            Obx(() {
              return Text("${mapType2.value["count"] ?? "无"}");
            }),
            ElevatedButton(
              onPressed: () {
                if (mapType2.value.isEmpty) {
                  mapType2.value["count"] = 0;
                }
                mapType2.update((val) {
                  mapType2.value["count"] = mapType2.value["count"]! + 1;
                });
              },
              child: const Text("add"),
            ),

            /// <Map<String, int>>{}.obs
            Obx(() {
              return Text("${mapType3.singleOrNull?["count"] ?? "无"}");
            }),
            ElevatedButton(
              onPressed: () {
                if (mapType3.isEmpty) {
                  mapType3.add({"count": 0});
                }
                mapType3.update((value) {
                  mapType3.single["count"] = mapType3.single["count"]! + 1;
                });
              },
              child: const Text("add"),
            )
申明响应式对象,使用update更新
  /// 对象
  final cusClassType1 = Rx<CustomClass>(CustomClass(""));
  final cusClassType2 = CustomClass("").obs;
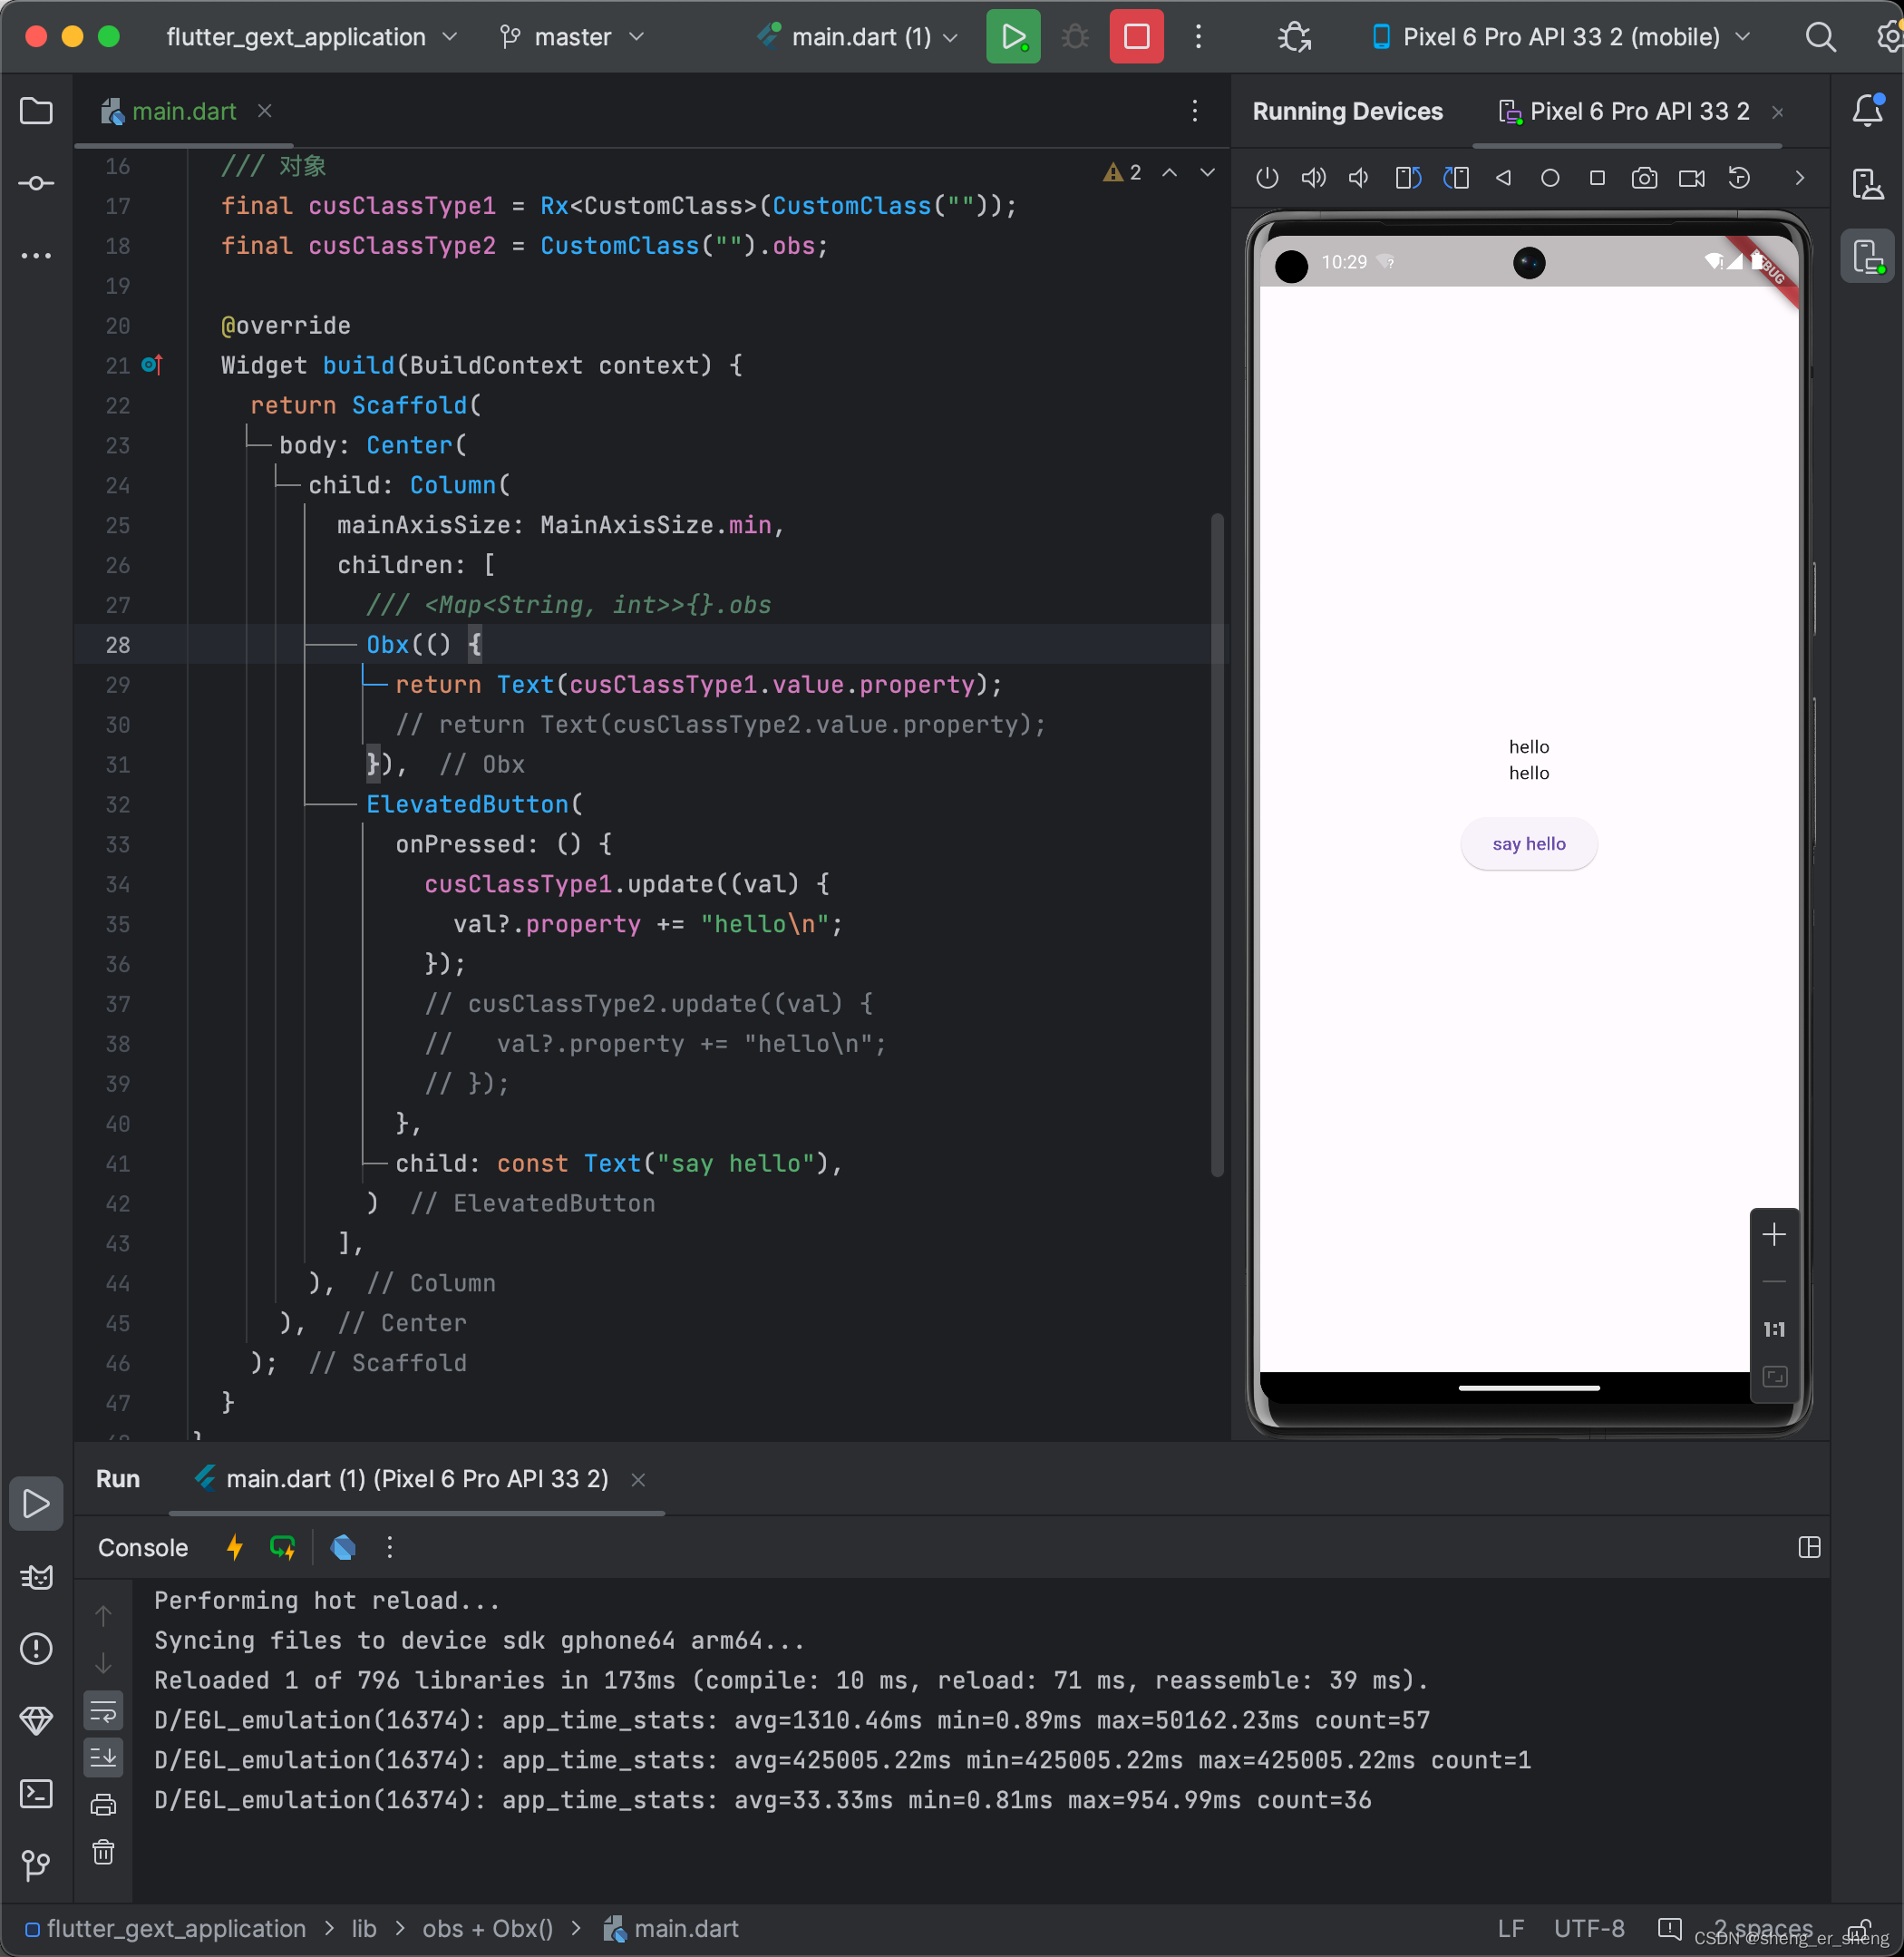
Obx(() {
              return Text(cusClassType1.value.property);
              // return Text(cusClassType2.value.property);
            }),
            ElevatedButton(
              onPressed: () {
                cusClassType1.update((val) {
                  val?.property += "hello\n";
                });
                // cusClassType2.update((val) {
                //   val?.property += "hello\n";
                // });
              },
              child: const Text("say hello"),
            )
输入数字
继续案例
在声明好响应式变量后,定义点击事件
  void numberOperator(String value) {
    result.value += value;
  }
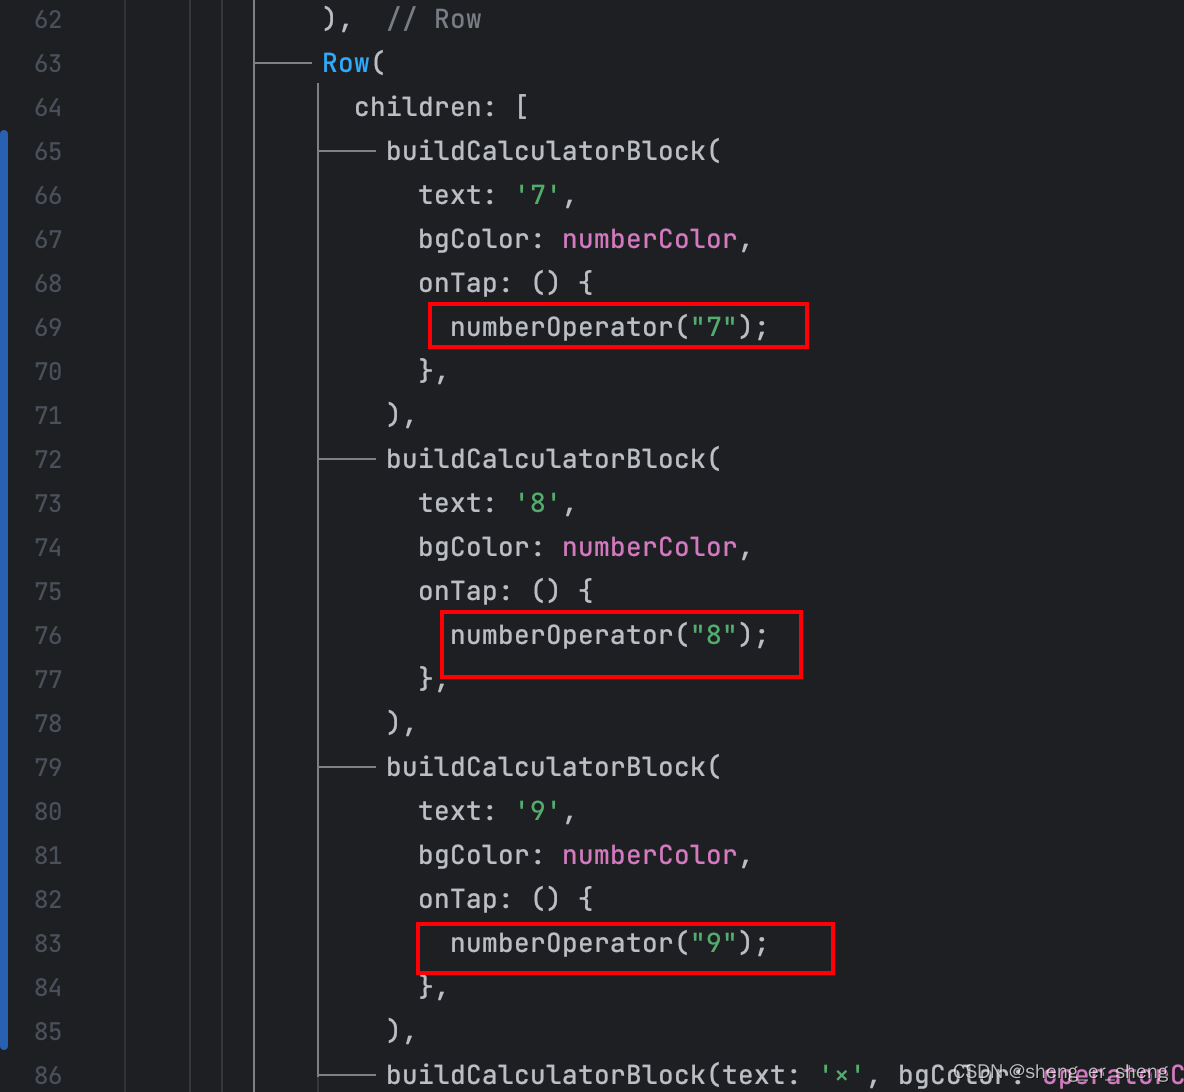
当点击数字时,会使Obx()包裹的界面重构
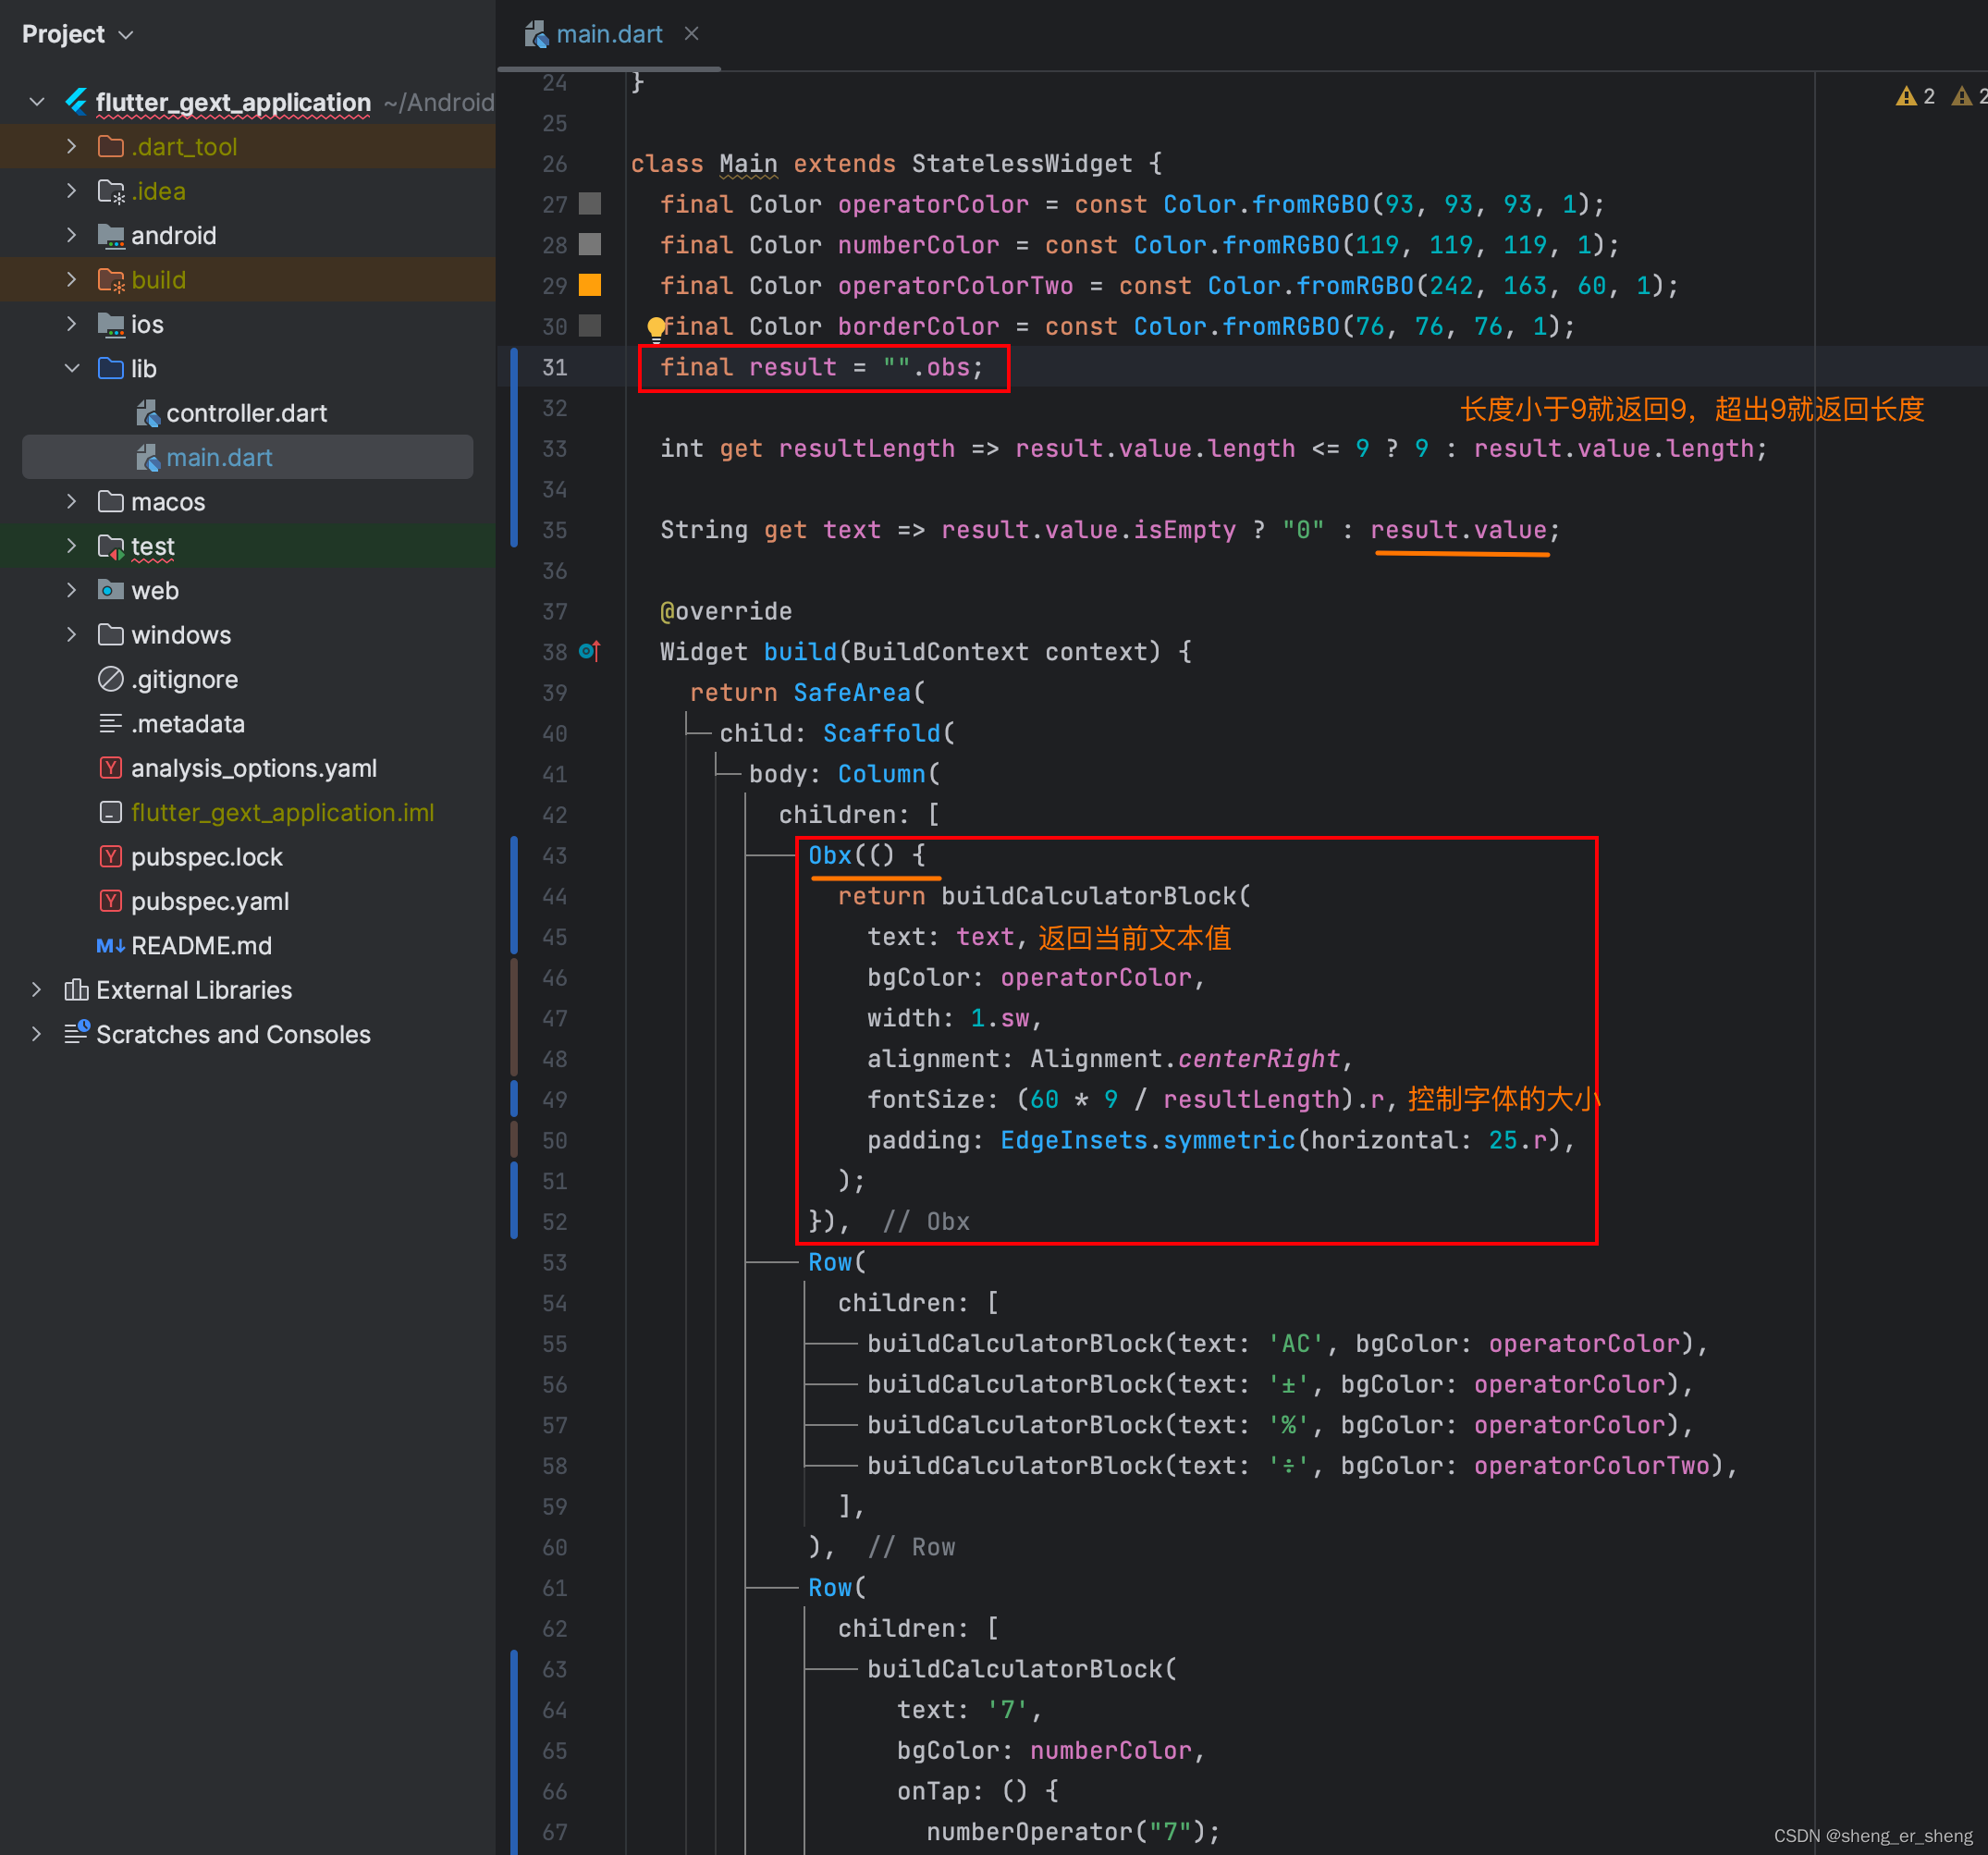
GetX
除了Obx,来自动刷新布局,还可以采用GetX,同样是自动刷新,但需要GetxController
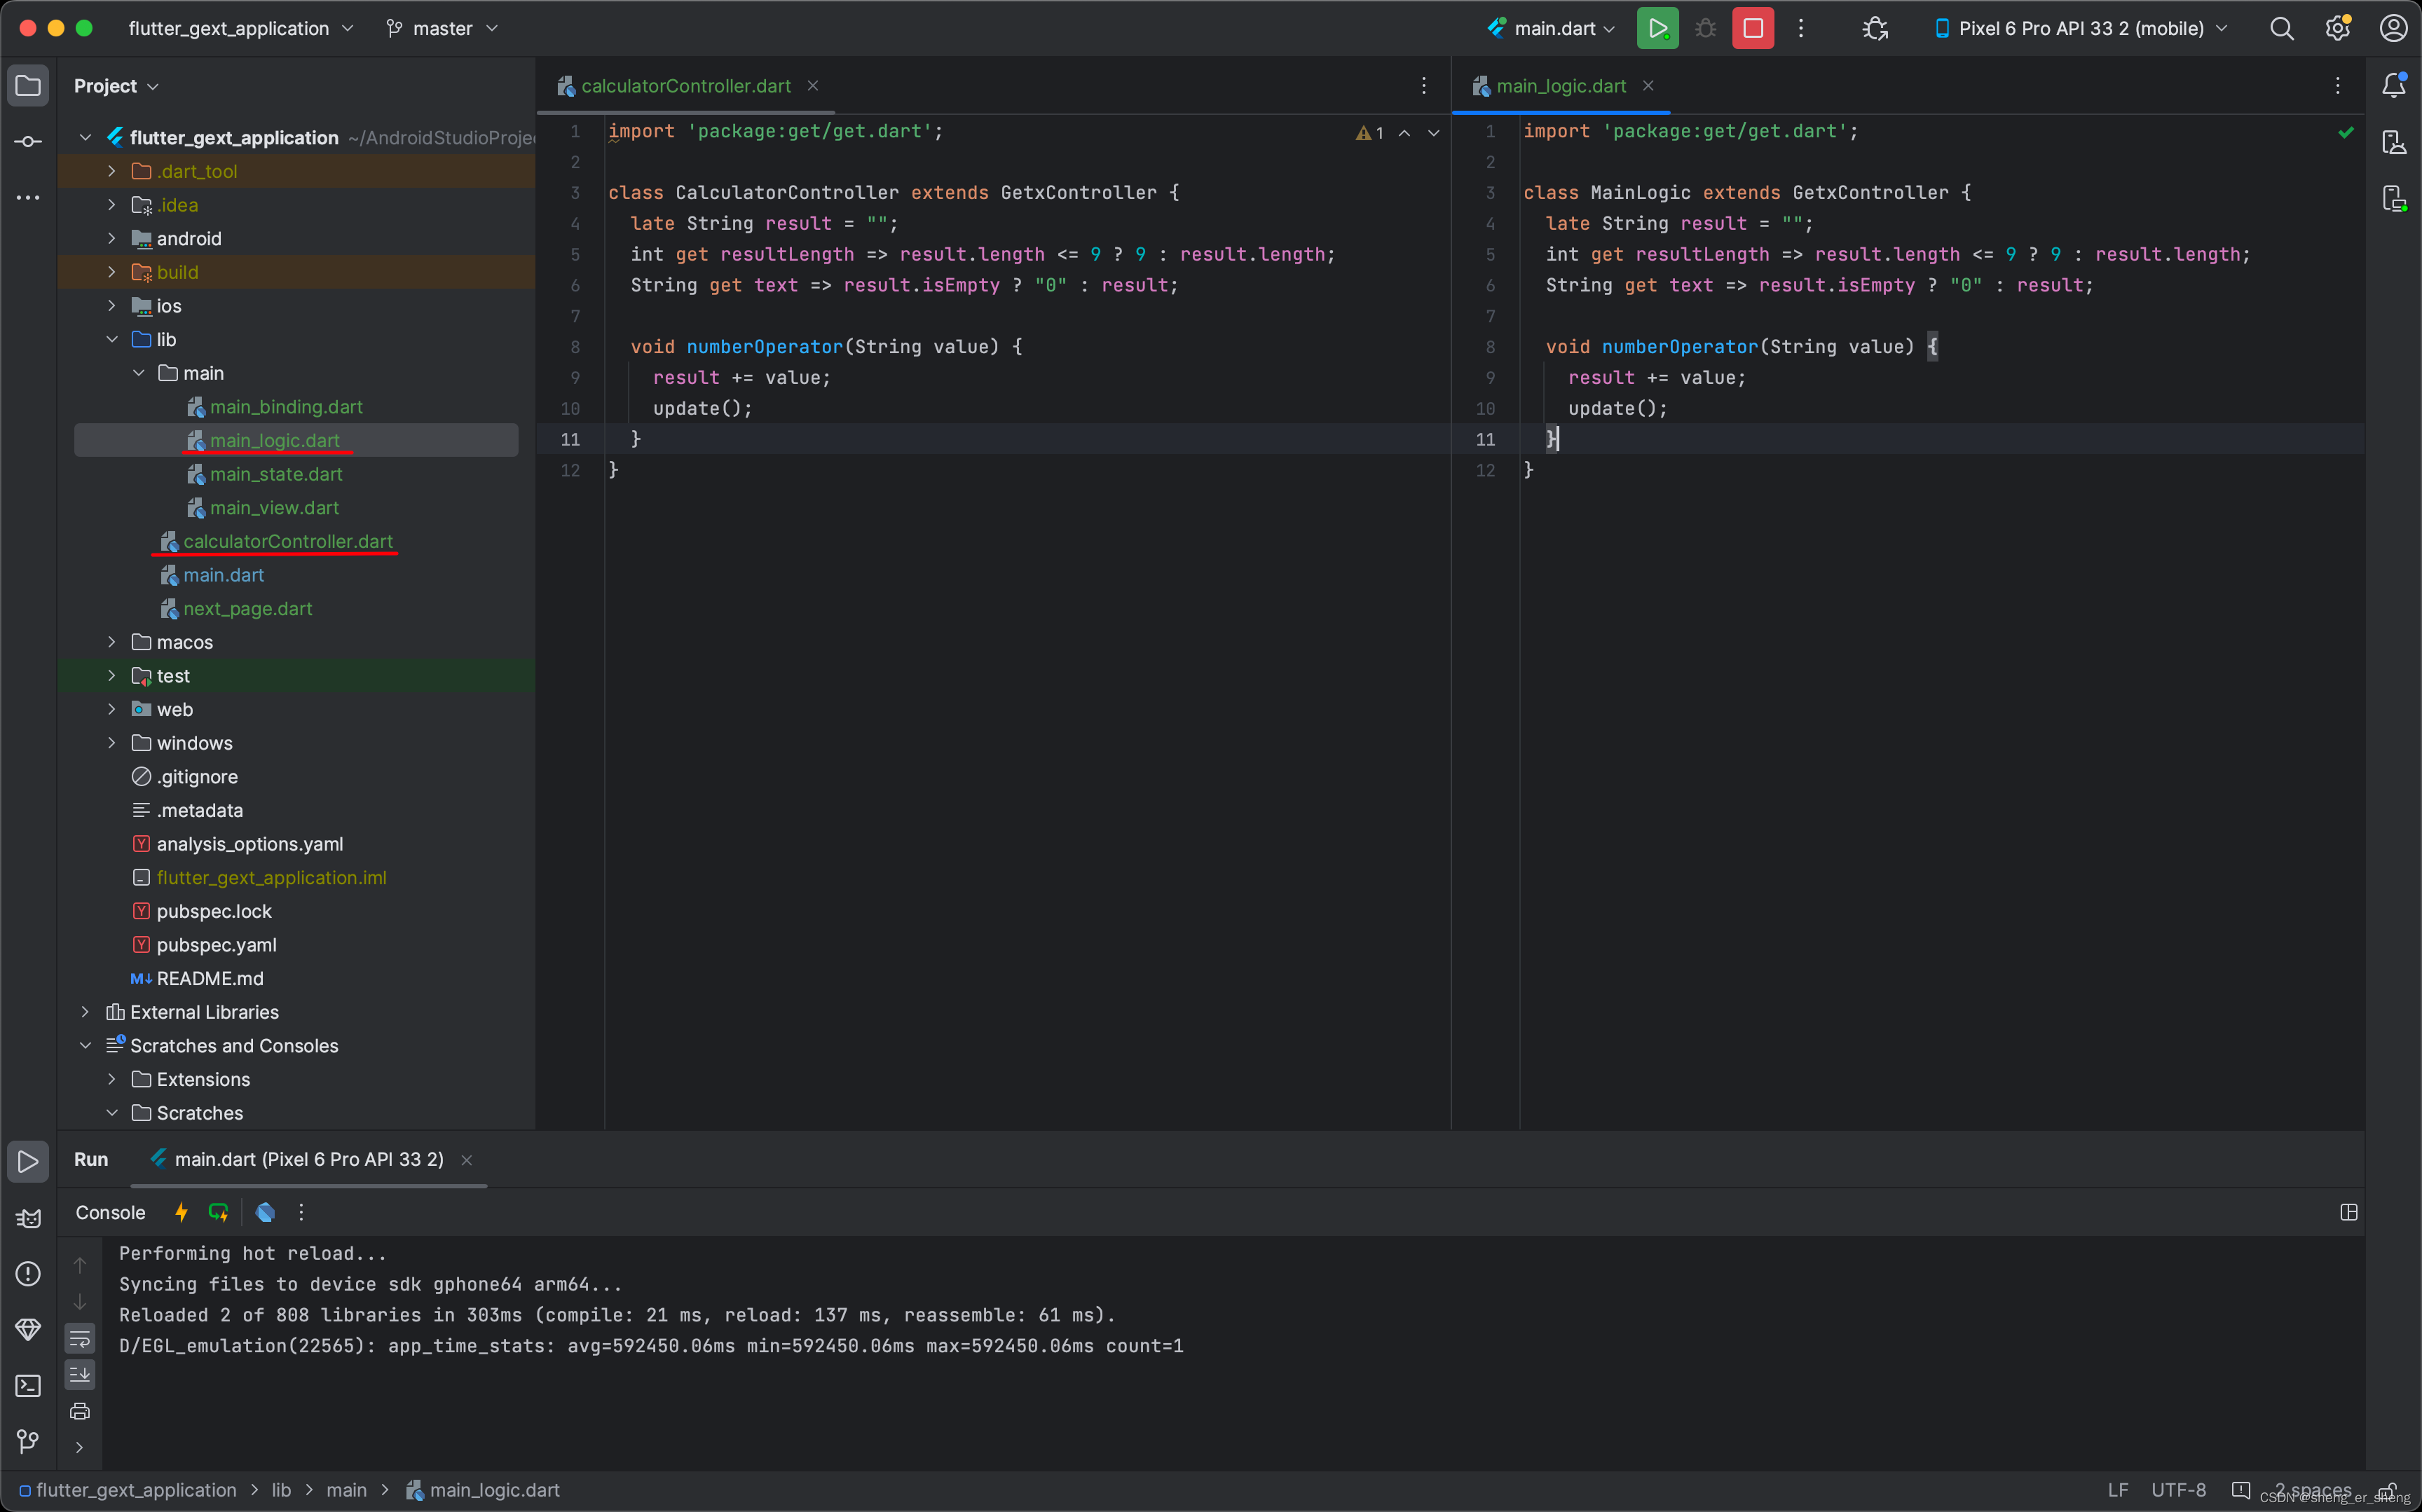
先定义一个子类CalculatorController,并将之前逻辑的部分,都放进这个CalculatorController中
import 'package:get/get.dart';

class CalculatorController extends GetxController {
  final result = "".obs;
  int get resultLength => result.value.length <= 9 ? 9 : result.value.length;
  String get text => result.value.isEmpty ? "0" : result.value;

  void numberOperator(String value) {
    result.value += value;
  }
}
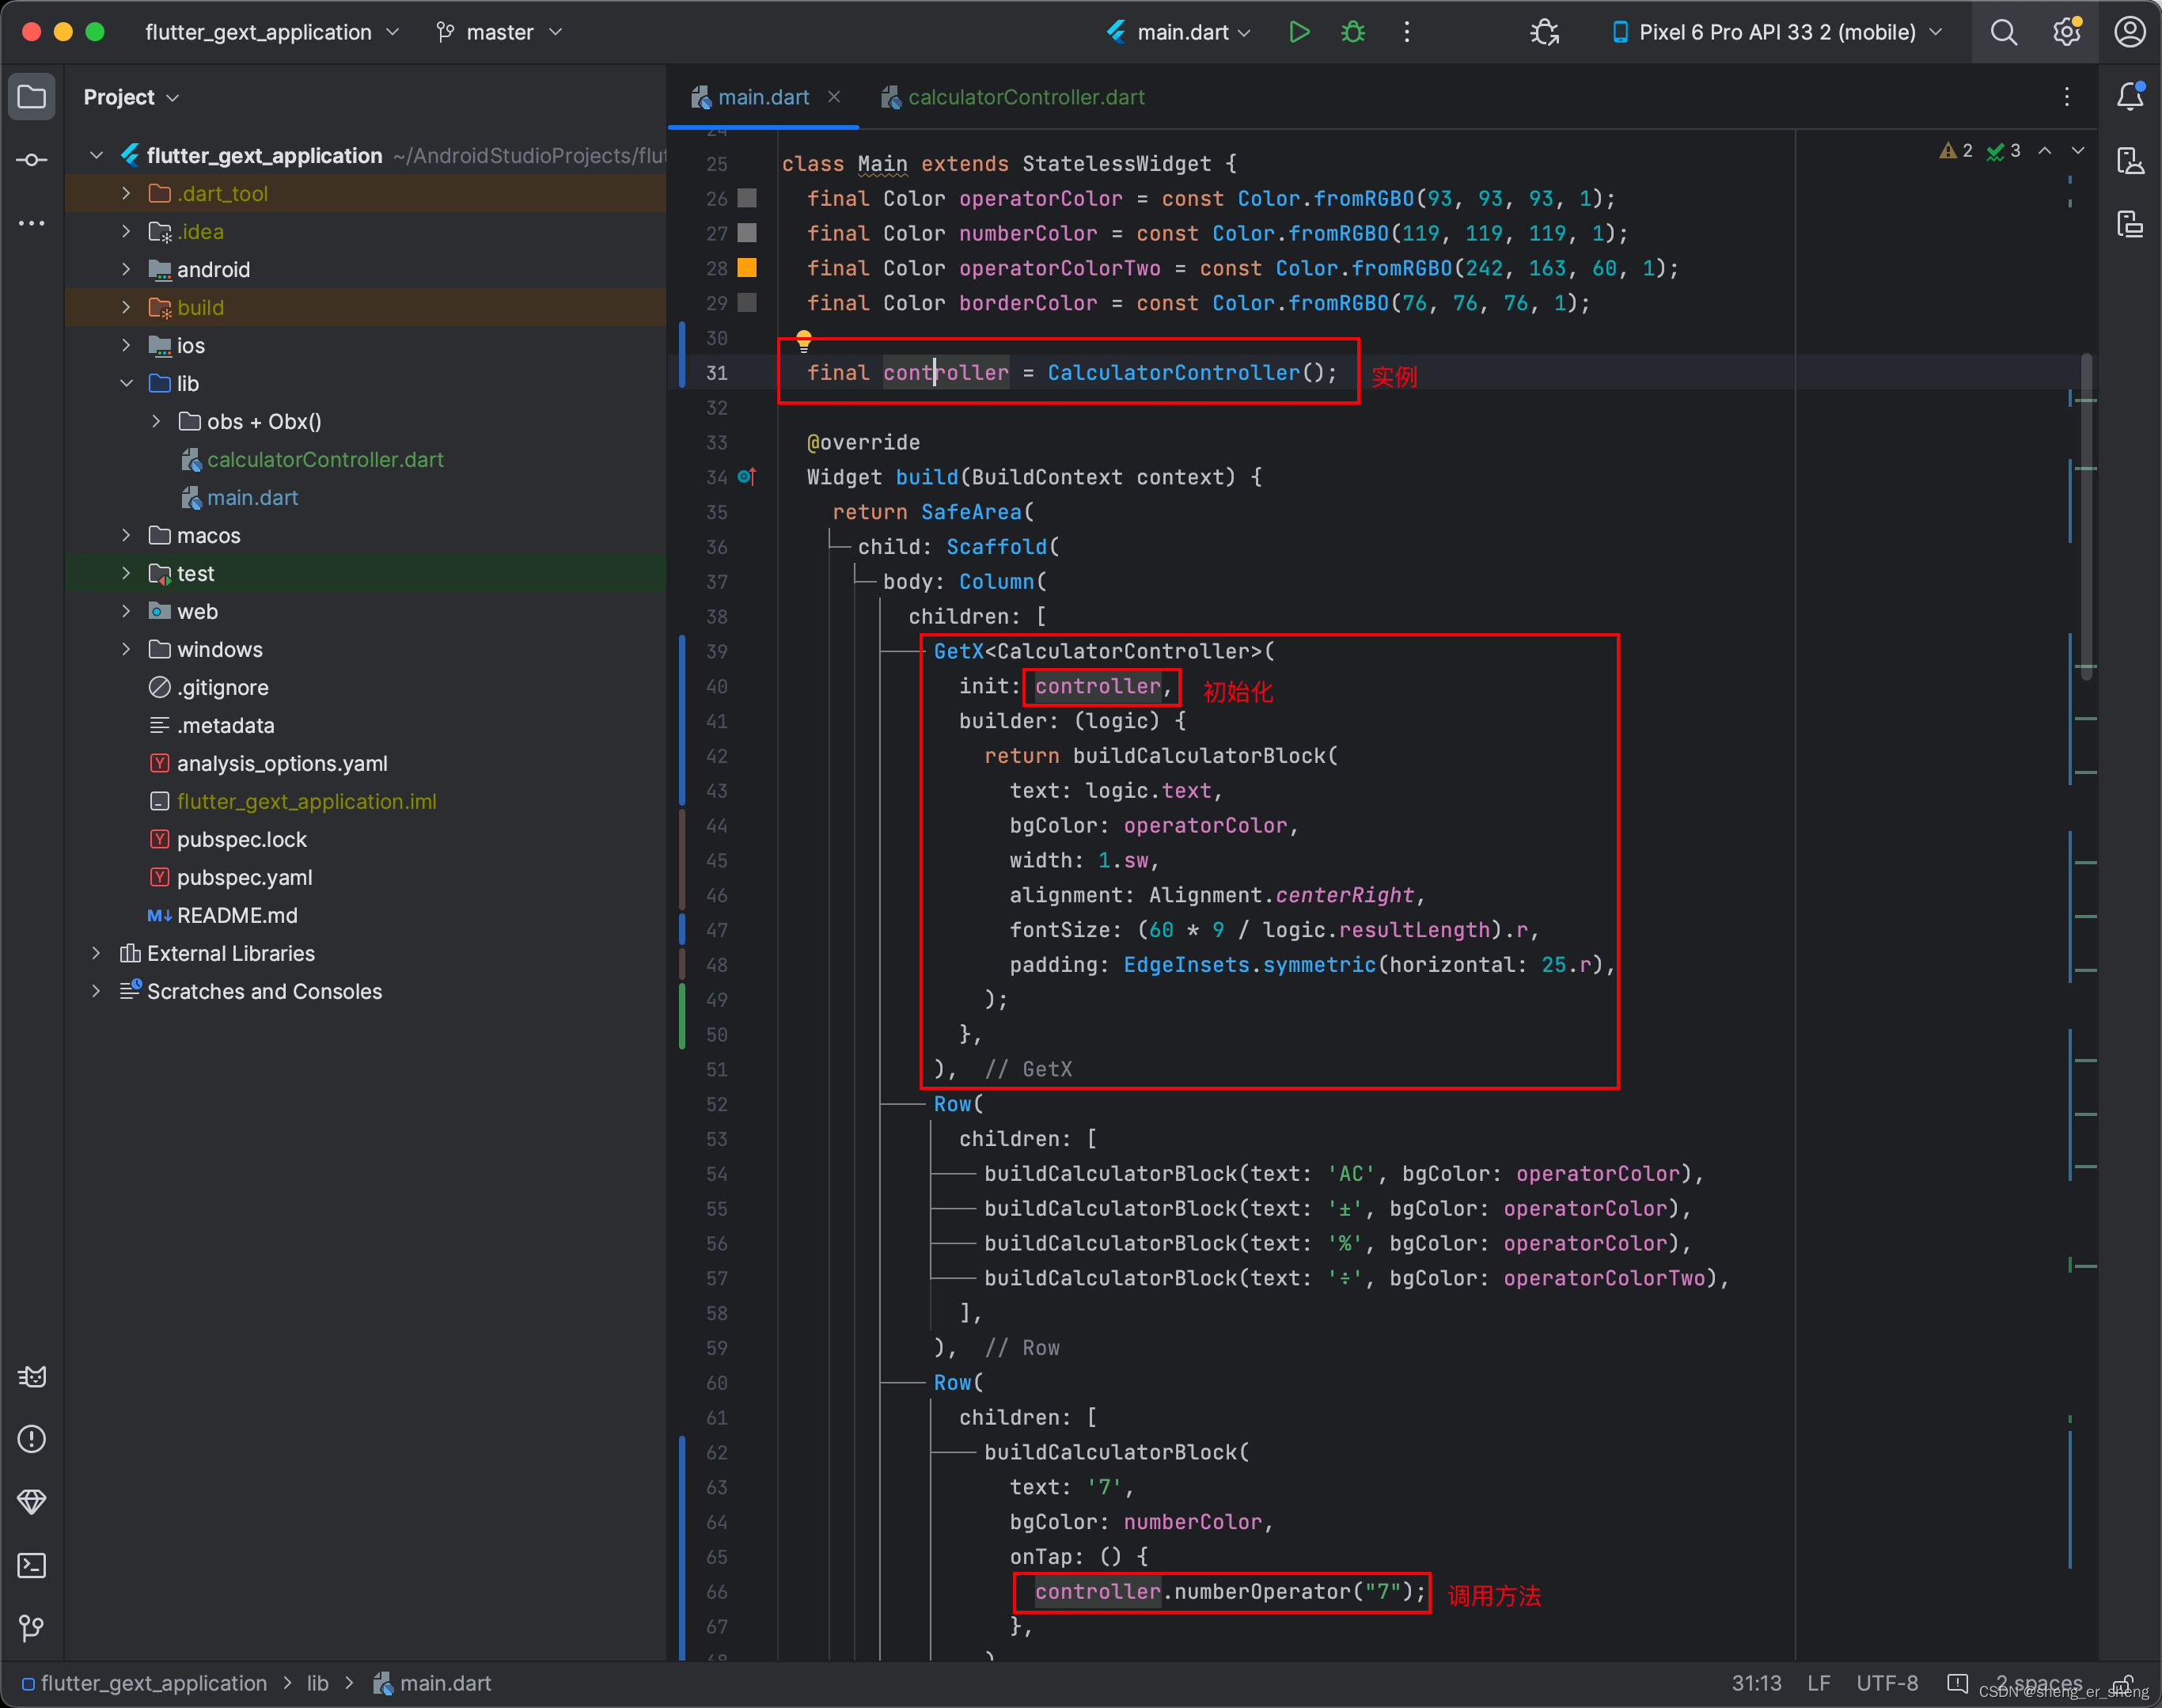
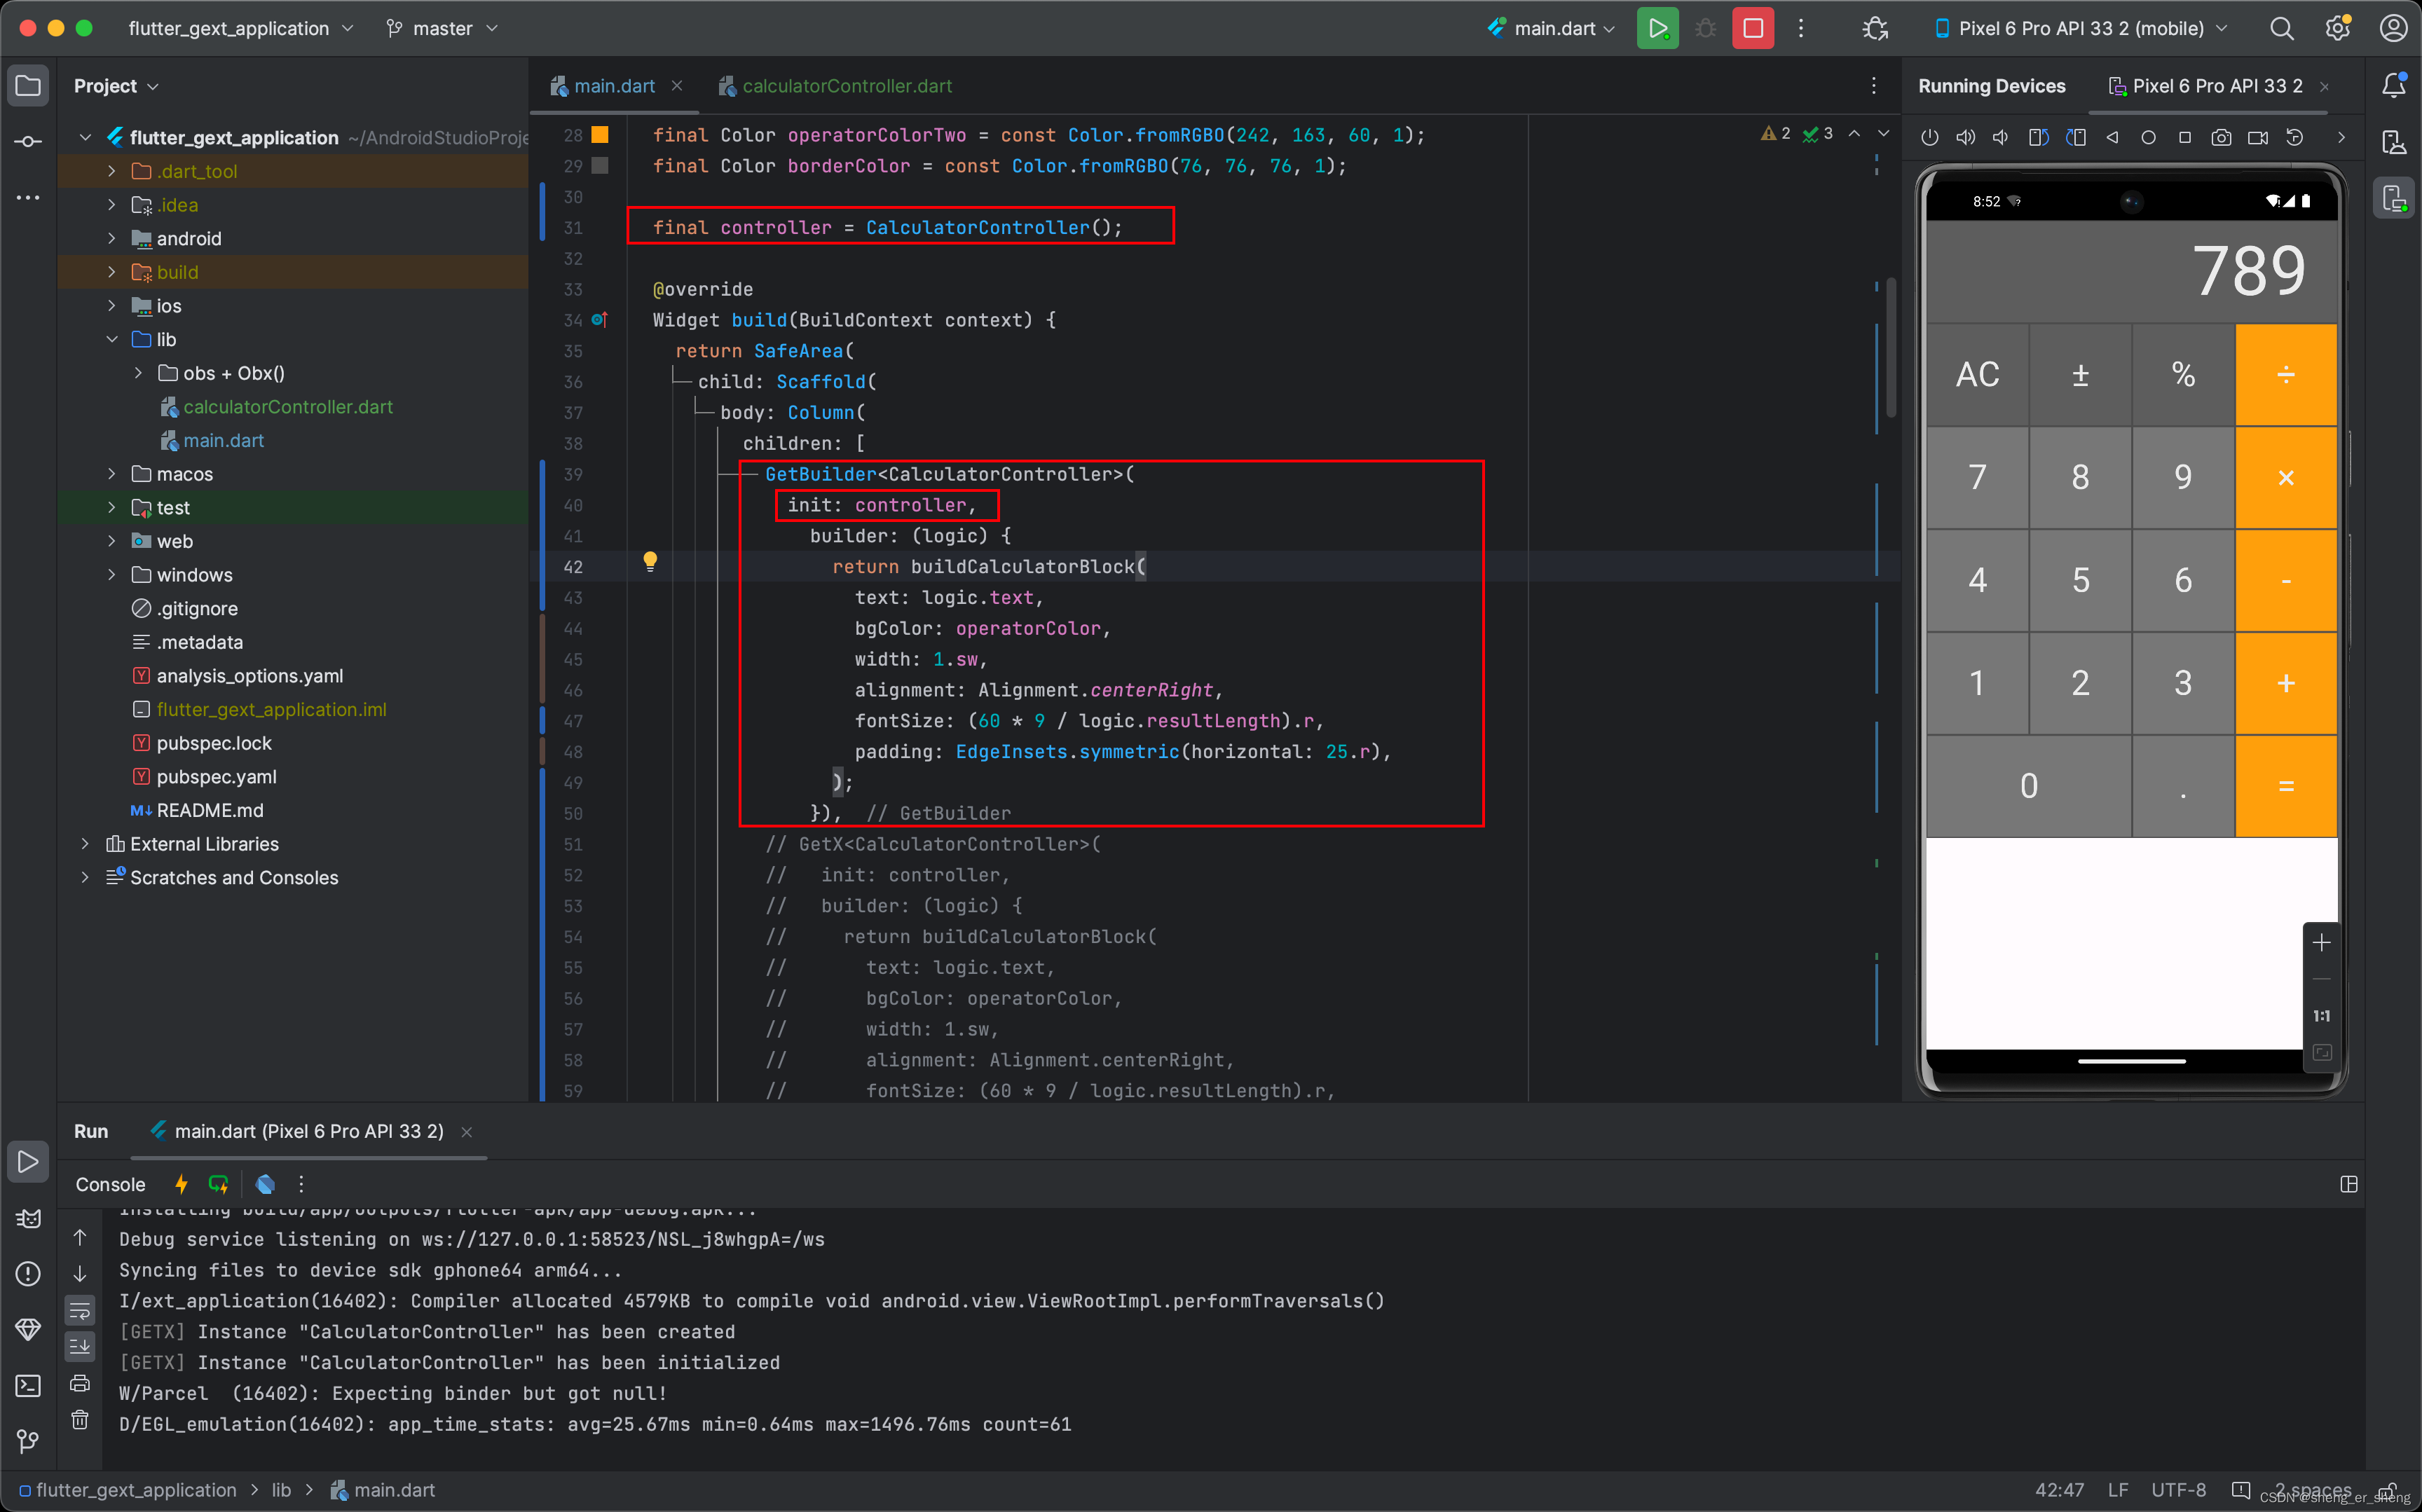
            GetX<CalculatorController>(
              init: controller,
              builder: (logic) {
                return buildCalculatorBlock(
                  text: logic.text,
                  bgColor: operatorColor,
                  width: 1.sw,
                  alignment: Alignment.centerRight,
                  fontSize: (60 * 9 / logic.resultLength).r,
                  padding: EdgeInsets.symmetric(horizontal: 25.r),
                );
              },
            ),
运行之后,点击数字,也能自动刷新
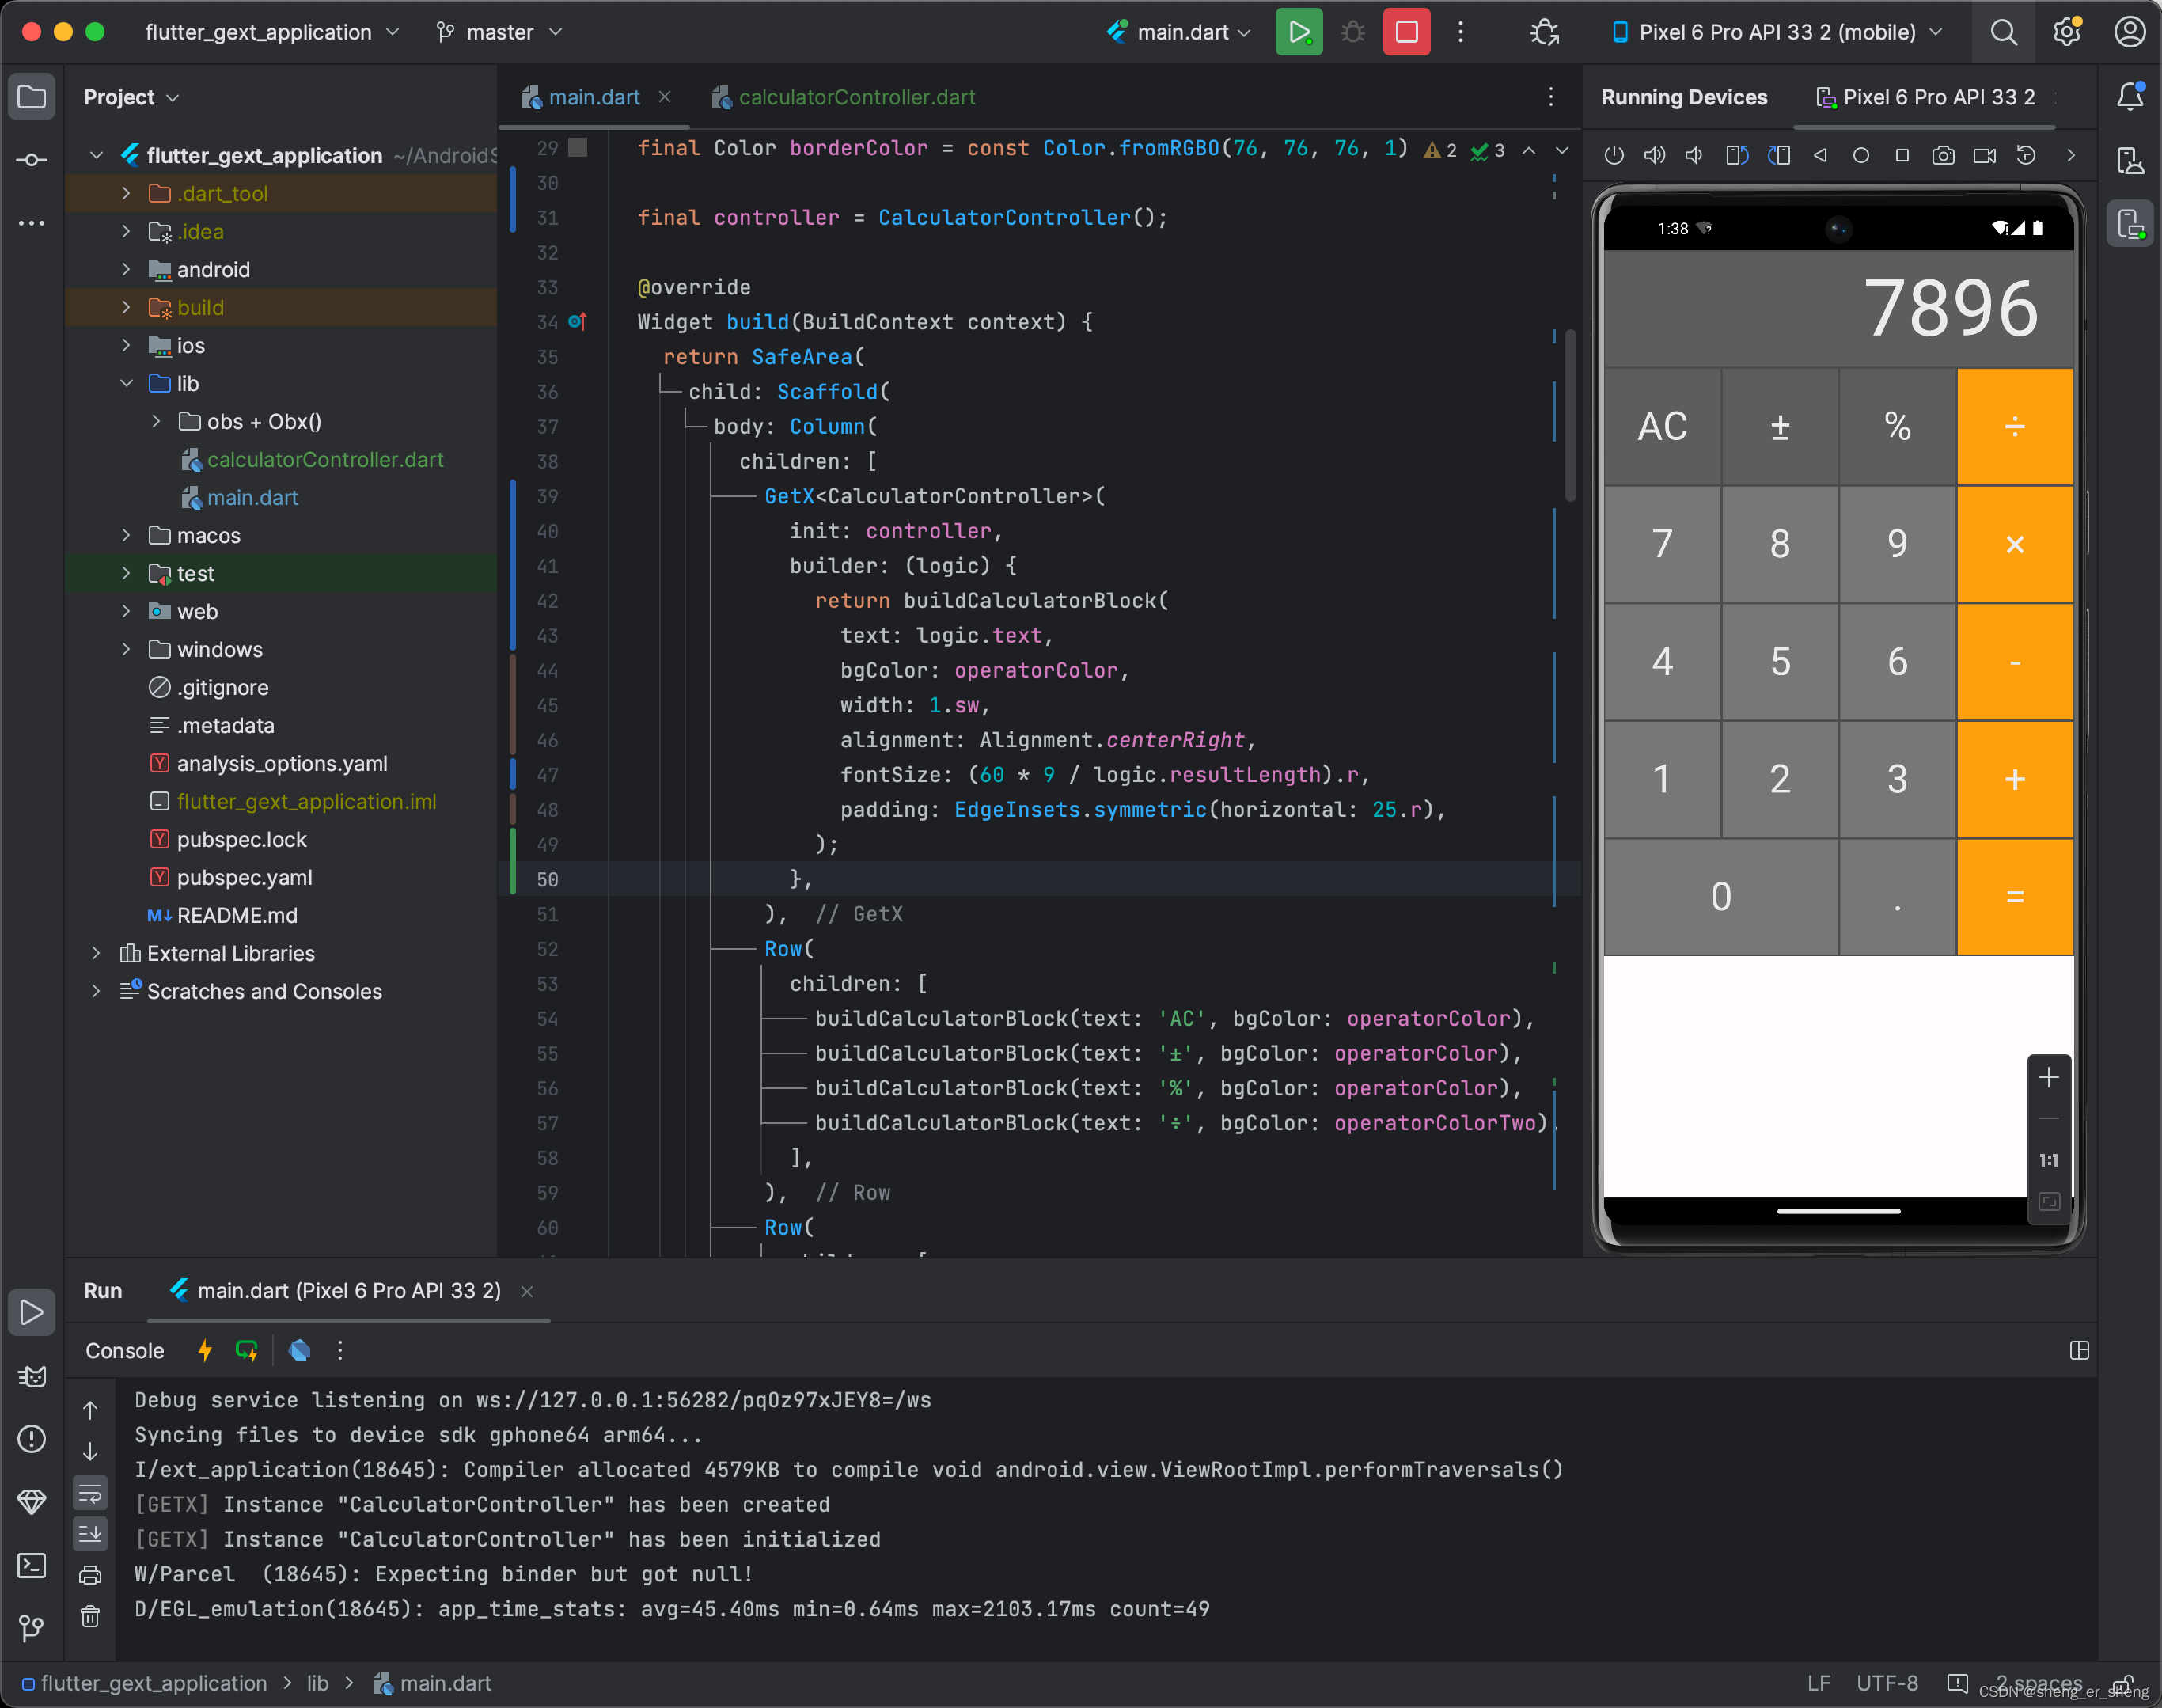
相比ObX,他有初始化状态,可以将逻辑部分归类到GetXController中
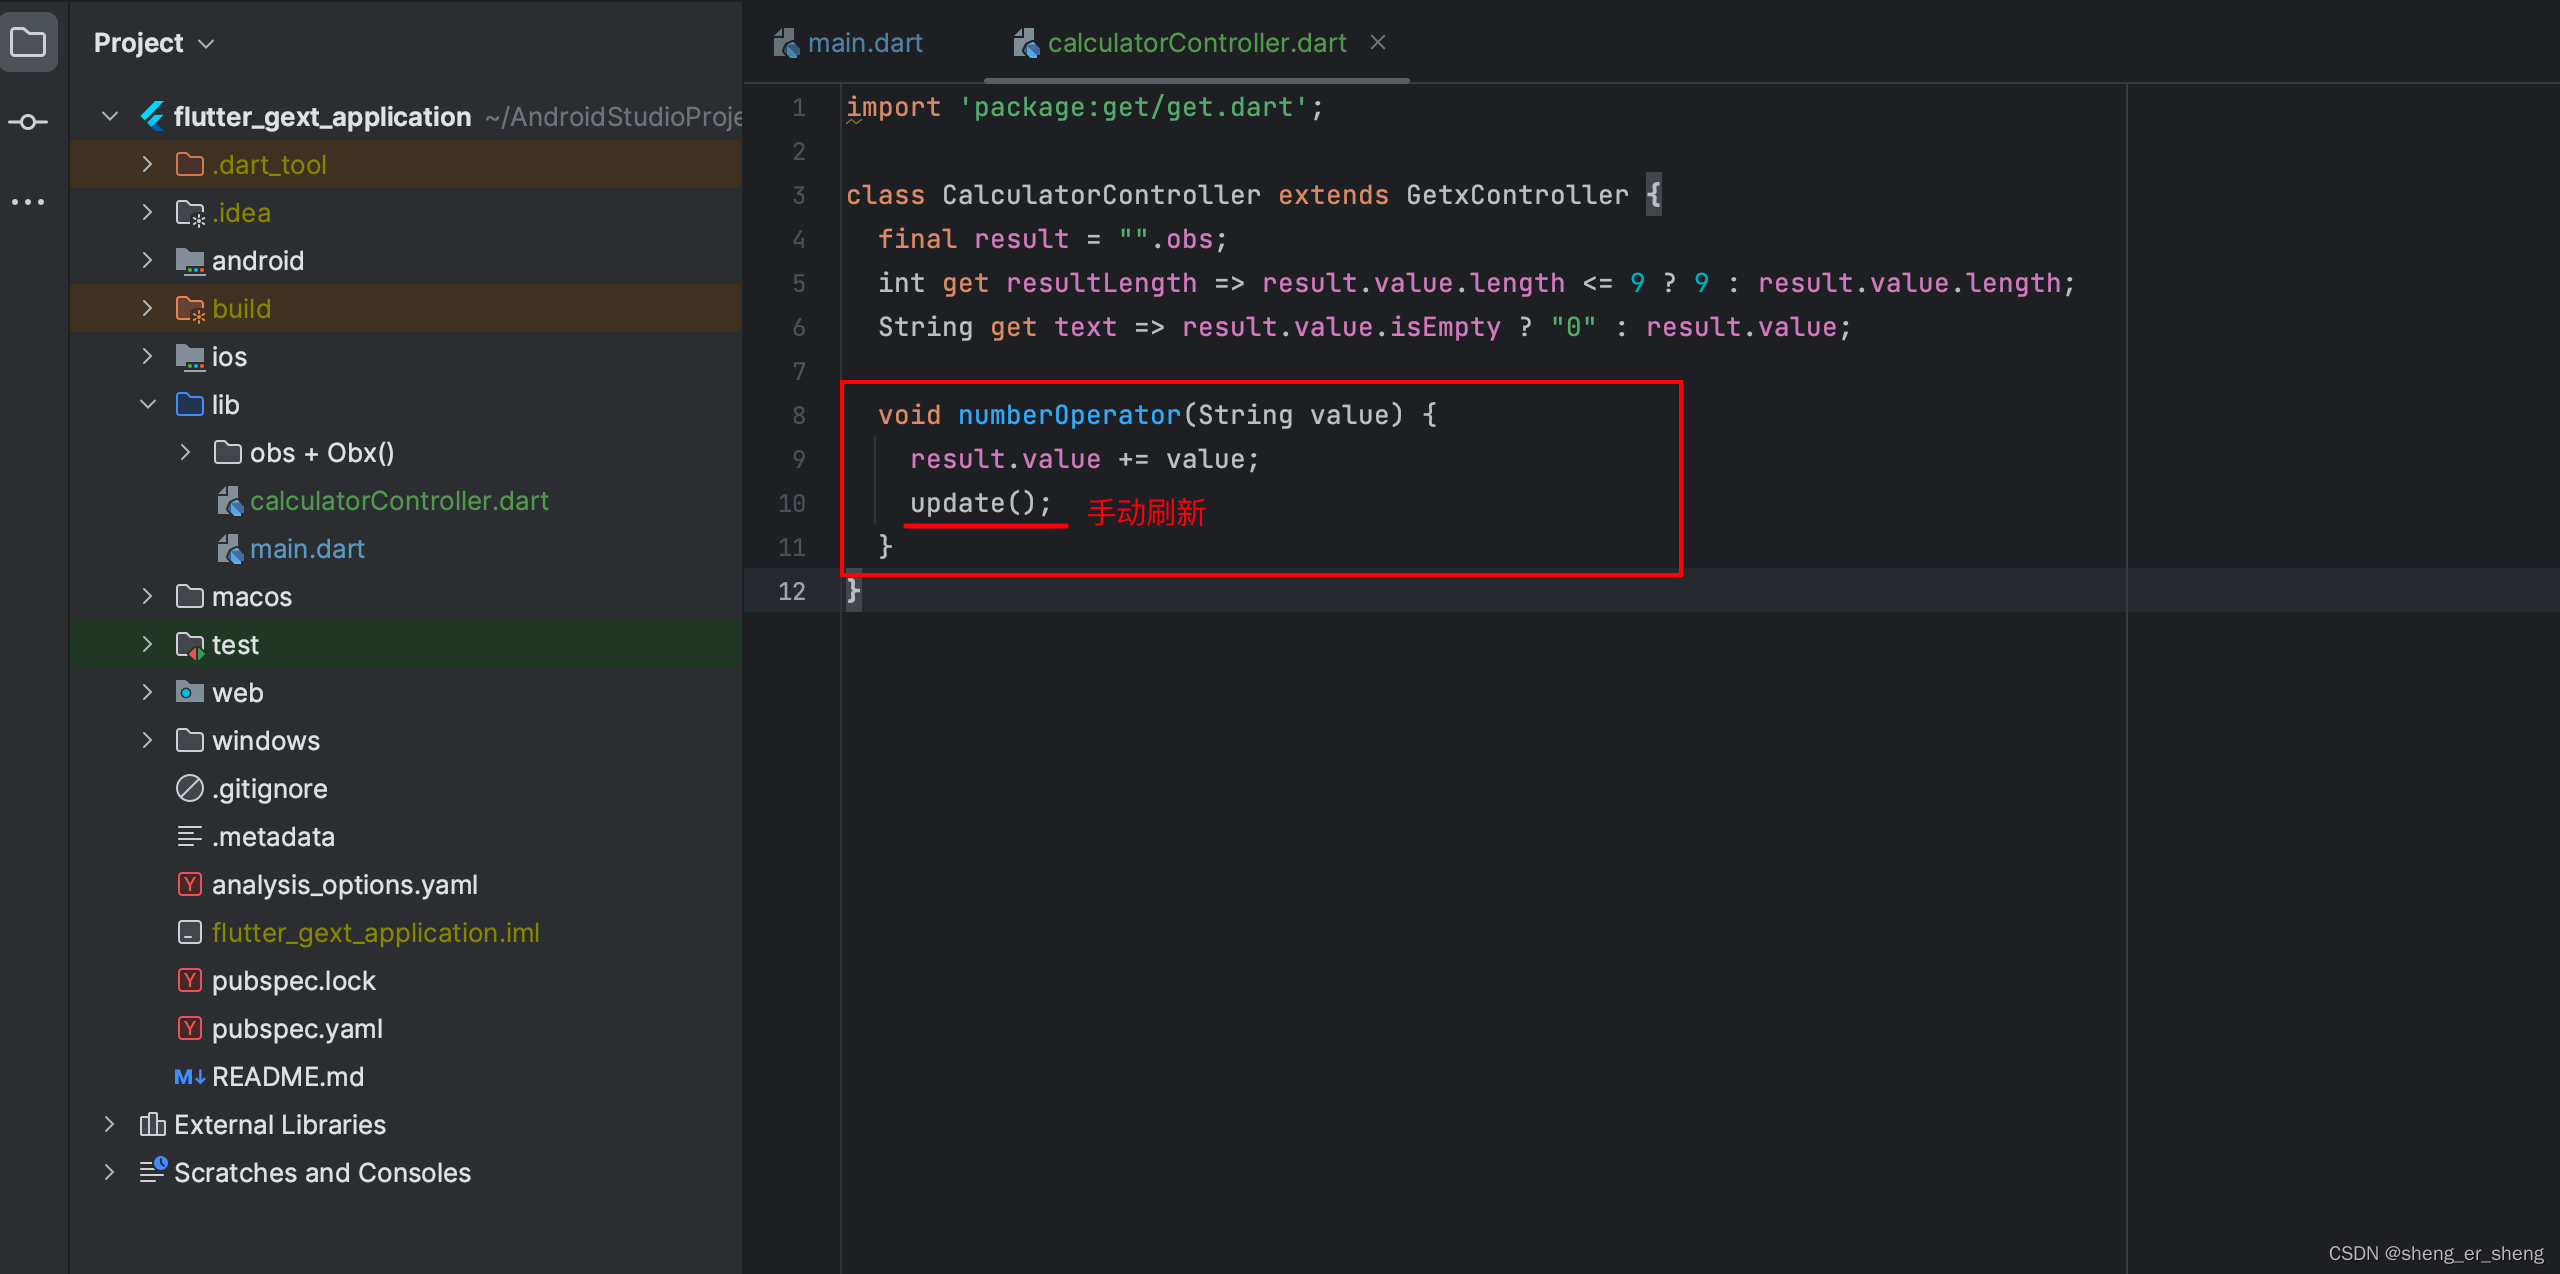
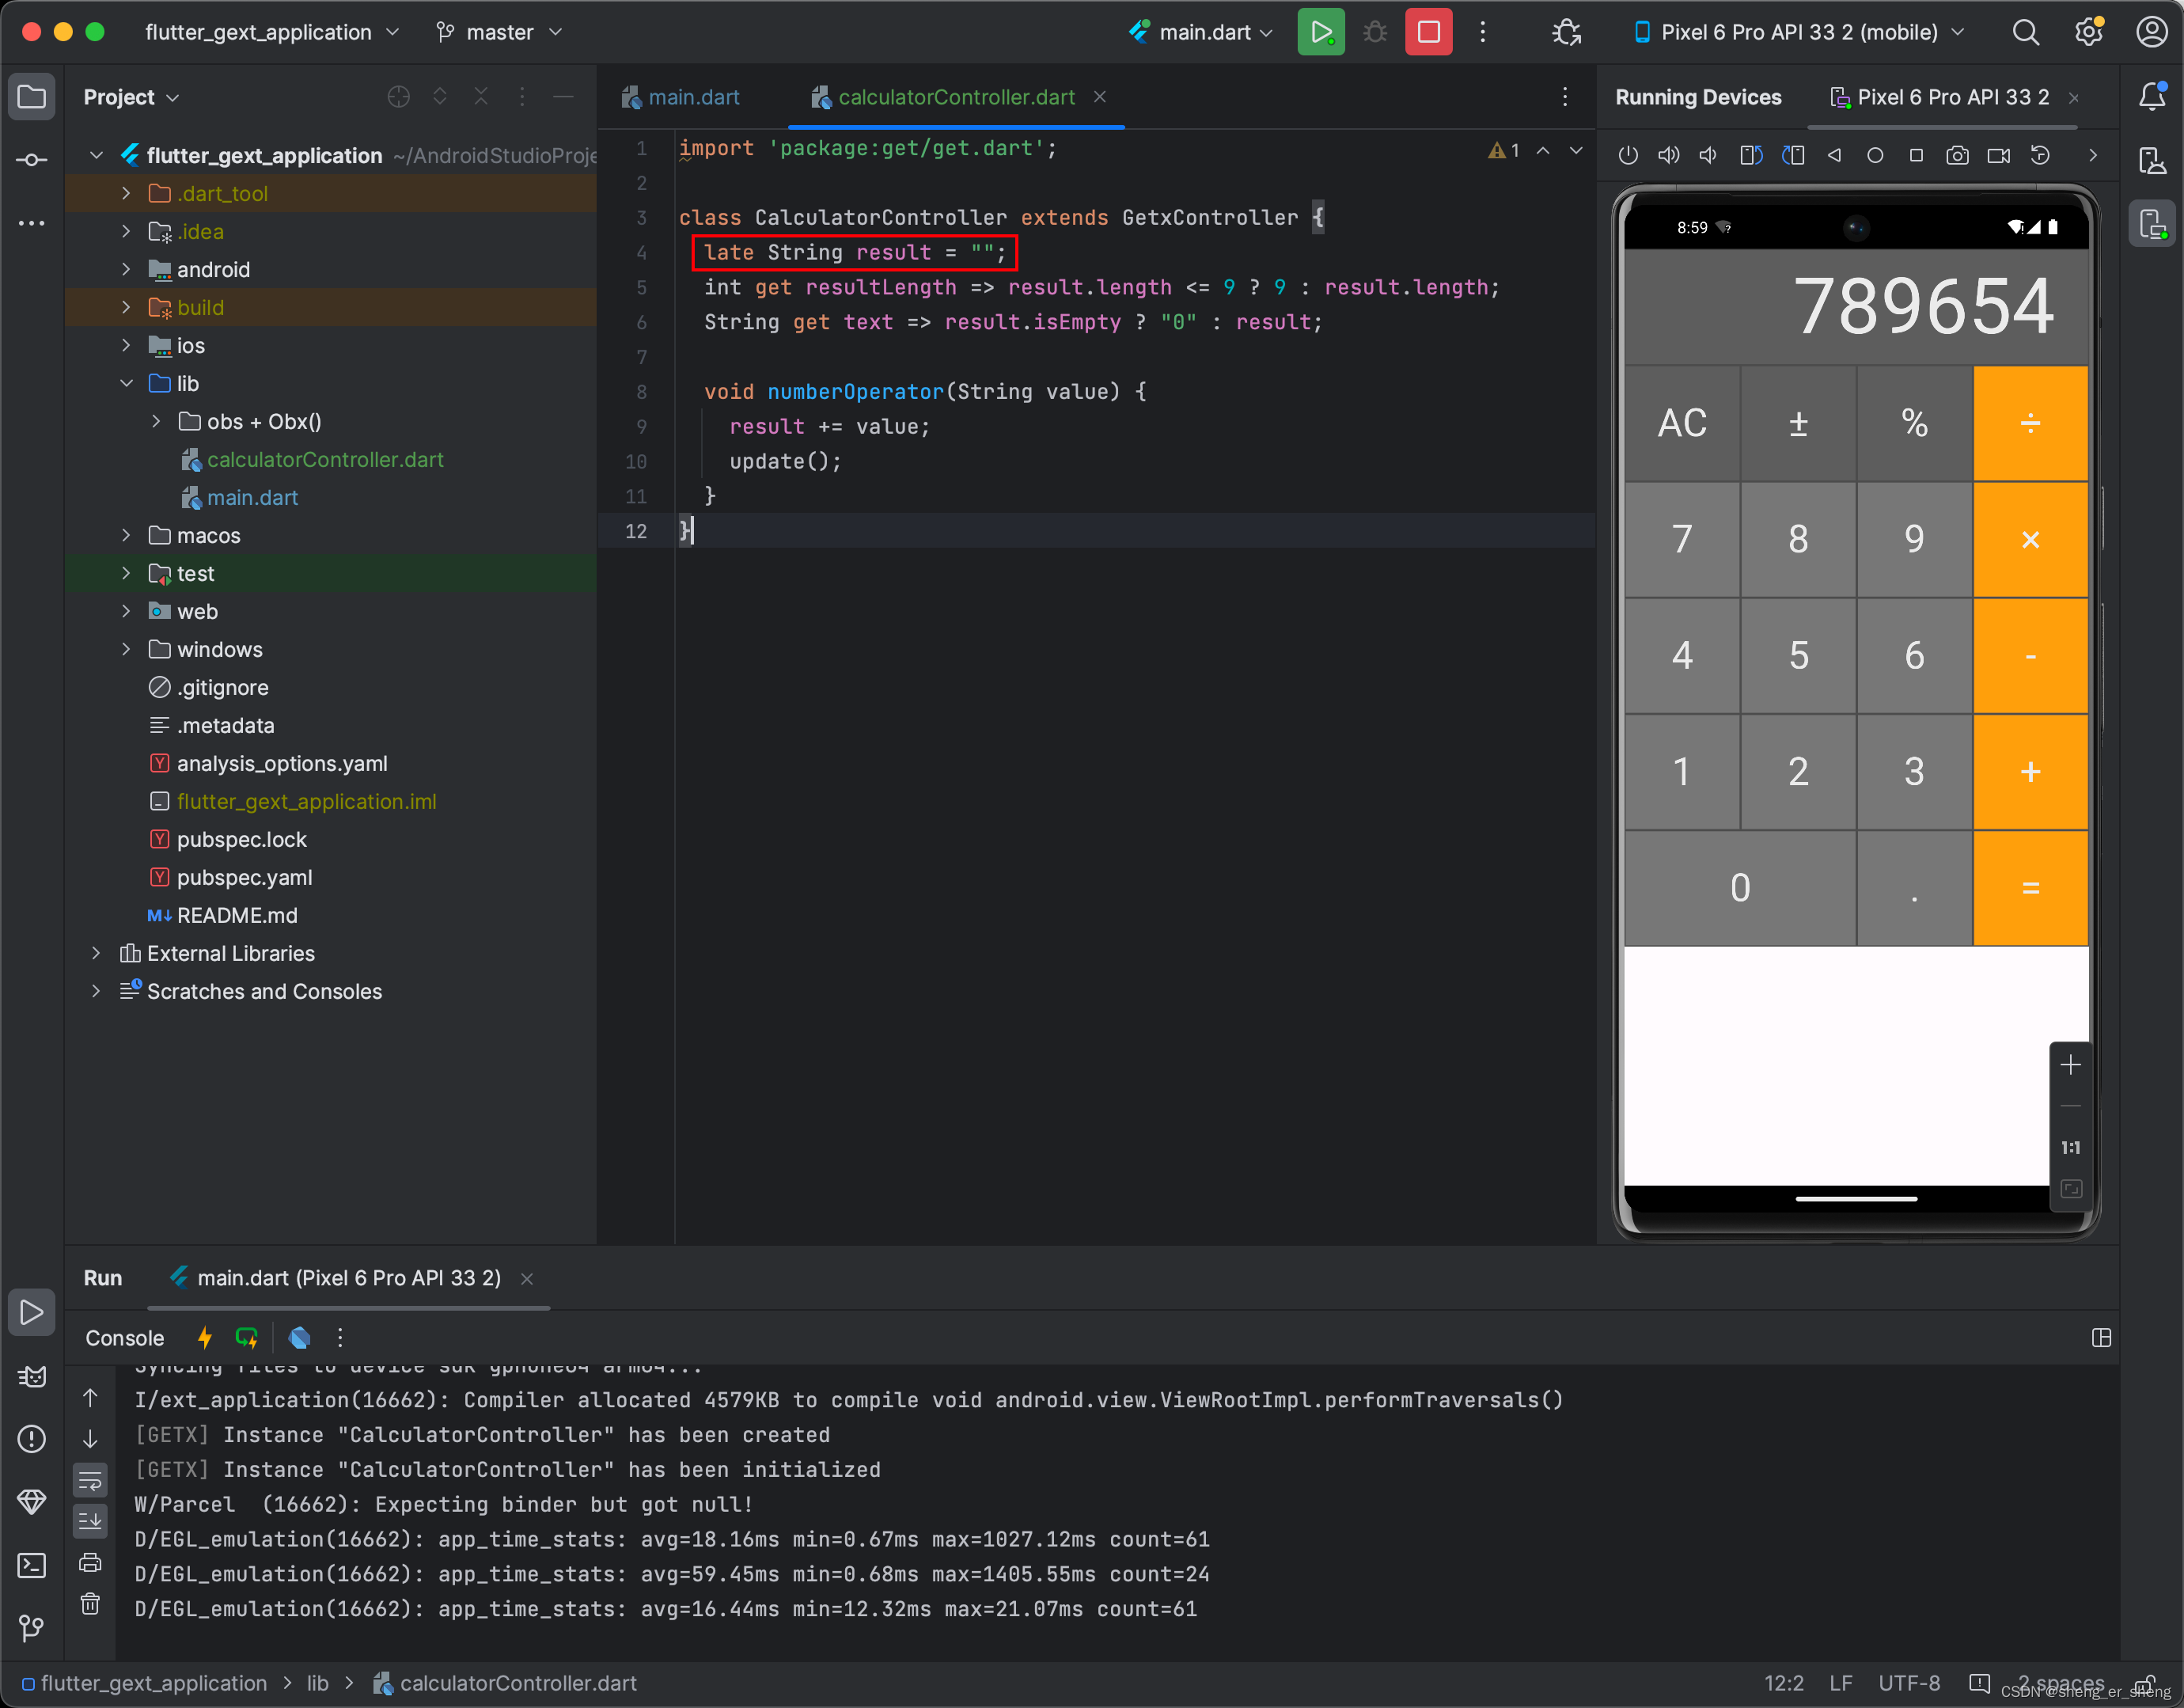
GetBuilder & update
除了Obx和GetX这两种自动刷新,还有手动刷新的方式,那就是采用GetBuilder
之前在GetX中创建好Controller,在这里仍然需要使用
鼠标点在需要包裹的Widget中,按下【option】和【回车】,就能看到
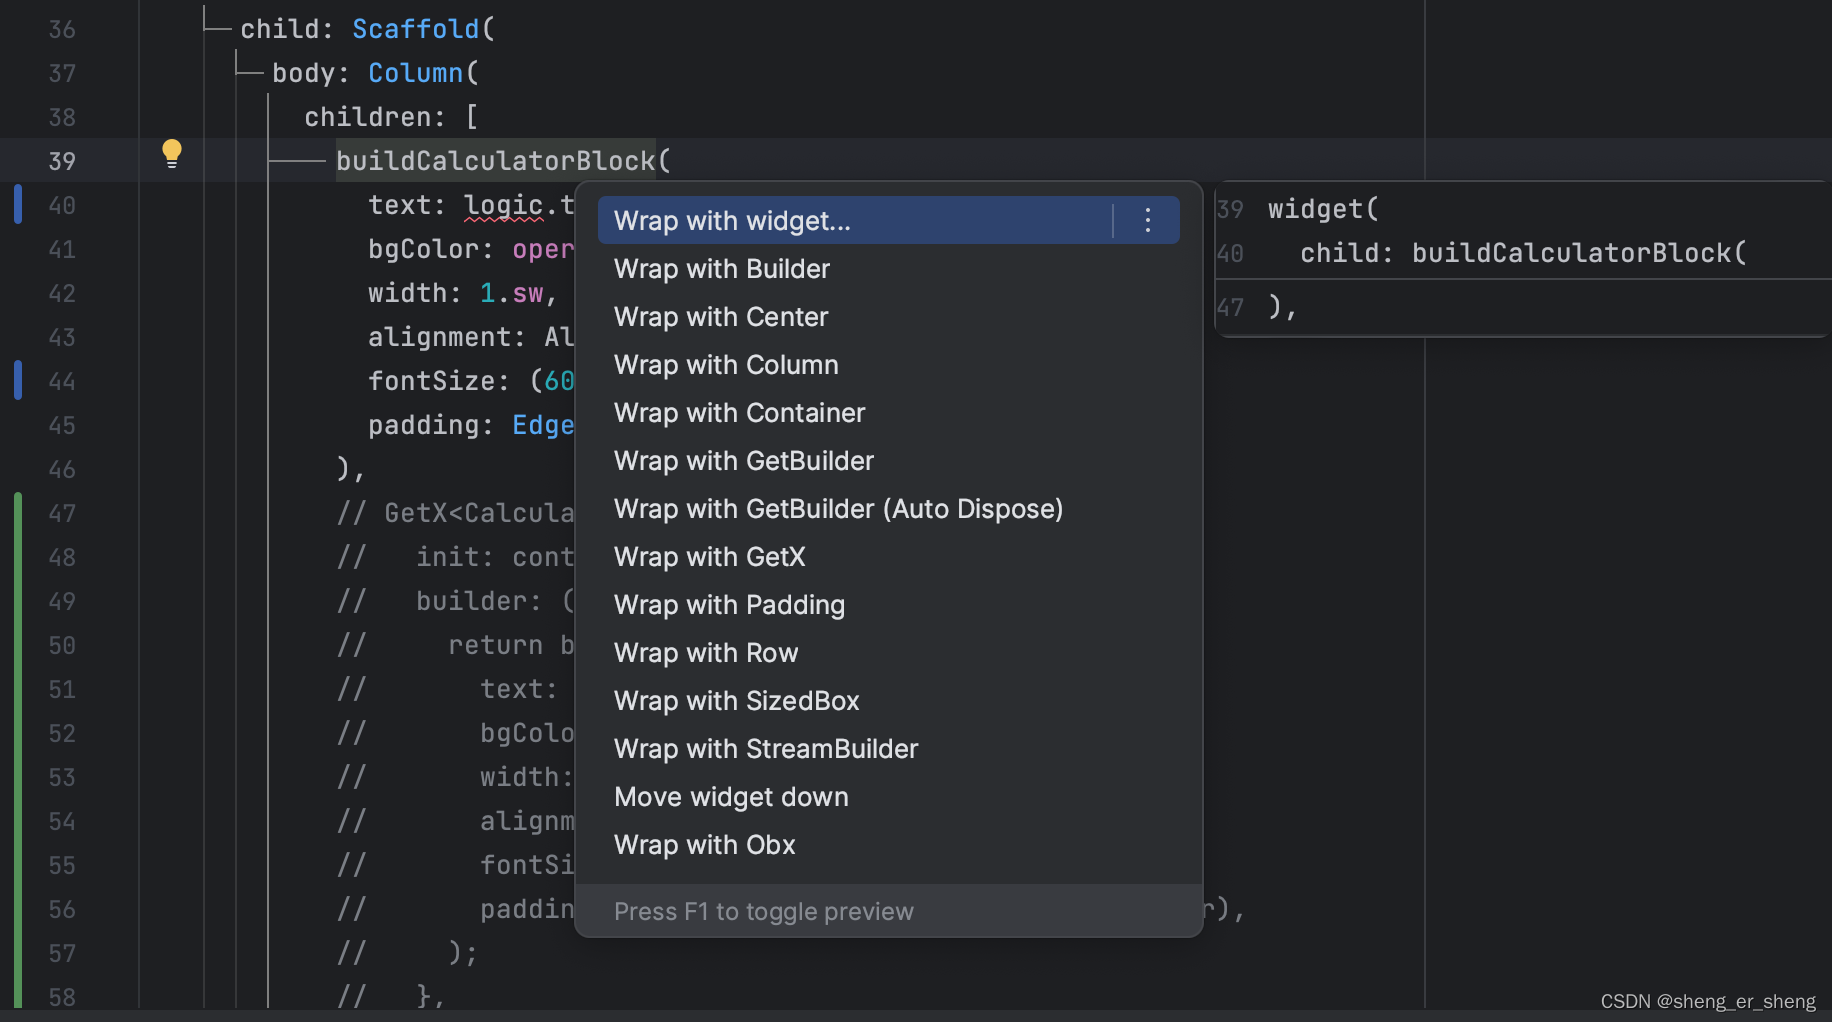
同样需要初始化controller,因为只需要刷新上面计算的结果,所以,只需要包裹需要刷新的部分,这很重要。
看我上面的截图,是可以输入数字的,但是,这里还需要一步,你们才能刷新。这就是为什么GetBuilder是手动刷新了。
如果不调用,需要刷新的界面不会刷新
同时可以再简化,因为obs响应式变量是配合自动刷新的GetX和ObX来使用的,在这里,既然都手动刷新了,那可以不采用响应式变量,当然你也可以留着。
改为普通的String,通过配合update,结果也能刷新。
只有你点击,即调用update,才会刷新对应的布局
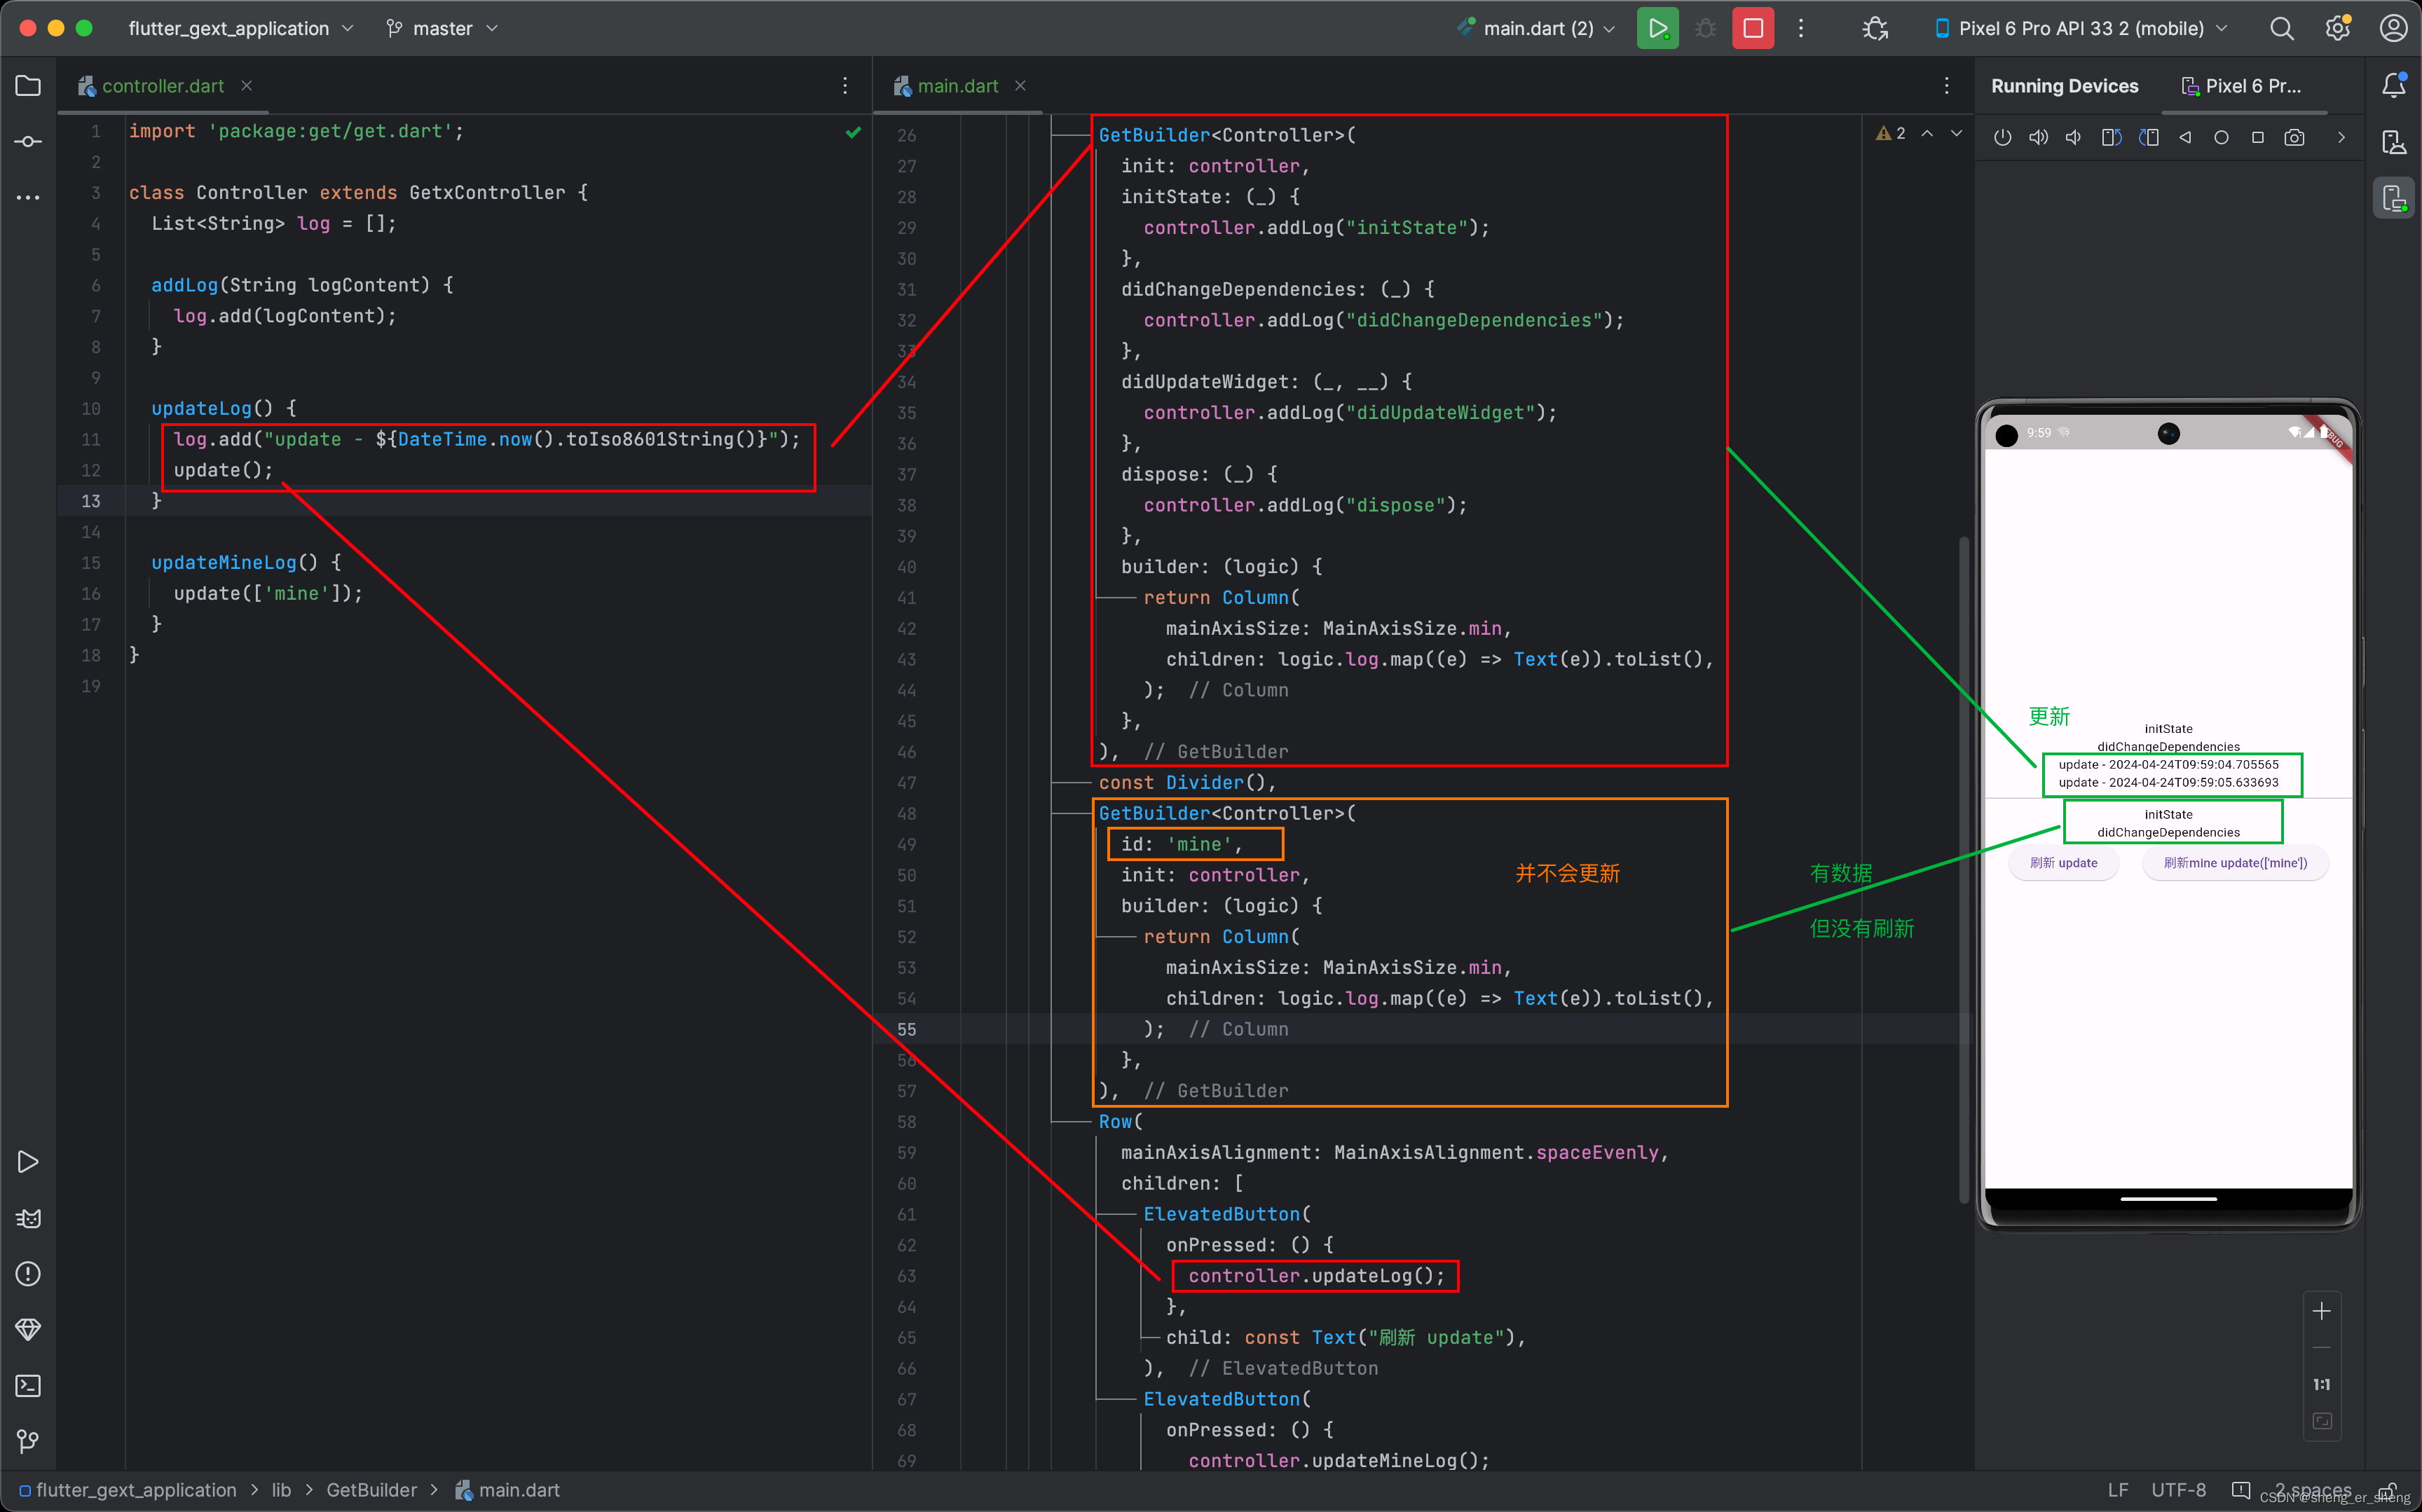
GetBuilder 指定id 和 回调函数
GetBuilder不仅有statefulWidget那种生命周期回调函数,还可以可以指定id,指定特定的界面刷新数据
import 'package:flutter/material.dart';
import 'package:get/get_state_manager/src/simple/get_state.dart';
import 'controller.dart';
void main() {
runApp(App());
}
class App extends StatelessWidget {
Widget build(BuildContext context) {
return MaterialApp(home: Main());
}
}
class Main extends StatelessWidget {
final controller = Controller();
Widget build(BuildContext context) {
return Scaffold(
body: Center(
child: Column(
mainAxisSize: MainAxisSize.min,
children: [
GetBuilder<Controller>(
init: controller,
initState: (_) {
controller.addLog("initState");
},
didChangeDependencies: (_) {
controller.addLog("didChangeDependencies");
},
didUpdateWidget: (_, __) {
controller.addLog("didUpdateWidget");
},
dispose: (_) {
controller.addLog("dispose");
},
builder: (logic) {
return Column(
mainAxisSize: MainAxisSize.min,
children: logic.log.map((e) => Text(e)).toList(),
);
},
),
const Divider(),
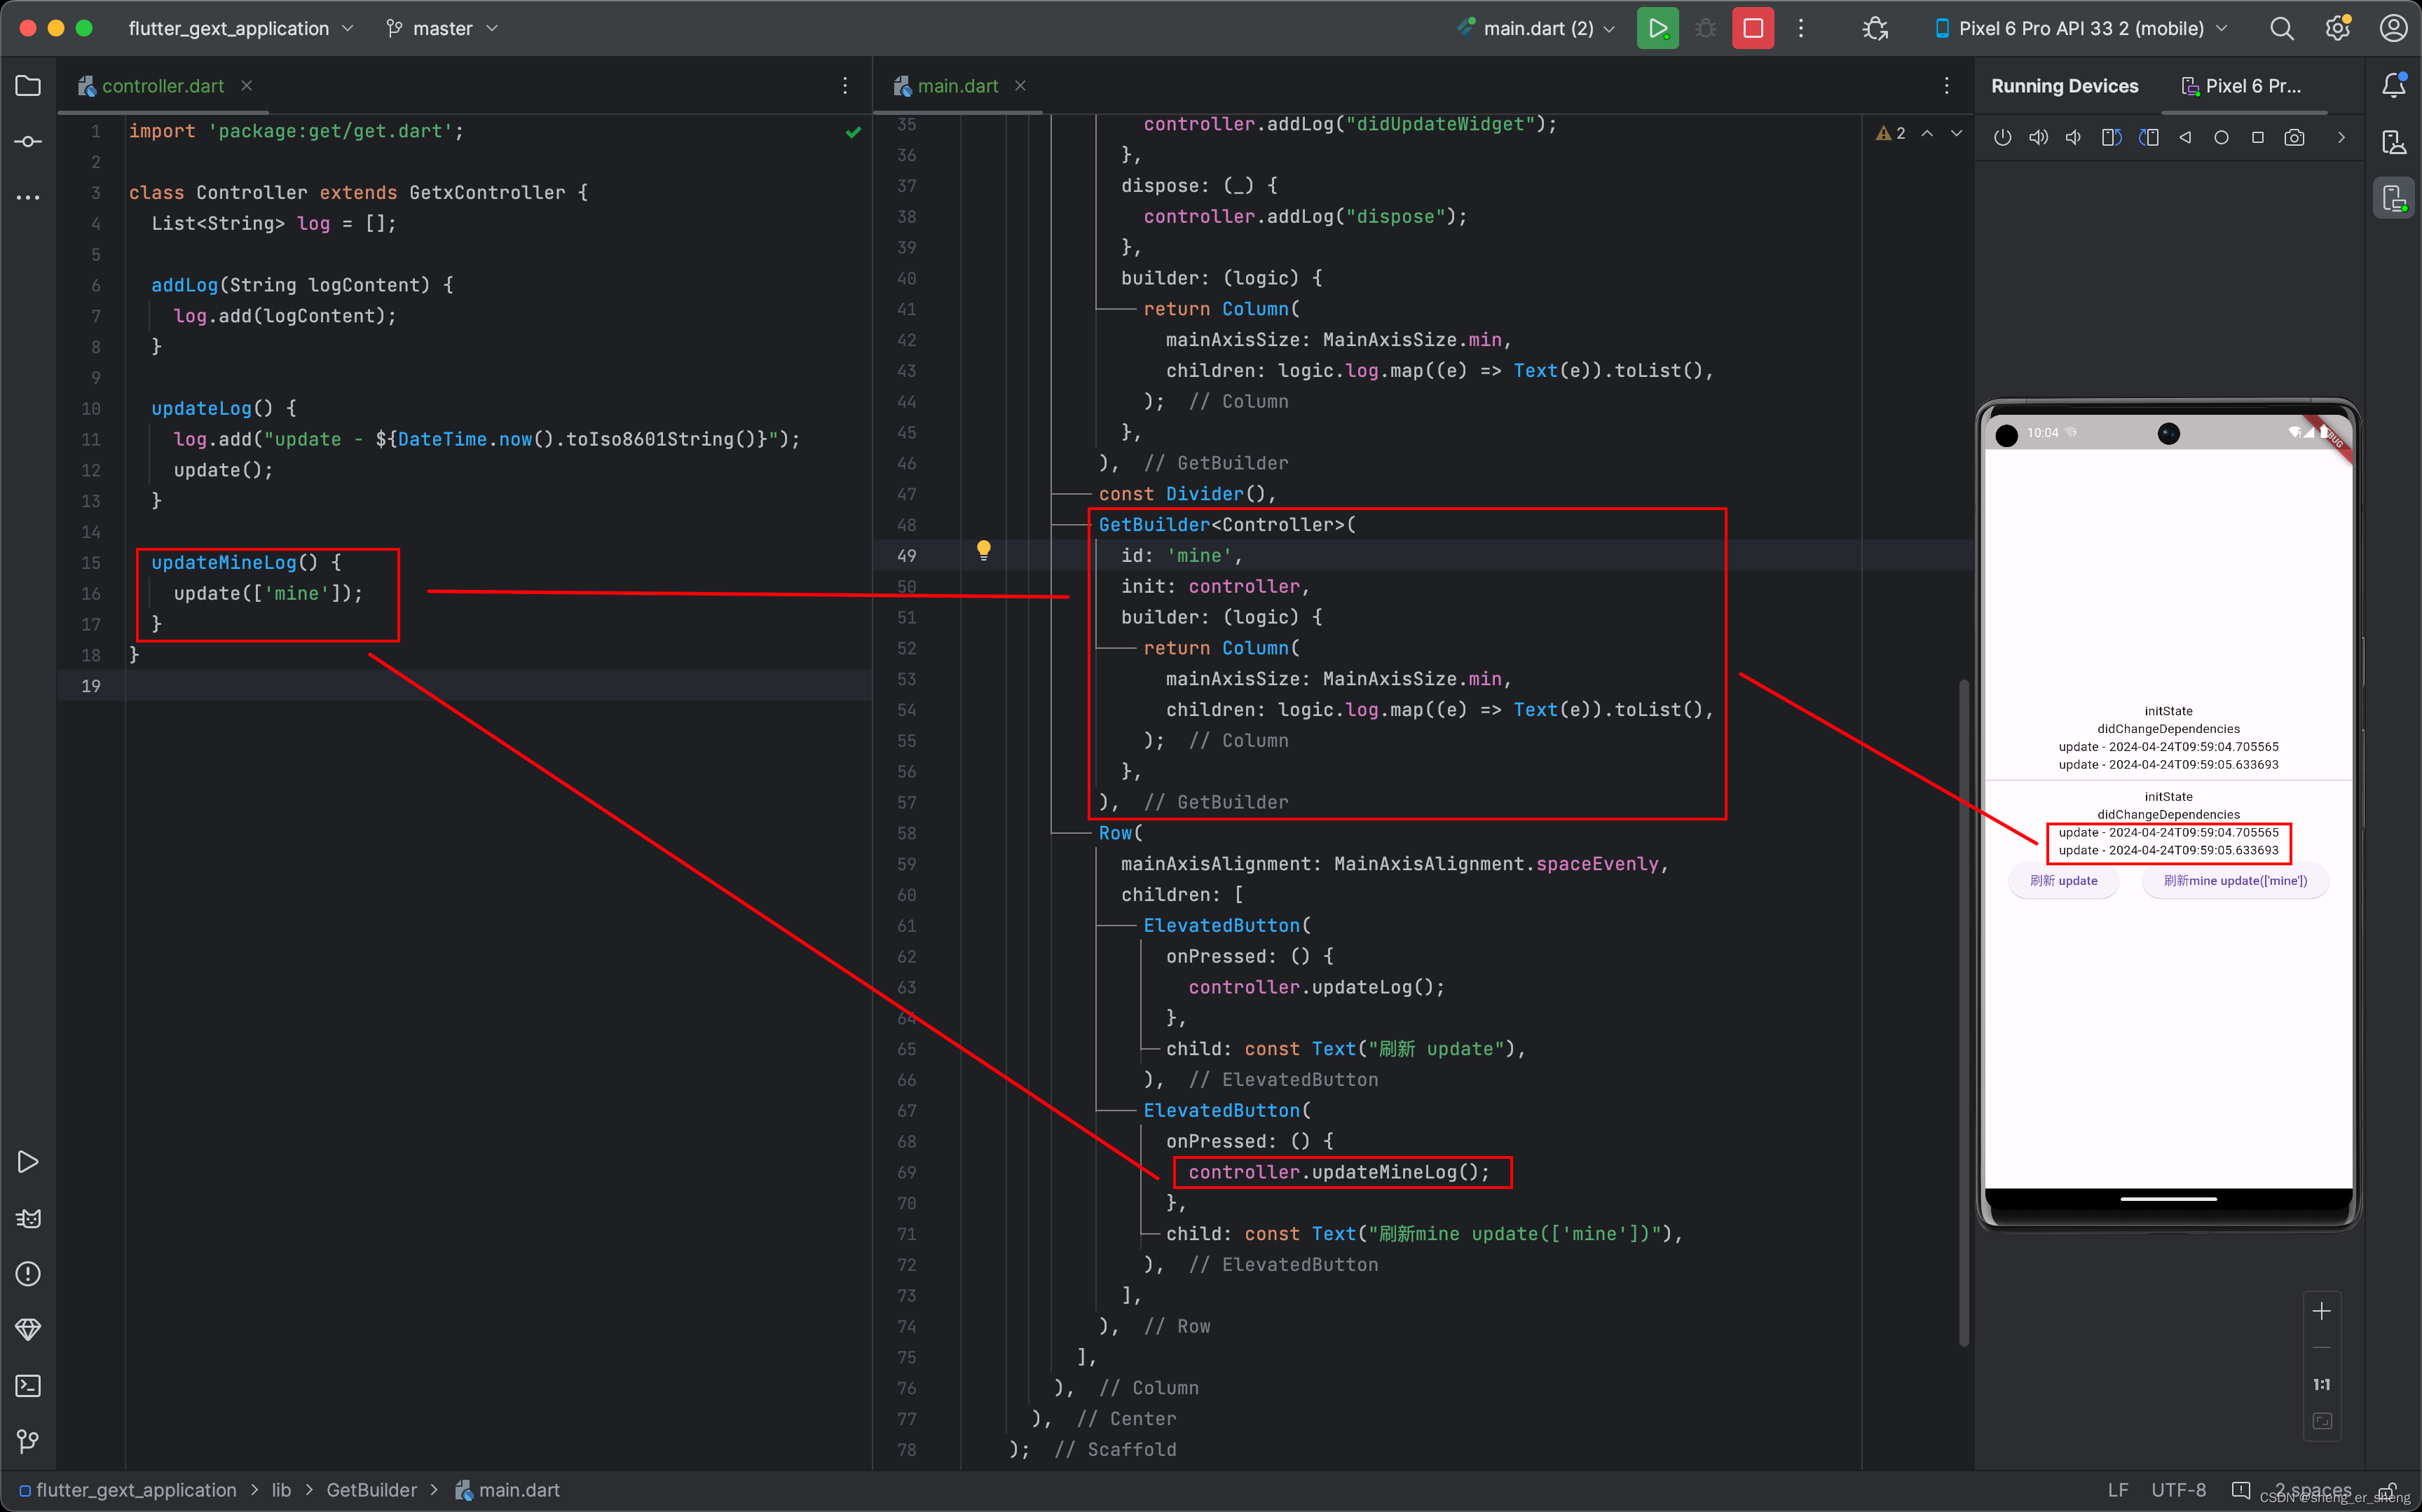
GetBuilder<Controller>(
id: 'mine',
init: controller,
builder: (logic) {
return Column(
mainAxisSize: MainAxisSize.min,
children: logic.log.map((e) => Text(e)).toList(),
);
},
),
Row(
mainAxisAlignment: MainAxisAlignment.spaceEvenly,
children: [
ElevatedButton(
onPressed: () {
controller.updateLog();
},
child: const Text("刷新 update"),
),
ElevatedButton(
onPressed: () {
controller.updateMineLog();
},
child: const Text("刷新mine update(['mine'])"),
),
],
),
],
),
),
);
}
}
import 'package:get/get.dart';

class Controller extends GetxController {
  List<String> log = [];

  addLog(String logContent) {
    log.add(logContent);
  }

  updateLog() {
    log.add("update - ${DateTime.now().toIso8601String()}");
    update();
  }

  updateMineLog() {
    update(['mine']);
  }
}
GetxController的回调函数
可以看到initState要优先于onInit,接着当界面加载出来之后,再会执行到onReady,当Get.delete掉GetxController,最后会调用到onClose。当然之后有了依赖管理和绑定后,无需去删除GetxController
所以有了这三个(onInit / onReady / onClose),就能完成大部分功能了。GetBuilder里面的回调不是必须使用
- onInit一般用于初始化数据,界面还没有出来时
- 当界面首次出来后,会回调onReady
- 当你使用了,例如流这种,需要销毁的控制器,页面关闭后,都要在onClose中销毁
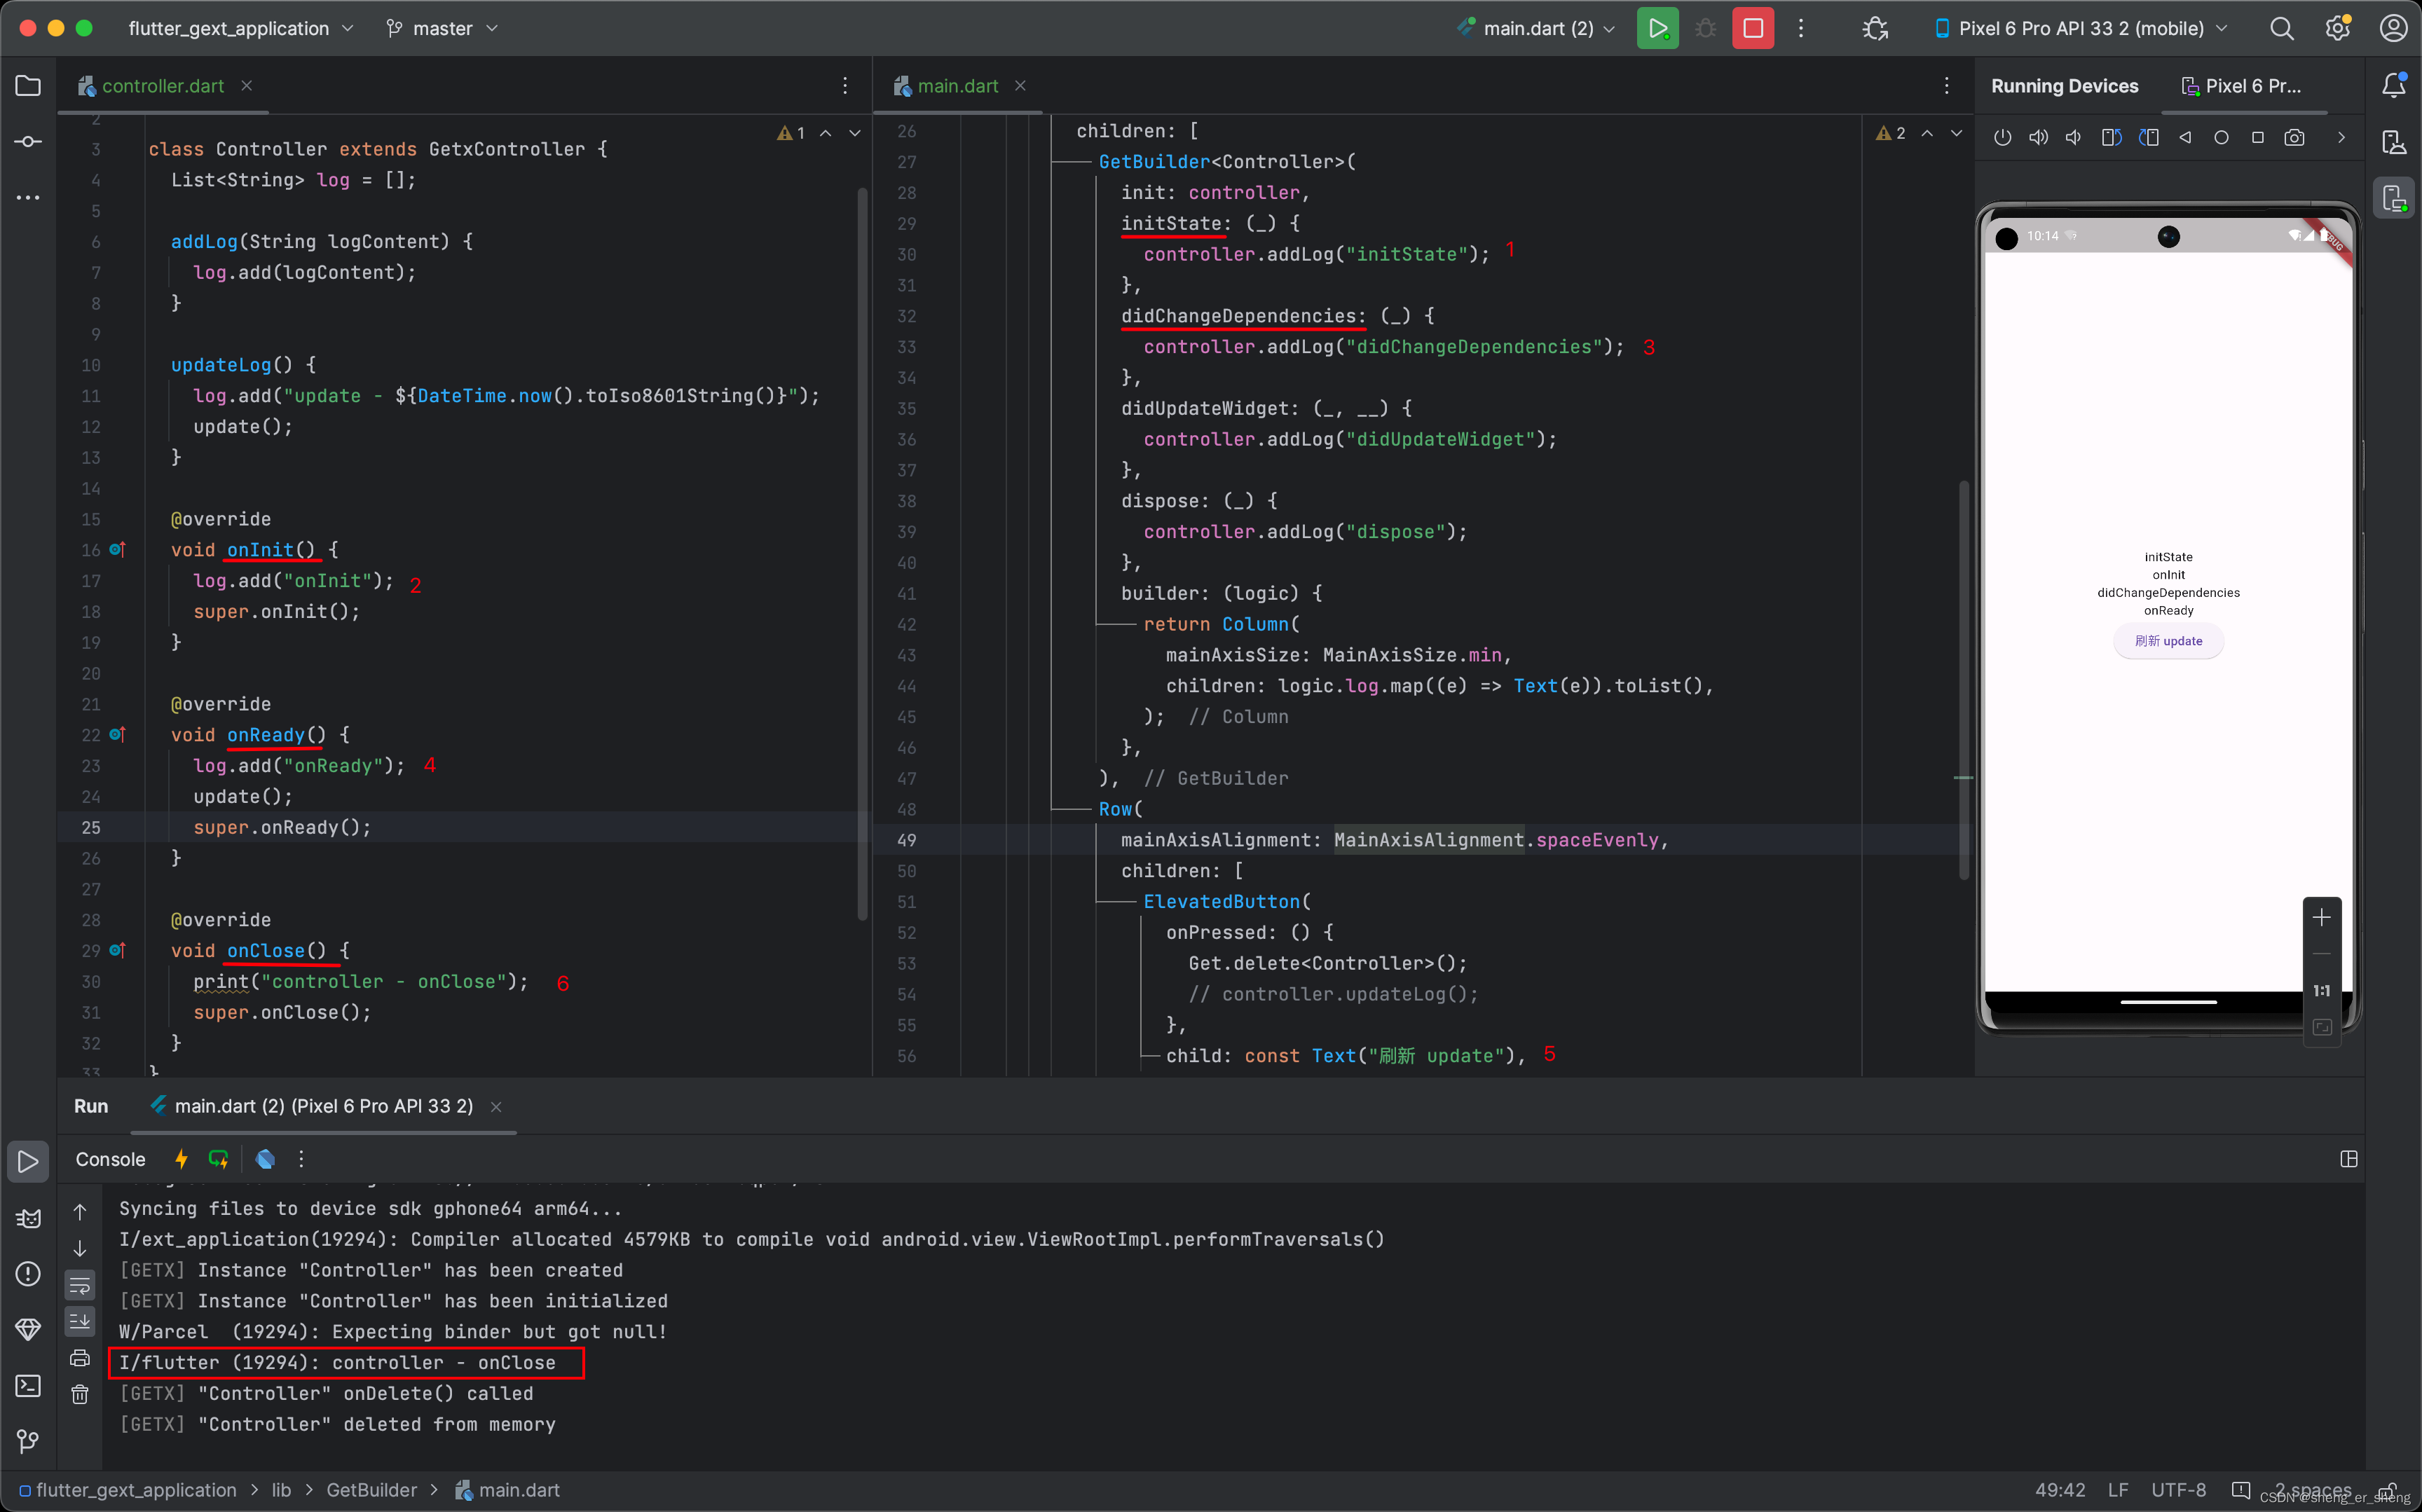
import 'package:get/get.dart';
class Controller extends GetxController {
List<String> log = [];
addLog(String logContent) {
log.add(logContent);
}
updateLog() {
log.add("update - ${DateTime.now().toIso8601String()}");
update();
}
void onInit() {
log.add("onInit");
super.onInit();
}
void onReady() {
log.add("onReady");
update();
super.onReady();
}
void onClose() {
print("controller - onClose");
super.onClose();
}
}
import 'package:flutter/material.dart';
import 'package:get/get_state_manager/src/simple/get_state.dart';
import 'package:get/instance_manager.dart';
import 'controller.dart';
void main() {
runApp(App());
}
class App extends StatelessWidget {
Widget build(BuildContext context) {
return MaterialApp(home: Main());
}
}
class Main extends StatelessWidget {
final controller = Controller();
Widget build(BuildContext context) {
return Scaffold(
body: Center(
child: Column(
mainAxisSize: MainAxisSize.min,
children: [
GetBuilder<Controller>(
init: controller,
initState: (_) {
controller.addLog("initState");
},
didChangeDependencies: (_) {
controller.addLog("didChangeDependencies");
},
didUpdateWidget: (_, __) {
controller.addLog("didUpdateWidget");
},
dispose: (_) {
controller.addLog("dispose");
},
builder: (logic) {
return Column(
mainAxisSize: MainAxisSize.min,
children: logic.log.map((e) => Text(e)).toList(),
);
},
),
Row(
mainAxisAlignment: MainAxisAlignment.spaceEvenly,
children: [
ElevatedButton(
onPressed: () {
Get.delete<Controller>();
// controller.updateLog();
},
child: const Text("刷新 update"),
),
],
),
],
),
),
);
}
}
GetxController的爹 - SuperController
能监听到更多的事件。例如我将应用切到后台,再切回来,可以监听到,我可以做刷新界面数据的操作
又比如:我切换到后台,就停止监听机器的数据,节约流量。停止视频服务等
总之就是功能多一些,这样
- onDetached
- onHidden
- onInactive
- onPaused
- onResumed
import 'package:get/get.dart';
class Controller extends SuperController {
List<String> log = [];
addLog(String logContent) {
log.add(logContent);
}
updateLog() {
log.add("update - ${DateTime.now().toIso8601String()}");
update();
}
void onInit() {
log.add("onInit");
super.onInit();
}
void onReady() {
log.add("onReady");
update();
super.onReady();
}
void onClose() {
print("controller - onClose");
super.onClose();
}
void onDetached() {
// TODO: implement onDetached
}
void onHidden() {
// TODO: implement onHidden
}
void onInactive() {
// TODO: implement onInactive
}
void onPaused() {
// TODO: implement onPaused
}
void onResumed() {
// TODO: implement onResumed
}
}
依赖管理
Get.put
之前有用到GetsController,那么配合它,可以使用注册依赖,来达到多页面使用
回到之前的案例
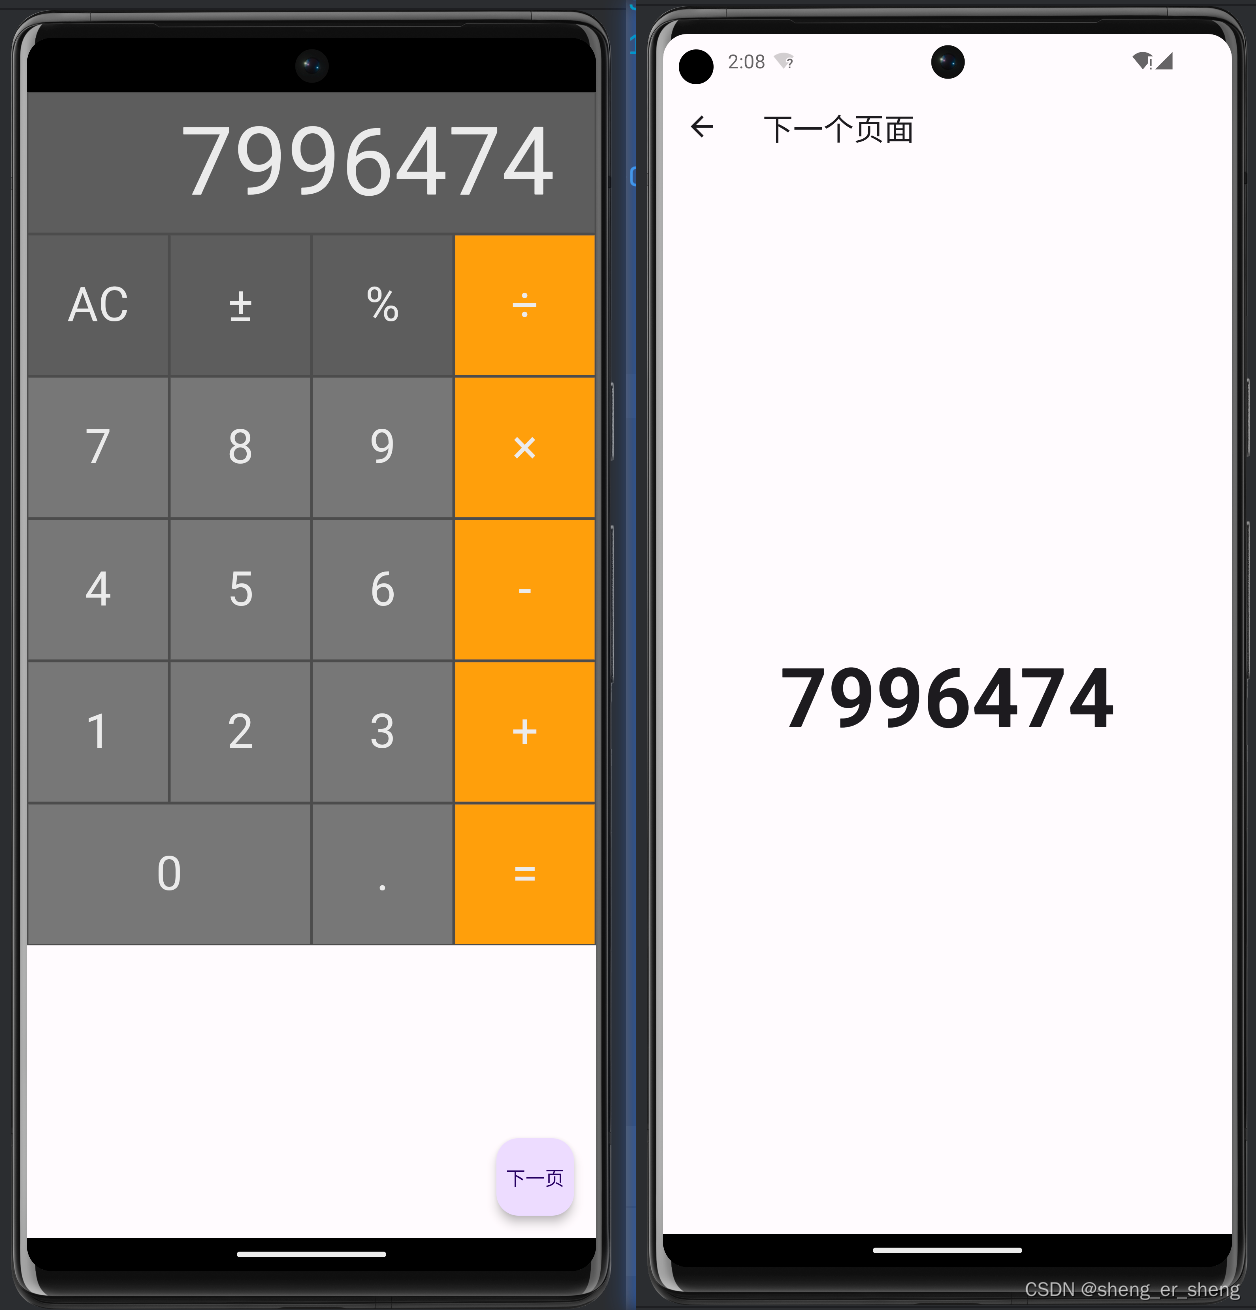
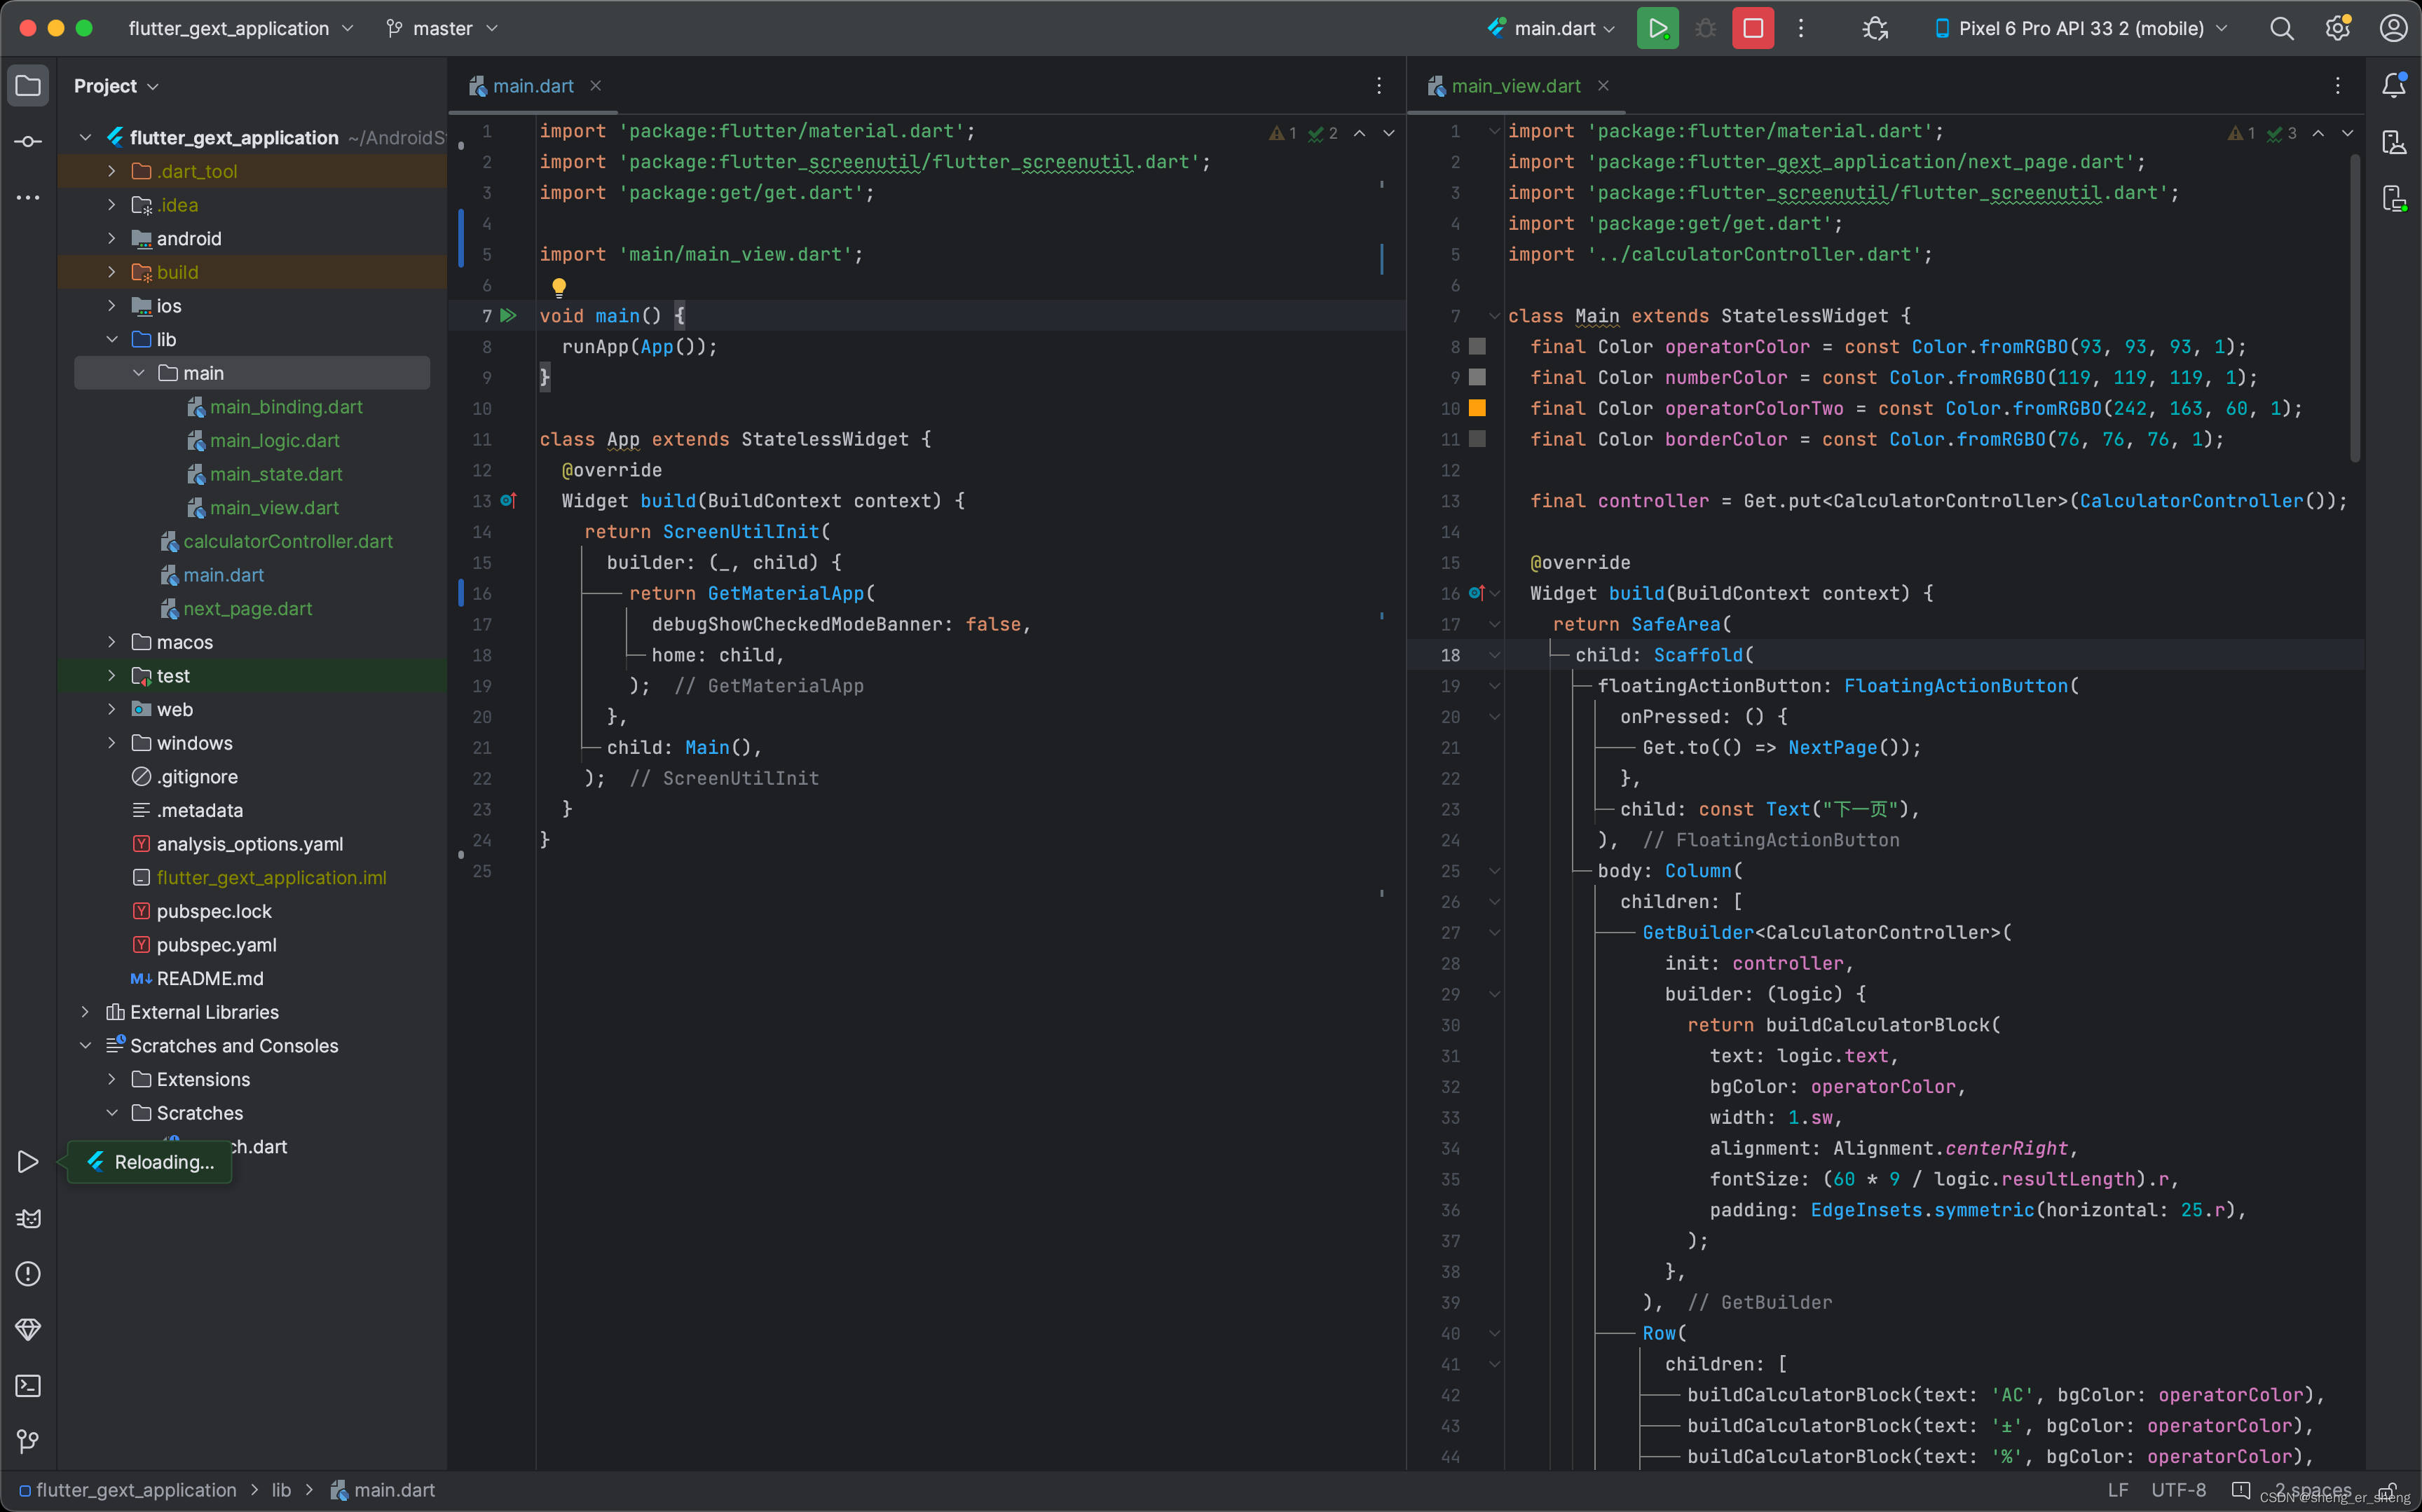
我们构建了一个计算器。现在跳转到下一个界面,并获取输入的数据
实现的效果
改写用Get.put
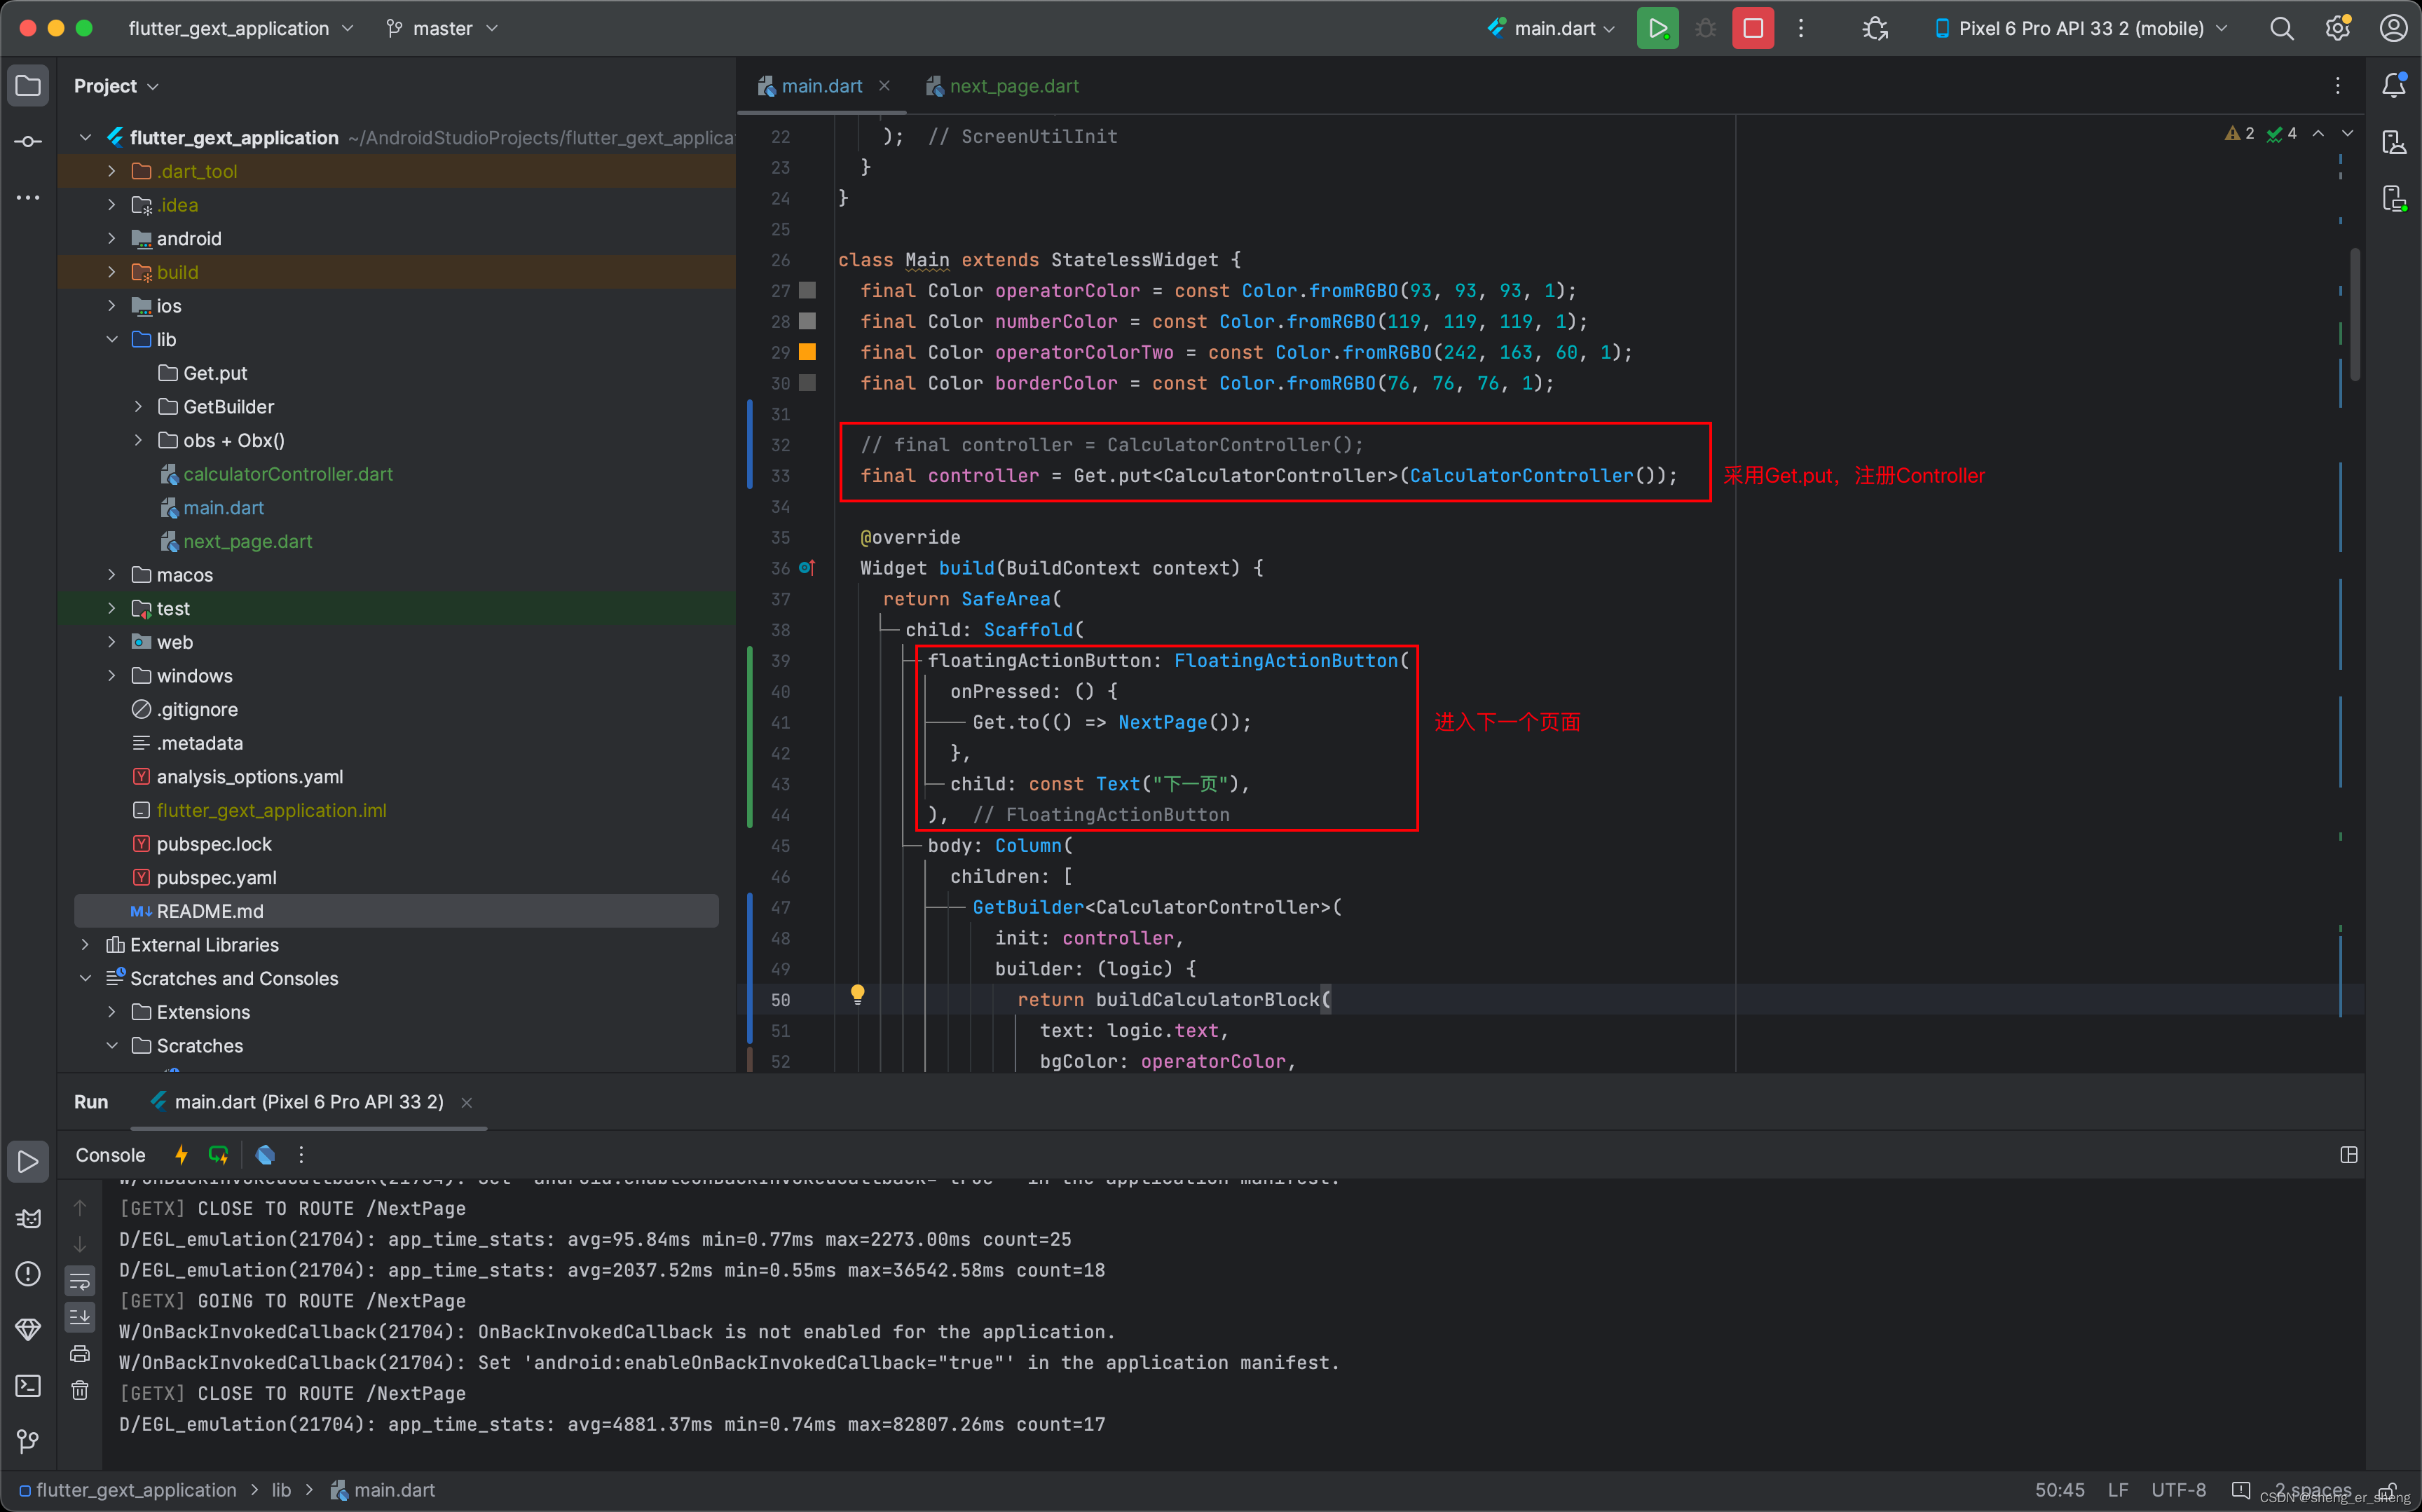
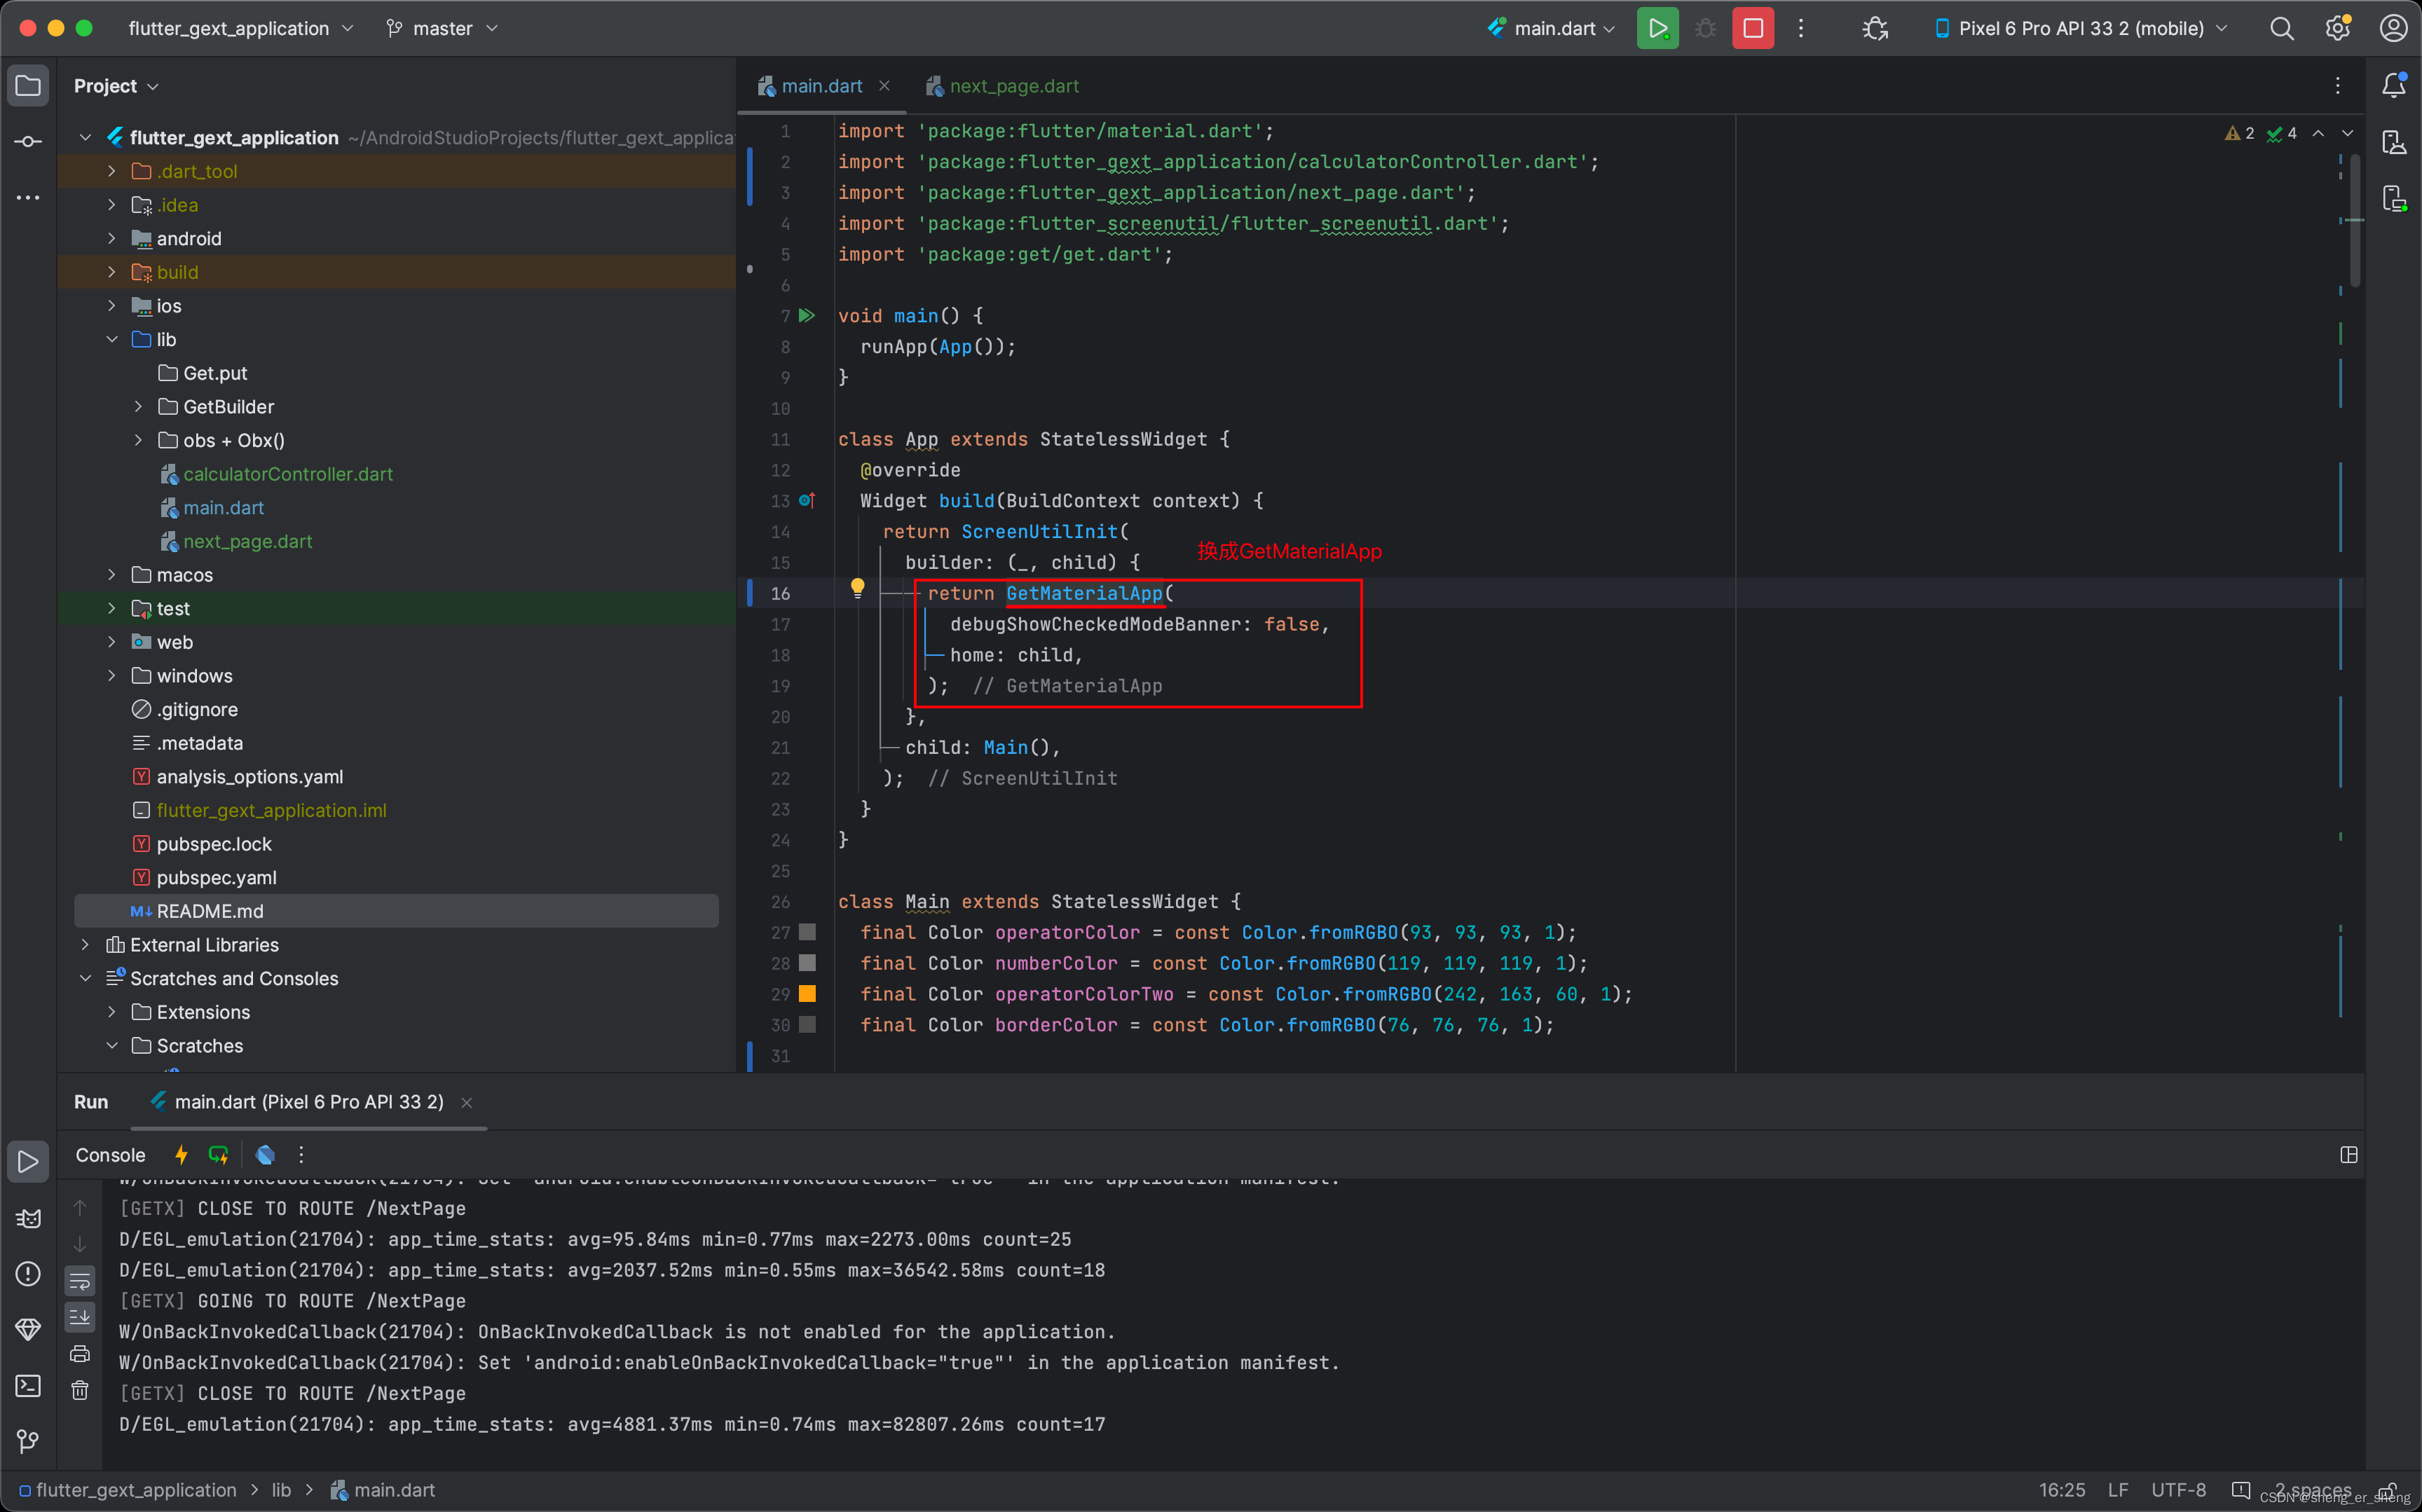
页面跳转需要Get.to,而使用路由相关功能,需要使用GetMaterialApp
final controller = Get.put<CalculatorController>(CalculatorController());
floatingActionButton: FloatingActionButton(
          onPressed: () {
            Get.to(() => NextPage());
          },
          child: const Text("下一页"),
        ),
而在另一个界面中,需要通过Get.find来找到之前注册的Controller
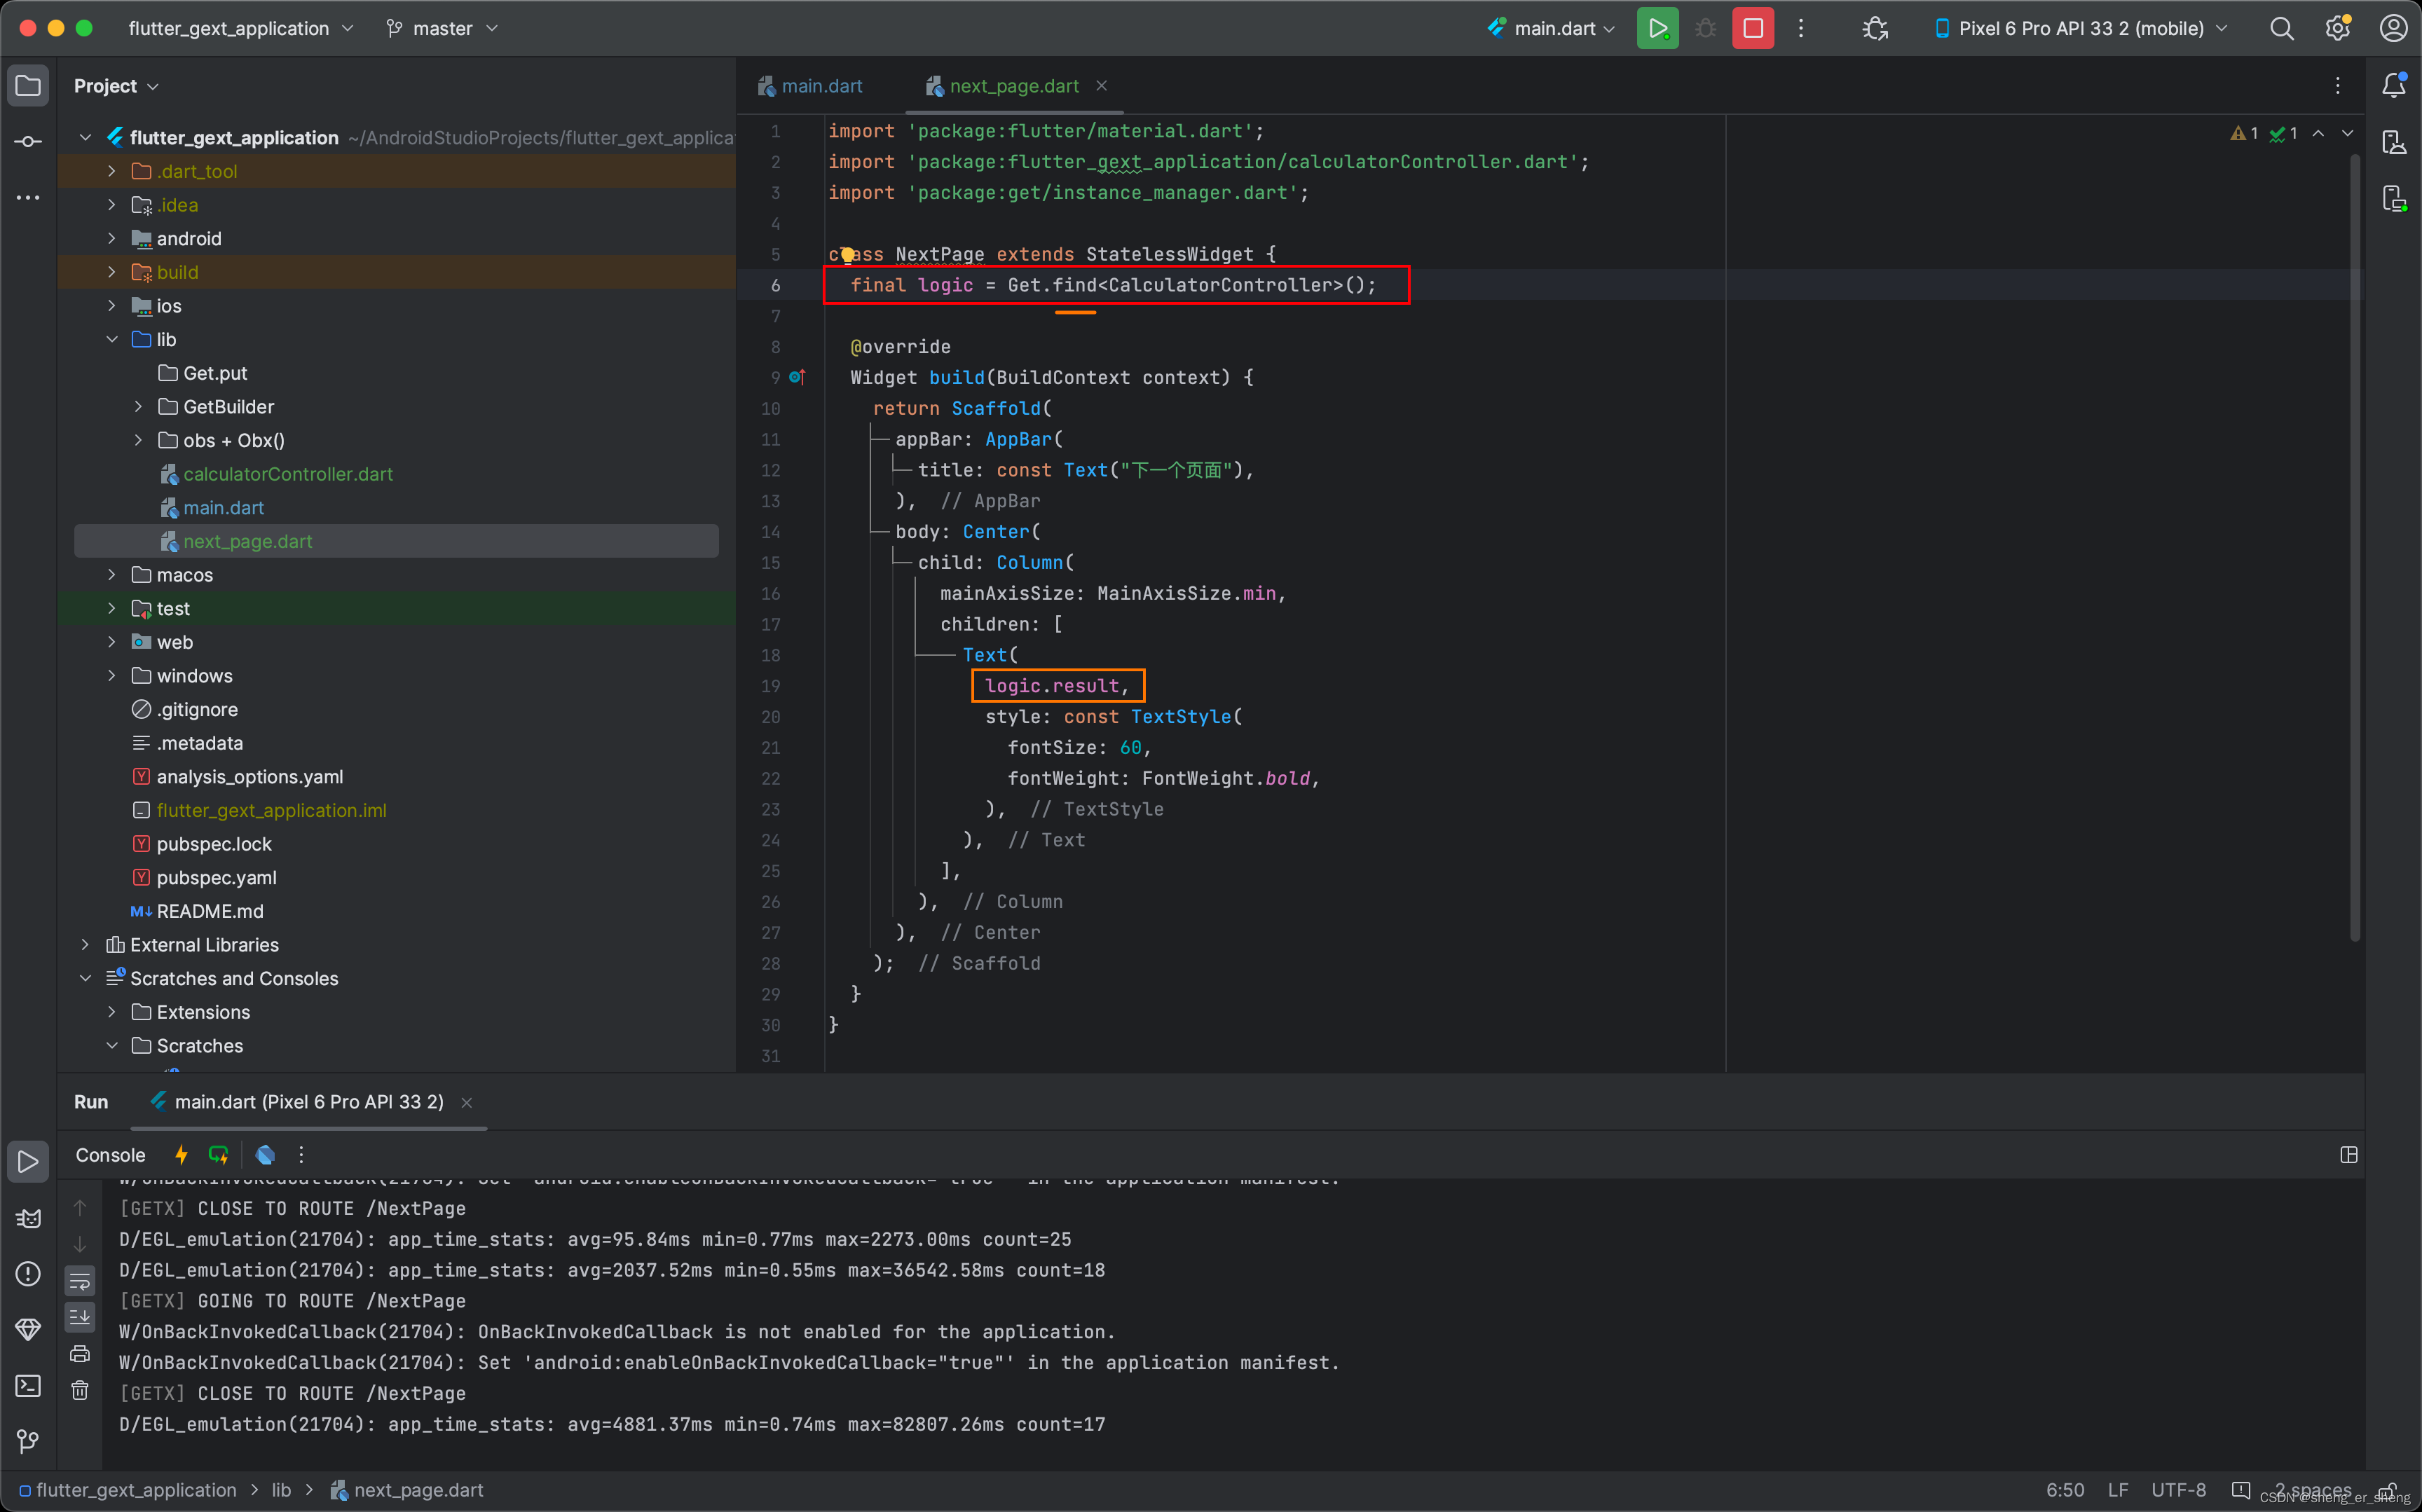
最终,取到了Controller里面的数值
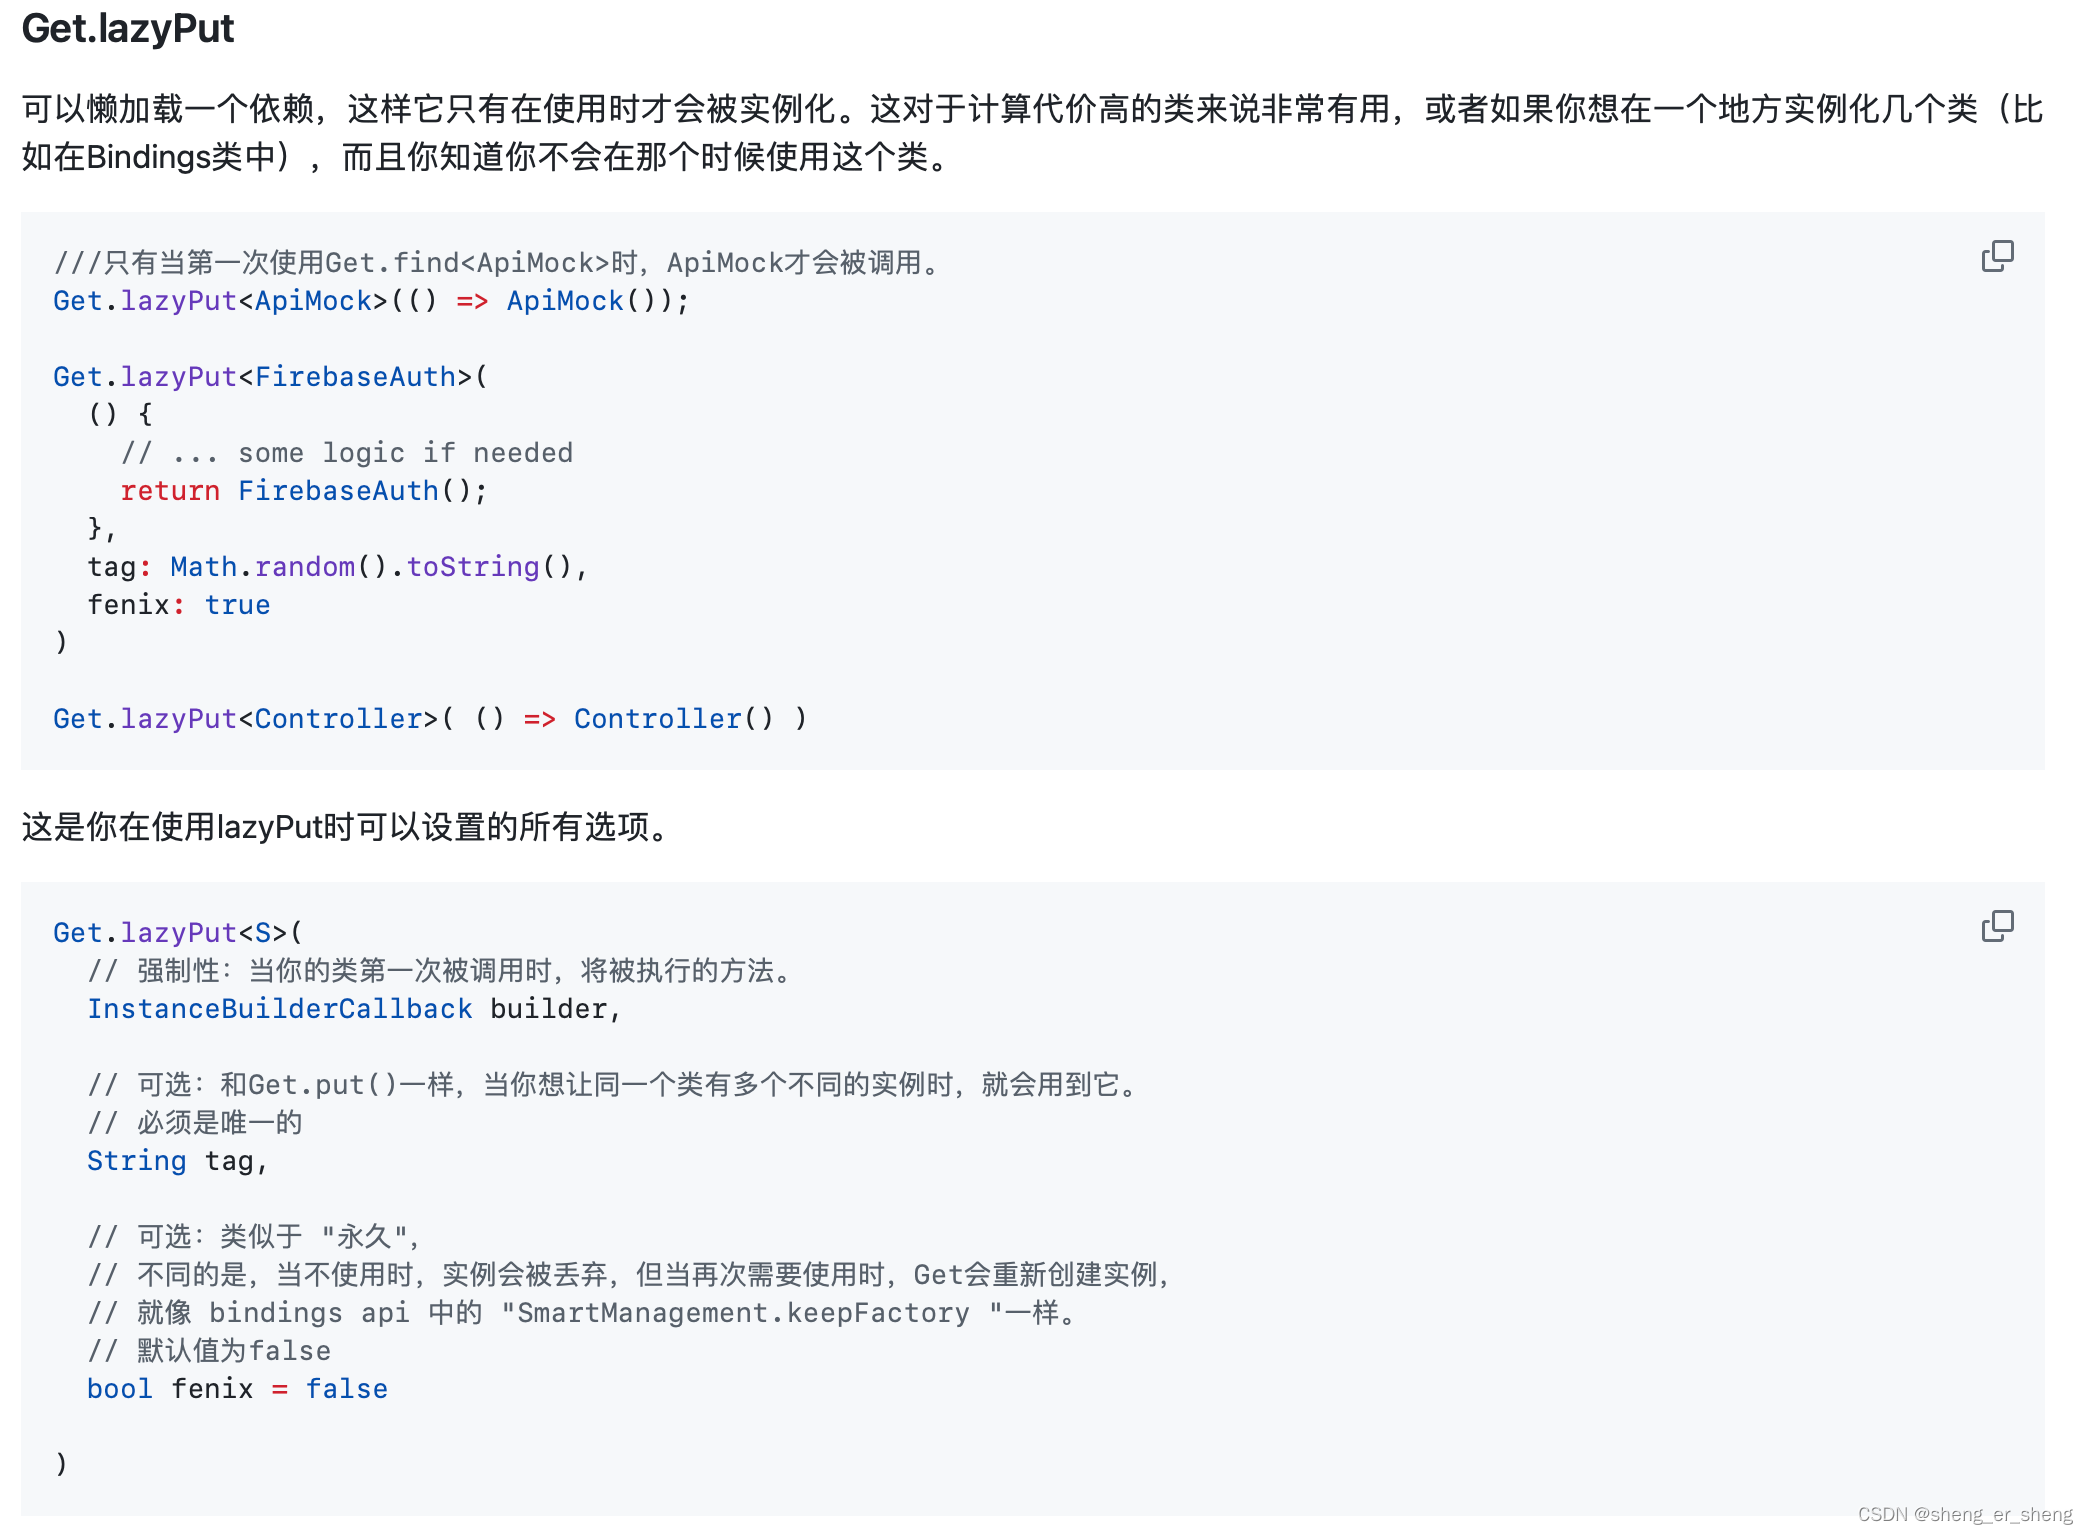
继续改造(Get.lazyput & Bindings)
现在写下来,代码很乱,所以整理一下
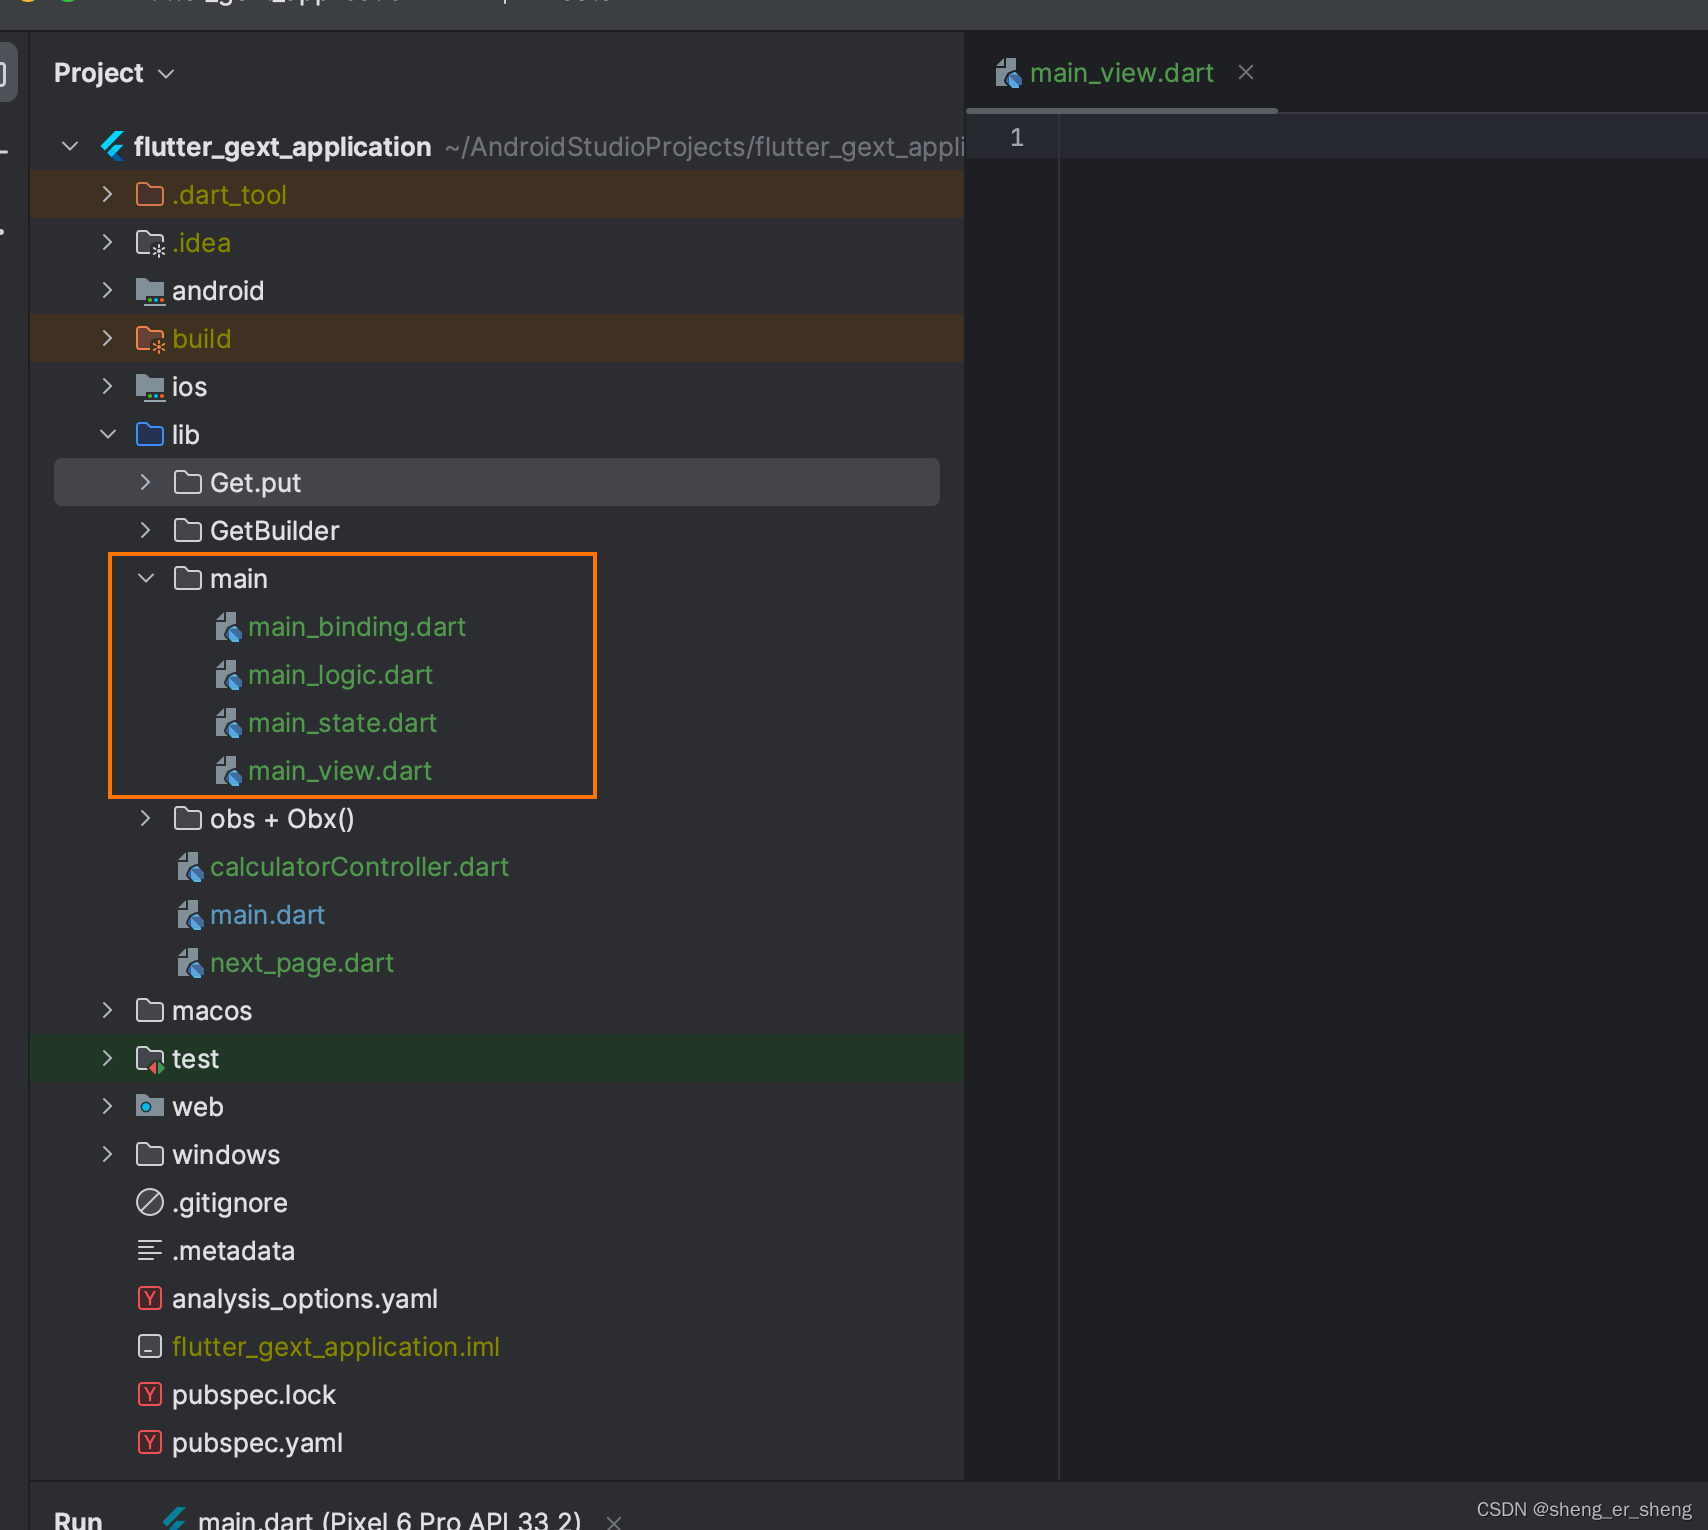
新建一个文件夹,里面放上四个空文件(之后会采用插件生成代码,现在先写一遍)
- main-binding.dart 绑定层,用于注册Controller
- main_logic.dart 逻辑层,就是之前的GetxController,只写逻辑
- main_state.dart 状态层,是存放你的变量的地方,以及初始化你的变量
- main_view.dart 界面层,只写界面,不写任何逻辑
将main.dart中的所有代码都转移到main_view.dart
接着移动controller到绑定层,并改写为Get.lazyput。
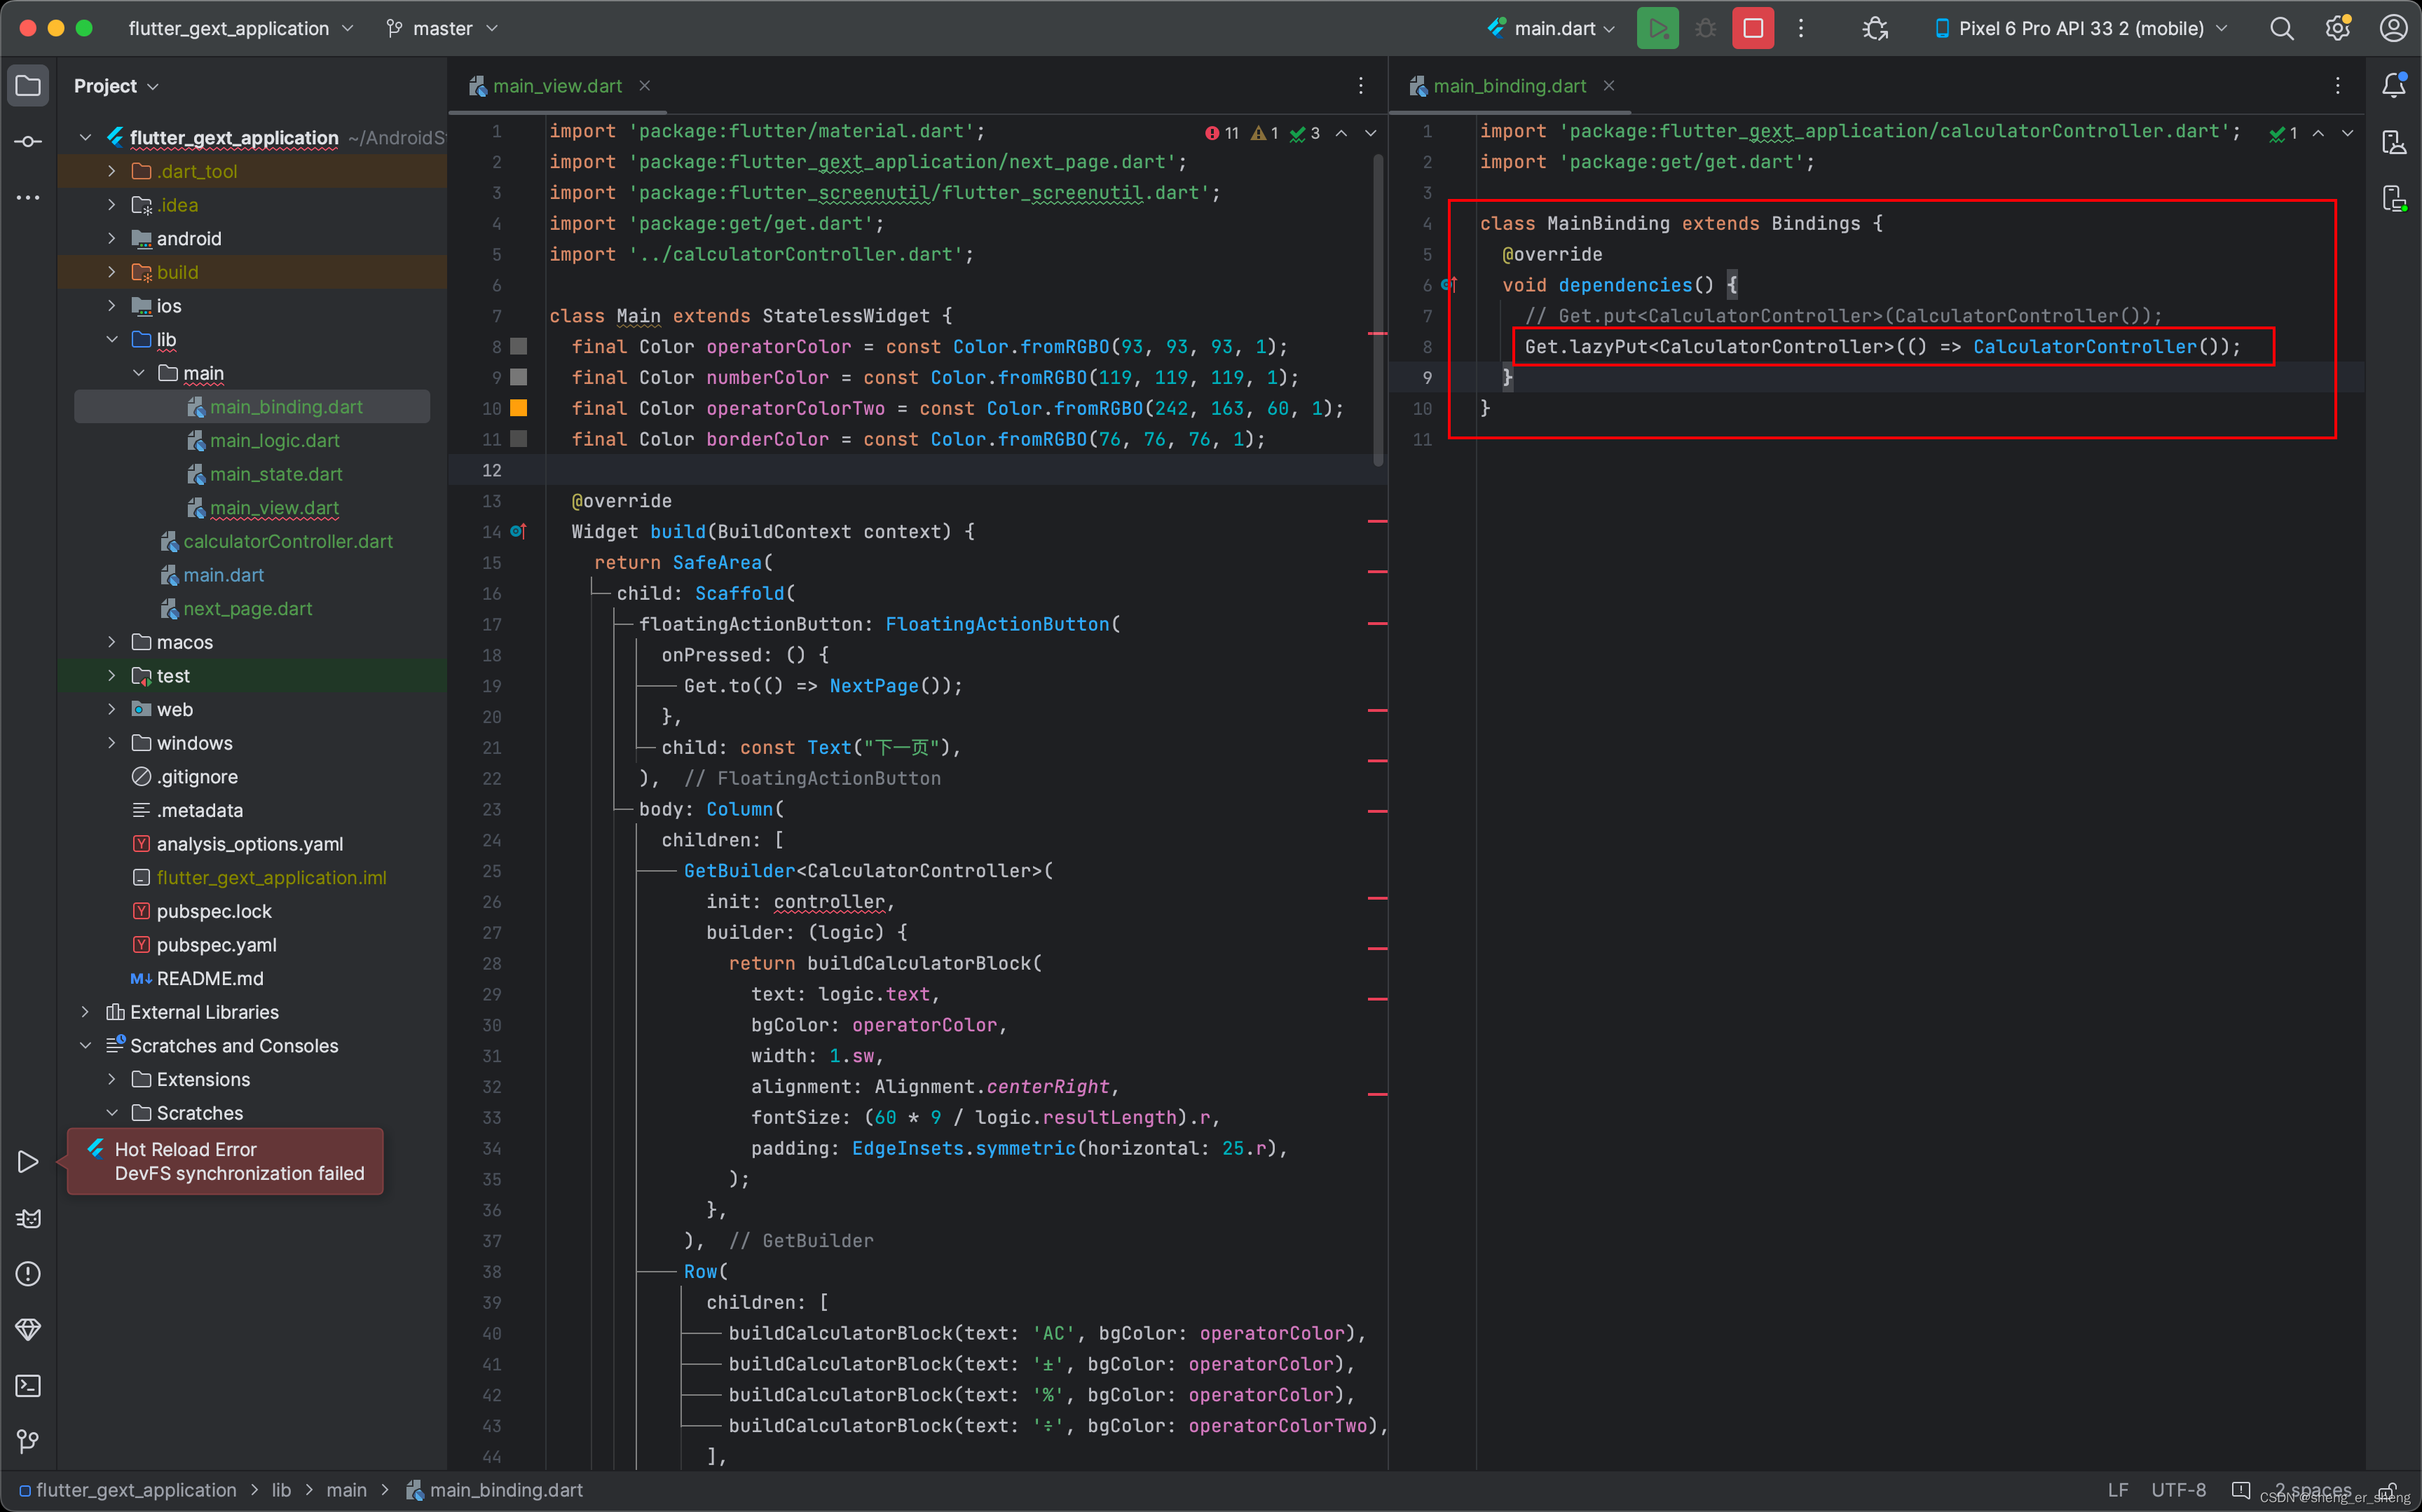
Get.lazyPut<CalculatorController>(() => CalculatorController());
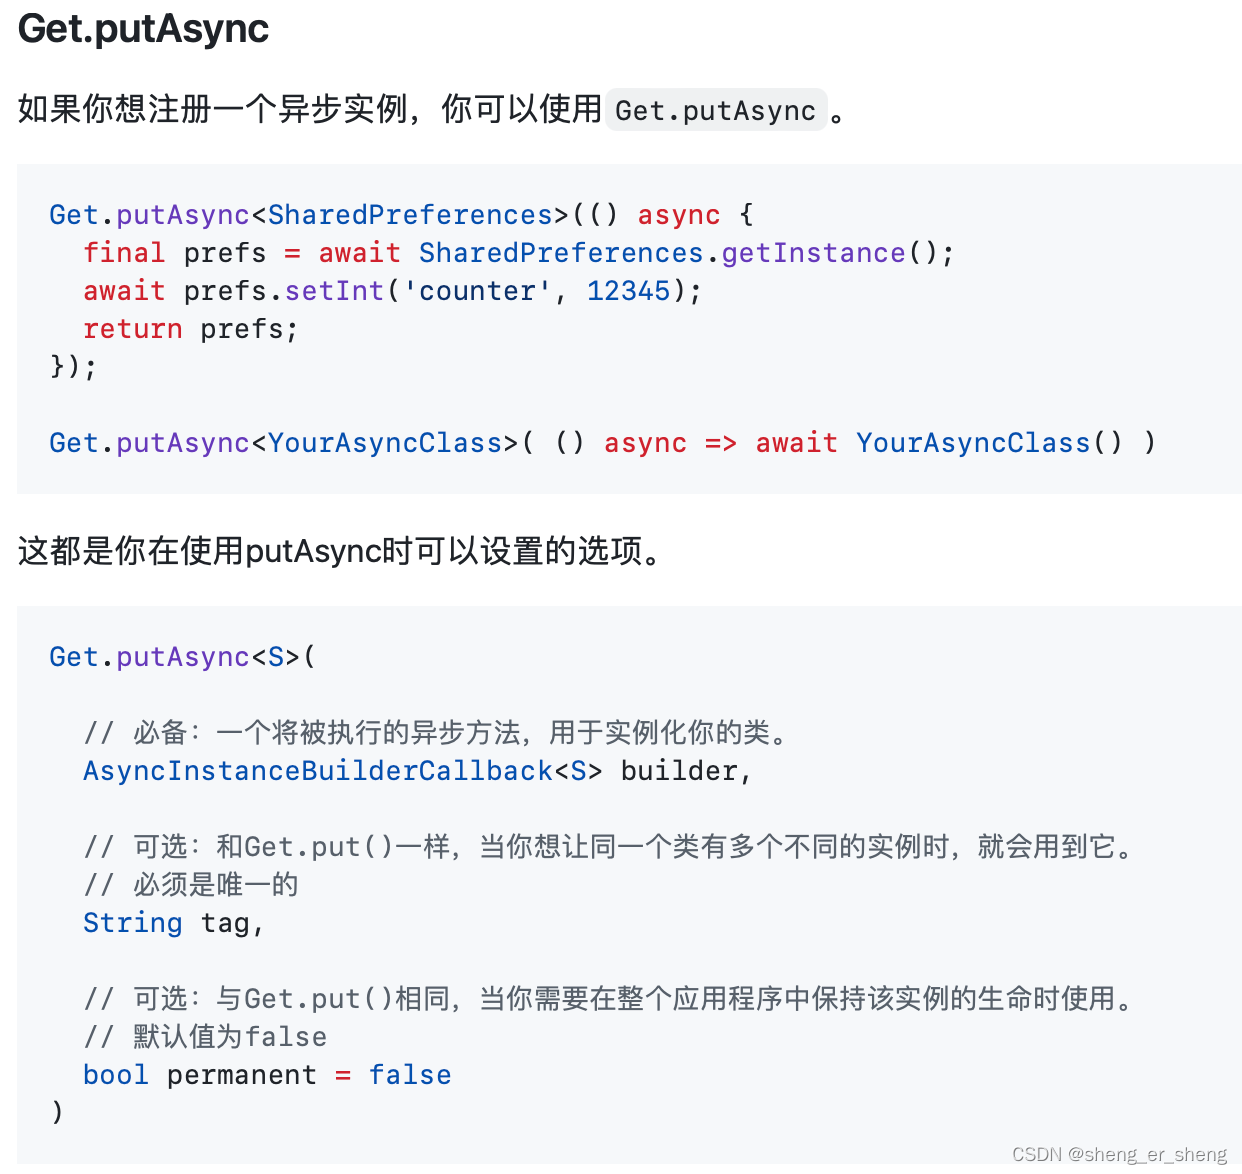
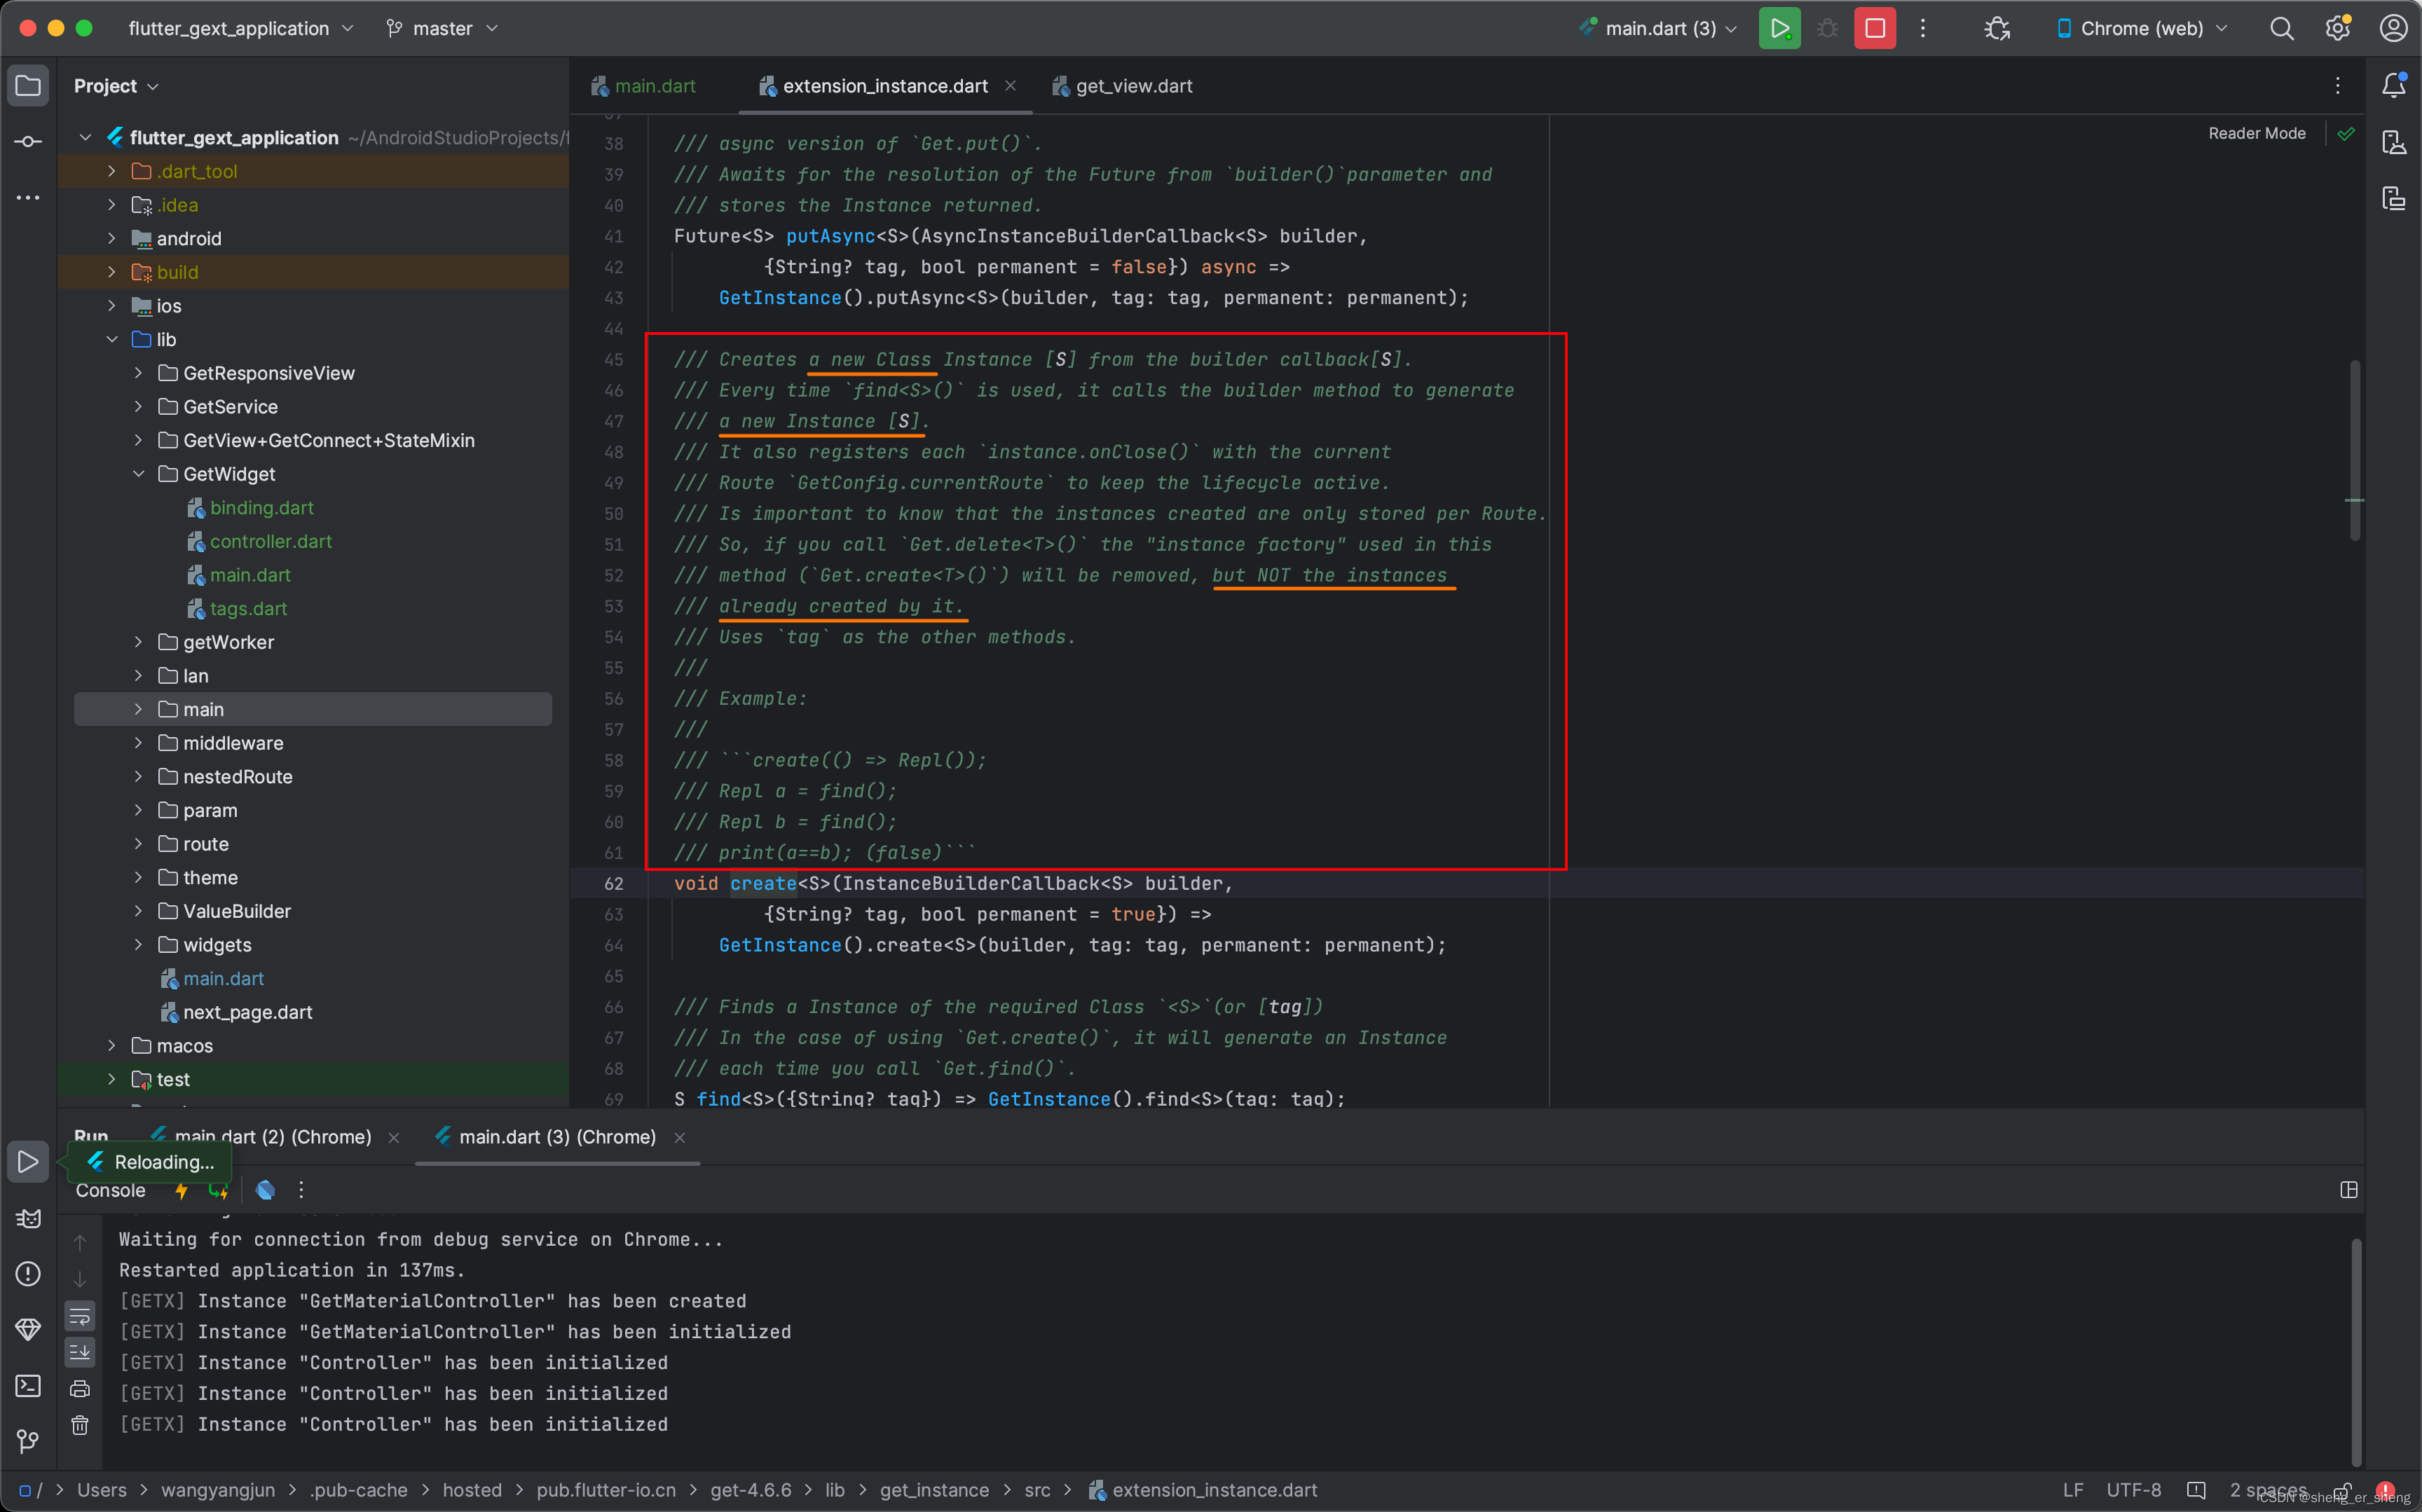
Get.put / Get.lazyPut / Get.putAsync
- Get.put 就是普通的注册依赖的方式
- Get.lazyPut 是懒注册依赖,当有用到时,它就加载这个依赖
- Get.putAsync 是异步注册
Get.find
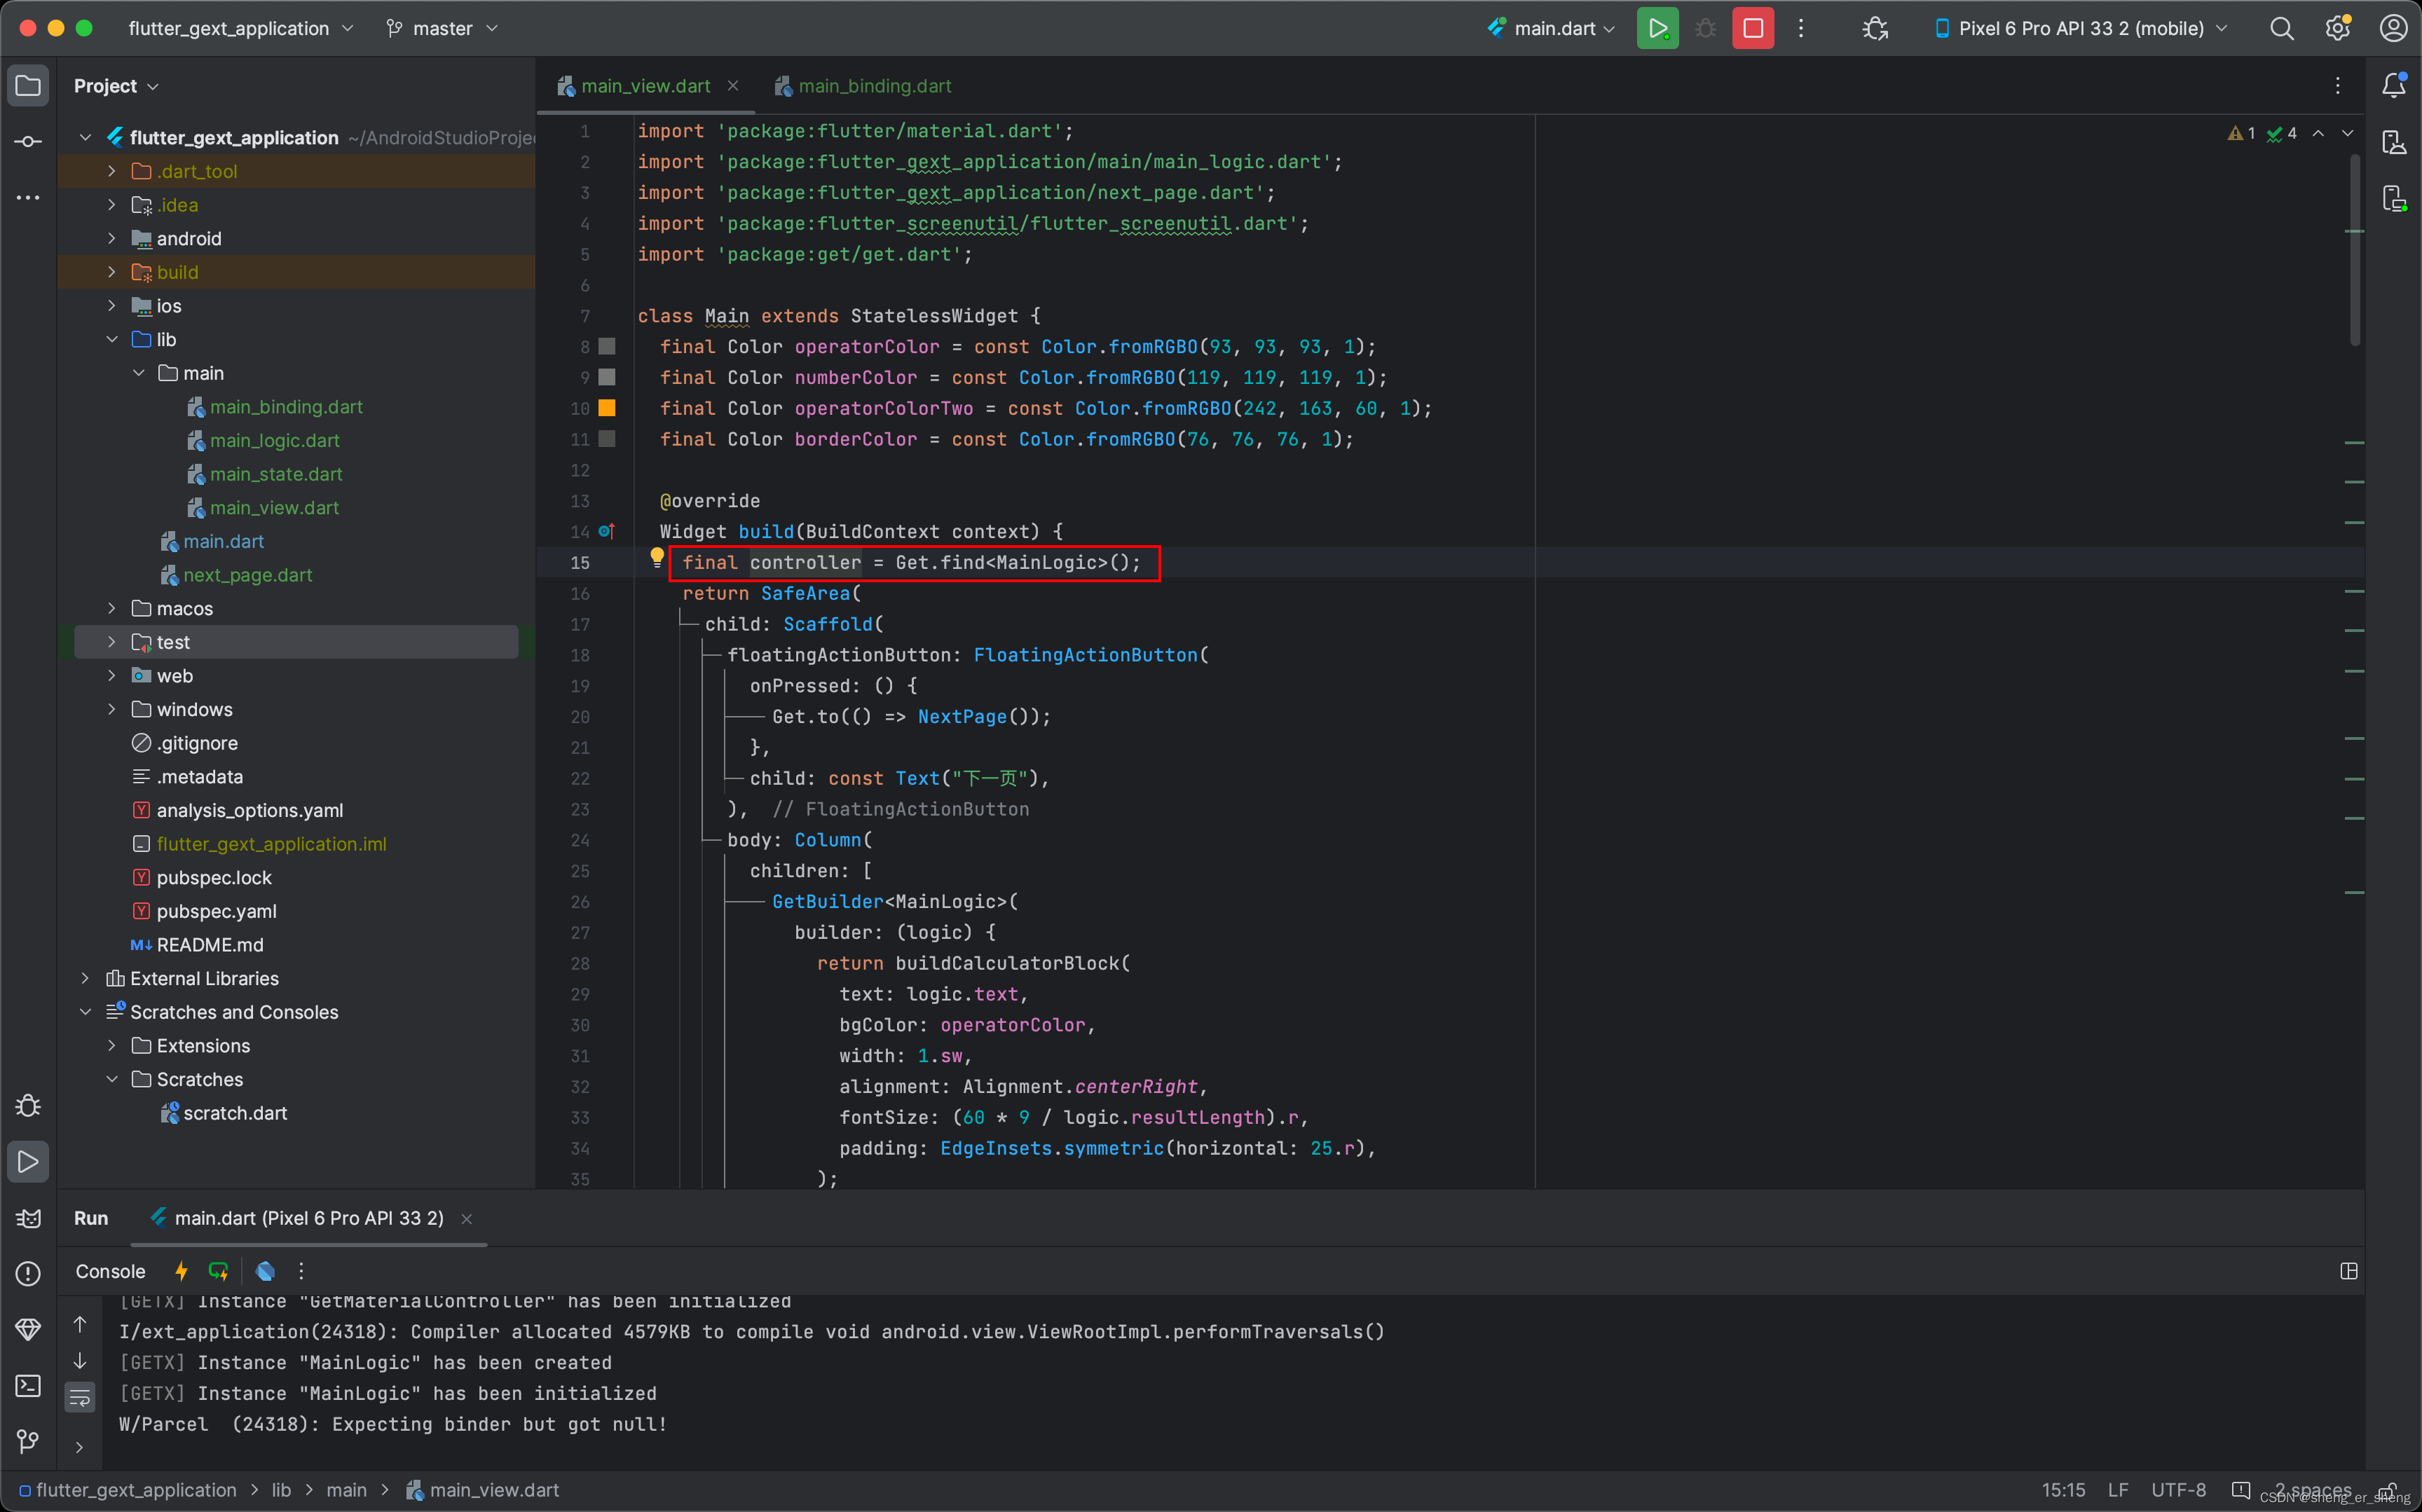
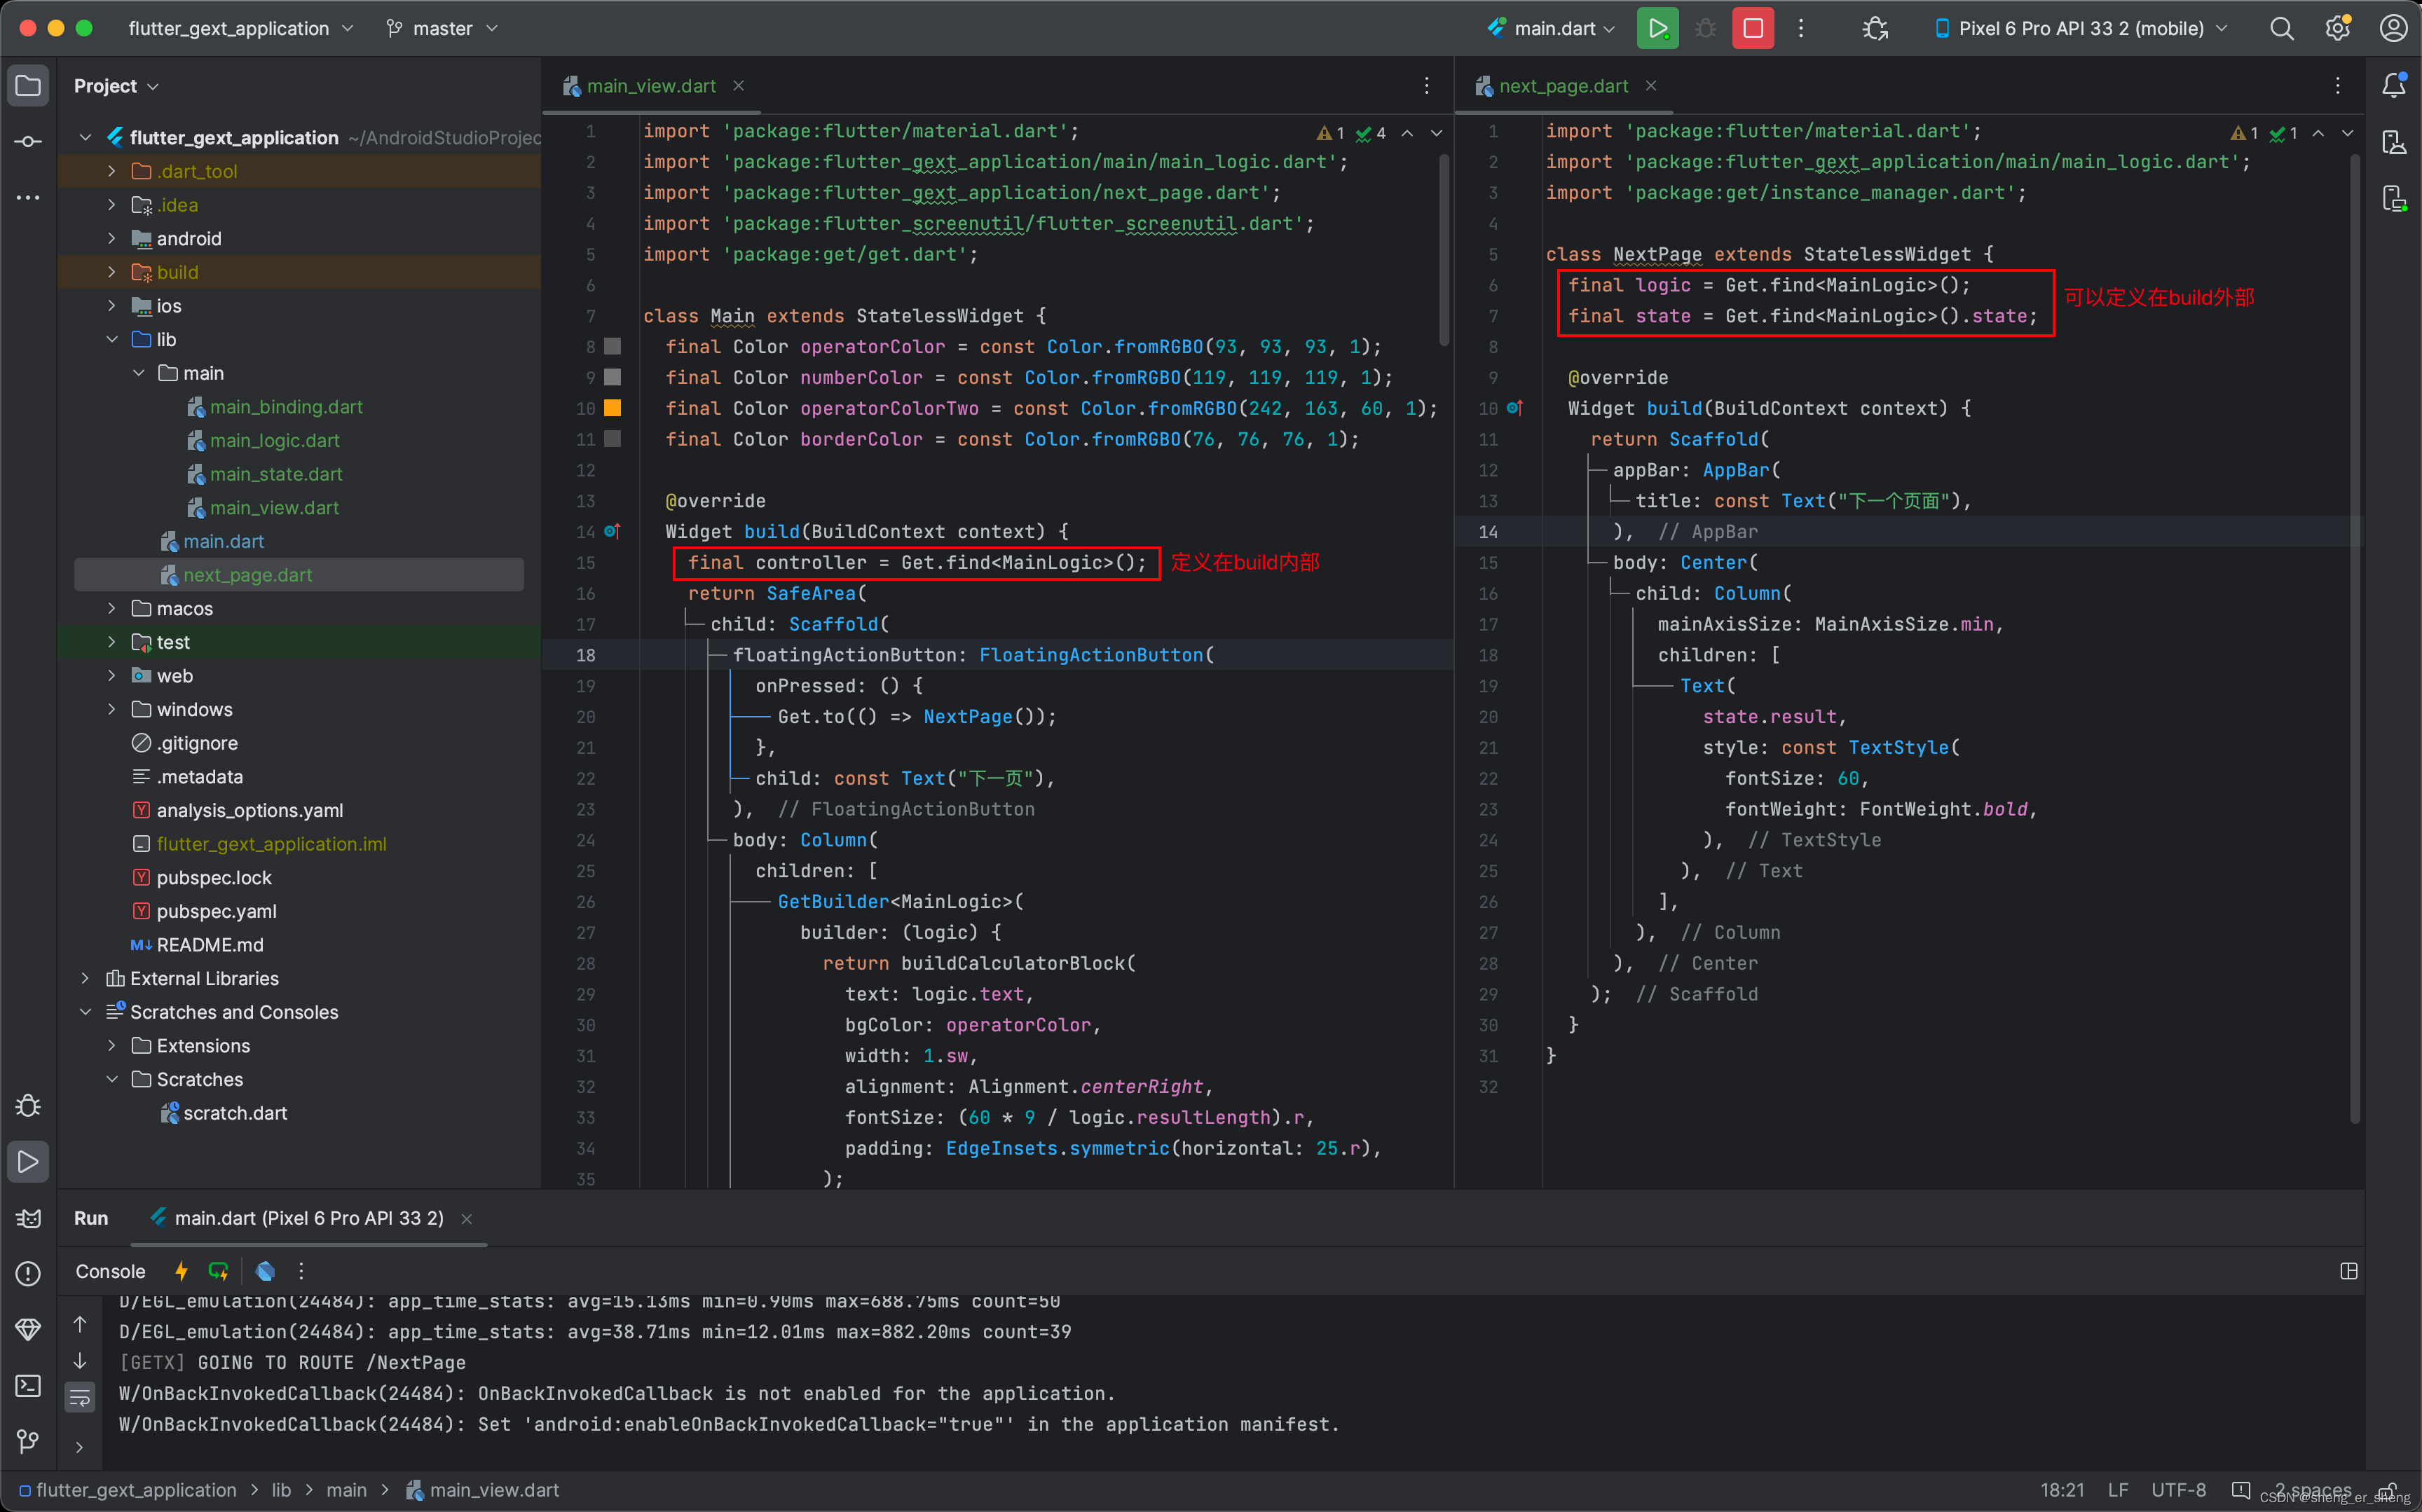
继续改造,通过Get.find,并传入你定义的Controller泛型,就可以得到一个对象。这样就不会报错了
注意要定义在build内
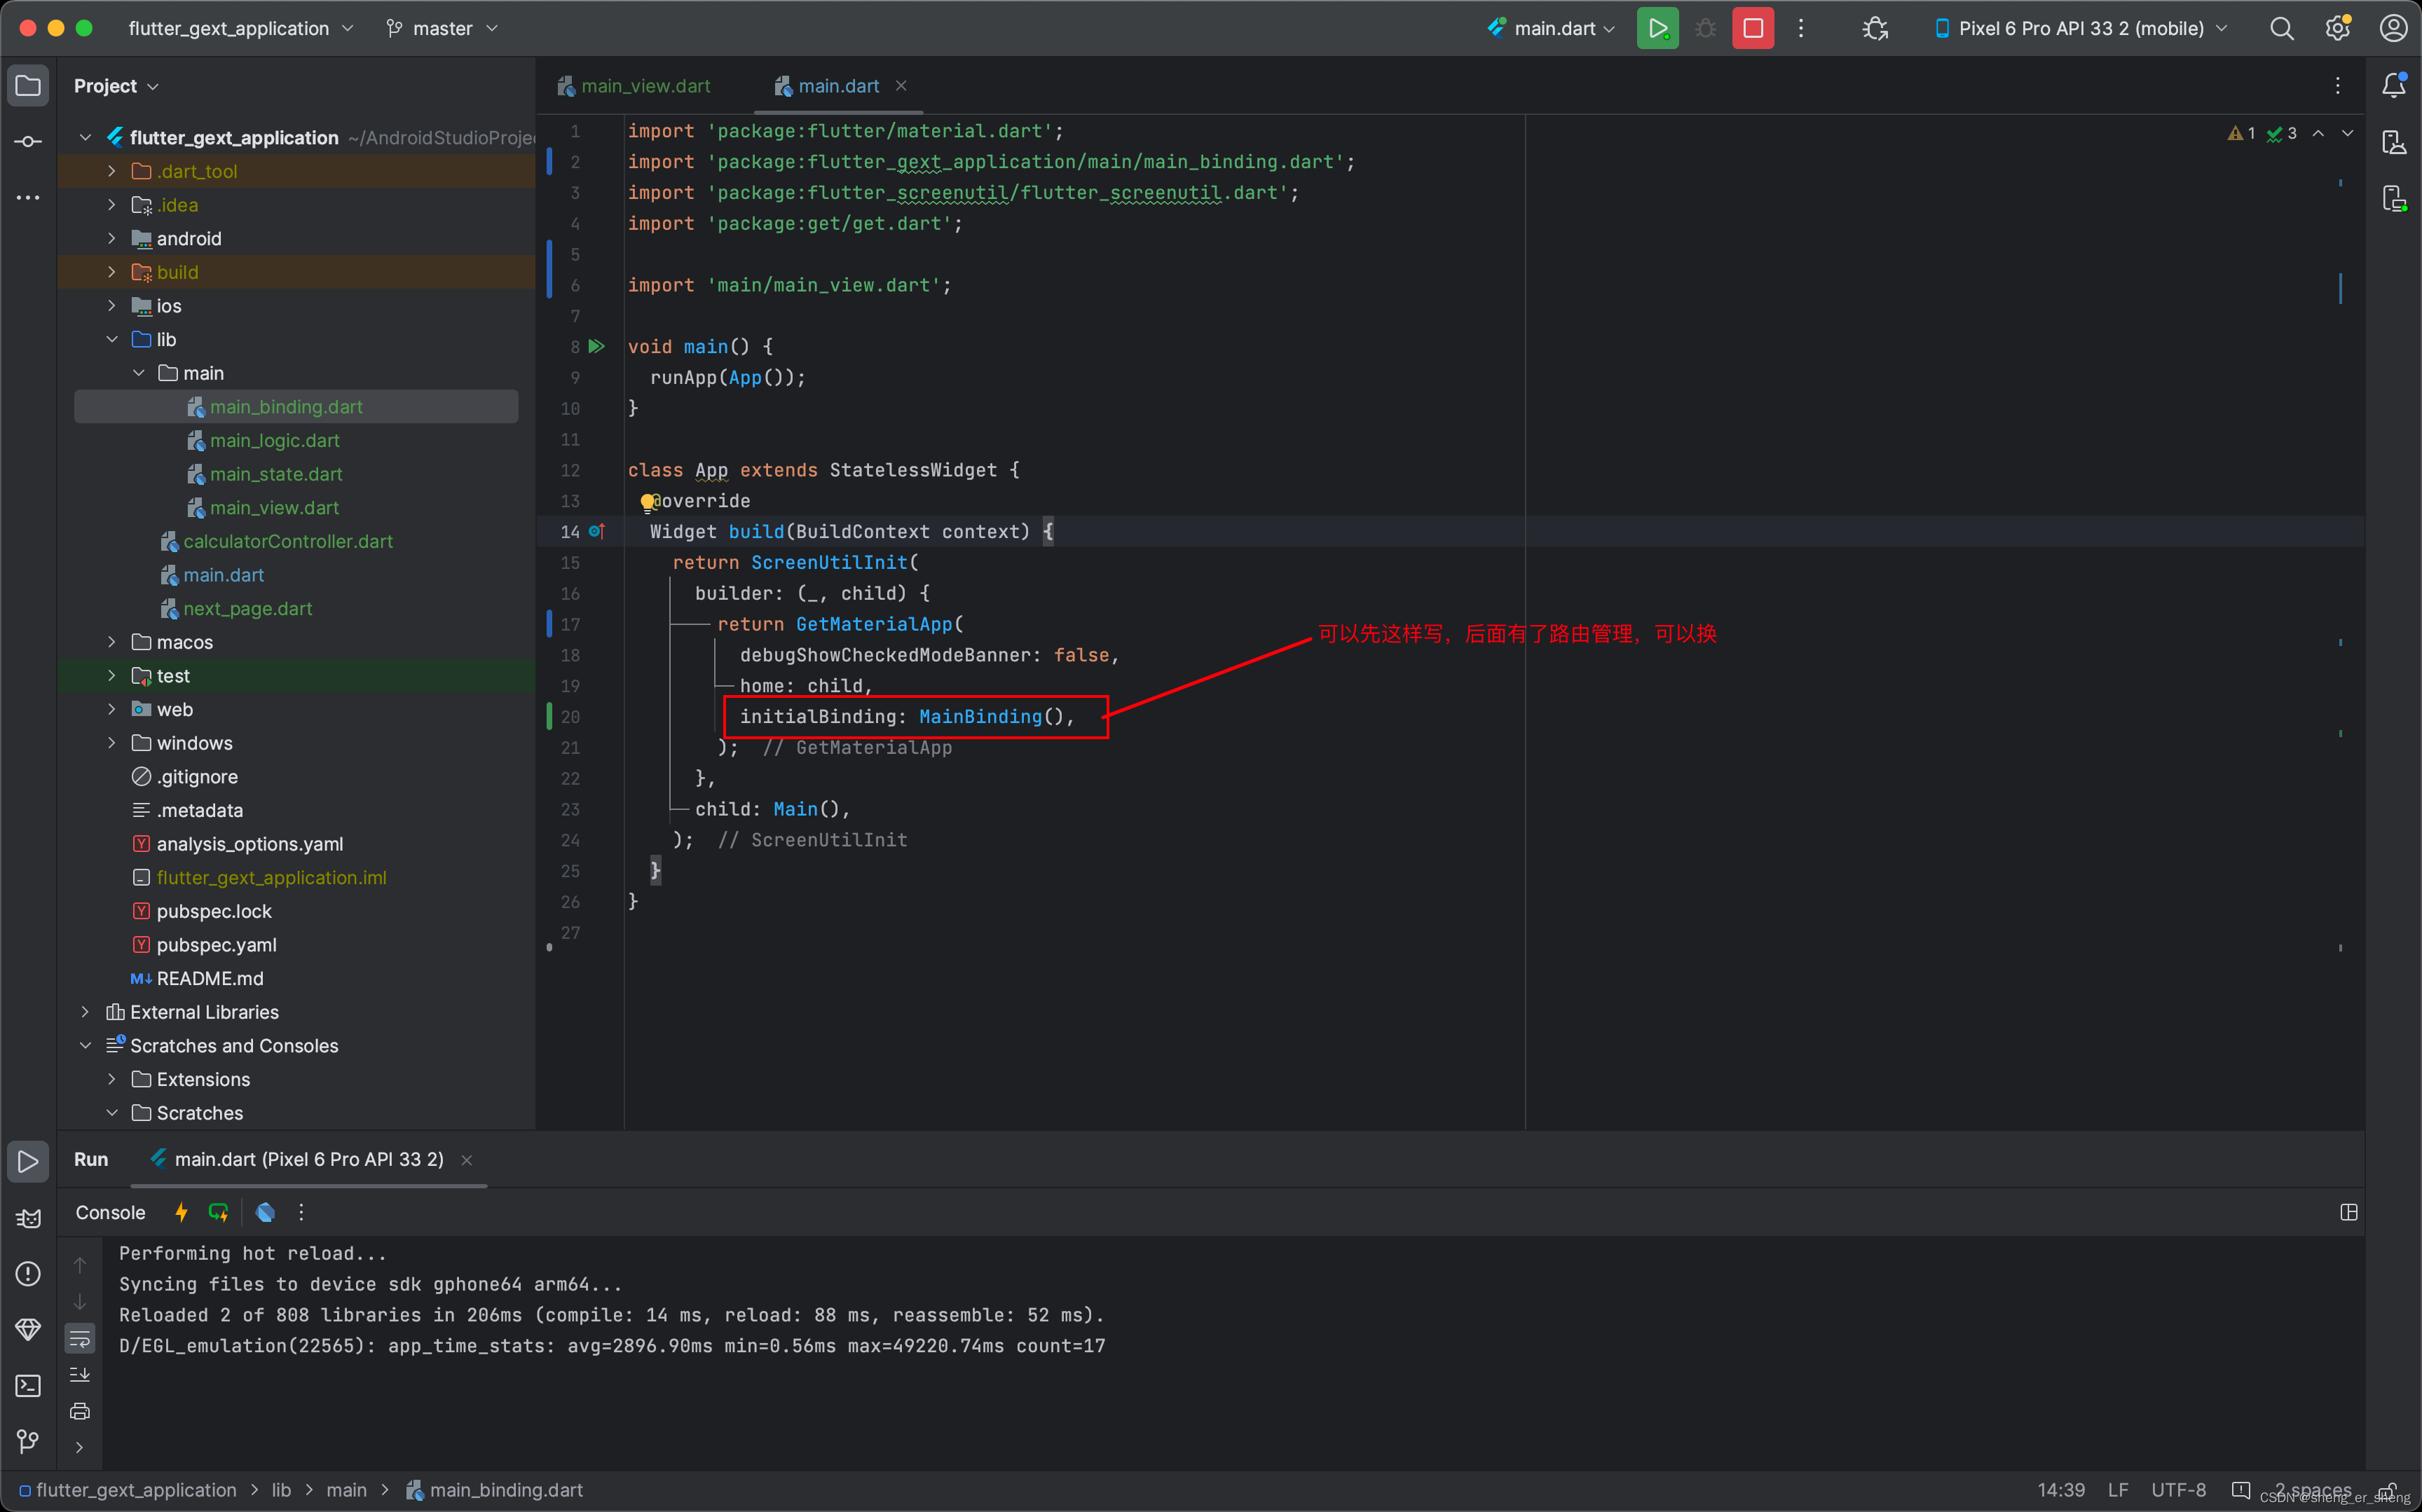
GetMaterialApp -> initBinding
最后一步在GetMaterialApp中使用的bindings
main_logic
将之前定义好的controller放进逻辑层中,可以改个名字,代表main这一部分的逻辑层。直接删掉之前的文件
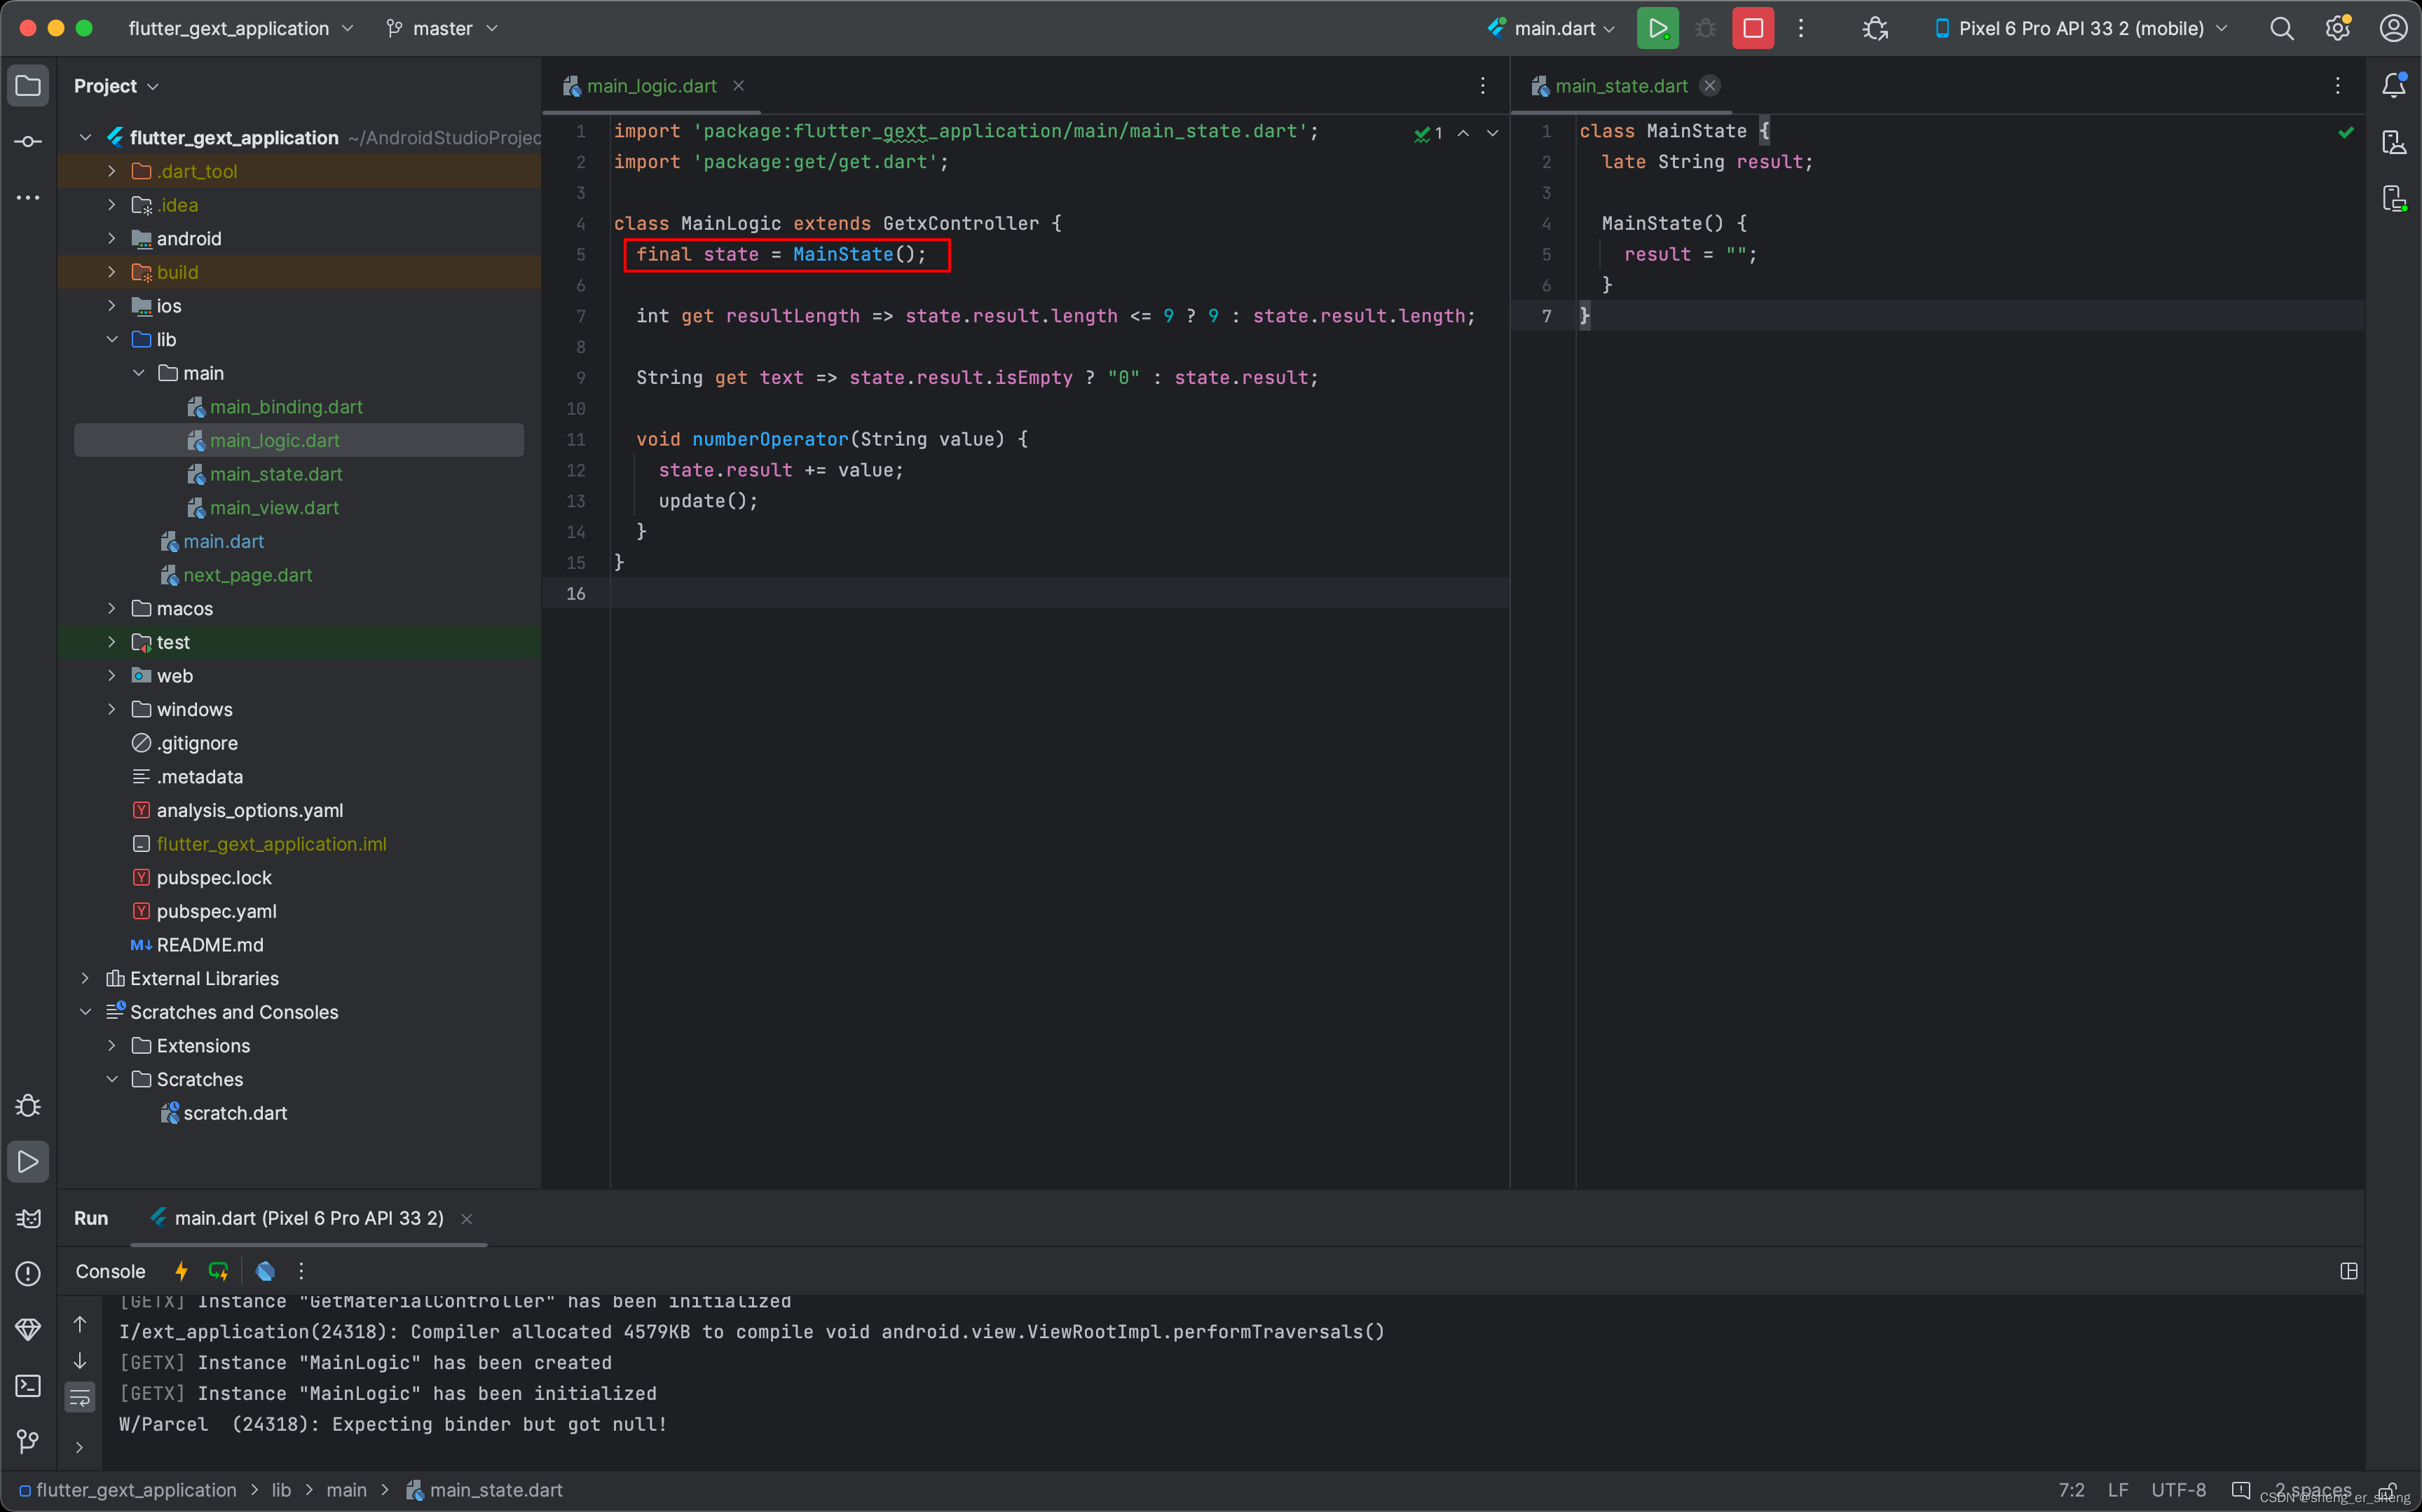
main_logic & main_state
将变量放进状态层,留下逻辑函数
next_page
运行项目

命名路由
使用别名路由,在GetMaterialApp中注册路由及绑定,并设置初始路径
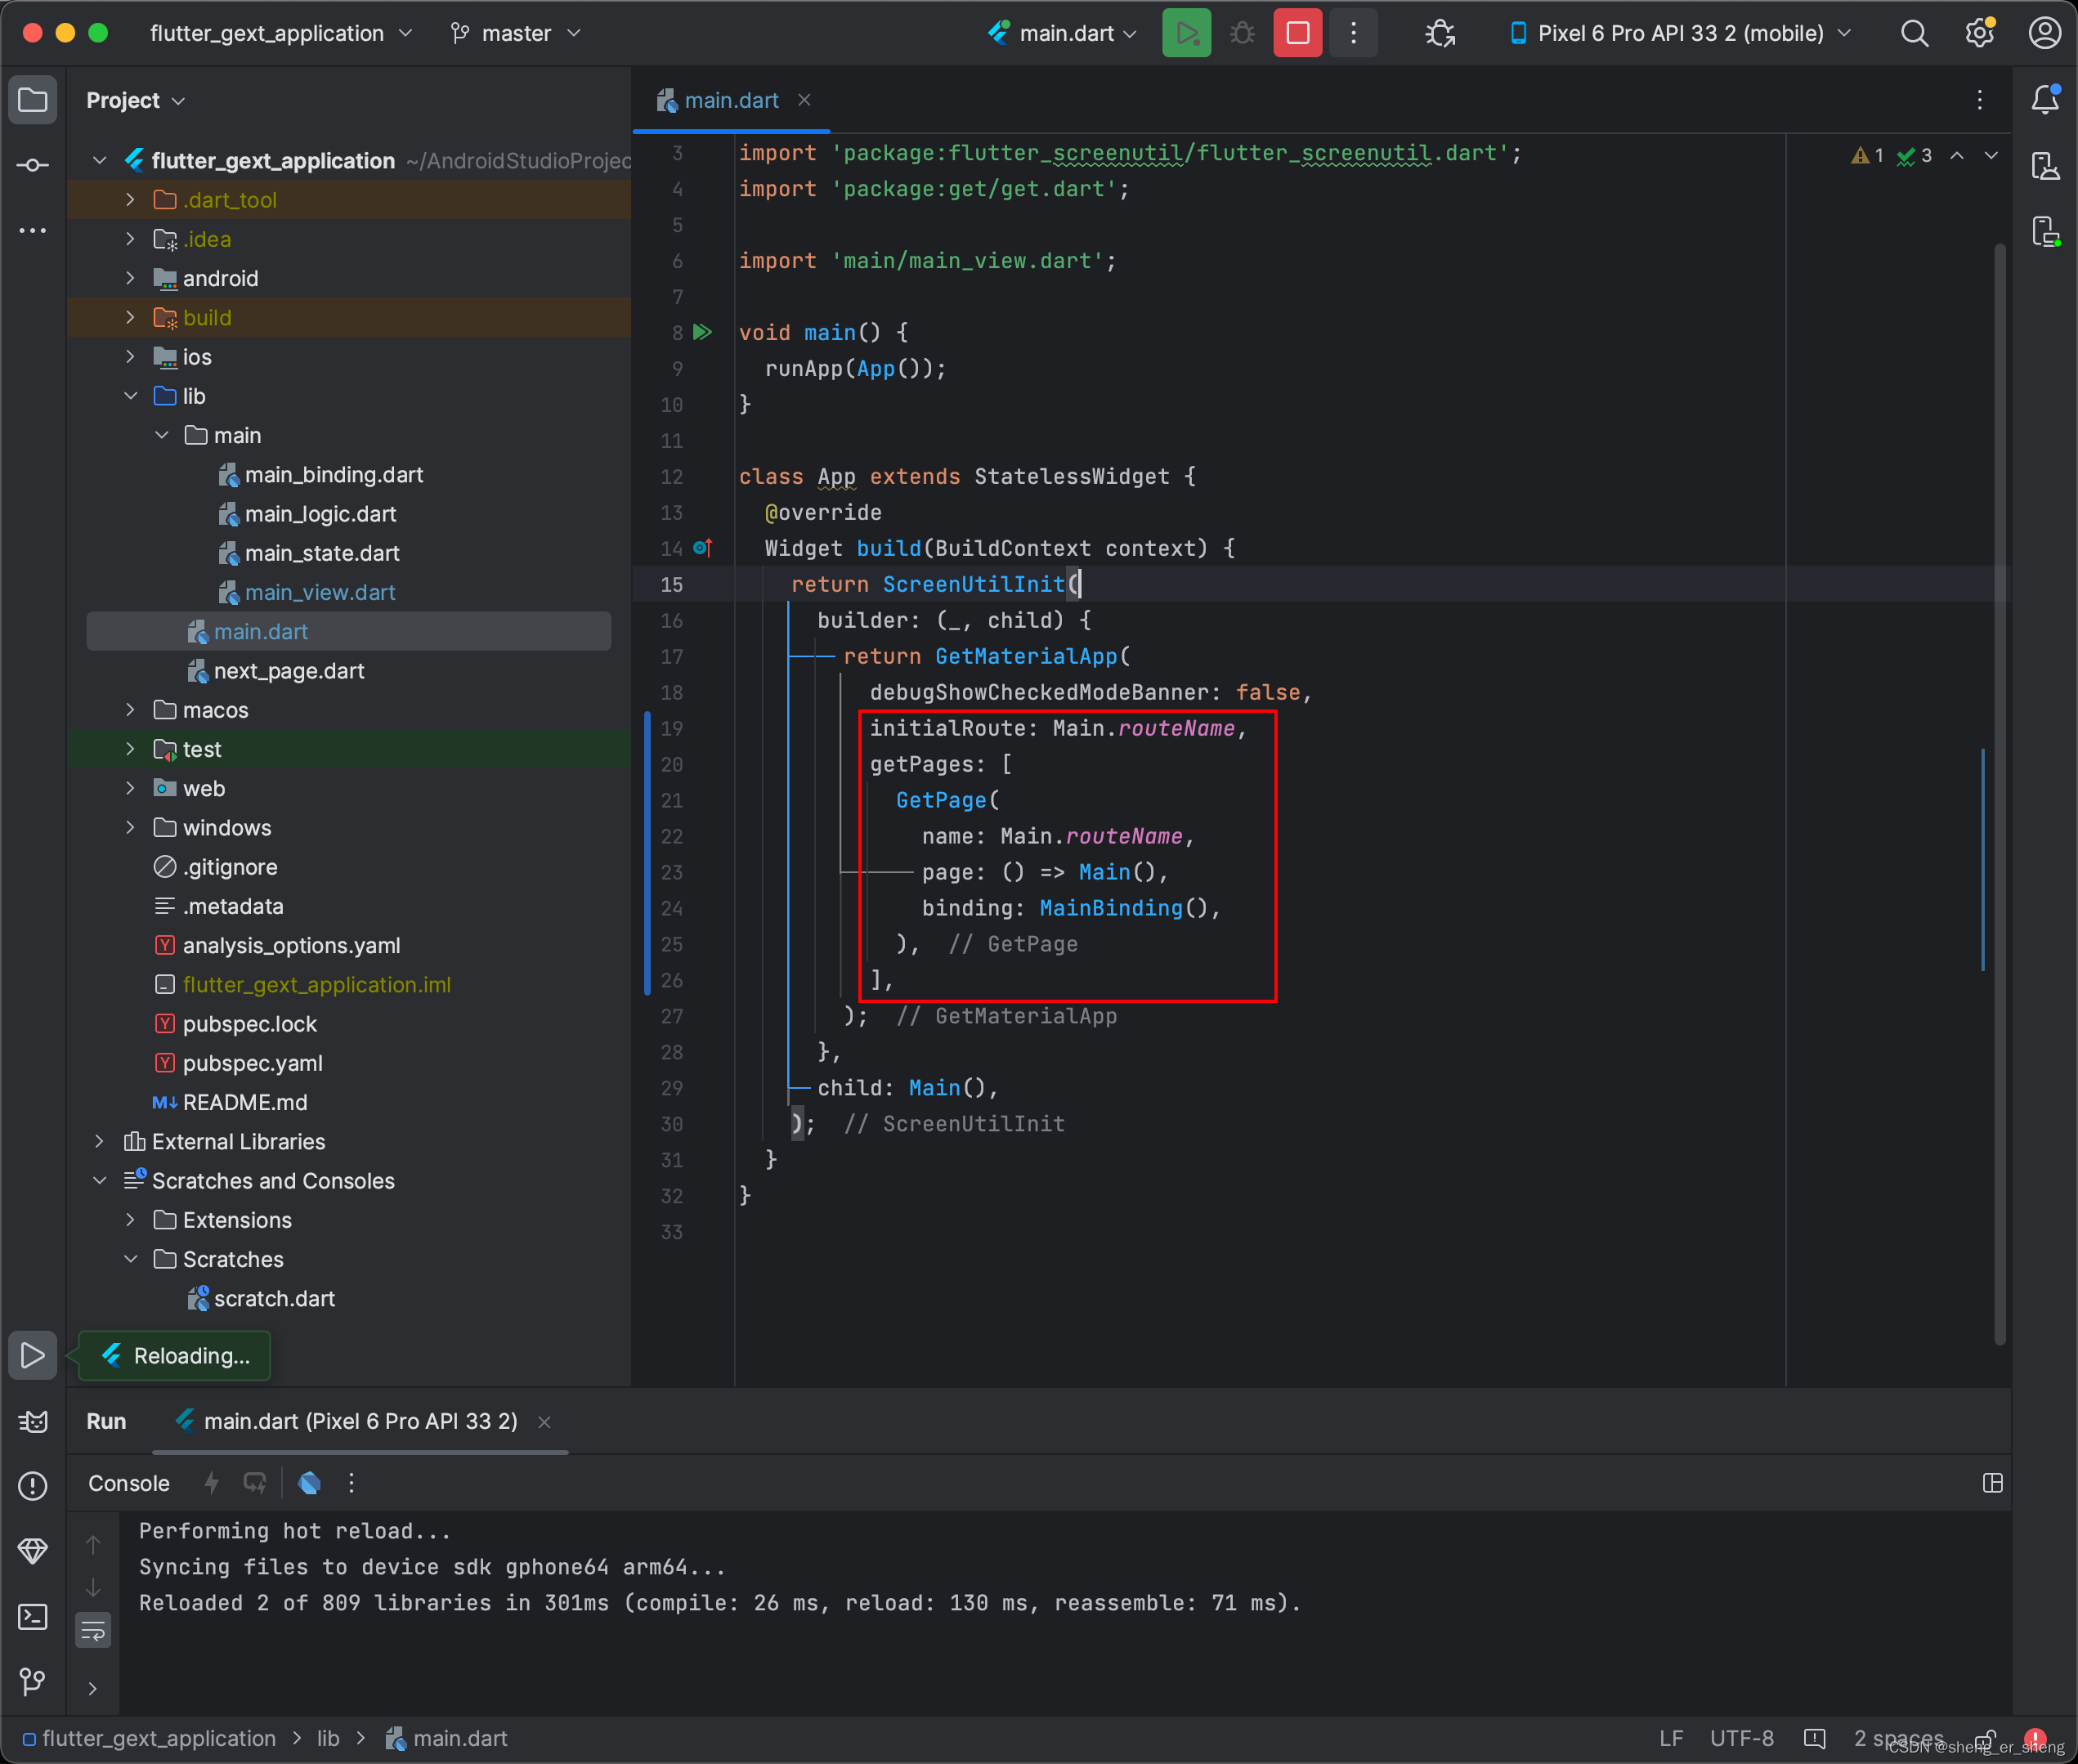
路由以‘/’开头
static String routeName = '/main';
import 'package:flutter/material.dart';
import 'package:flutter_gext_application/main/main_binding.dart';
import 'package:flutter_screenutil/flutter_screenutil.dart';
import 'package:get/get.dart';
import 'main/main_view.dart';
void main() {
runApp(App());
}
class App extends StatelessWidget {
Widget build(BuildContext context) {
return ScreenUtilInit(
builder: (_, child) {
return GetMaterialApp(
debugShowCheckedModeBanner: false,
initialRoute: Main.routeName,
getPages: [
GetPage(
name: Main.routeName,
page: () => Main(),
binding: MainBinding(),
),
],
);
},
child: Main(),
);
}
}
路由管理
注册路由
普通路由
home为最初的路由
Get.to()
跳转至一个新的页面 (Pushes a new page to the stack)
Get.to(() => const BPage());
Get.off()
关闭当前的页面,并进入一个新的页面(Pop the current page and pushes a new page to the stack)
Get.off(() => const BPage());
Get.offAll()
关闭所有的页面,并进入一个新的页面(Push a page and pop several pages in the stack until predicate returns true. predicate is optional)
Get.offAll(() => const BPage());
Get.back()
返回上一个页面
案例
A -> B -> C --(to / off / offAll)–> D
import 'package:flutter/material.dart';
import 'package:get/get.dart';
void main() {
runApp(const App());
}
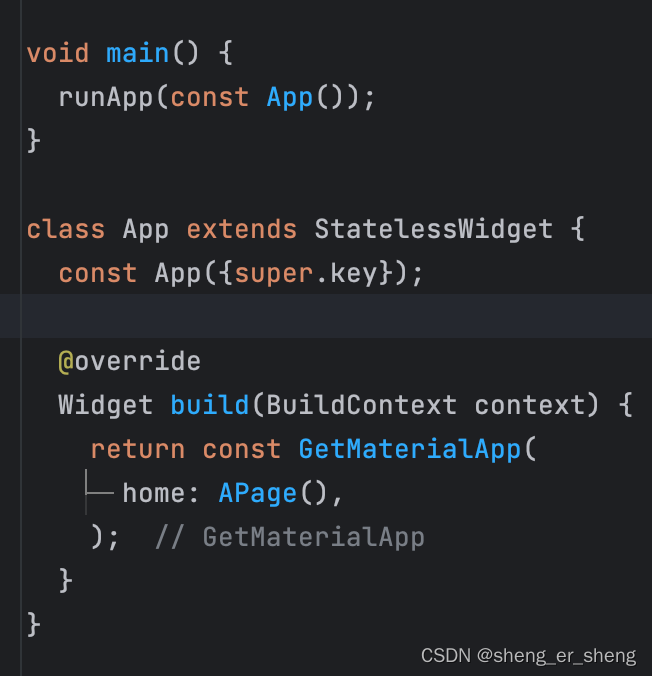
class App extends StatelessWidget {
const App({super.key});
Widget build(BuildContext context) {
return const GetMaterialApp(
home: APage(),
);
}
}
class APage extends StatelessWidget {
const APage({super.key});
Widget build(BuildContext context) {
return Scaffold(
body: Center(
child: Column(
mainAxisSize: MainAxisSize.min,
children: [
const Text("A页面"),
ElevatedButton(
onPressed: () {
Get.to(() => const BPage());
},
child: const Text("跳转至B页面"),
),
],
),
),
);
}
}
class BPage extends StatelessWidget {
const BPage({super.key});
Widget build(BuildContext context) {
return Scaffold(
body: Center(
child: Column(
mainAxisSize: MainAxisSize.min,
children: [
const Text("B页面"),
ElevatedButton(
onPressed: () {
Get.to(() => const CPage());
},
child: const Text("跳转至C页面"),
),
],
),
),
);
}
}
class CPage extends StatelessWidget {
const CPage({super.key});
Widget build(BuildContext context) {
return Scaffold(
body: Center(
child: Column(
mainAxisSize: MainAxisSize.min,
children: [
const Text("C页面"),
ElevatedButton(
onPressed: () {
Get.to(() => const DPage());
// Get.off(() => const DPage());
// Get.offAll(() => const DPage());
},
child: const Text("跳转至D页面"),
),
],
),
),
);
}
}
class DPage extends StatelessWidget {
const DPage({super.key});
Widget build(BuildContext context) {
return Scaffold(
body: Center(
child: Column(
mainAxisSize: MainAxisSize.min,
children: [
const Text("D页面"),
ElevatedButton(
onPressed: () {
Get.back();
},
child: const Text("返回上一个页面"),
),
],
),
),
);
}
}
别名路由
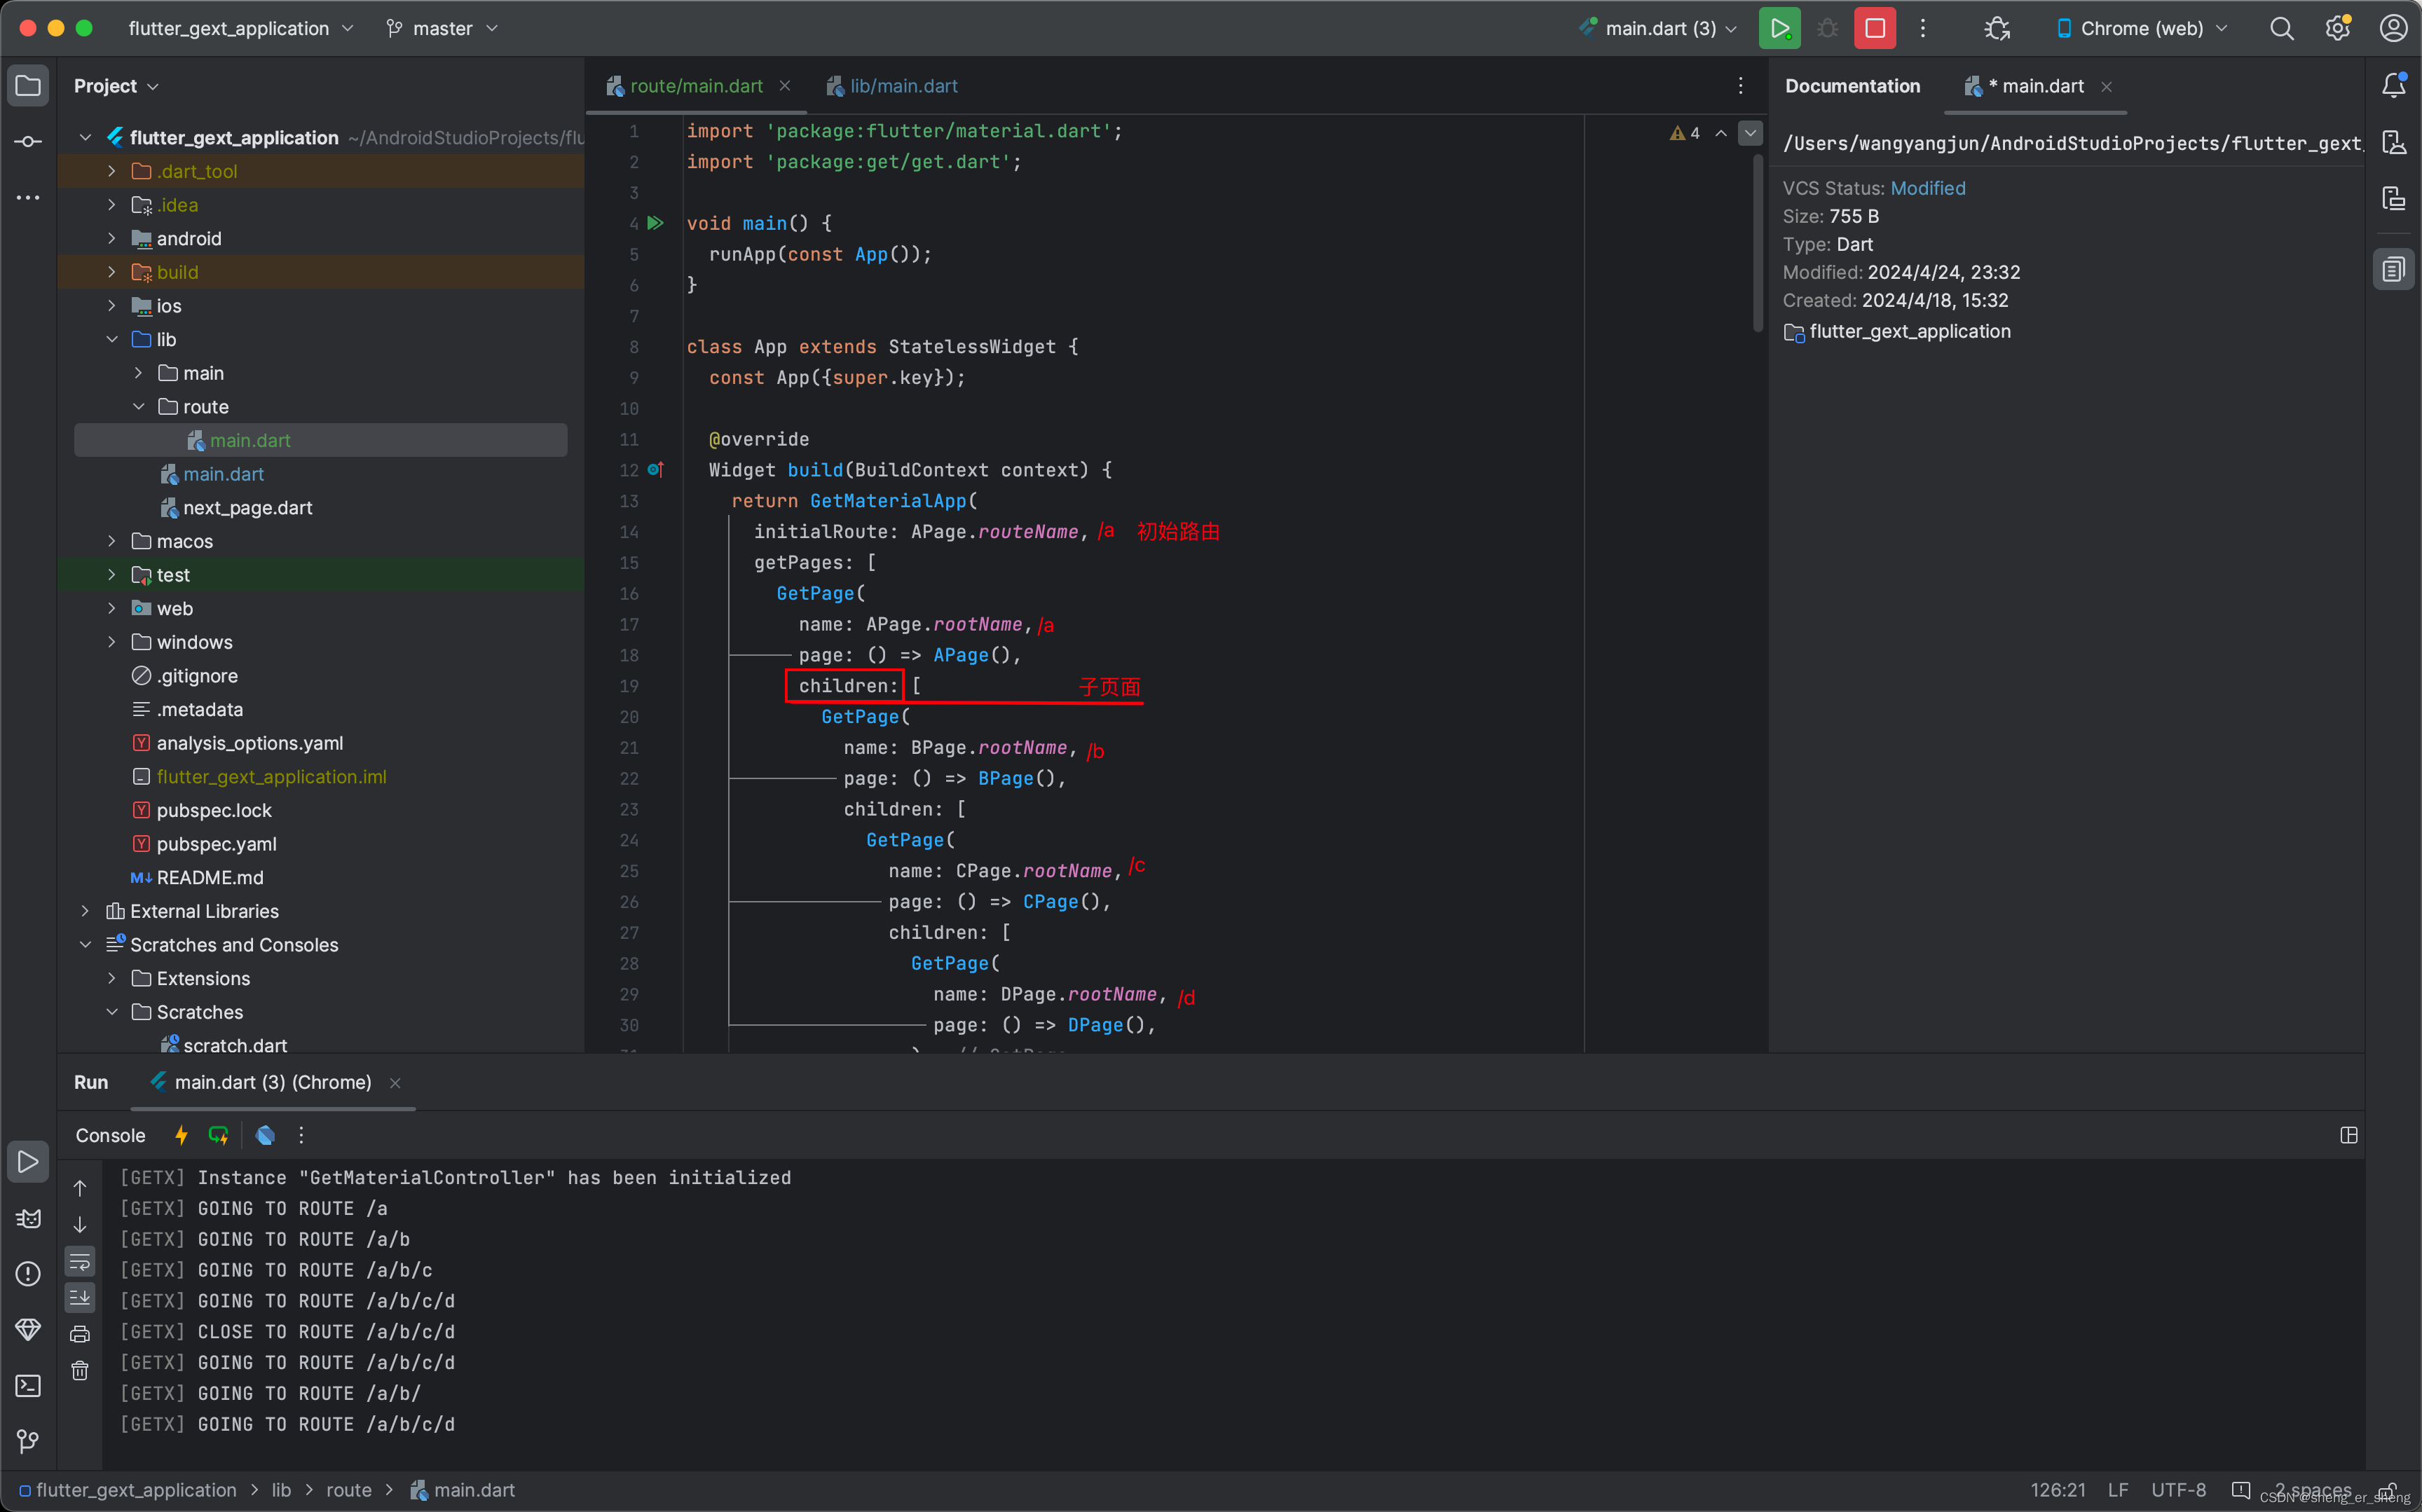
给每一个页面都定一个根路由和跳转路由
A -> B -> C -> D
import 'package:flutter/material.dart';
import 'package:get/get.dart';
void main() {
runApp(const App());
}
class App extends StatelessWidget {
const App({super.key});
Widget build(BuildContext context) {
return GetMaterialApp(
initialRoute: APage.routeName,
getPages: [
GetPage(
name: APage.rootName,
page: () => APage(),
children: [
GetPage(
name: BPage.rootName,
page: () => BPage(),
children: [
GetPage(
name: CPage.rootName,
page: () => CPage(),
children: [
GetPage(
name: DPage.rootName,
page: () => DPage(),
),
],
),
],
),
],
),
],
);
}
}
class APage extends StatelessWidget {
static String routeName = "/a";
static String rootName = "/a";
Widget build(BuildContext context) {
return Scaffold(
body: Center(
child: Column(
mainAxisSize: MainAxisSize.min,
children: [
const Text("A页面"),
ElevatedButton(
onPressed: () {
Get.toNamed(BPage.routeName);
},
child: const Text("跳转至B页面"),
),
],
),
),
);
}
}
class BPage extends StatelessWidget {
static String routeName = "${APage.routeName}$rootName";
static String rootName = "/b";
Widget build(BuildContext context) {
return Scaffold(
body: Center(
child: Column(
mainAxisSize: MainAxisSize.min,
children: [
const Text("B页面"),
ElevatedButton(
onPressed: () {
Get.toNamed(CPage.routeName);
},
child: const Text("跳转至C页面"),
),
],
),
),
);
}
}
class CPage extends StatelessWidget {
static String routeName = "${BPage.routeName}$rootName";
static String rootName = "/c";
Widget build(BuildContext context) {
return Scaffold(
body: Center(
child: Column(
mainAxisSize: MainAxisSize.min,
children: [
const Text("C页面"),
ElevatedButton(
onPressed: () {
Get.toNamed(DPage.routeName);
// Get.off(() => const DPage());
// Get.offAll(() => const DPage());
},
child: const Text("跳转至D页面"),
),
],
),
),
);
}
}
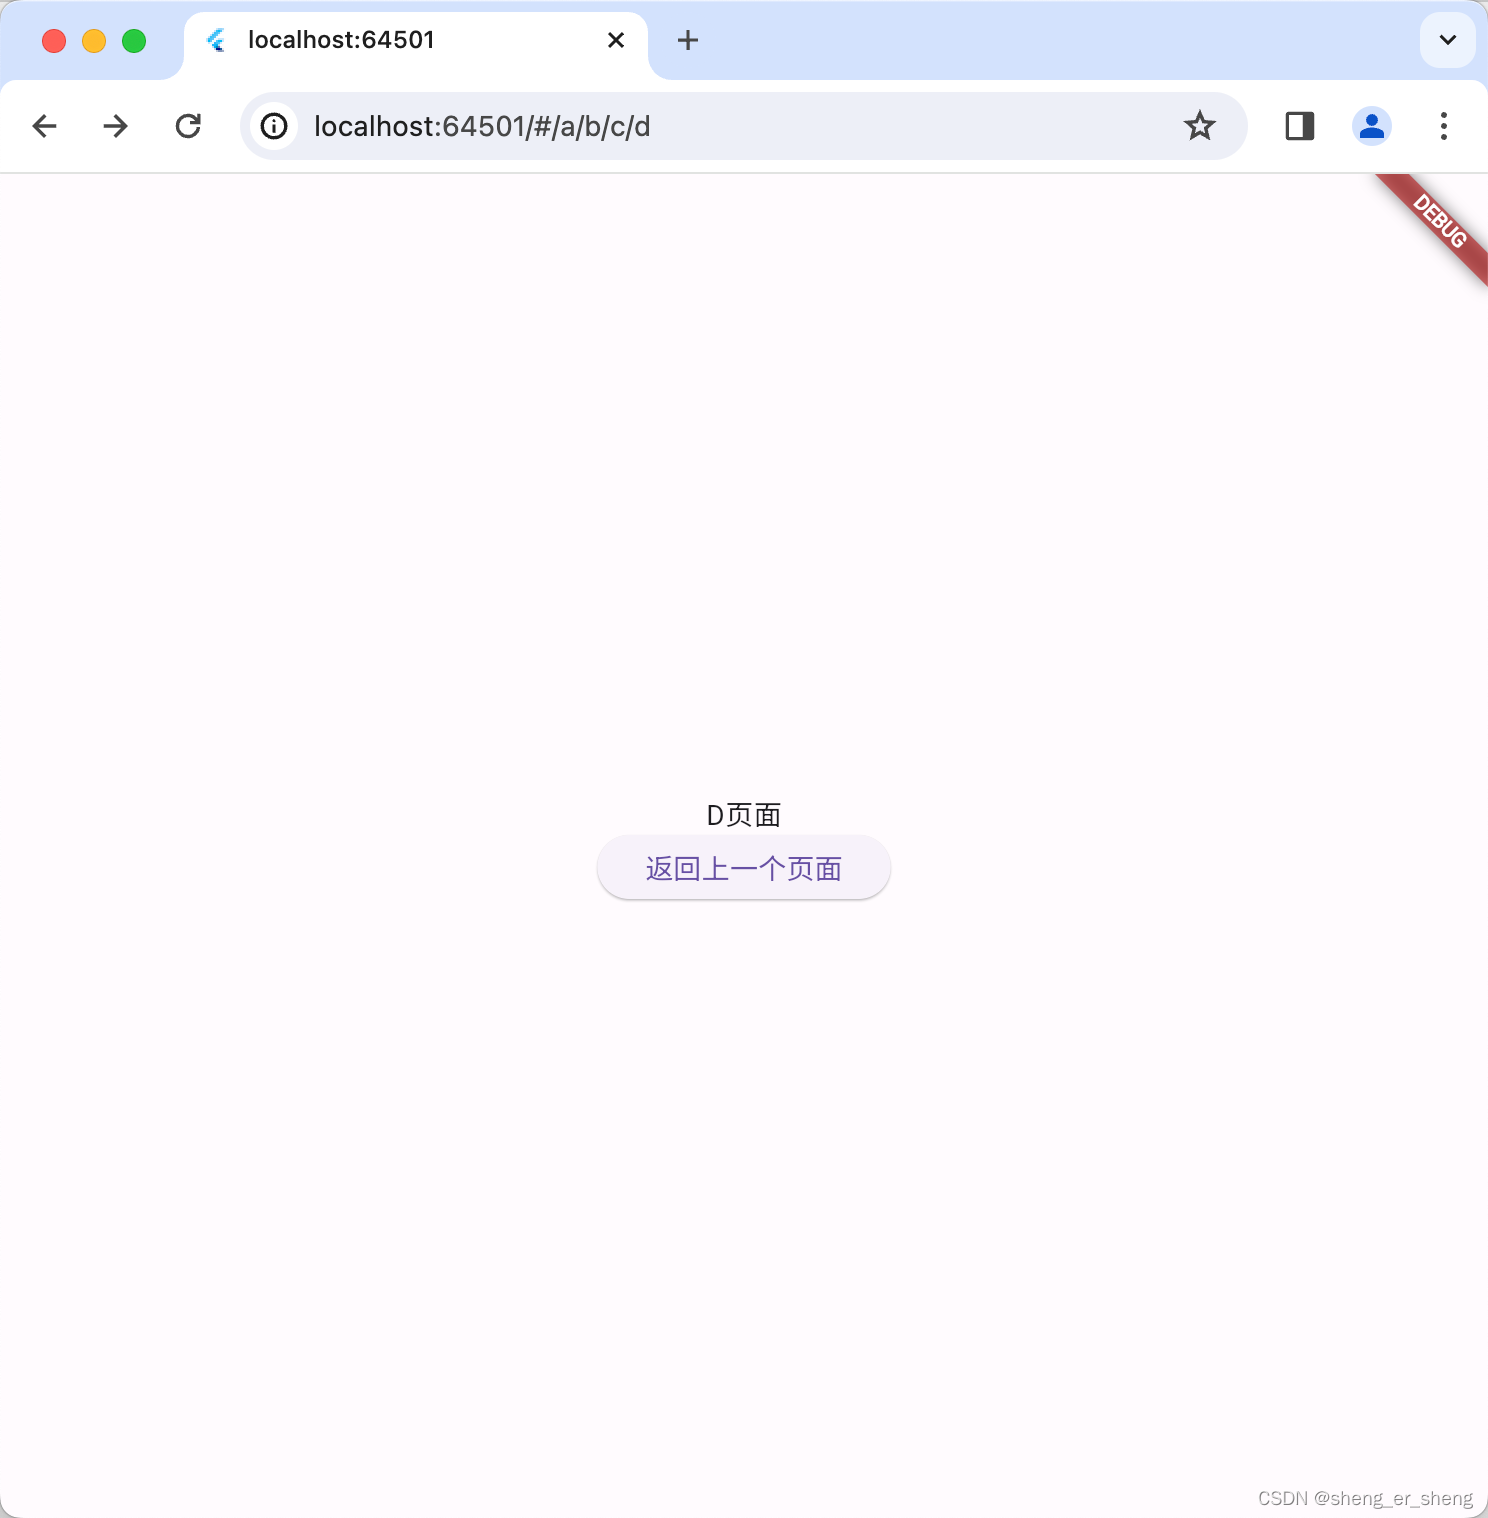
class DPage extends StatelessWidget {
static String routeName = "${CPage.routeName}$rootName";
static String rootName = "/d";
Widget build(BuildContext context) {
return Scaffold(
body: Center(
child: Column(
mainAxisSize: MainAxisSize.min,
children: [
const Text("D页面"),
ElevatedButton(
onPressed: () {
Get.back();
},
child: const Text("返回上一个页面"),
),
],
),
),
);
}
}
以上的写法是,A的子页面有B,B的子页面是C,C的子页面是D
Get.toNamed()
跳转到新页面
Get.toNamed('/a');
Get.offNamed()
关闭当前页面,跳转到新页面
Get.offNamed('/a');
Get.offAllNamed()
关闭所有页面,跳转到新页面
Get.offAllNamed('/a');
import 'package:flutter/material.dart';
import 'package:get/get.dart';
void main() {
runApp(const App());
}
class App extends StatelessWidget {
const App({super.key});
Widget build(BuildContext context) {
return GetMaterialApp(
initialRoute: APage.routeName,
getPages: [
GetPage(
name: APage.rootName,
page: () => APage(),
children: [
GetPage(
name: BPage.rootName,
page: () => BPage(),
children: [
GetPage(
name: CPage.rootName,
page: () => CPage(),
children: [
GetPage(
name: DPage.rootName,
page: () => DPage(),
),
],
),
],
),
],
),
],
);
}
}
class APage extends StatelessWidget {
static String routeName = "/a";
static String rootName = "/a";
Widget build(BuildContext context) {
return Scaffold(
body: Center(
child: Column(
mainAxisSize: MainAxisSize.min,
children: [
const Text("A页面"),
ElevatedButton(
onPressed: () {
Get.toNamed(BPage.routeName);
},
child: const Text("跳转至B页面"),
),
],
),
),
);
}
}
class BPage extends StatelessWidget {
static String routeName = "${APage.routeName}$rootName";
static String rootName = "/b";
Widget build(BuildContext context) {
return Scaffold(
body: Center(
child: Column(
mainAxisSize: MainAxisSize.min,
children: [
const Text("B页面"),
ElevatedButton(
onPressed: () {
Get.toNamed(CPage.routeName);
},
child: const Text("跳转至C页面"),
),
],
),
),
);
}
}
class CPage extends StatelessWidget {
static String routeName = "${BPage.routeName}$rootName";
static String rootName = "/c";
Widget build(BuildContext context) {
return Scaffold(
body: Center(
child: Column(
mainAxisSize: MainAxisSize.min,
children: [
const Text("C页面"),
ElevatedButton(
onPressed: () {
Get.toNamed(DPage.routeName);
// Get.offNamed(DPage.routeName);
// Get.offAllNamed(DPage.routeName);
},
child: const Text("跳转至D页面"),
),
],
),
),
);
}
}
class DPage extends StatelessWidget {
static String routeName = "${CPage.routeName}$rootName";
static String rootName = "/d";
Widget build(BuildContext context) {
return Scaffold(
body: Center(
child: Column(
mainAxisSize: MainAxisSize.min,
children: [
const Text("D页面"),
ElevatedButton(
onPressed: () {
Get.back();
},
child: const Text("返回上一个页面"),
),
],
),
),
);
}
}
未知路由
当用户输入一个不存在的路径,返回一个指定页面
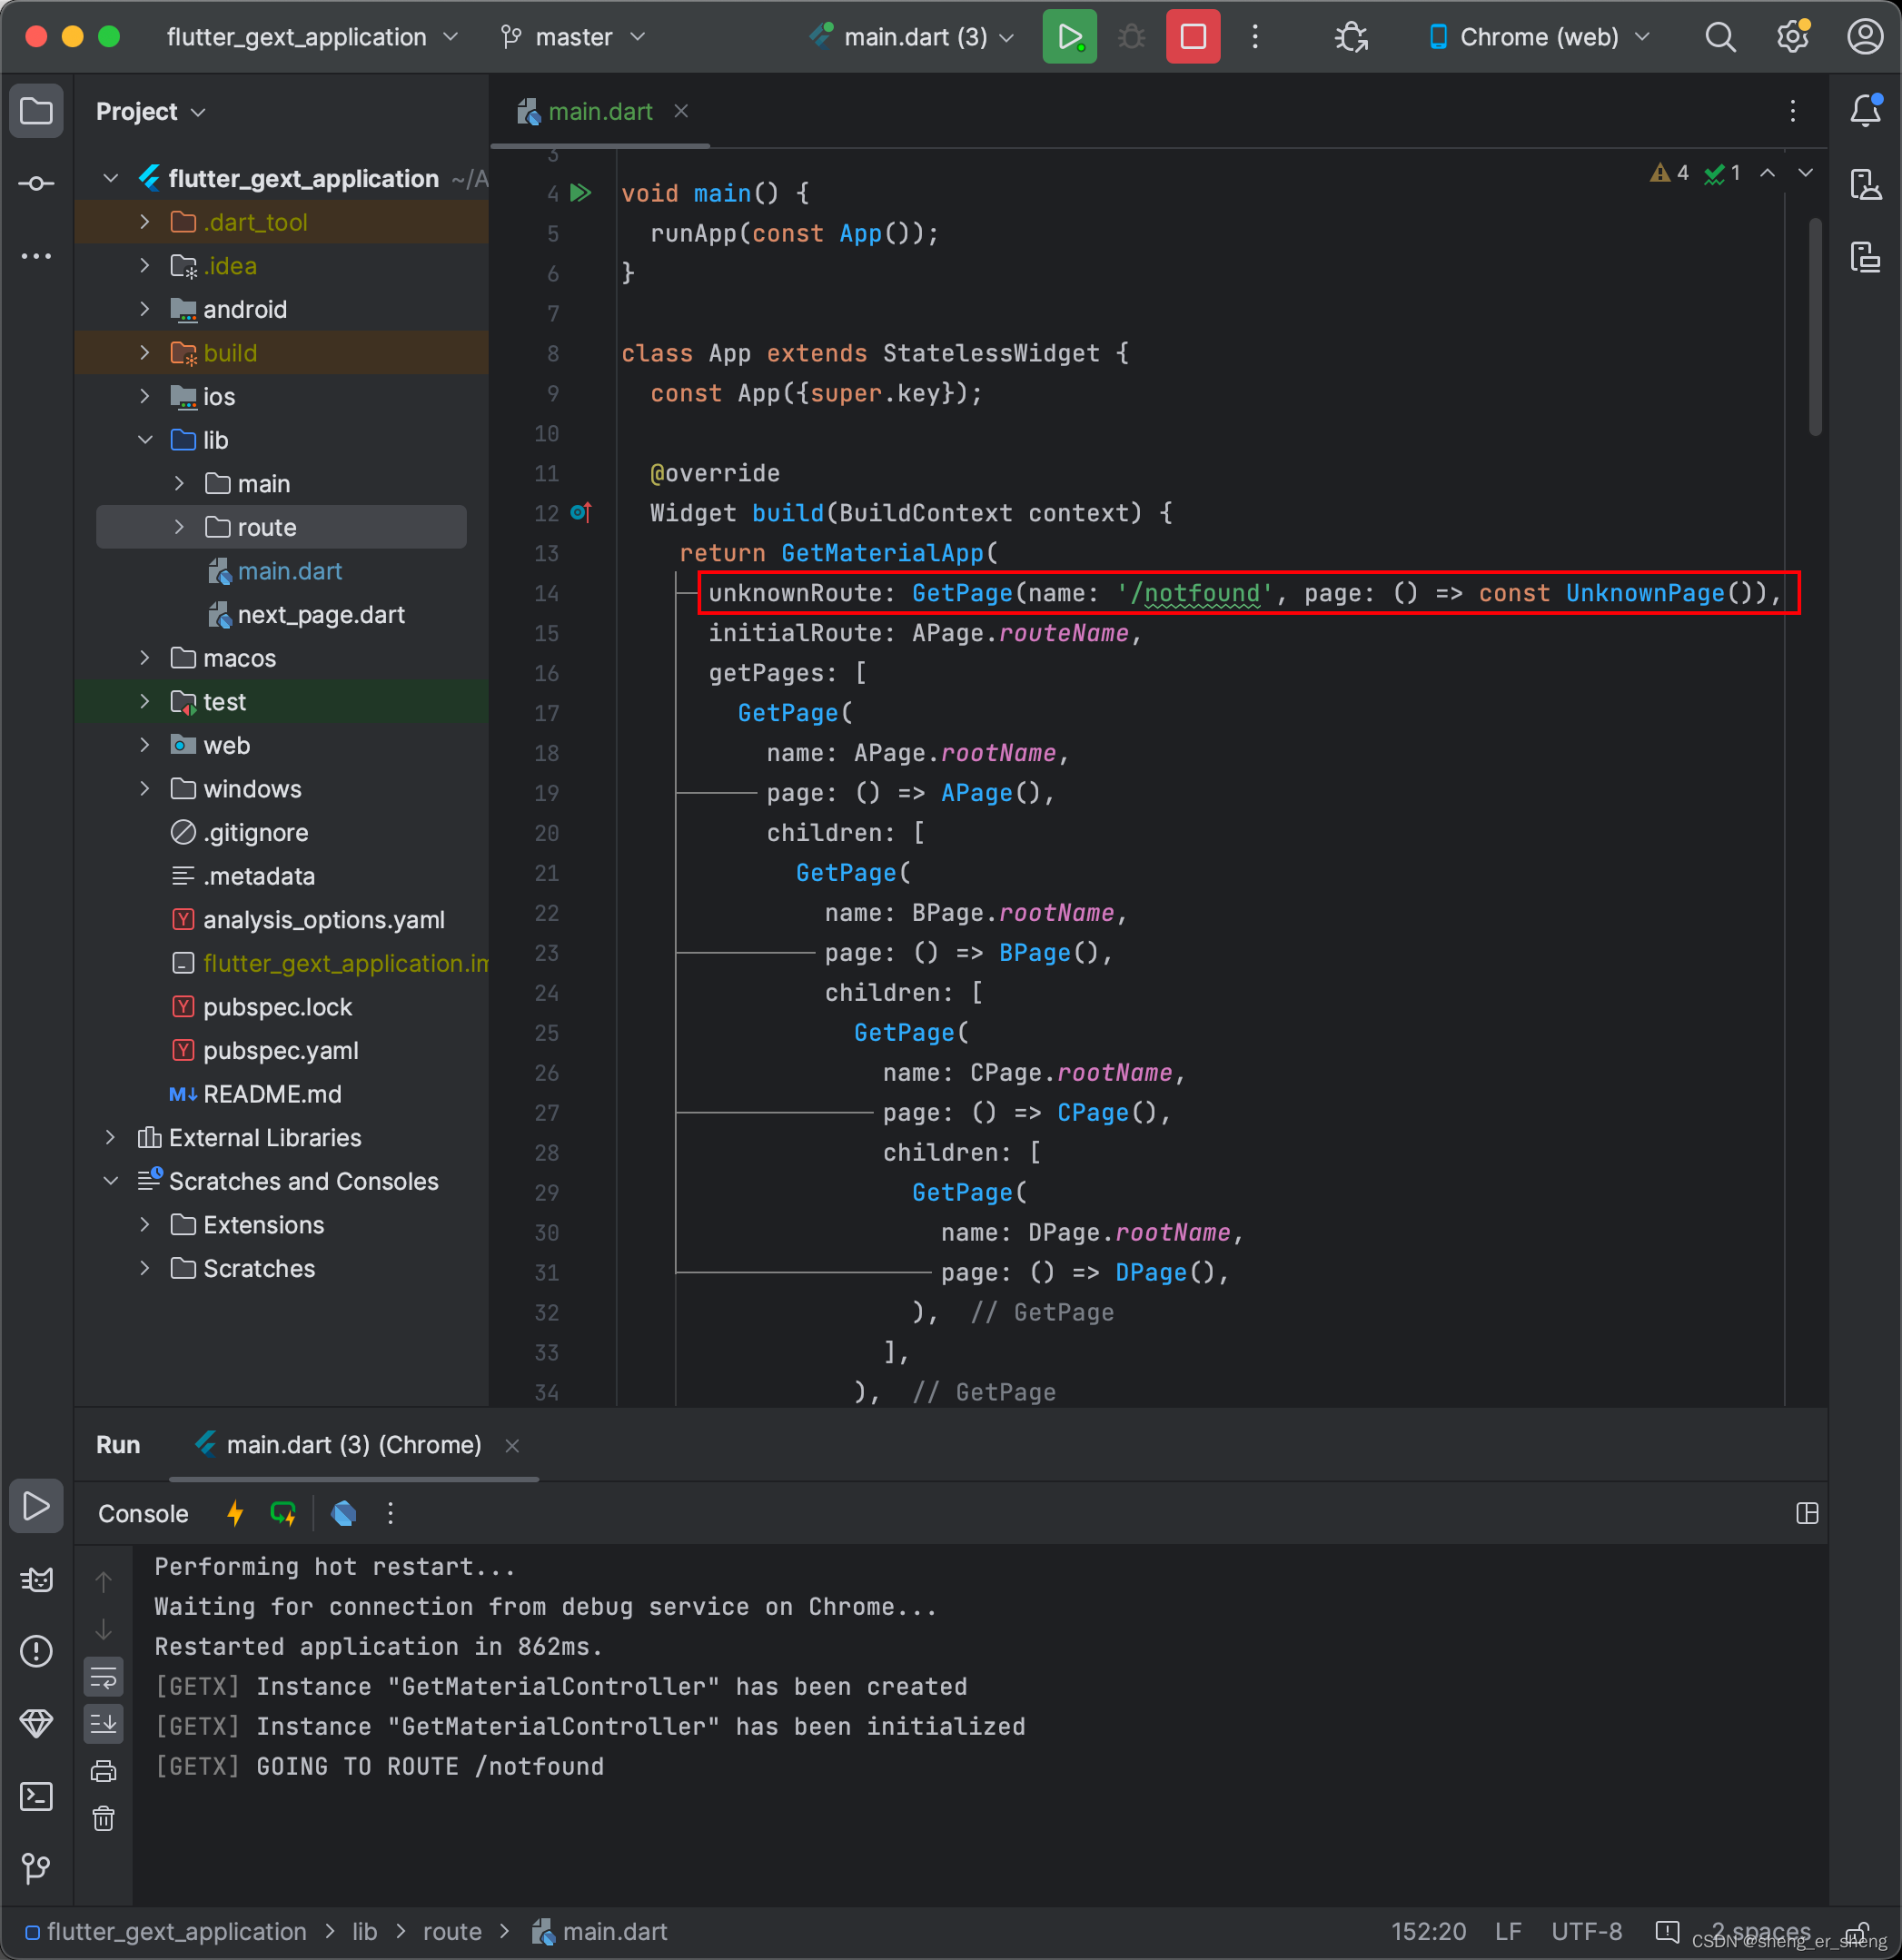
unknownRoute: GetPage(name: '/notfound', page: () => const UnknownPage())
class UnknownPage extends StatelessWidget {
const UnknownPage({super.key});
Widget build(BuildContext context) {
return const Scaffold(
body: Center(
child: Text(
'404',
style: TextStyle(
fontSize: 40,
),
),
),
);
}
}
传参数
有三种方式
Get.to(arguments: {})
页面切到下一个页面,可以在argument中直接附带参数。

import 'package:flutter/material.dart';
import 'package:get/get.dart';
void main() {
runApp(const App());
}
class App extends StatelessWidget {
const App({super.key});
Widget build(BuildContext context) {
return GetMaterialApp(
initialRoute: APage.routeName,
getPages: [
GetPage(
name: APage.rootName,
page: () => APage(),
children: [
GetPage(
name: BPage.rootName,
page: () => BPage(),
),
],
),
],
);
}
}
class APage extends StatelessWidget {
static String routeName = "/a";
static String rootName = "/a";
Widget build(BuildContext context) {
return Scaffold(
body: Center(
child: Column(
mainAxisSize: MainAxisSize.min,
children: [
const Text("A页面"),
ElevatedButton(
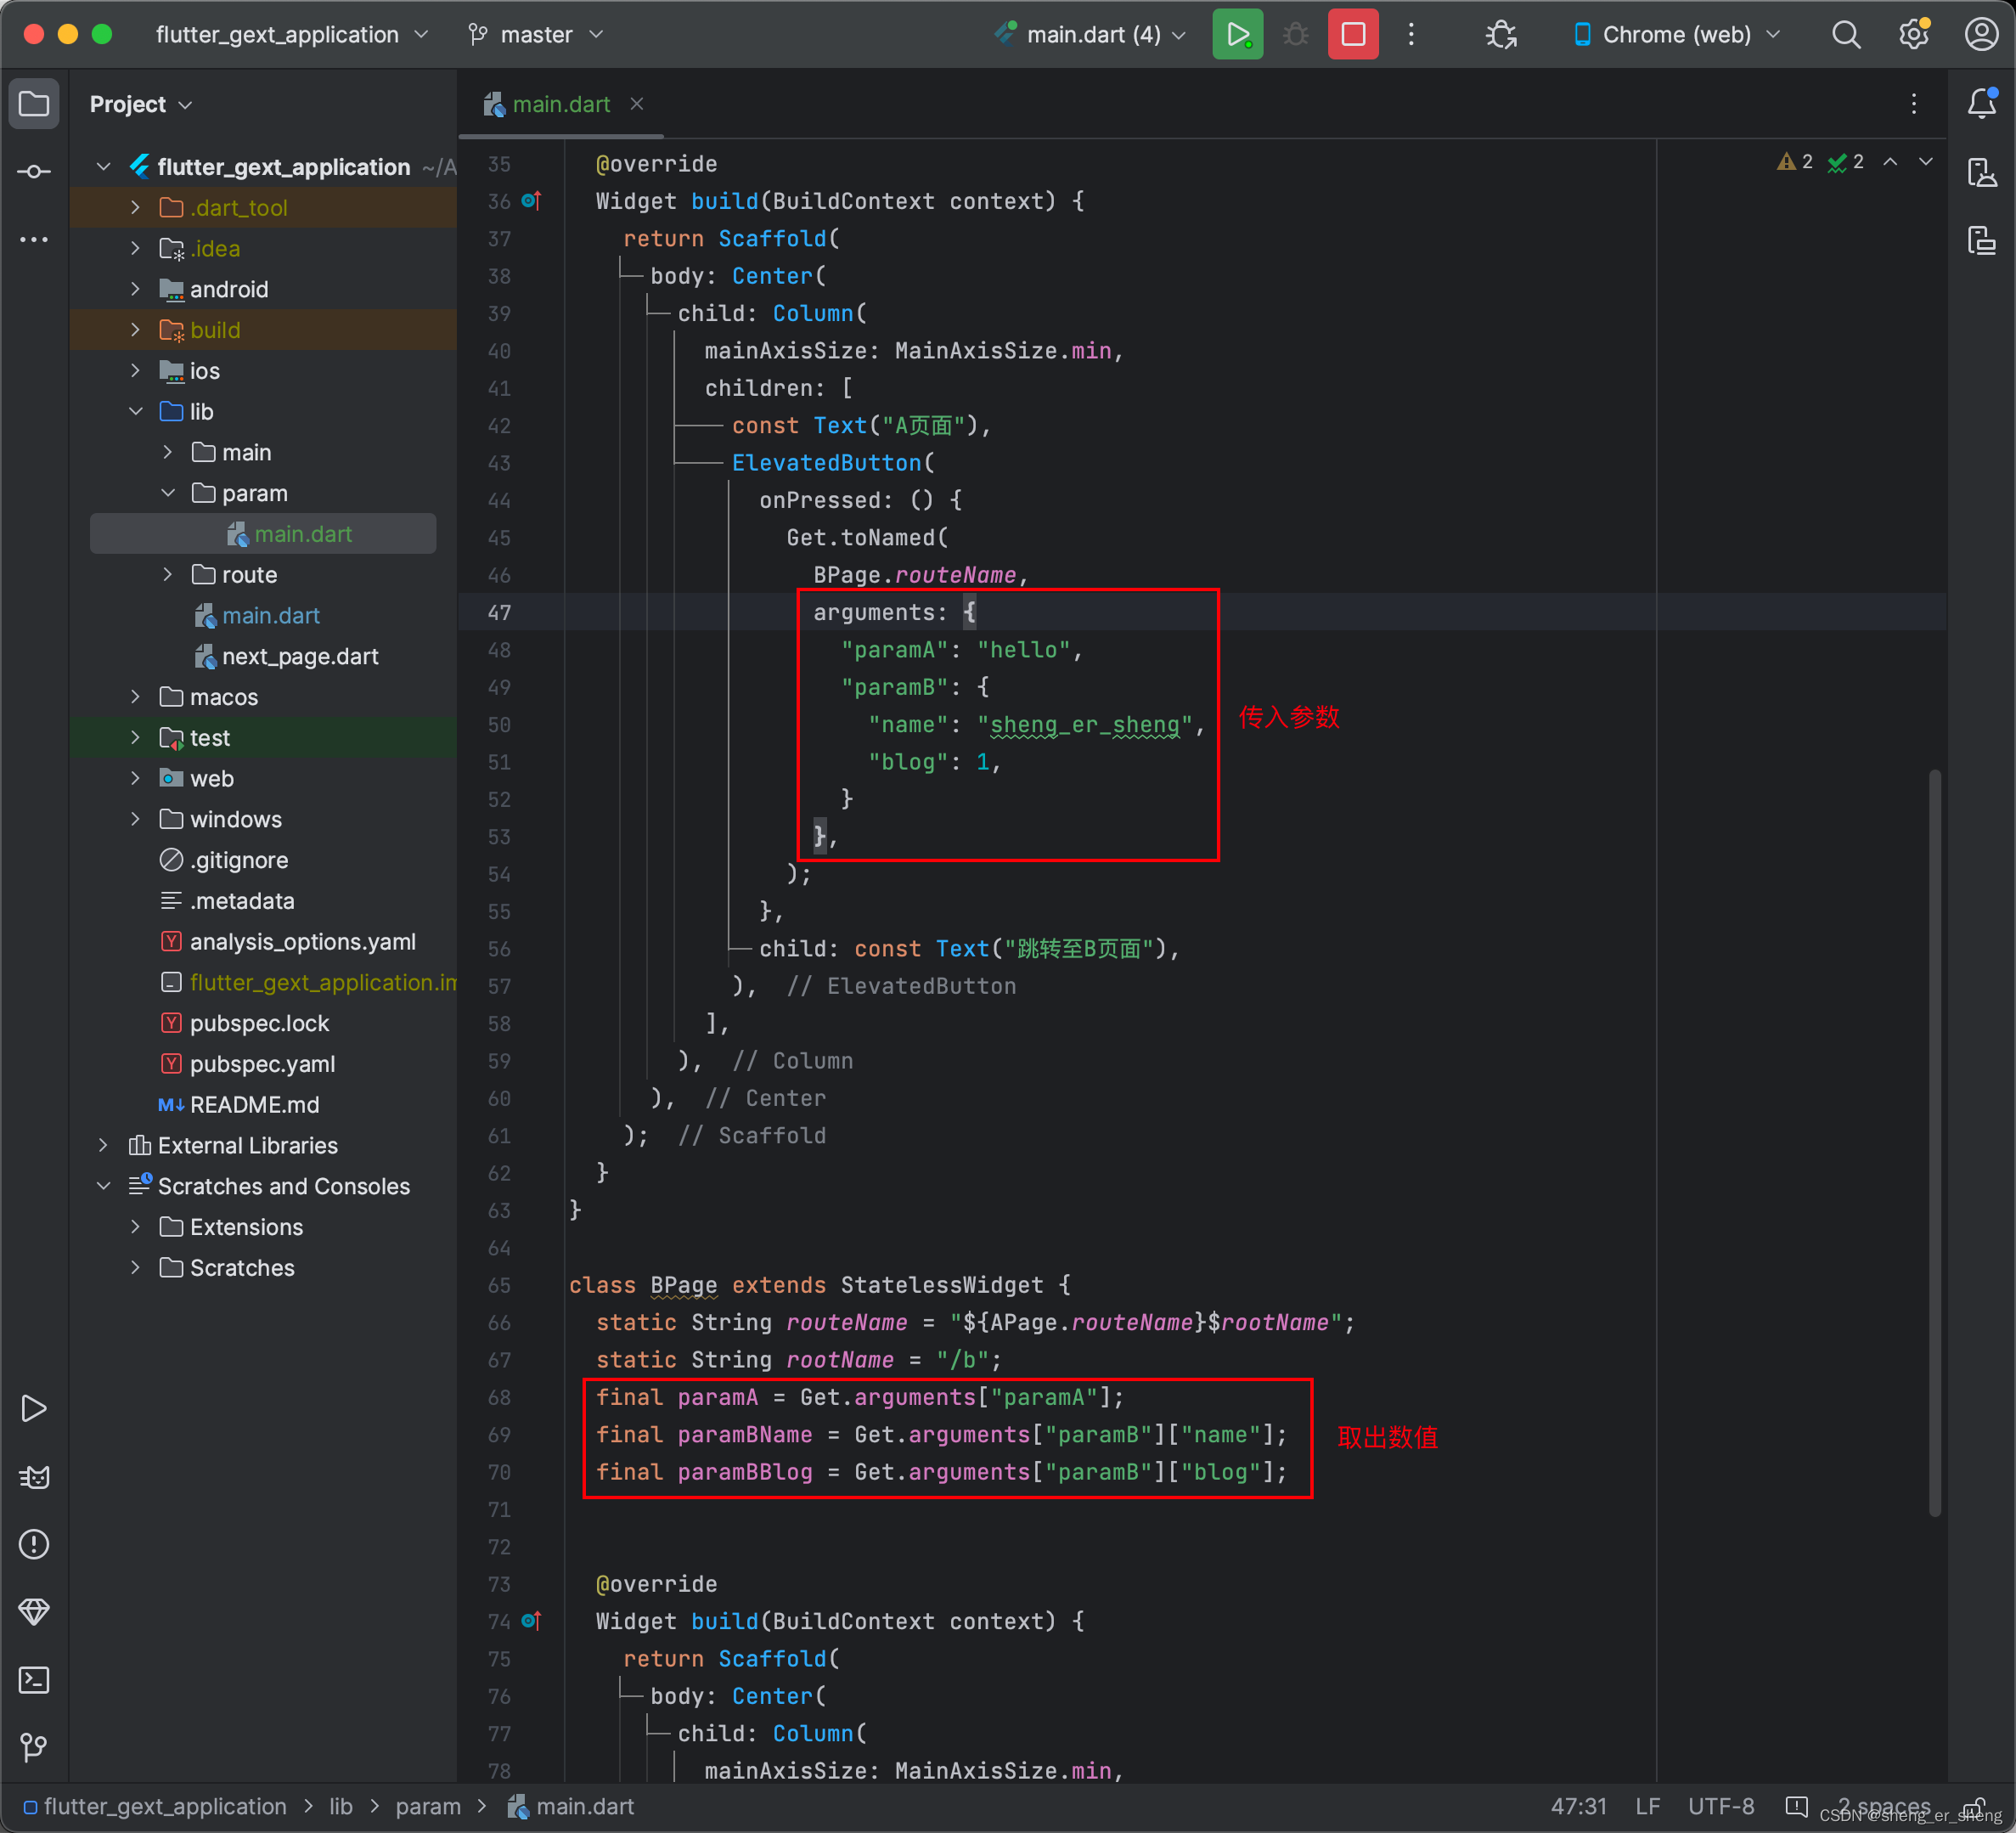
onPressed: () {
Get.toNamed(
BPage.routeName,
arguments: {
"paramA": "hello",
"paramB": {
"name": "sheng_er_sheng",
"blog": 1,
}
},
);
},
child: const Text("跳转至B页面"),
),
],
),
),
);
}
}
class BPage extends StatelessWidget {
static String routeName = "${APage.routeName}$rootName";
static String rootName = "/b";
final paramA = Get.arguments["paramA"];
final paramBName = Get.arguments["paramB"]["name"];
final paramBBlog = Get.arguments["paramB"]["blog"];
Widget build(BuildContext context) {
return Scaffold(
body: Center(
child: Column(
mainAxisSize: MainAxisSize.min,
children: [
const Text("B页面"),
Text("$paramA, $paramBName, $paramBBlog"),
],
),
),
);
}
}
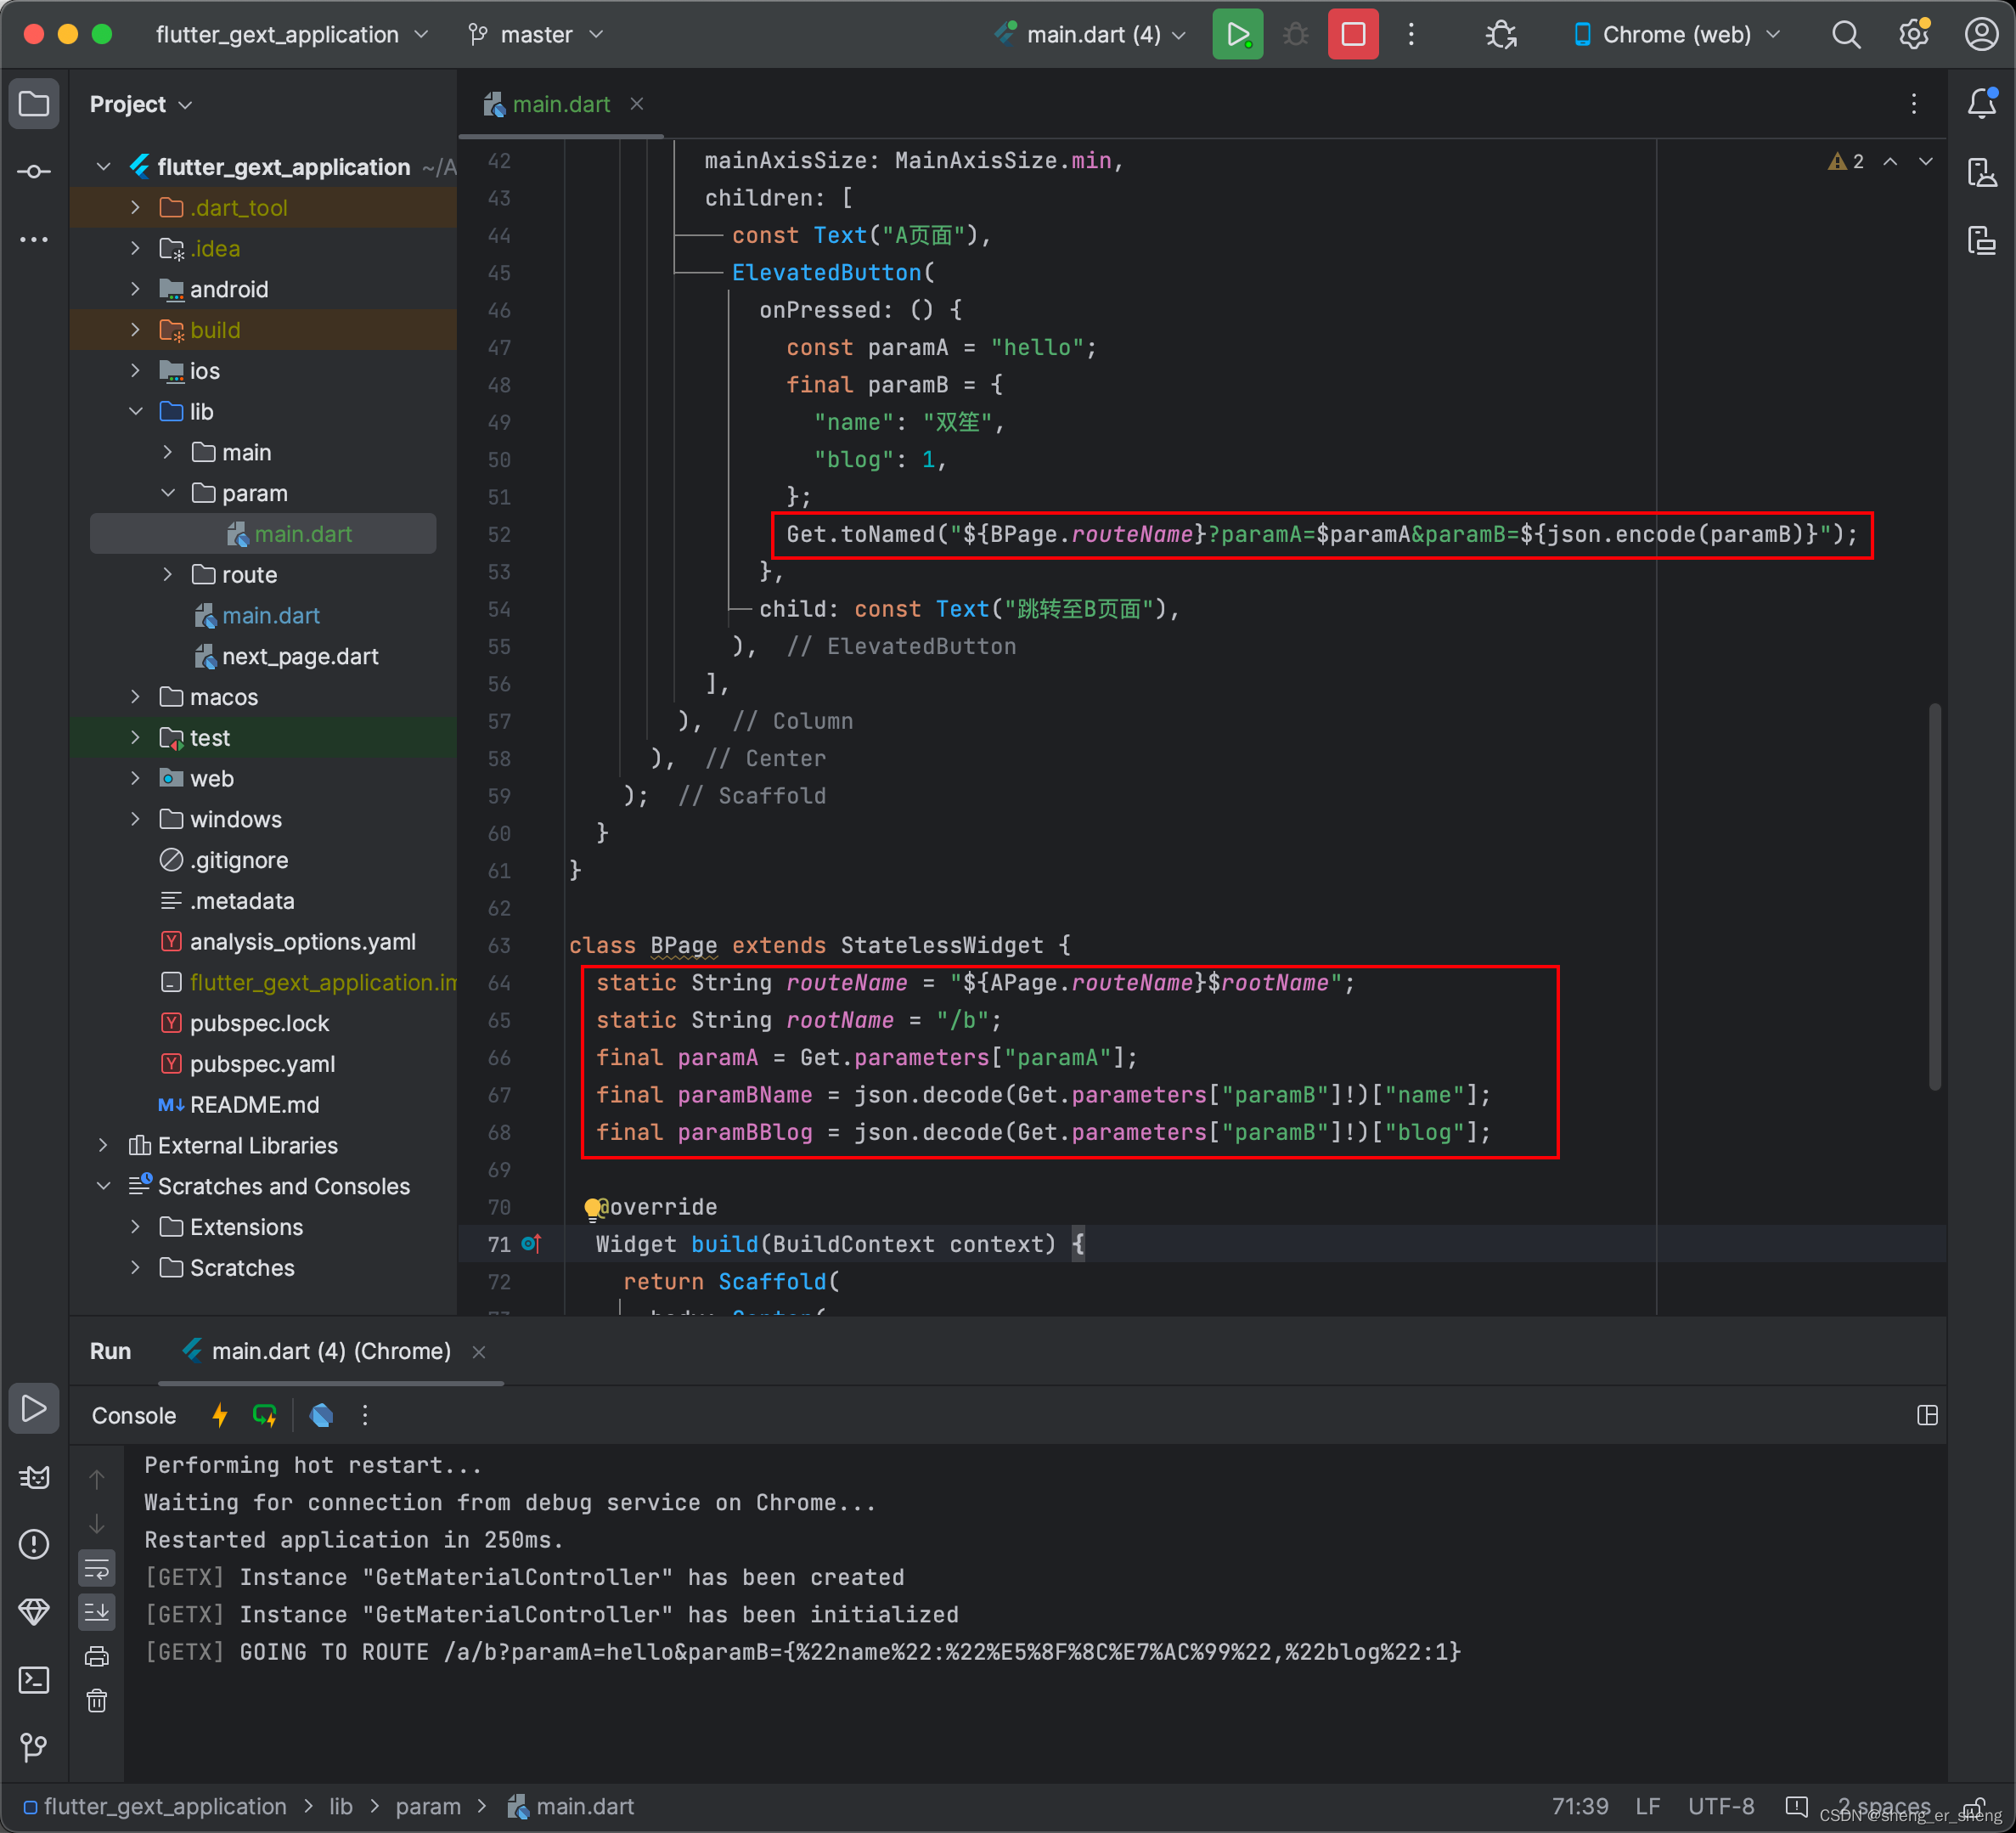
Get.toNamed() 路径带参数
页面切到下一个页面,可以在路由上附带参数。
这里要采用别名路由,很明显是网址携带参数的写法
?加个参数名,=后面接参数值,如果有第二个参数就用&链接一下,然后继续参数名,接一个=,参数值
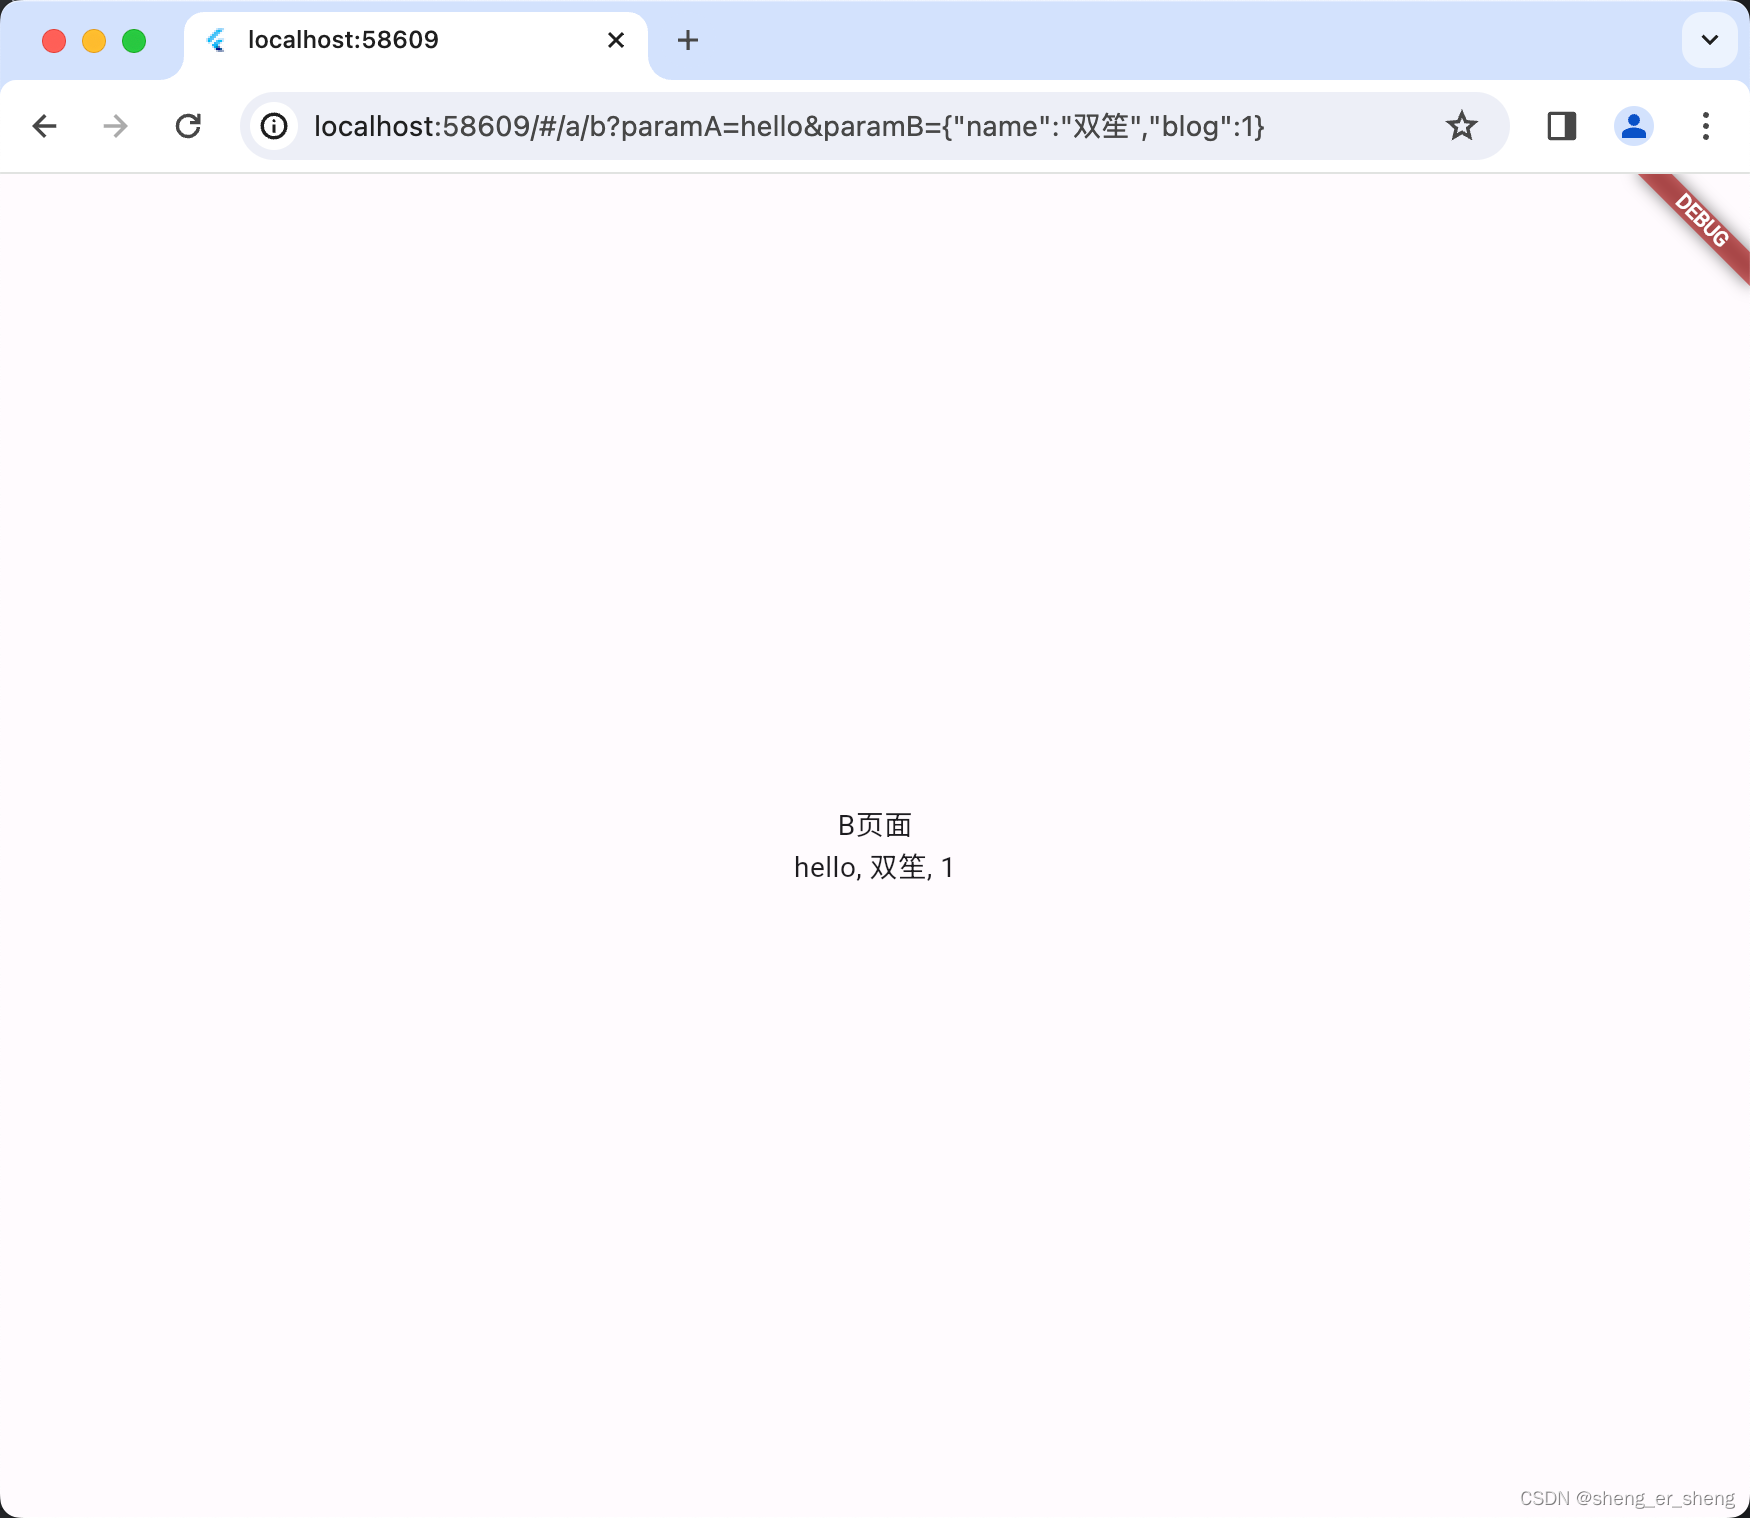
这样即便没有前一个页面,也能通过这种传参数的方式进入到这个页面
比如我换一个网址,但是参数可以改动
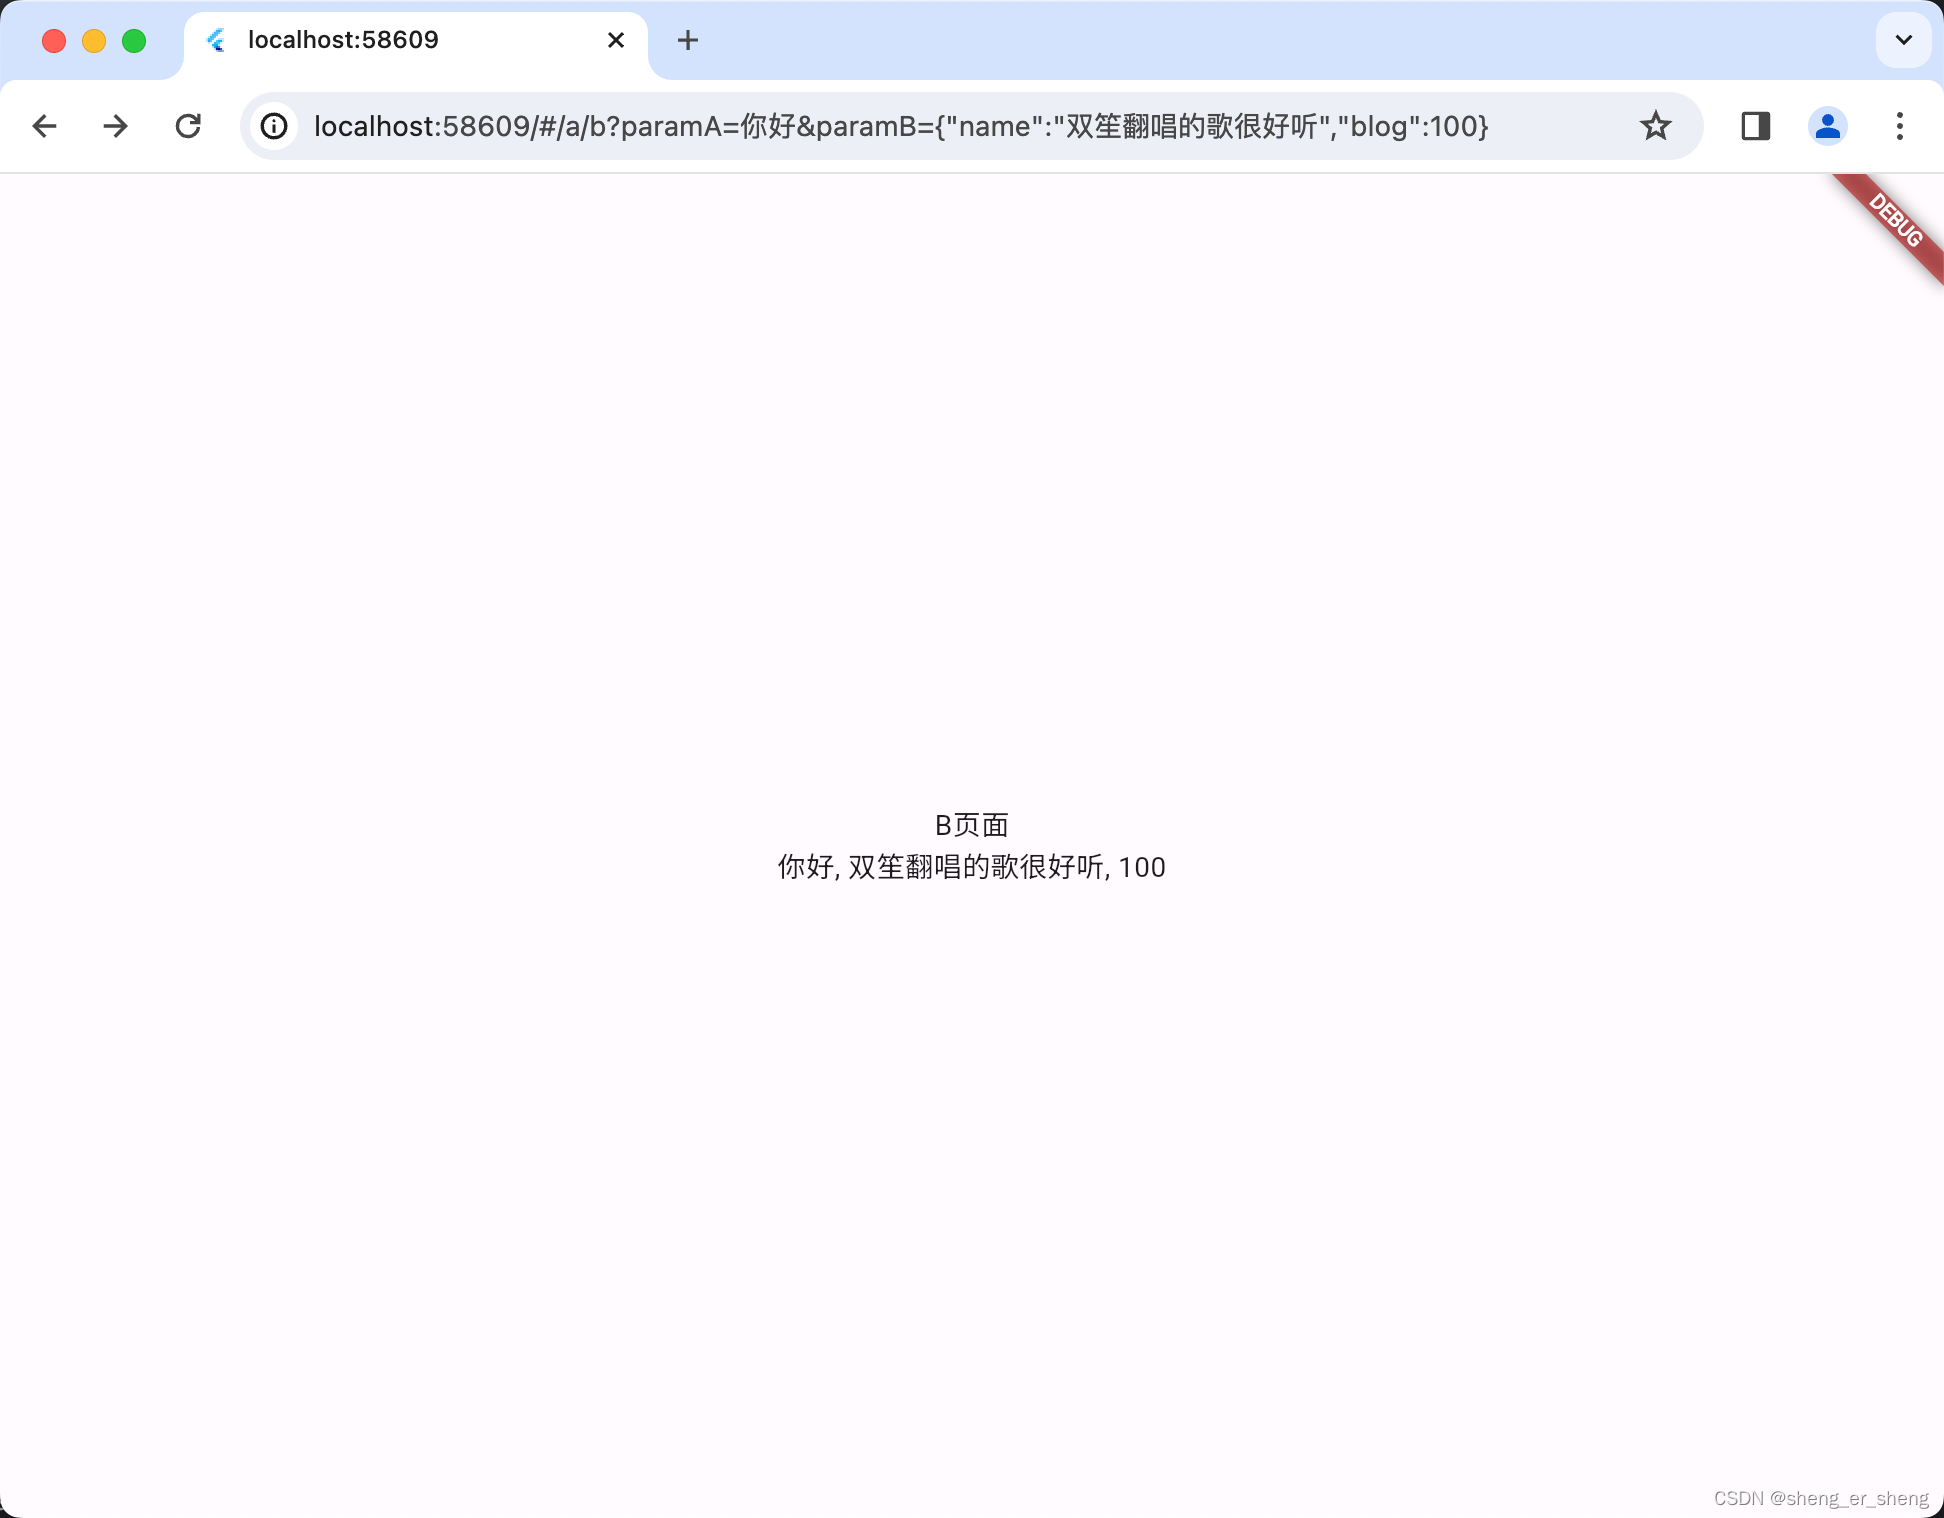
这是代码中,指定的参数值
import 'dart:convert';
import 'package:flutter/material.dart';
import 'package:get/get.dart';
void main() {
runApp(const App());
}
class App extends StatelessWidget {
const App({super.key});
Widget build(BuildContext context) {
return GetMaterialApp(
initialRoute: APage.routeName,
getPages: [
GetPage(
name: APage.rootName,
page: () => APage(),
children: [
GetPage(
name: BPage.rootName,
page: () => BPage(),
),
],
),
],
);
}
}
class APage extends StatelessWidget {
static String routeName = "/a";
static String rootName = "/a";
Widget build(BuildContext context) {
return Scaffold(
body: Center(
child: Column(
mainAxisSize: MainAxisSize.min,
children: [
const Text("A页面"),
ElevatedButton(
onPressed: () {
const paramA = "hello";
final paramB = {
"name": "双笙",
"blog": 1,
};
Get.toNamed("${BPage.routeName}?paramA=$paramA¶mB=${json.encode(paramB)}");
},
child: const Text("跳转至B页面"),
),
],
),
),
);
}
}
class BPage extends StatelessWidget {
static String routeName = "${APage.routeName}$rootName";
static String rootName = "/b";
final paramA = Get.parameters["paramA"];
final paramBName = json.decode(Get.parameters["paramB"]!)["name"];
final paramBBlog = json.decode(Get.parameters["paramB"]!)["blog"];
Widget build(BuildContext context) {
return Scaffold(
body: Center(
child: Column(
mainAxisSize: MainAxisSize.min,
children: [
const Text("B页面"),
Text("$paramA, $paramBName, $paramBBlog"),
],
),
),
);
}
}
在路由上规定参数(命名参数)
路由上定义参数名
这种写法需要注册路由
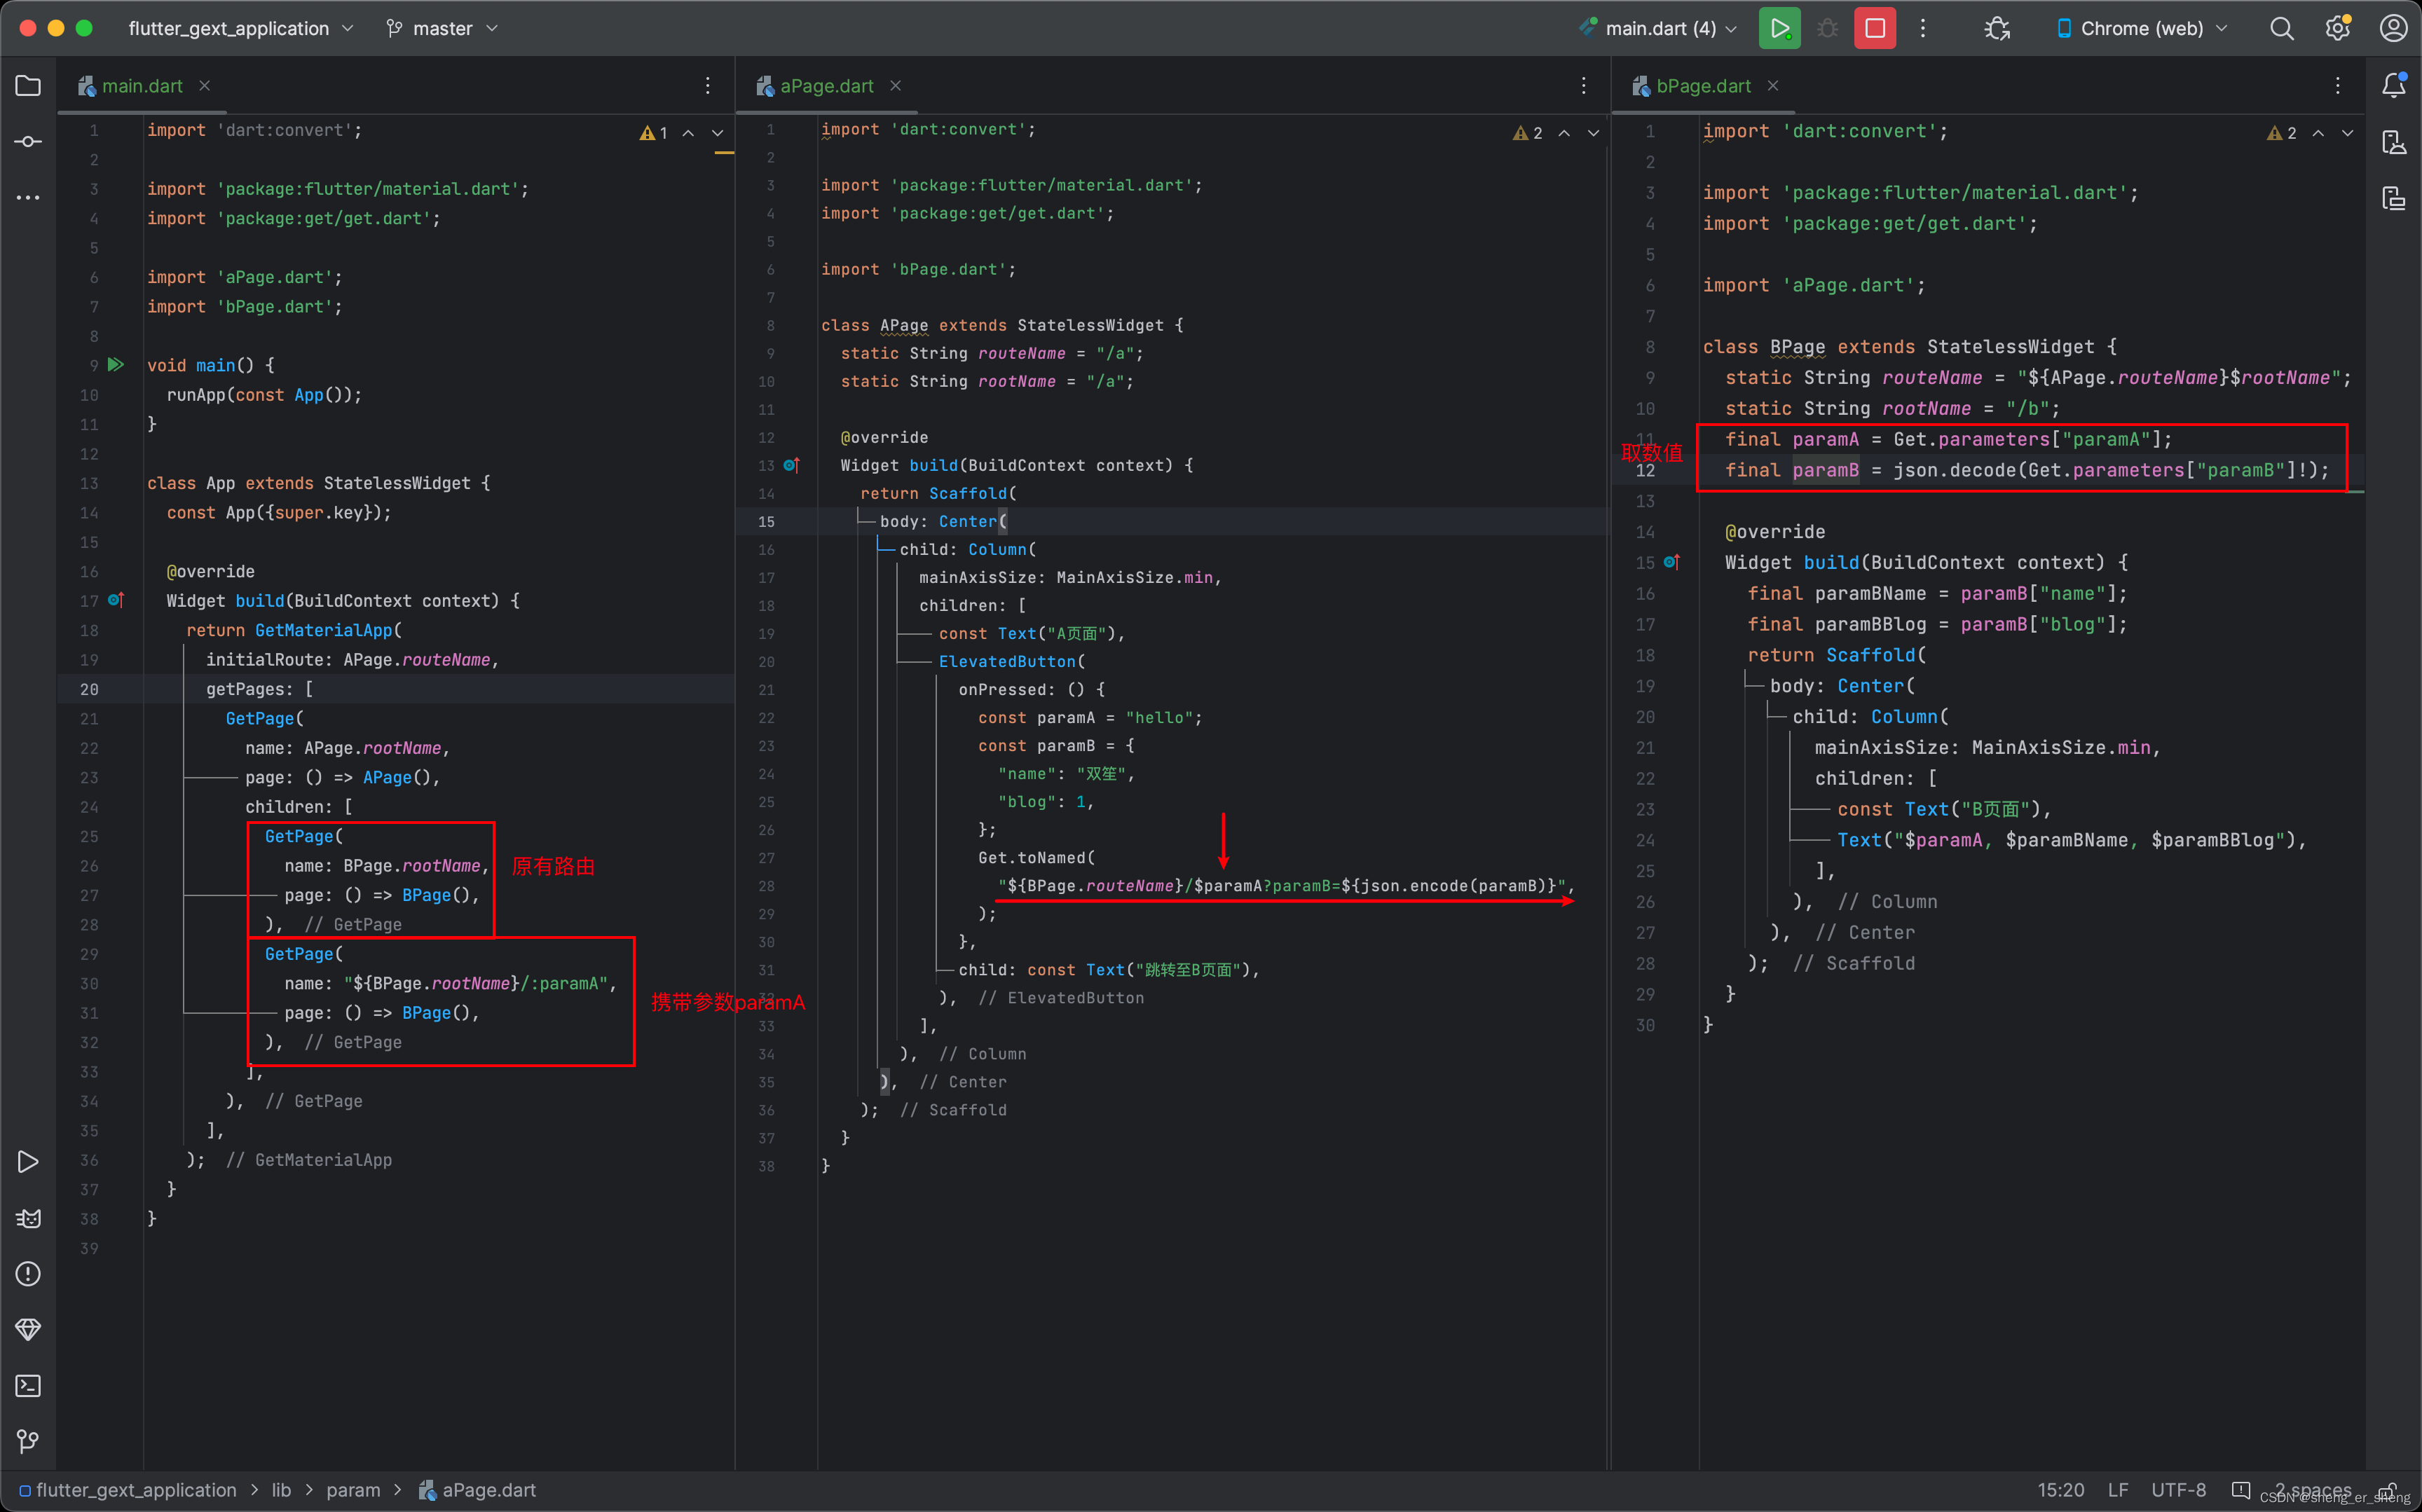
import 'dart:convert';
import 'package:flutter/material.dart';
import 'package:get/get.dart';
import 'aPage.dart';
import 'bPage.dart';
void main() {
runApp(const App());
}
class App extends StatelessWidget {
const App({super.key});
Widget build(BuildContext context) {
return GetMaterialApp(
initialRoute: APage.routeName,
getPages: [
GetPage(
name: APage.rootName,
page: () => APage(),
children: [
GetPage(
name: BPage.rootName,
page: () => BPage(),
),
GetPage(
name: "${BPage.rootName}/:paramA",
page: () => BPage(),
),
],
),
],
);
}
}
import 'dart:convert';
import 'package:flutter/material.dart';
import 'package:get/get.dart';
import 'bPage.dart';
class APage extends StatelessWidget {
static String routeName = "/a";
static String rootName = "/a";
Widget build(BuildContext context) {
return Scaffold(
body: Center(
child: Column(
mainAxisSize: MainAxisSize.min,
children: [
const Text("A页面"),
ElevatedButton(
onPressed: () {
const paramA = "hello";
const paramB = {
"name": "双笙",
"blog": 1,
};
Get.toNamed(
"${BPage.routeName}/$paramA?paramB=${json.encode(paramB)}",
);
},
child: const Text("跳转至B页面"),
),
],
),
),
);
}
}
import 'dart:convert';
import 'package:flutter/material.dart';
import 'package:get/get.dart';
import 'aPage.dart';
class BPage extends StatelessWidget {
static String routeName = "${APage.routeName}$rootName";
static String rootName = "/b";
final paramA = Get.parameters["paramA"];
final paramB = json.decode(Get.parameters["paramB"]!);
Widget build(BuildContext context) {
final paramBName = paramB["name"];
final paramBBlog = paramB["blog"];
return Scaffold(
body: Center(
child: Column(
mainAxisSize: MainAxisSize.min,
children: [
const Text("B页面"),
Text("$paramA, $paramBName, $paramBBlog"),
],
),
),
);
}
}

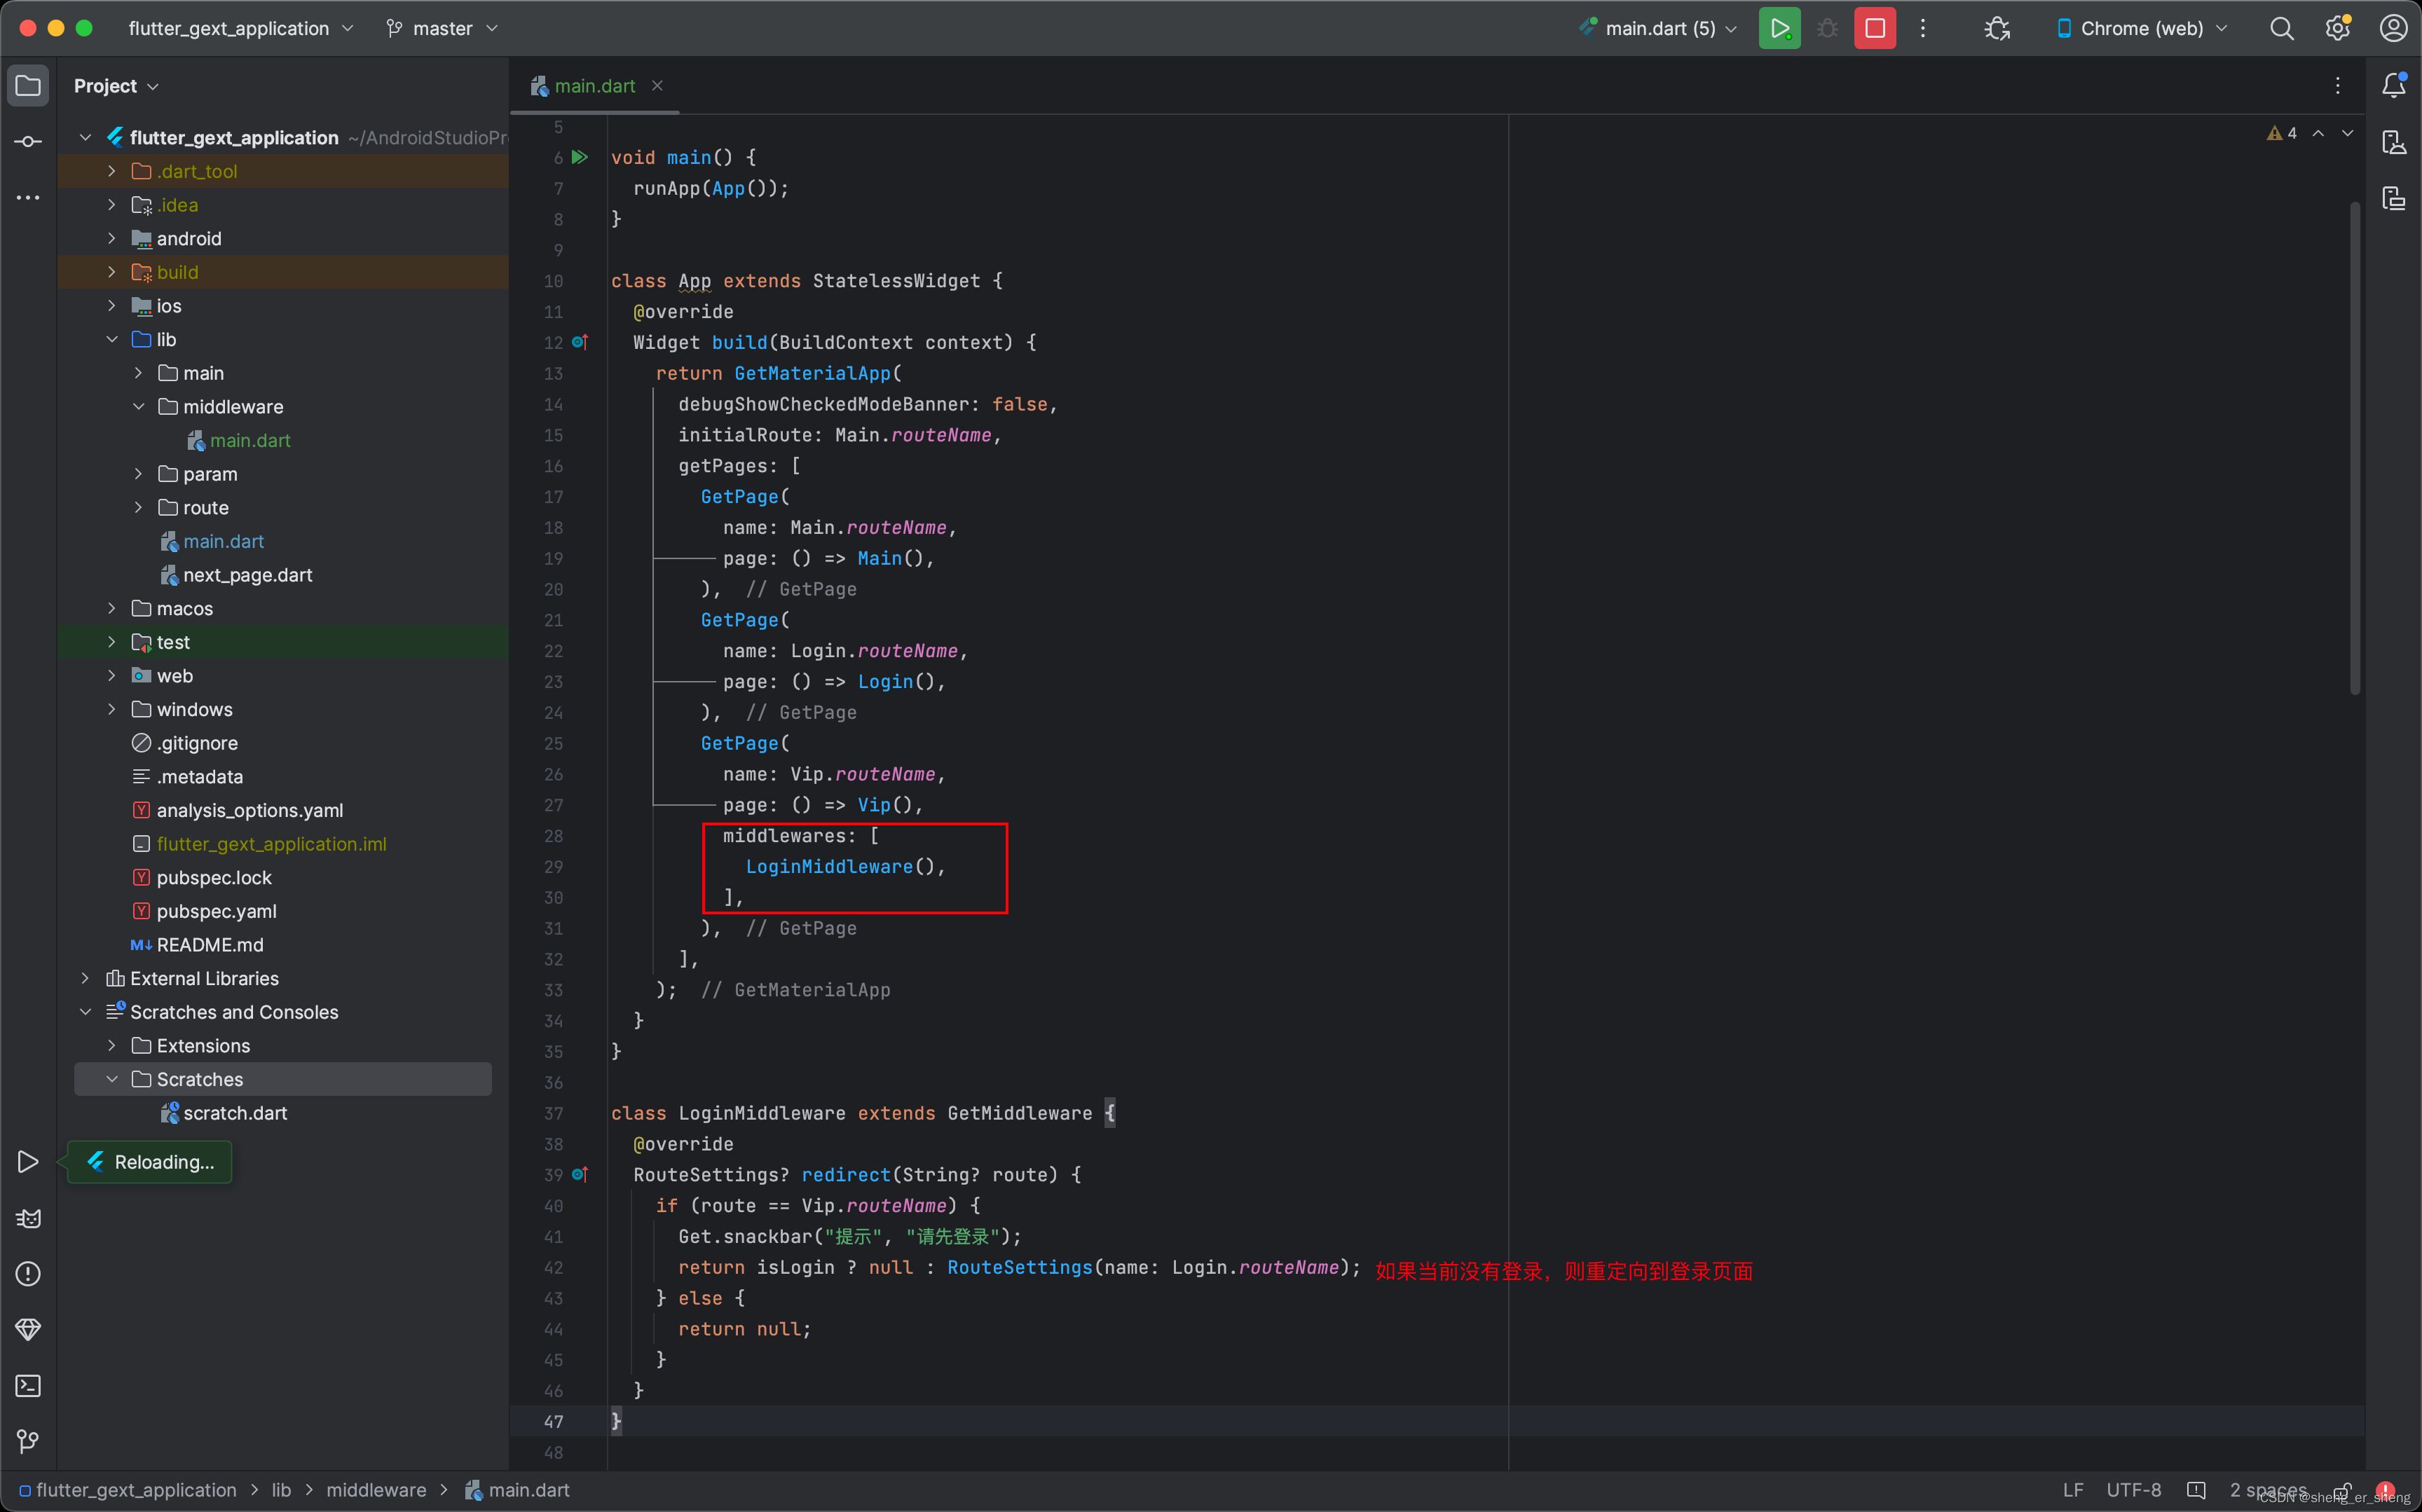
中间件
案例
描述:进入一个页面,但是这个页面需要登录。如果登录过就直接进入这个页面,否则跳转至登录页面
main --(没有登录)-> login --(返回首页)-> main --(已登录)-> vip
import 'package:flutter/material.dart';
import 'package:get/get.dart';
bool isLogin = false;
void main() {
runApp(App());
}
class App extends StatelessWidget {
Widget build(BuildContext context) {
return GetMaterialApp(
debugShowCheckedModeBanner: false,
initialRoute: Main.routeName,
getPages: [
GetPage(
name: Main.routeName,
page: () => Main(),
),
GetPage(
name: Login.routeName,
page: () => Login(),
),
GetPage(
name: Vip.routeName,
page: () => Vip(),
middlewares: [
LoginMiddleware(),
],
),
],
);
}
}
class Main extends StatelessWidget {
static String routeName = "/main";
Widget build(BuildContext context) {
return Scaffold(
body: Center(
child: Column(
mainAxisSize: MainAxisSize.min,
children: [
const Text("主页"),
ElevatedButton(
onPressed: () {
Get.toNamed(Vip.routeName);
},
child: const Text("VIP页面"),
),
],
),
),
);
}
}
class Vip extends StatelessWidget {
static String routeName = "/vip";
Widget build(BuildContext context) {
return const Scaffold(
body: Center(
child: Text("欢迎VIP用户"),
),
);
}
}
class Login extends StatelessWidget {
static String routeName = "/login";
Widget build(BuildContext context) {
return Scaffold(
body: Center(
child: Column(
mainAxisSize: MainAxisSize.min,
children: [
const Text("登录页面"),
ElevatedButton(
onPressed: () {
Get.snackbar("提示", "登录成功");
isLogin = true;
Get.offAllNamed(Main.routeName);
},
child: const Text("我是马化腾"),
)
],
),
),
);
}
}
class LoginMiddleware extends GetMiddleware {
RouteSettings? redirect(String? route) {
if (route == Vip.routeName) {
Get.snackbar("提示", "请先登录");
return isLogin ? null : RouteSettings(name: Login.routeName);
} else {
return null;
}
}
}
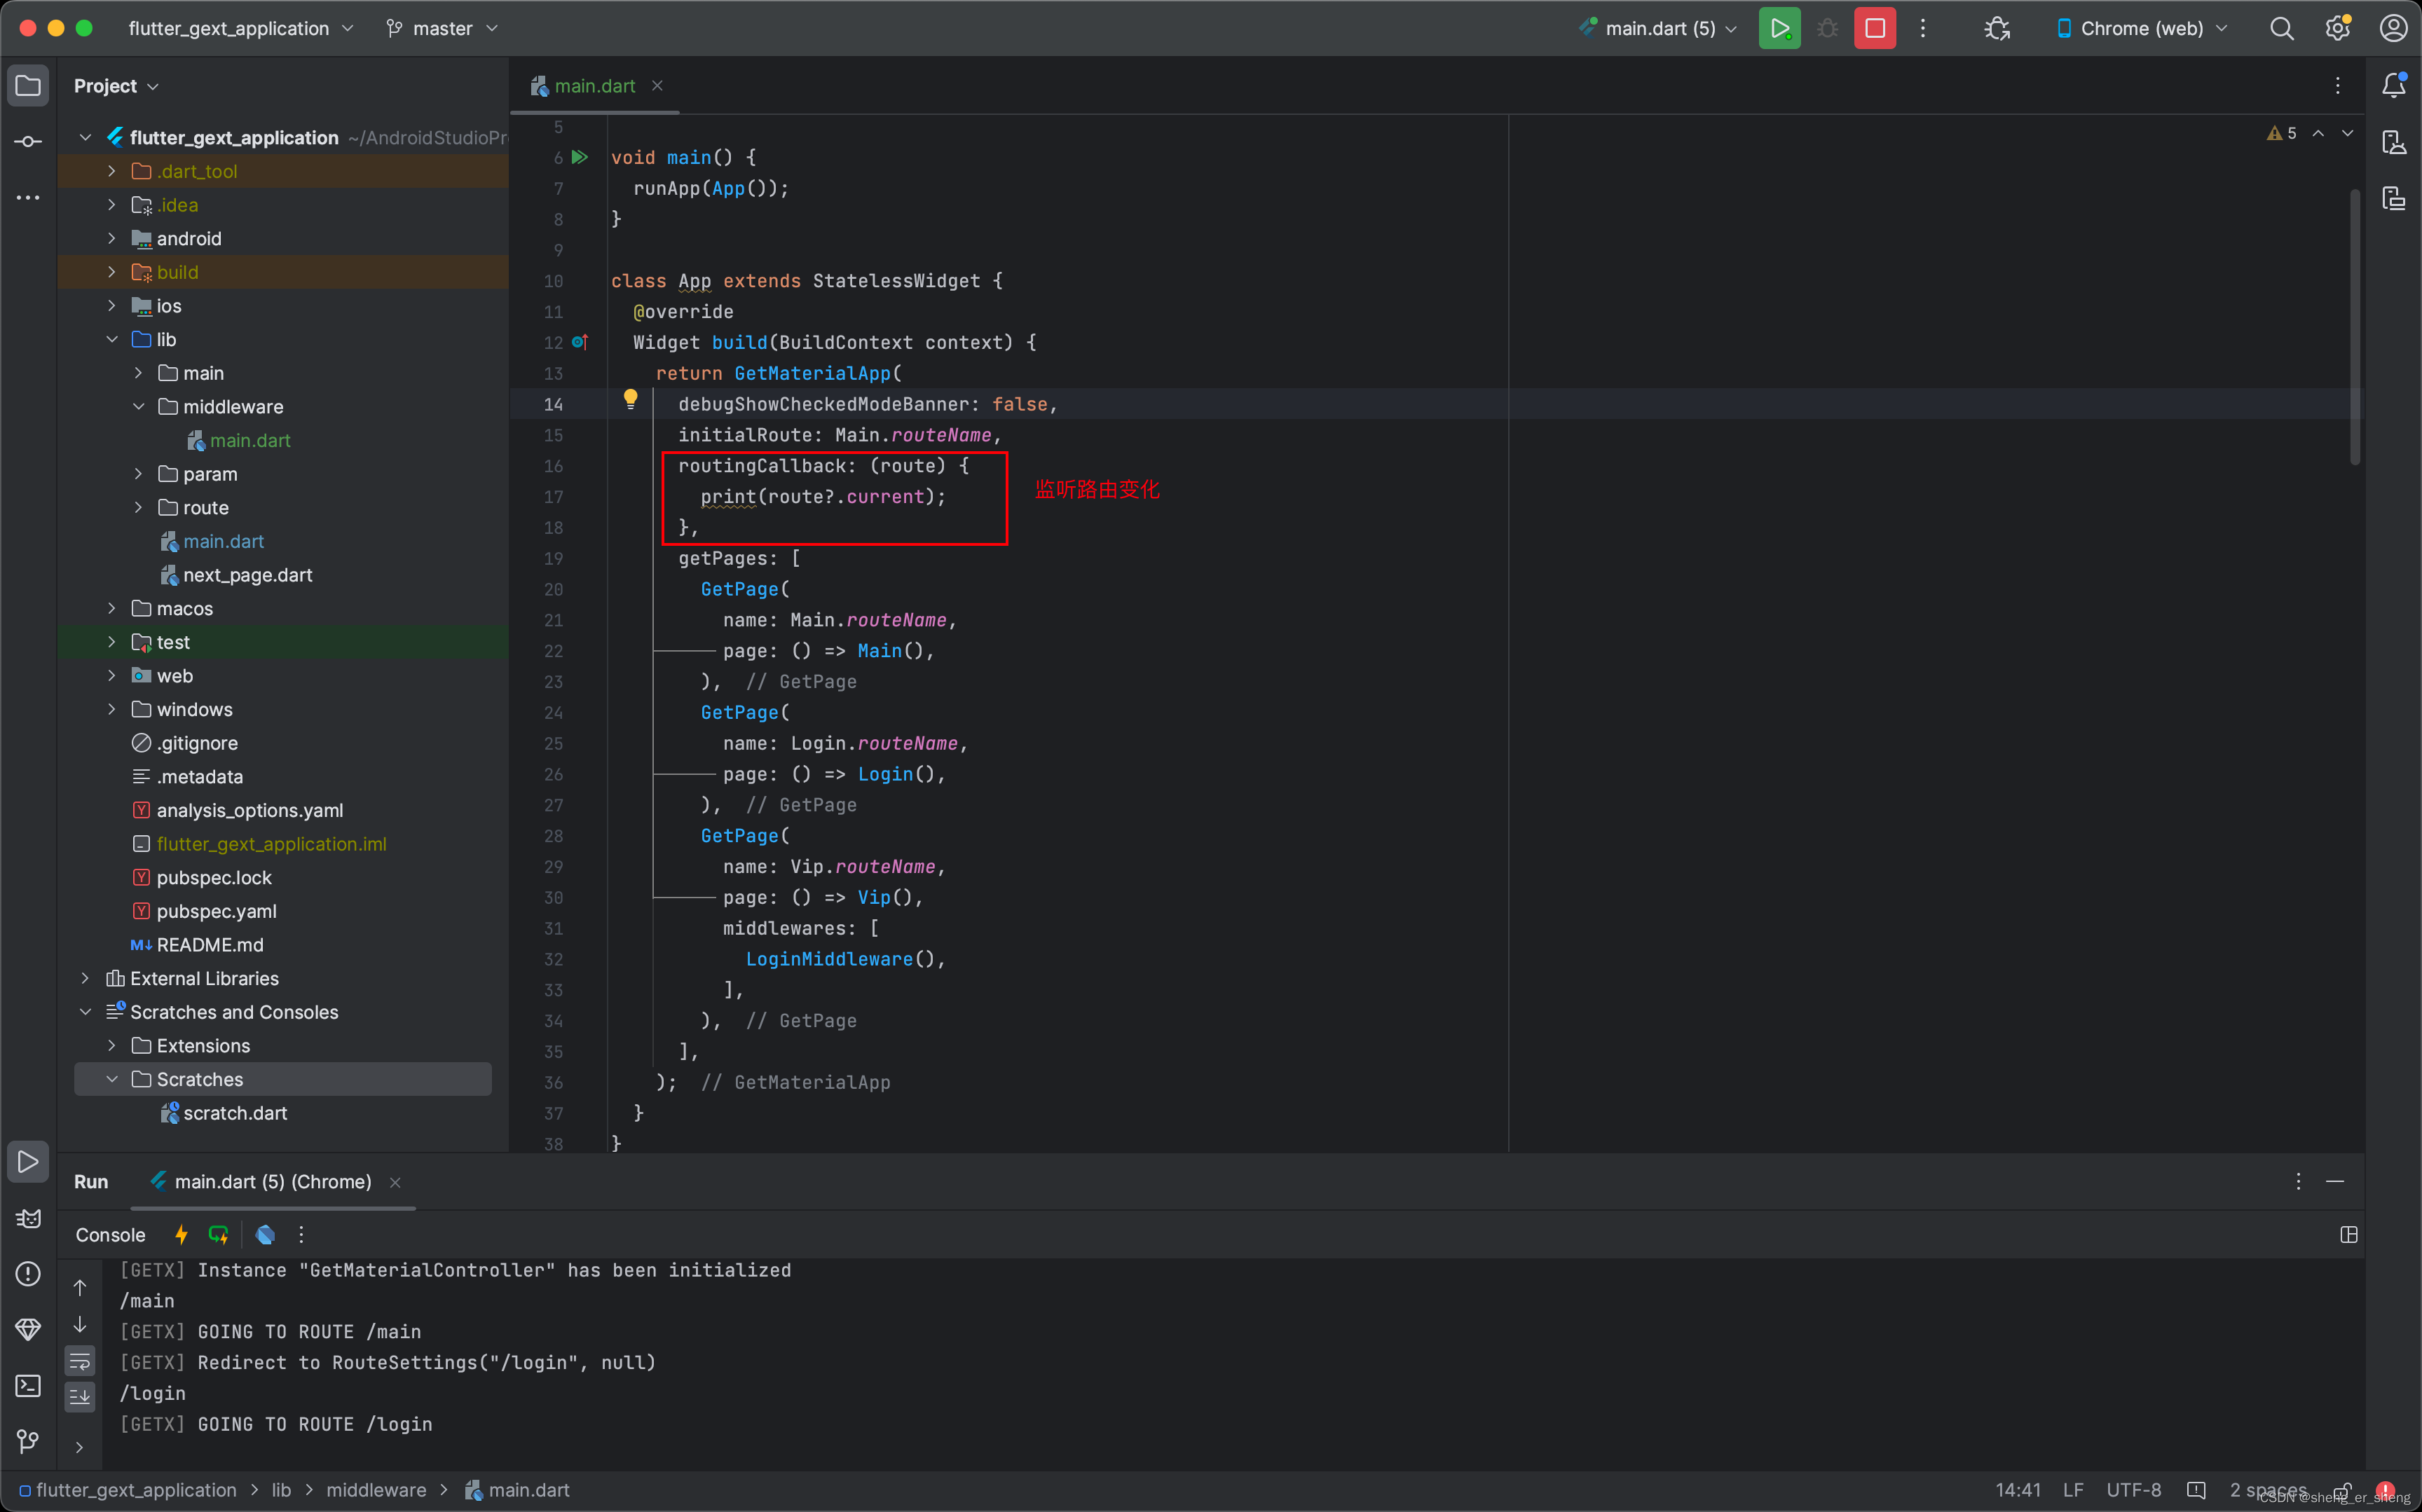
补充(routingCallback)
嵌套路由
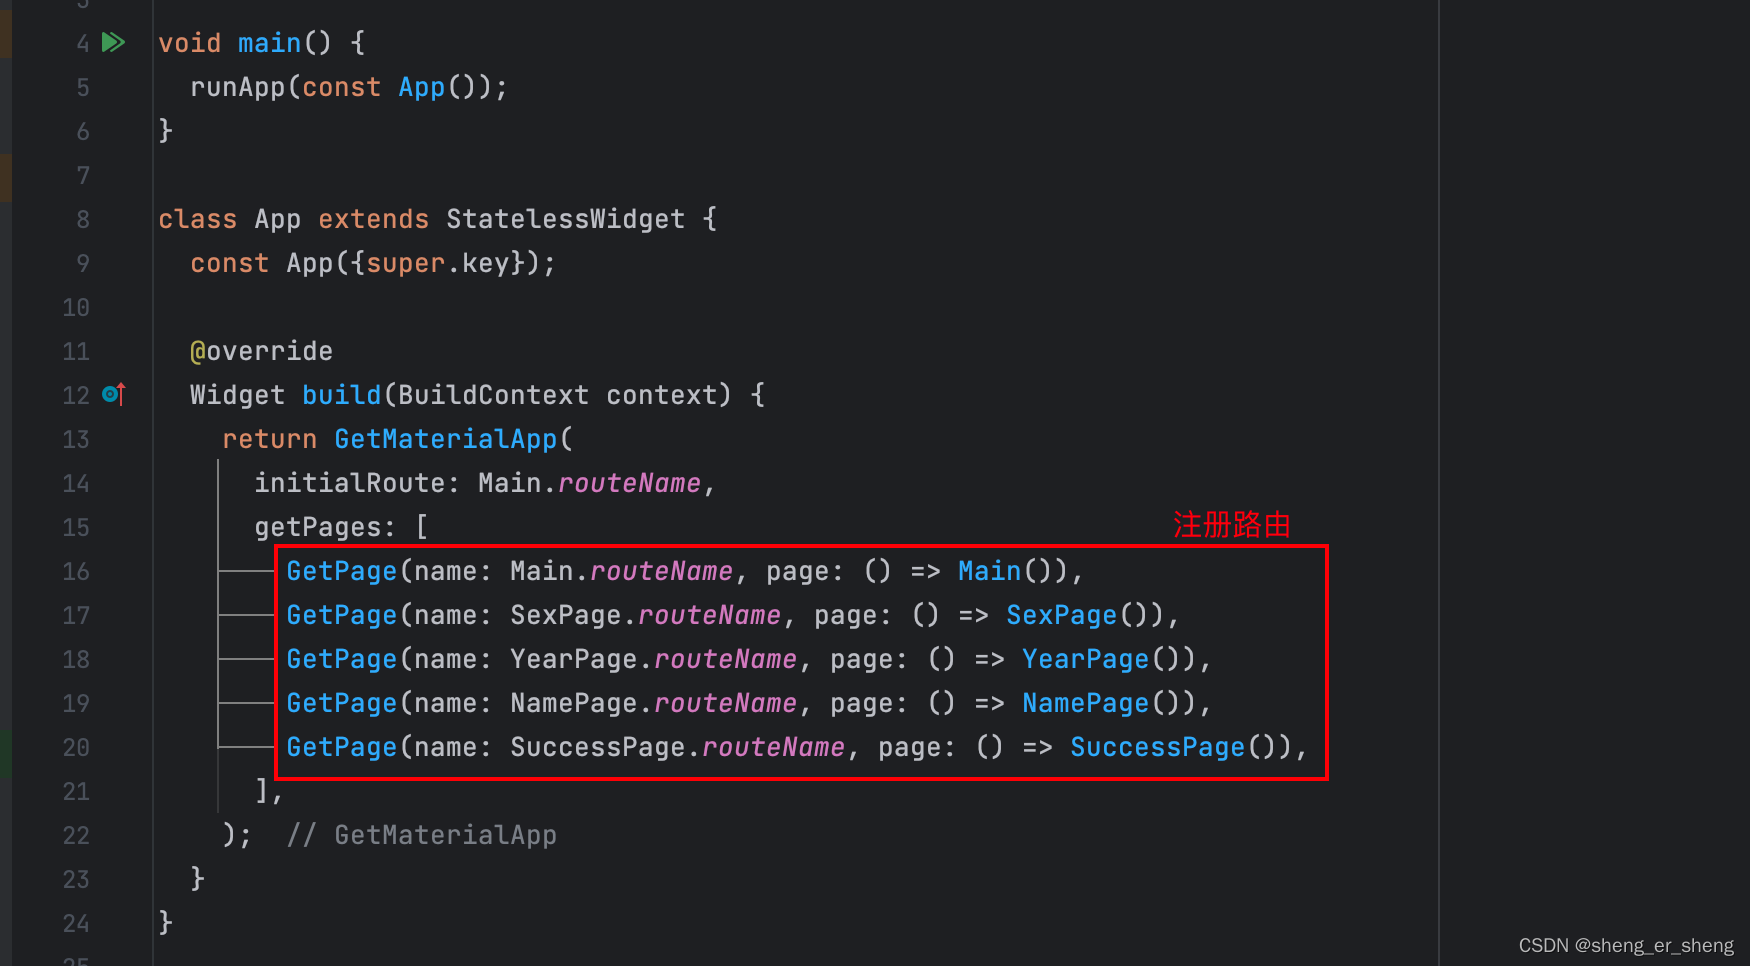
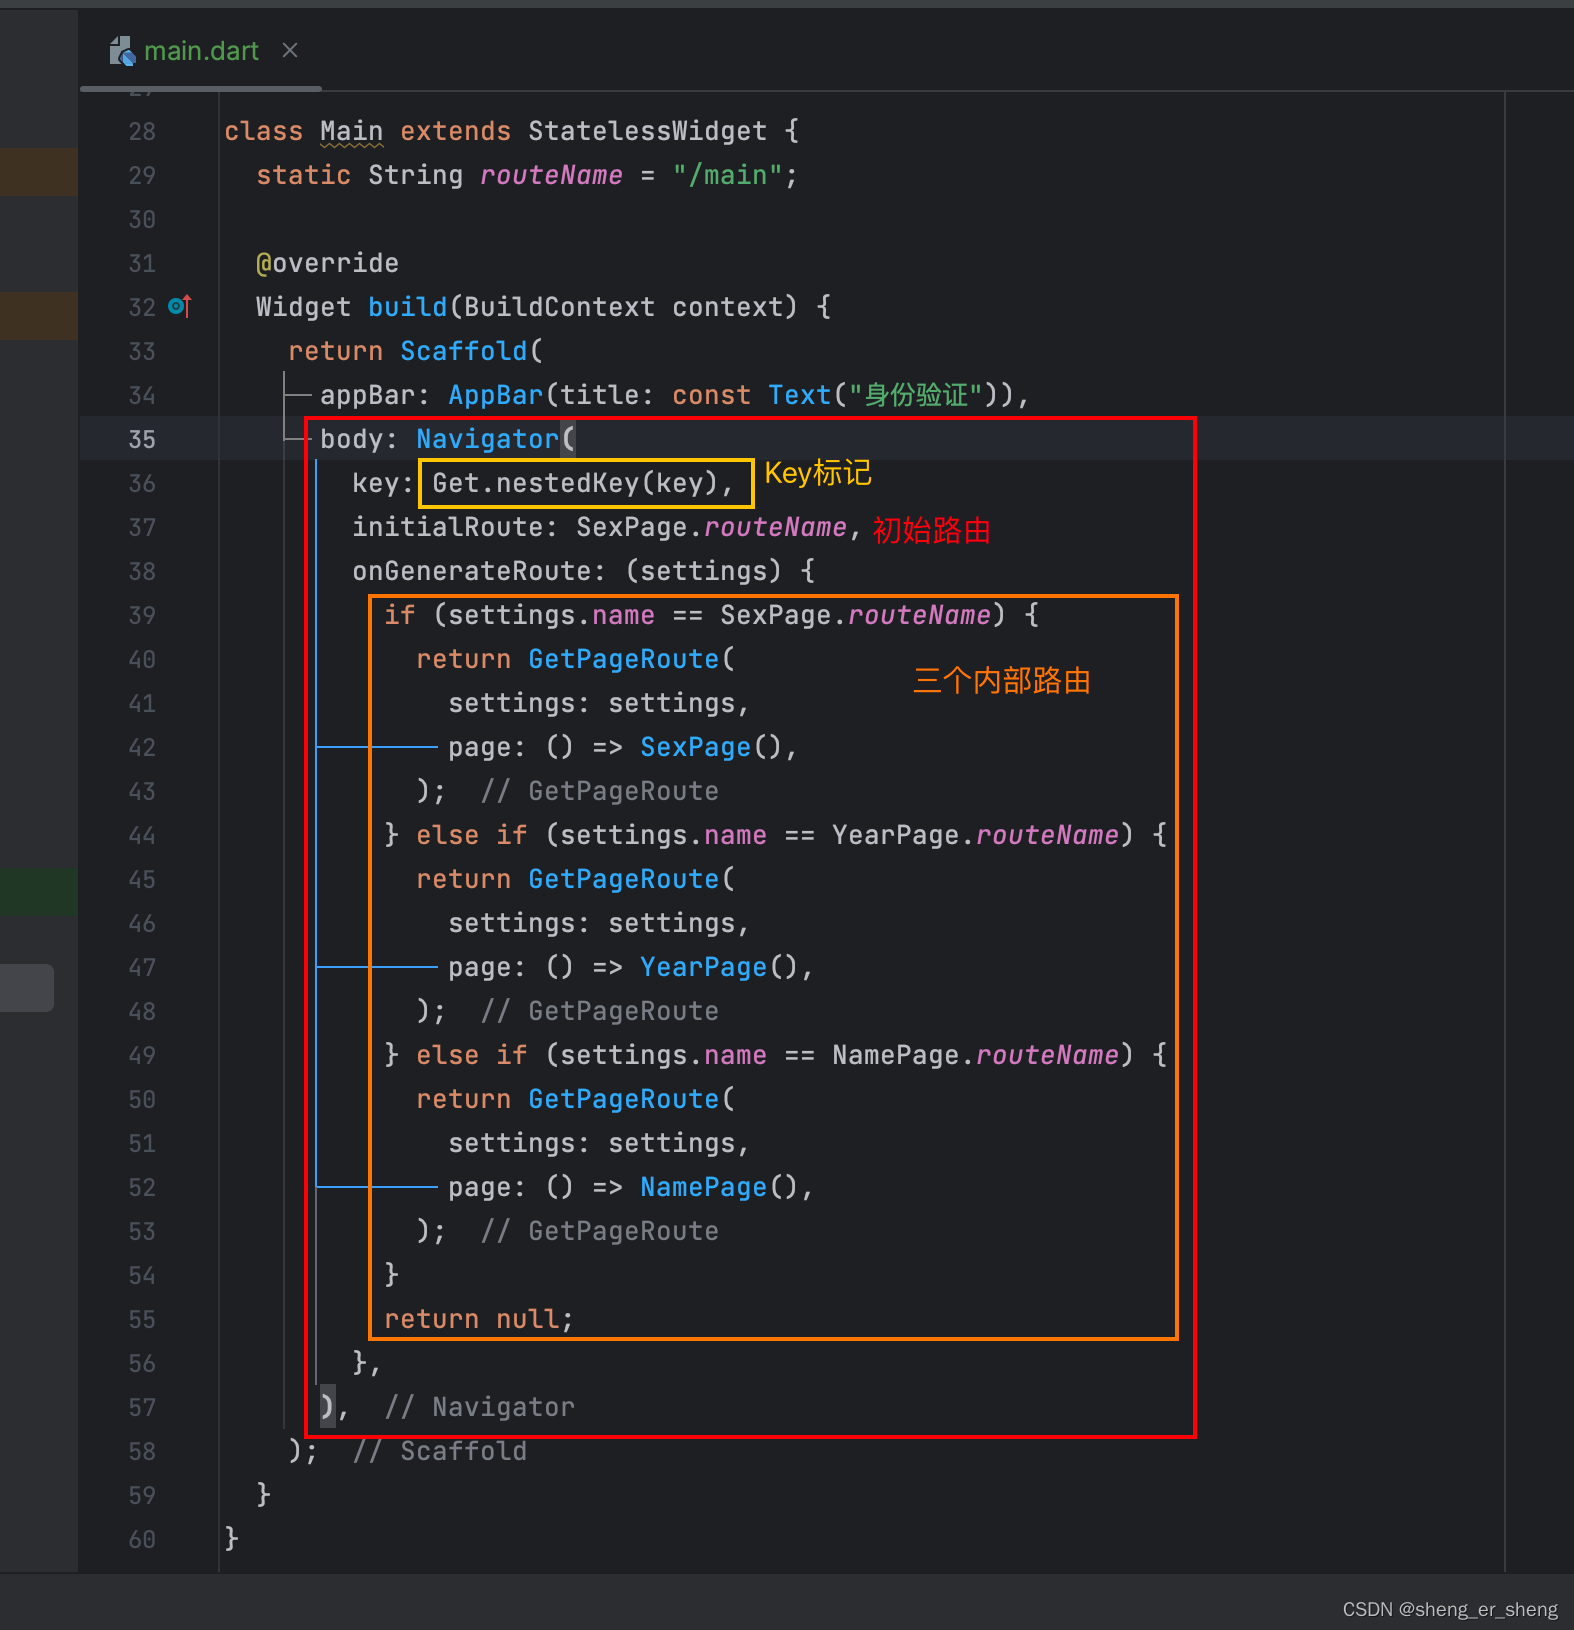
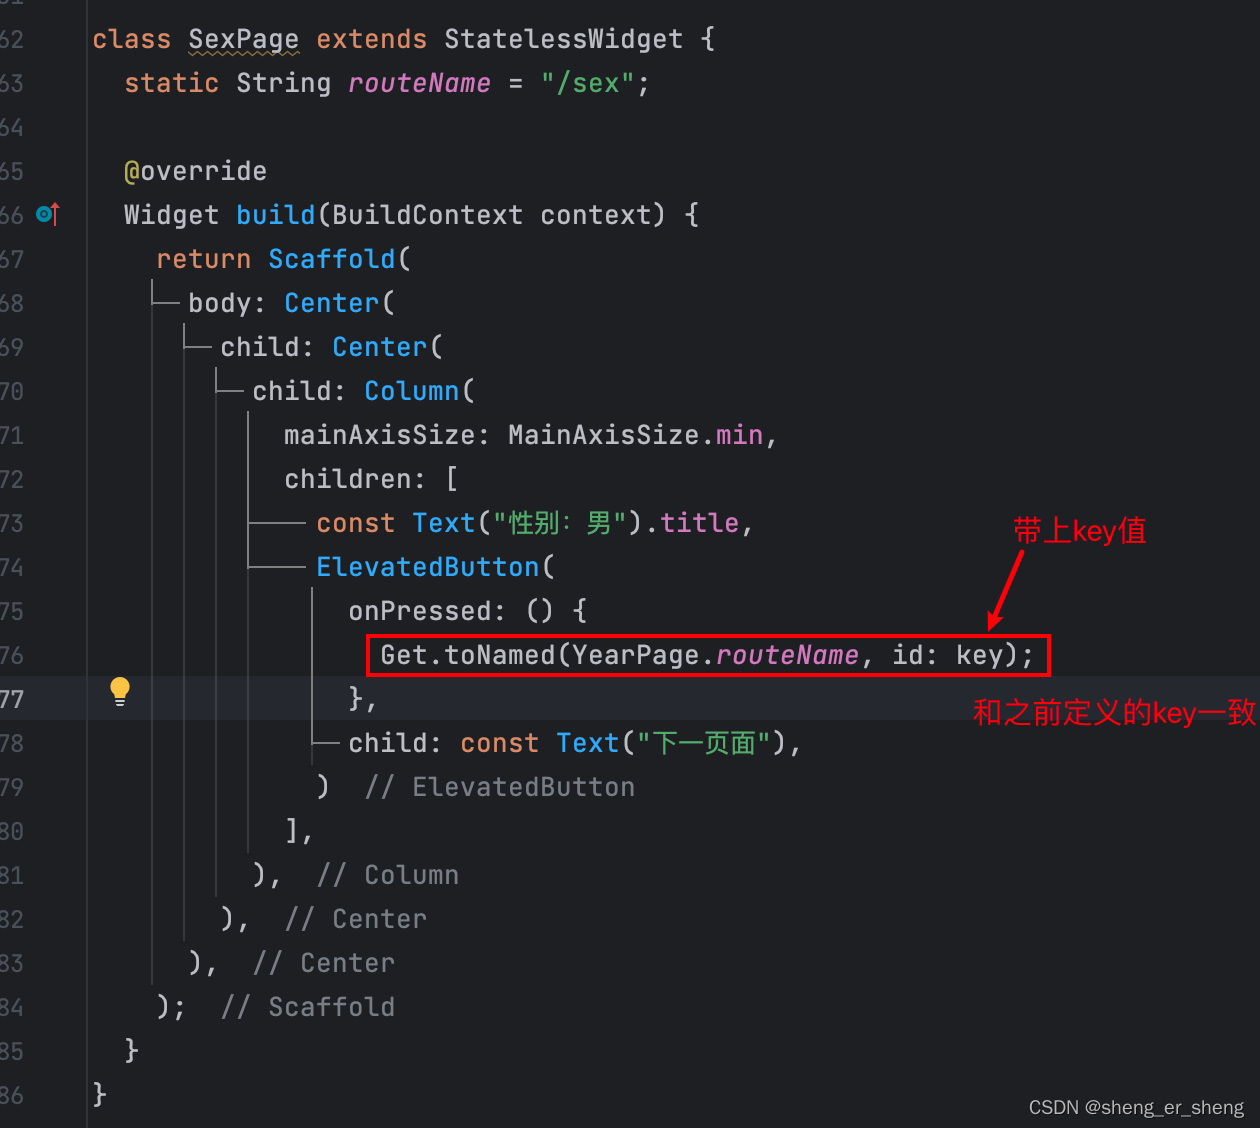
跳转时,带上id,值为key值。点击会发现始终在/main路由下,但是页面分别进入了三个内部的路由
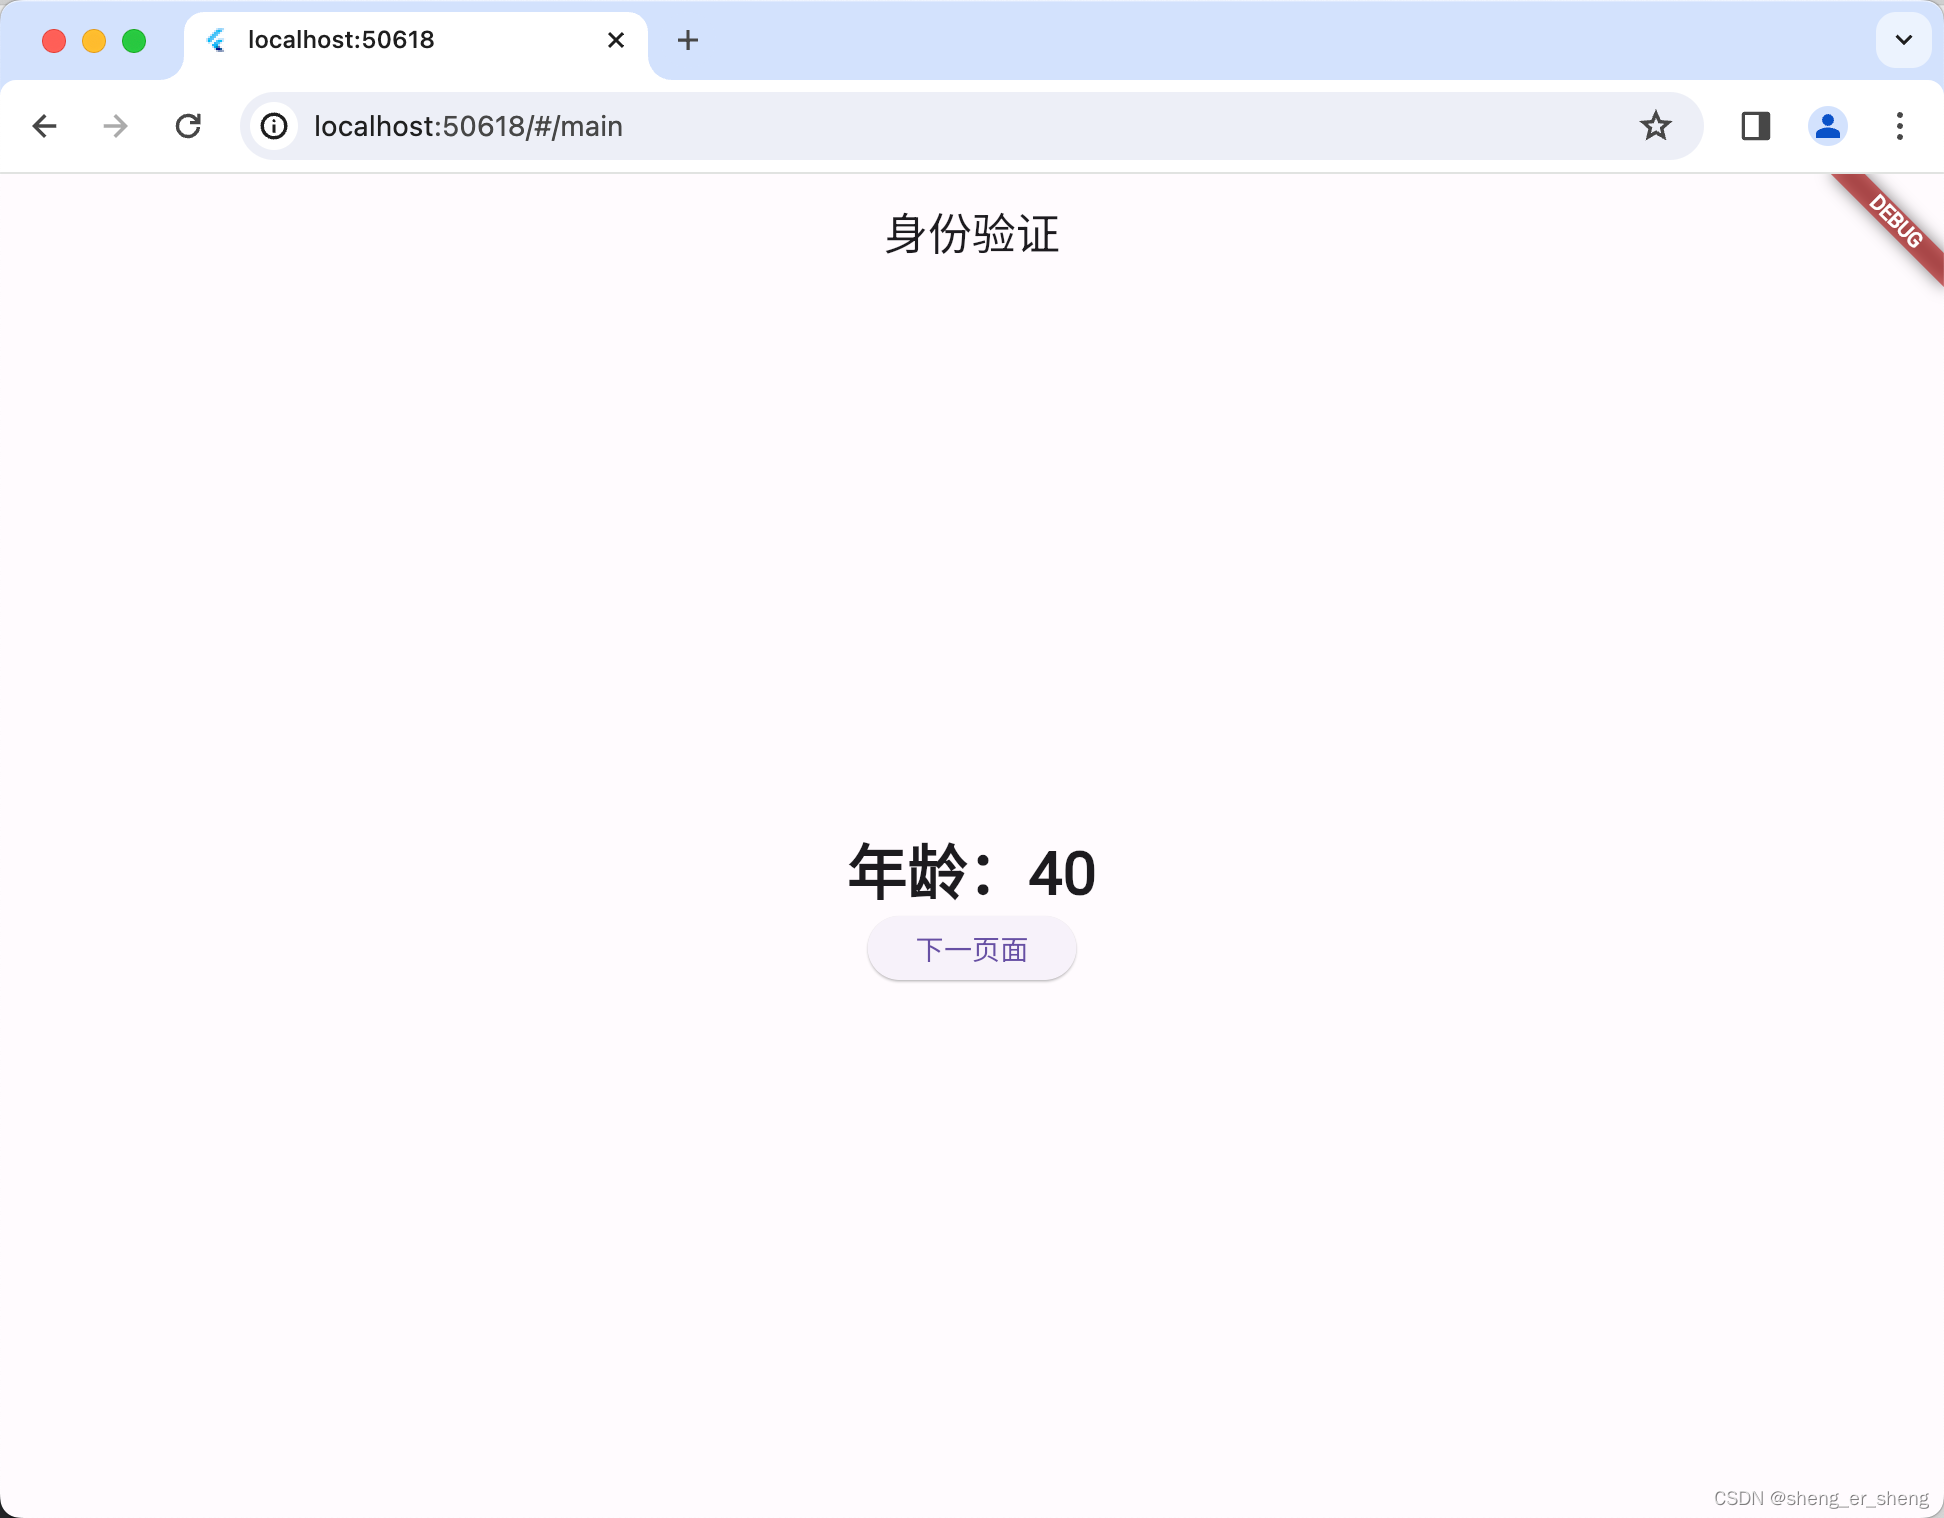
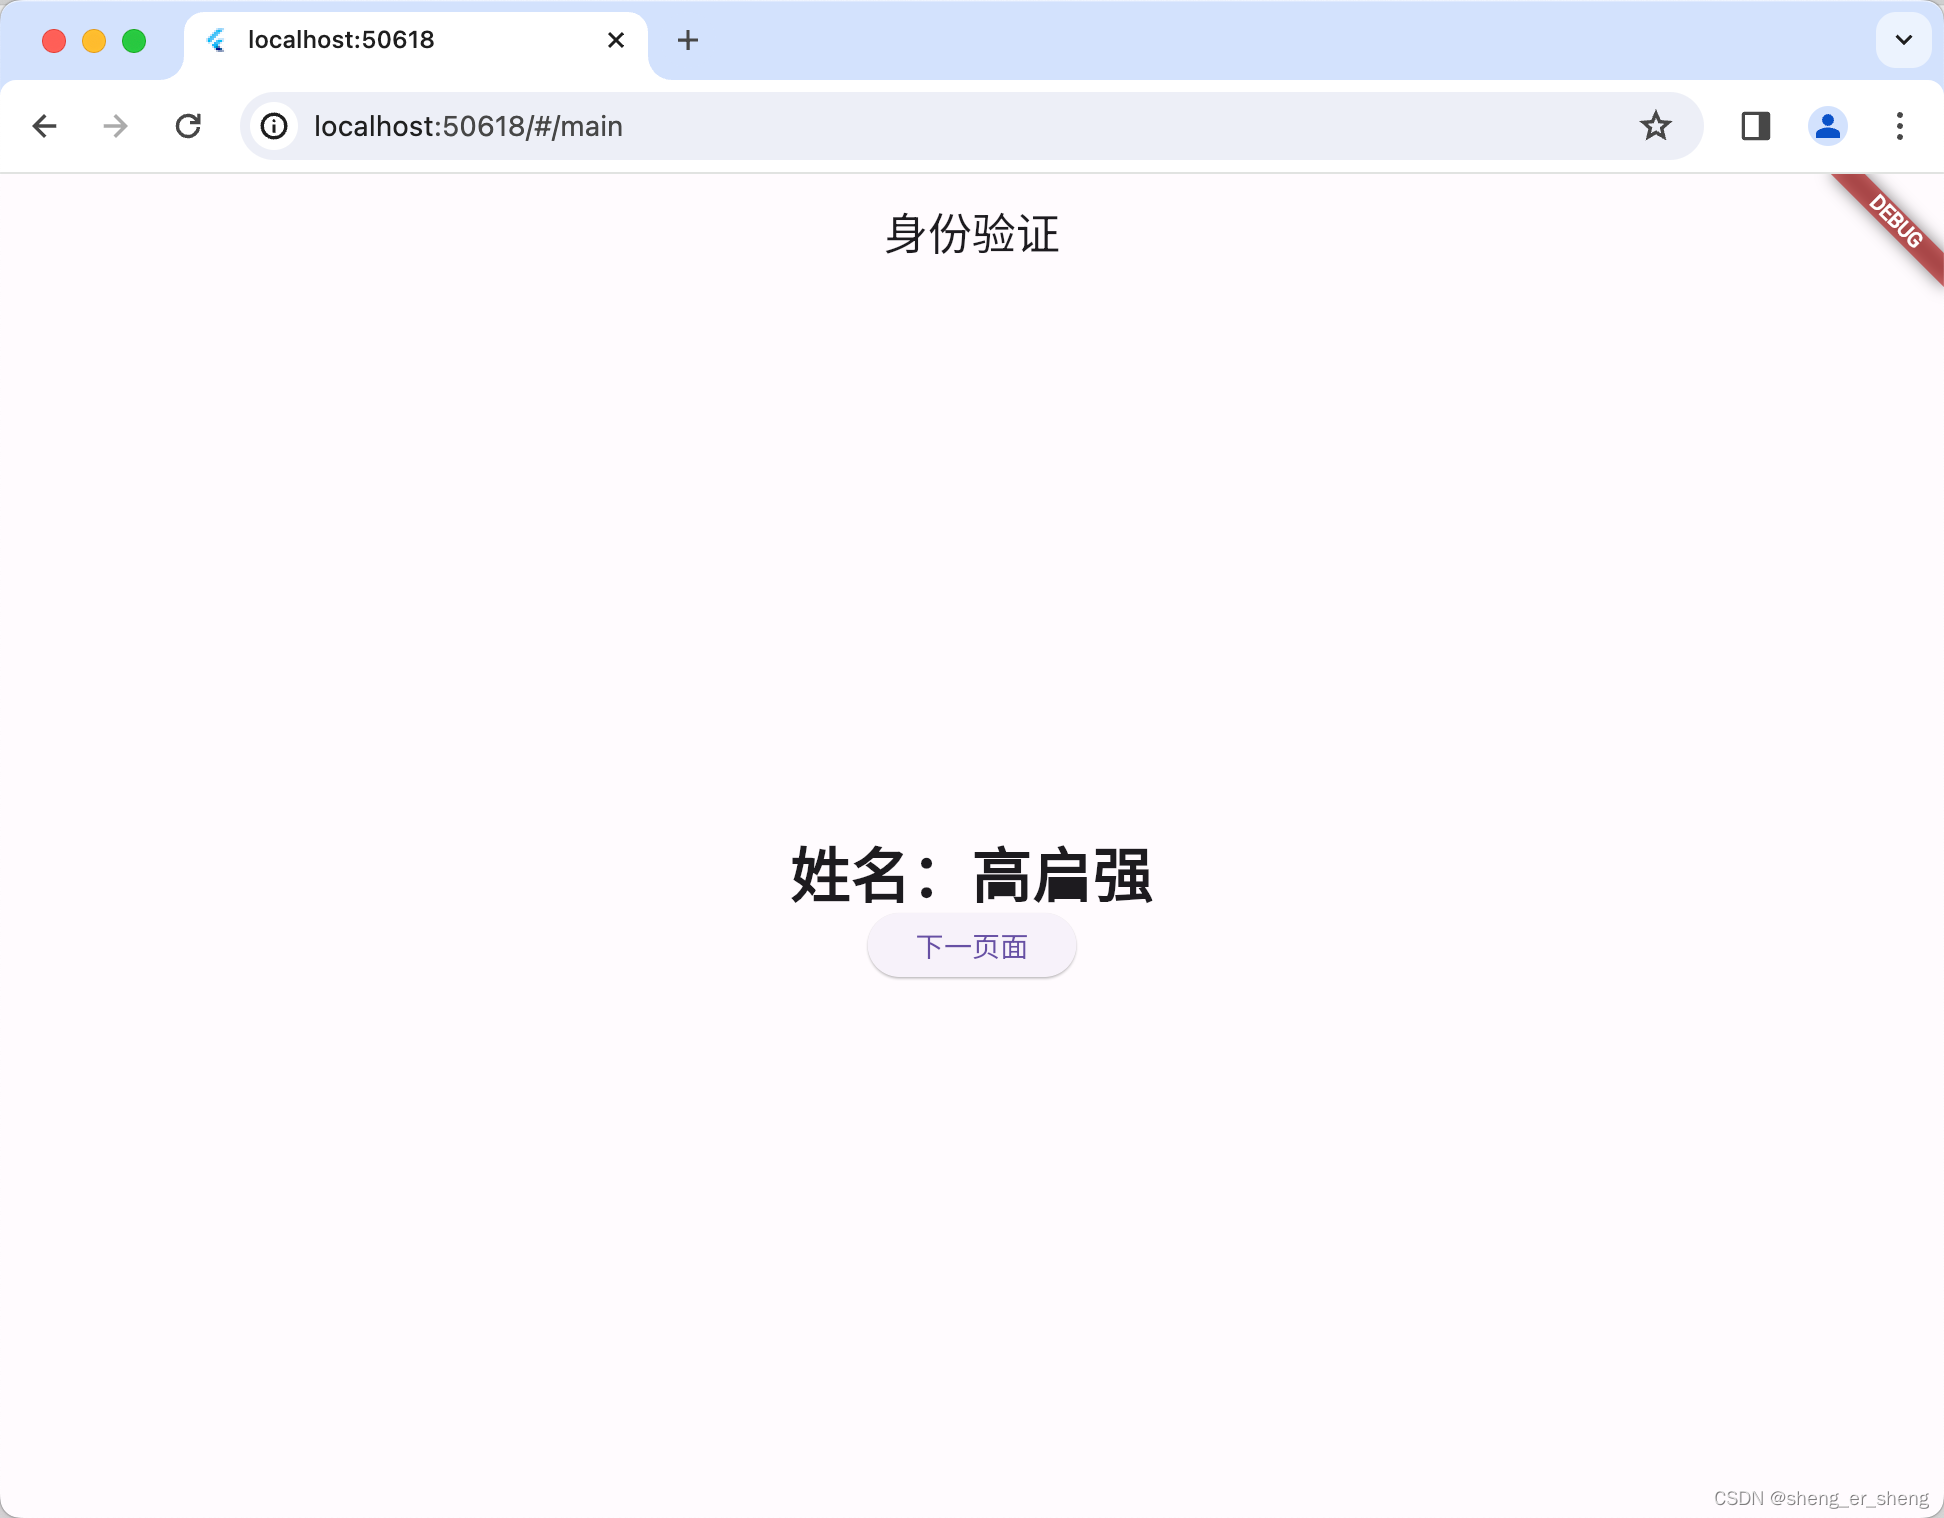
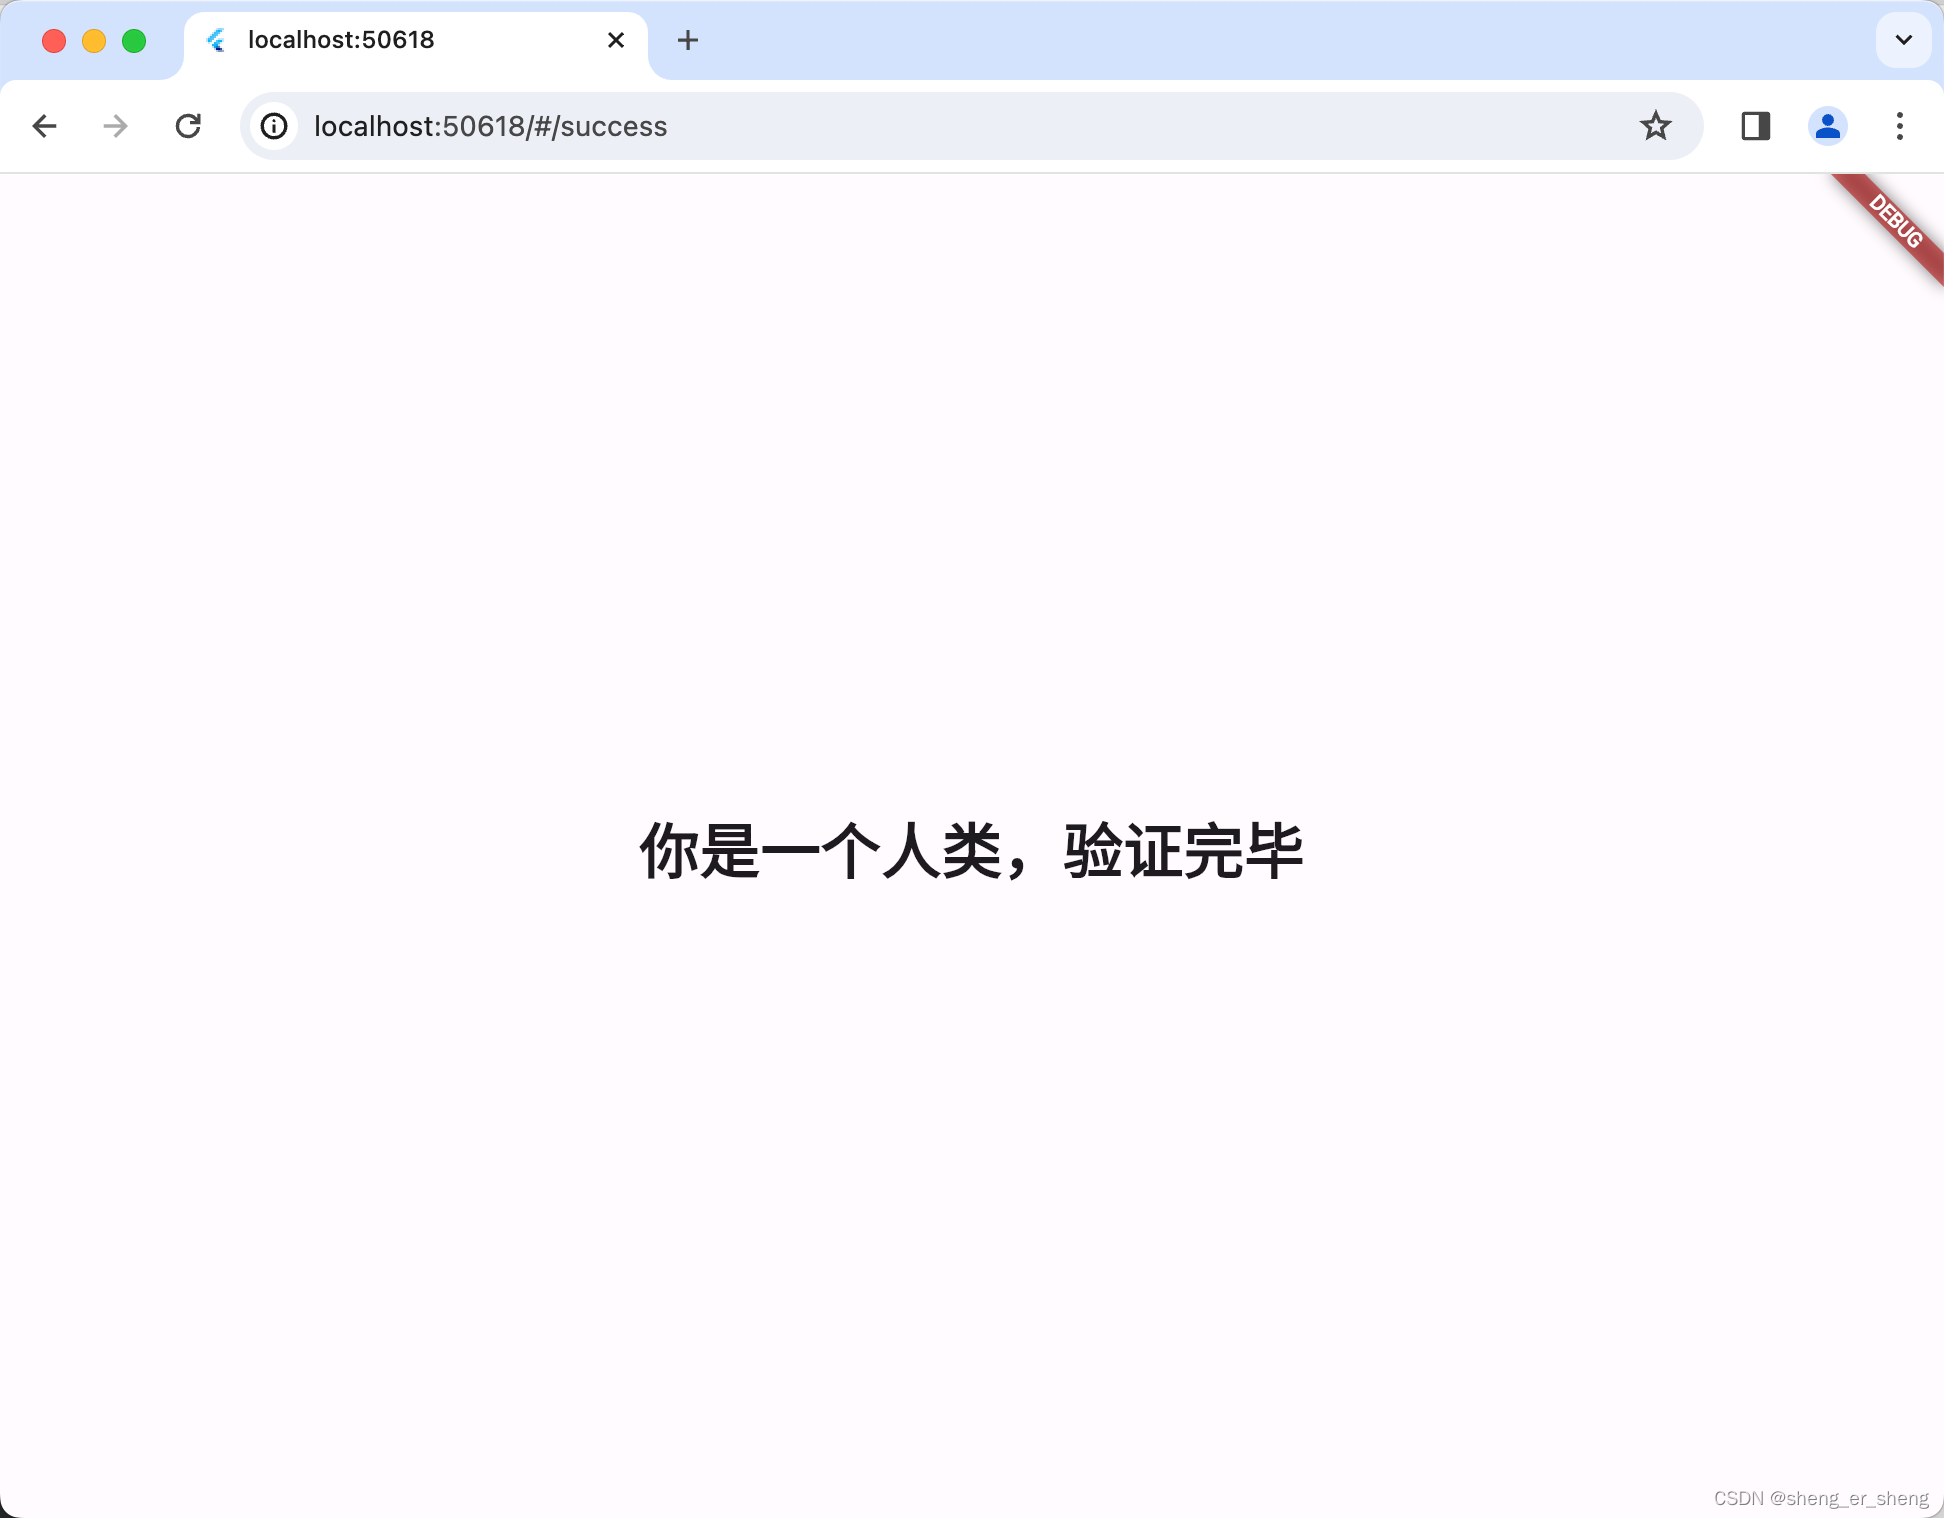
最后进入完成页面
extension TitleText on Text {
  Text get title => Text(
    data!,
    style: const TextStyle(fontSize: 30, fontWeight: FontWeight.bold),
  );
}
import 'package:flutter/material.dart';
import 'package:flutter_gext_application/nestedRoute/tWidget.dart';
import 'package:get/get.dart';
void main() {
runApp(const App());
}
class App extends StatelessWidget {
const App({super.key});
Widget build(BuildContext context) {
return GetMaterialApp(
initialRoute: Main.routeName,
getPages: [
GetPage(name: Main.routeName, page: () => Main()),
GetPage(name: SexPage.routeName, page: () => SexPage()),
GetPage(name: YearPage.routeName, page: () => YearPage()),
GetPage(name: NamePage.routeName, page: () => NamePage()),
GetPage(name: SuccessPage.routeName, page: () => SuccessPage()),
],
);
}
}
const int key = 1000;
class Main extends StatelessWidget {
static String routeName = "/main";
Widget build(BuildContext context) {
return Scaffold(
appBar: AppBar(title: const Text("身份验证")),
body: Navigator(
key: Get.nestedKey(key),
initialRoute: SexPage.routeName,
onGenerateRoute: (settings) {
if (settings.name == SexPage.routeName) {
return GetPageRoute(
settings: settings,
page: () => SexPage(),
);
} else if (settings.name == YearPage.routeName) {
return GetPageRoute(
settings: settings,
page: () => YearPage(),
);
} else if (settings.name == NamePage.routeName) {
return GetPageRoute(
settings: settings,
page: () => NamePage(),
);
}
return null;
},
),
);
}
}
class SexPage extends StatelessWidget {
static String routeName = "/sex";
Widget build(BuildContext context) {
return Scaffold(
body: Center(
child: Center(
child: Column(
mainAxisSize: MainAxisSize.min,
children: [
const Text("性别:男").title,
ElevatedButton(
onPressed: () {
Get.toNamed(YearPage.routeName, id: key);
},
child: const Text("下一页面"),
)
],
),
),
),
);
}
}
class YearPage extends StatelessWidget {
static String routeName = "/year";
Widget build(BuildContext context) {
return Scaffold(
body: Center(
child: Center(
child: Column(
mainAxisSize: MainAxisSize.min,
children: [
const Text("年龄:40").title,
ElevatedButton(
onPressed: () {
Get.toNamed(NamePage.routeName, id: key);
},
child: const Text("下一页面"),
)
],
),
),
),
);
}
}
class NamePage extends StatelessWidget {
static String routeName = "/name";
Widget build(BuildContext context) {
return Scaffold(
body: Center(
child: Center(
child: Column(
mainAxisSize: MainAxisSize.min,
children: [
const Text("姓名:高启强").title,
ElevatedButton(
onPressed: () {
Get.toNamed(SuccessPage.routeName);
},
child: const Text("下一页面"),
)
],
),
),
),
);
}
}
class SuccessPage extends StatelessWidget {
static String routeName = "/success";
Widget build(BuildContext context) {
return Scaffold(
body: Center(
child: const Text("你是一个人类,验证完毕").title,
),
);
}
}
相关组件
SnakBar

            Get.snackbar(
              "DOTA2",
              "恭喜中国队夺冠!",
              backgroundColor: Colors.white,
              boxShadows: [
                BoxShadow(
                  color: Colors.black.withAlpha(55),
                  offset: const Offset(1, 1),
                  blurRadius: 2,
                )
              ],
            );
Dialogs
Get.defaultDialog(
              title: '警告',
              onConfirm: () {
                Get.back();
              },
              middleText: "这是一个默认的弹窗,你知道了吗?",
            );
BottomSheets
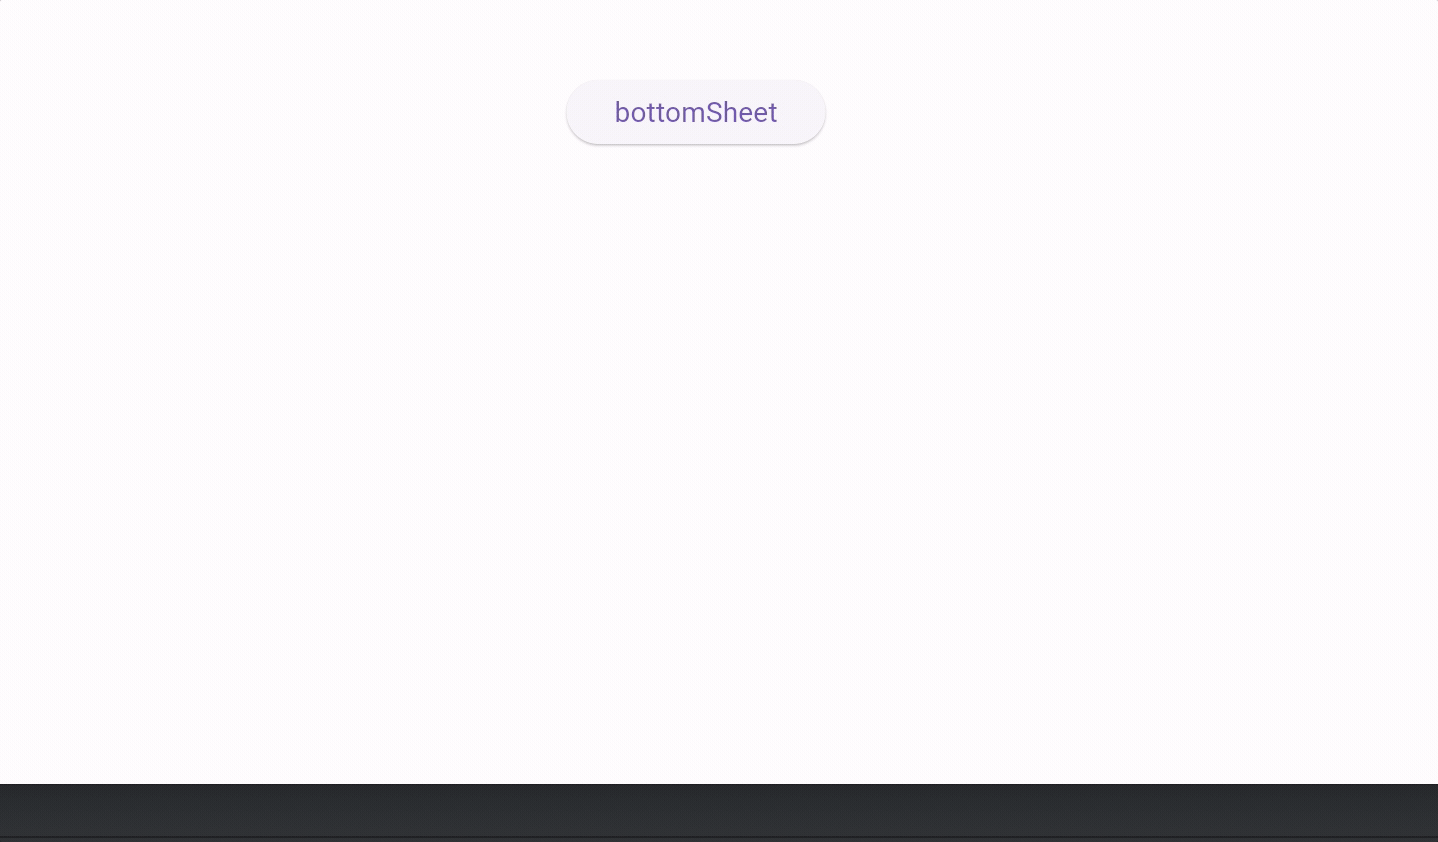
Get.bottomSheet(
              Wrap(
                children: <Widget>[
                  ListTile(
                    leading: const Icon(Icons.music_note),
                    title: const Text('Music'),
                    onTap: () {},
                  ),
                  ListTile(
                    leading: const Icon(Icons.videocam),
                    title: const Text('Video'),
                    onTap: () {},
                  ),
                ],
              ),
              backgroundColor: Colors.white,
            );
ValueBuilder
StatefulWidget的简化版
import 'package:flutter/material.dart';
import 'package:get/get.dart';
void main() {
runApp(const App());
}
class App extends StatelessWidget {
const App({super.key});
Widget build(BuildContext context) {
return const GetMaterialApp(
home: Home(),
);
}
}
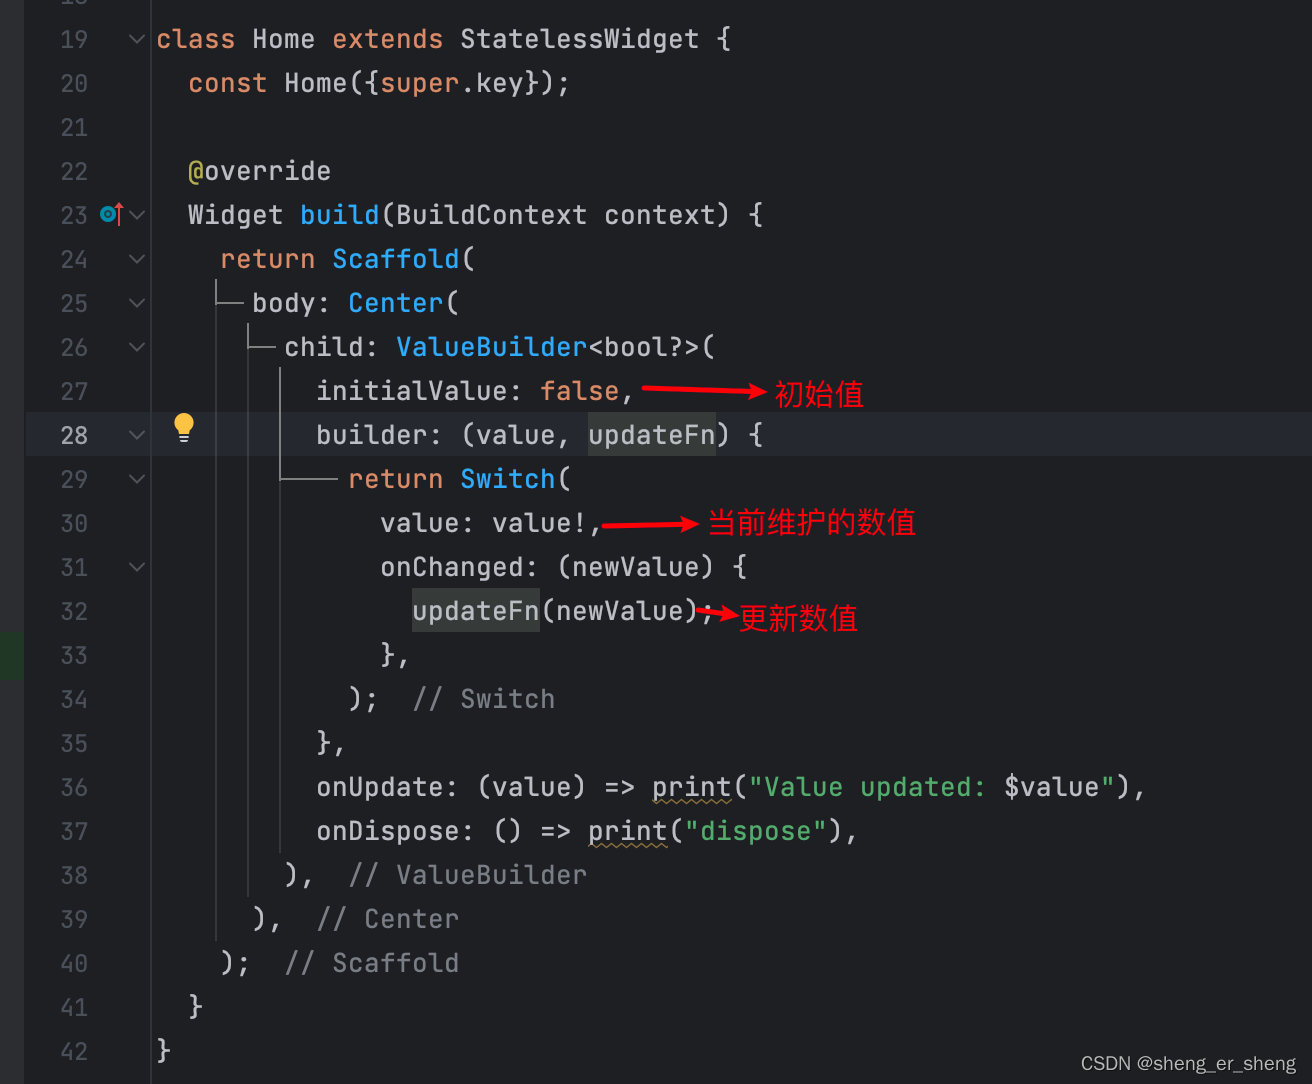
class Home extends StatelessWidget {
const Home({super.key});
Widget build(BuildContext context) {
return Scaffold(
body: Center(
child: ValueBuilder<bool?>(
initialValue: false,
builder: (value, updateFn) {
return Switch(
value: value!,
onChanged: (newValue) {
updateFn(newValue);
},
);
},
onUpdate: (value) => print("Value updated: $value"),
onDispose: () => print("dispose"),
),
),
);
}
}
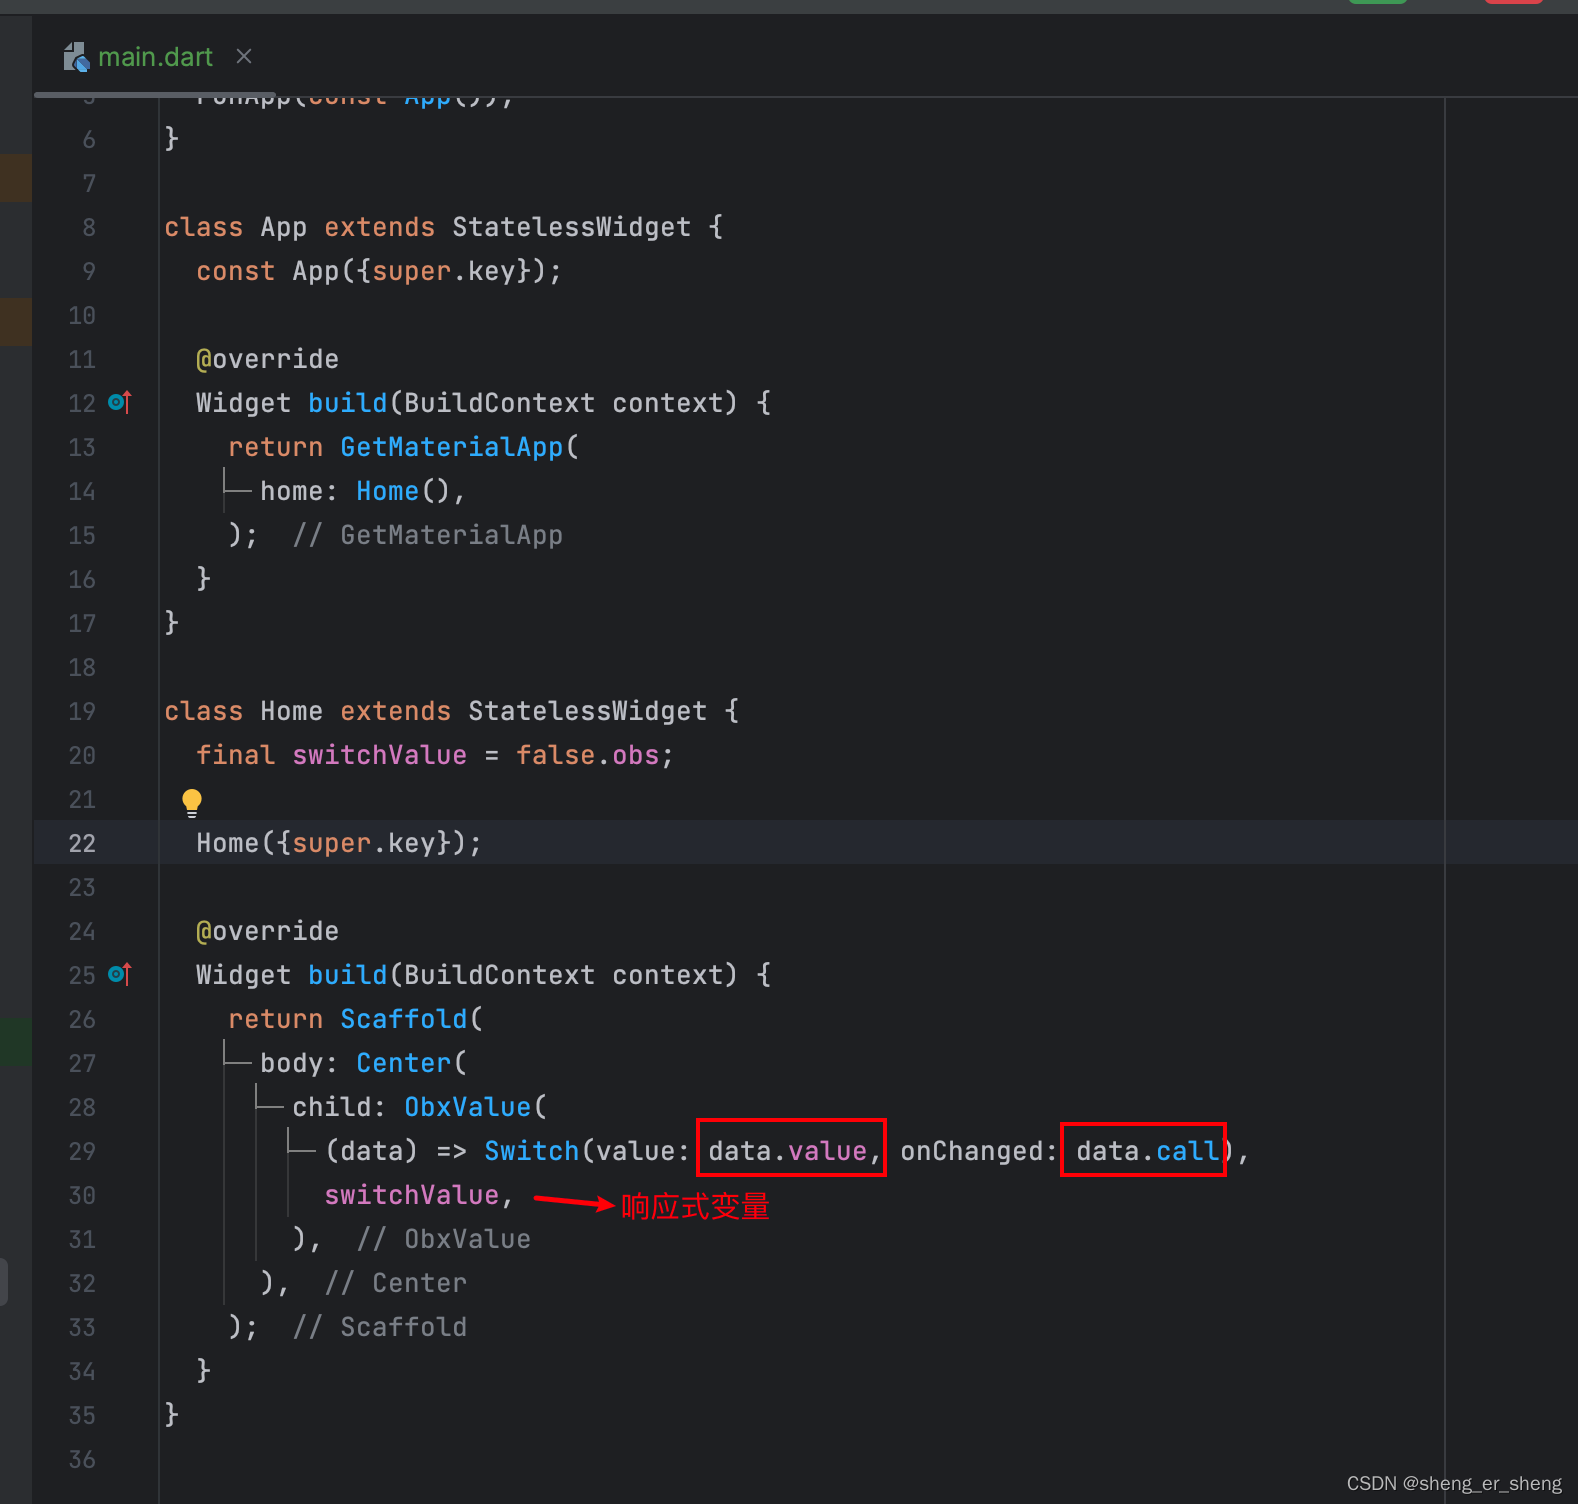
ObxValue
ValueBuilder的简化版本,融入了响应式变量
import 'package:flutter/material.dart';
import 'package:get/get.dart';
void main() {
runApp(const App());
}
class App extends StatelessWidget {
const App({super.key});
Widget build(BuildContext context) {
return GetMaterialApp(
home: Home(),
);
}
}
class Home extends StatelessWidget {
final switchValue = false.obs;
Home({super.key});
Widget build(BuildContext context) {
return Scaffold(
body: Center(
child: ObxValue(
(data) => Switch(value: data.value, onChanged: data.call),
switchValue,
),
),
);
}
}
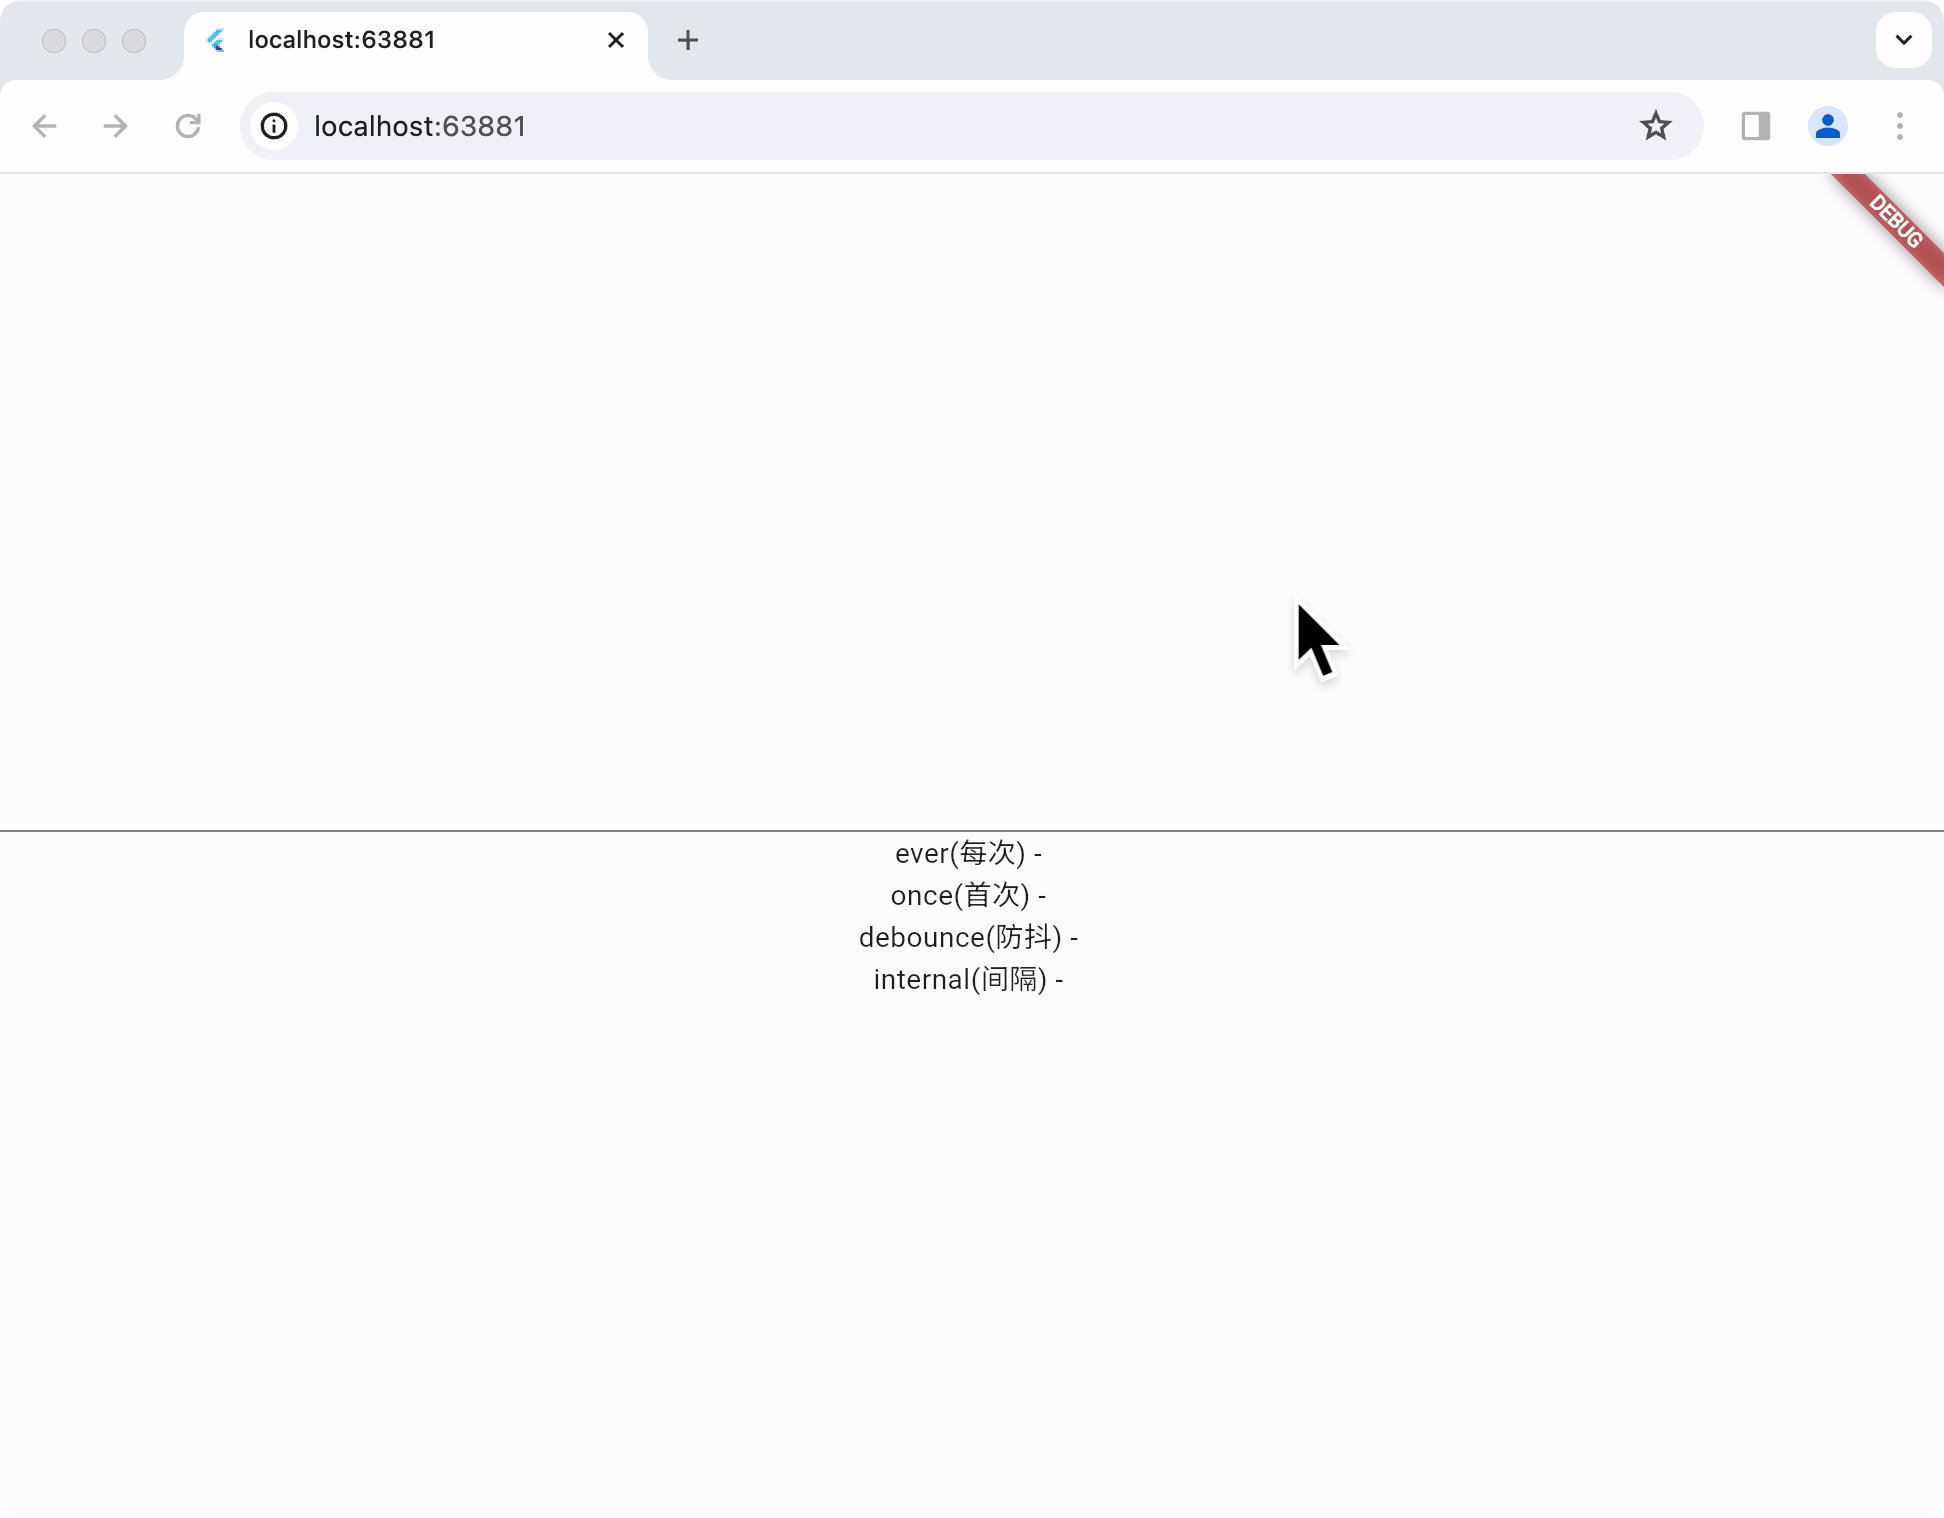
Get Worker
- ever 每次
- once 头次
- debounce 连续变化后的最后那一次
- interval 间隔t秒后取一次
案例
import 'package:flutter/material.dart';
import 'package:get/get.dart';
void main() {
runApp(const App());
}
class App extends StatelessWidget {
const App({super.key});
Widget build(BuildContext context) {
return GetMaterialApp(
home: Home(),
);
}
}
class Home extends StatelessWidget {
final input = "".obs;
final everValue = "".obs;
final onceValue = "".obs;
final debounceValue = "".obs;
final intervalValue = "".obs;
Home({super.key}) {
ever(input, (value) {
everValue.value = value;
});
once(input, (value) {
onceValue.value = value;
});
debounce(input, (value) {
debounceValue.value = value;
});
interval(
input,
(value) {
intervalValue.value = value;
},
time: const Duration(seconds: 2),
);
}
Widget build(BuildContext context) {
return Scaffold(
body: Center(
child: Obx(() {
return Column(
mainAxisSize: MainAxisSize.min,
children: [
ObxValue(
(data) {
return Column(
mainAxisSize: MainAxisSize.min,
children: [
Text(data.value),
TextField(onChanged: data.call),
],
);
},
input,
),
Text("ever(每次) - ${everValue.value}"),
Text("once(首次) - ${onceValue.value}"),
Text("debounce(防抖) - ${debounceValue.value}"),
Text("internal(间隔) - ${intervalValue.value}"),
],
);
}),
),
);
}
}
GetView + StateMixin + GetConnect
- StateMixin 比如有一个数据,它是需要通过网络请求来获取的。那么它有空、获取中、获取成功、获取失败几个状态,那么这个StateMixin可以管理这个数据。
- GetView 个人比较推荐使用这个。它是通过传入泛型来注册Controller
- GetConnect 提供数据
案例
获取某一坐标下的天气情况
GetConnect
网络请求获取数据
import 'package:get/get.dart';
class WeatherProvider extends GetConnect {
final weatherApi = "c23bb570c66f248d4543c7480169072b";
void onInit() {
super.onInit();
httpClient.baseUrl = 'https://api.openweathermap.org';
}
Future<Response> getWeather(double lat, double lon) {
String url = '/data/2.5/weather?lat=$lat&lon=$lon&appid=$weatherApi';
return get(url);
}
}
GetxController with StateMixin
维护WeatherDataModel这个变量
通过GetConnect获取的数据
根据不同的状态返回, 分别返回不同的RxStatus
import 'package:get/get.dart';

import 'weather_data_model.dart';
import 'weather_provider.dart';

class WeatherController extends GetxController with StateMixin<WeatherDataModel> {
  final provider = Get.find<WeatherProvider>();

  void getWeather() async {
    final response = await provider.getWeather(43.5, 140.5);
    if (response.hasError) {
      change(null, status: RxStatus.error("error"));
    } else {
      final data = WeatherDataModel.fromJson(response.body);
      change(data, status: RxStatus.success());
    }
  }
}
GetView
通过传入泛型WeatherController,获取controller。最后通过controller.obx
import 'package:flutter/material.dart';
import 'package:get/get.dart';
import 'binding.dart';
import 'controller.dart';
void main() {
runApp(App());
}
class App extends StatelessWidget {
const App({super.key});
Widget build(BuildContext context) {
return GetMaterialApp(
home: Main(),
initialBinding: Binding(),
);
}
}
class Main extends GetView<WeatherController> {
const Main({super.key});
Widget build(BuildContext context) {
return Scaffold(
body: Center(
child: Column(
mainAxisSize: MainAxisSize.min,
children: [
ElevatedButton(
onPressed: () {
controller.getWeather();
},
child: Text("获取数据"),
),
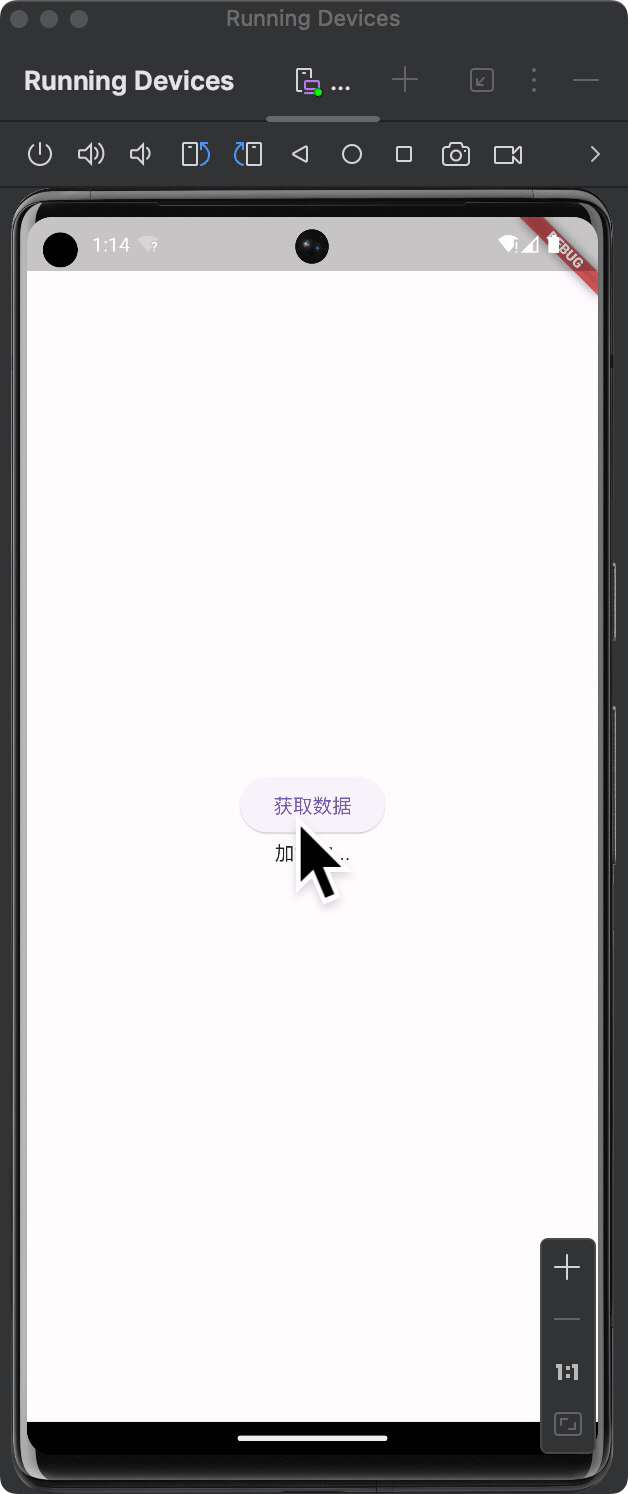
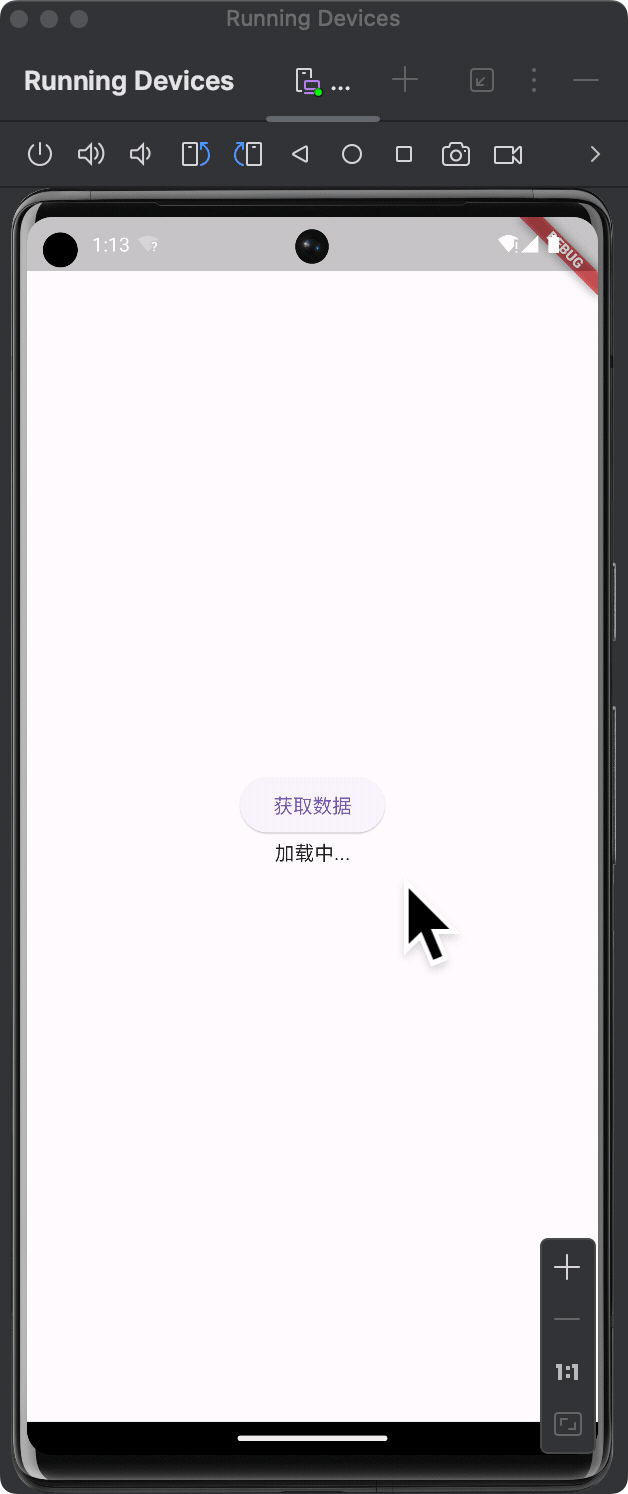
controller.obx(
(state) {
return Text("weather is ${state!.weather!.first.main!}");
},
onLoading: const Text("加载中..."),
onEmpty: const Text("数据空..."),
onError: (error) {
return const Text("出错...");
},
),
],
),
),
);
}
}
注册依赖及绑定
import 'package:flutter_gext_application/GetView+GetConnect+StateMixin/weather_provider.dart';
import 'package:get/get.dart';
import 'controller.dart';
class Binding extends Bindings {
void dependencies() {
Get.lazyPut(() => WeatherController());
Get.lazyPut(() => WeatherProvider());
}
}
GetWidget + Get.create()
先看案例
案例
- Get.lazyput + GetView
第一种我采用Get.put 或者Get.lazyput的方式去注册GetxController
配合GetView

无论怎么点,这个controller早已注册好了,返回的永远都是同一个实例
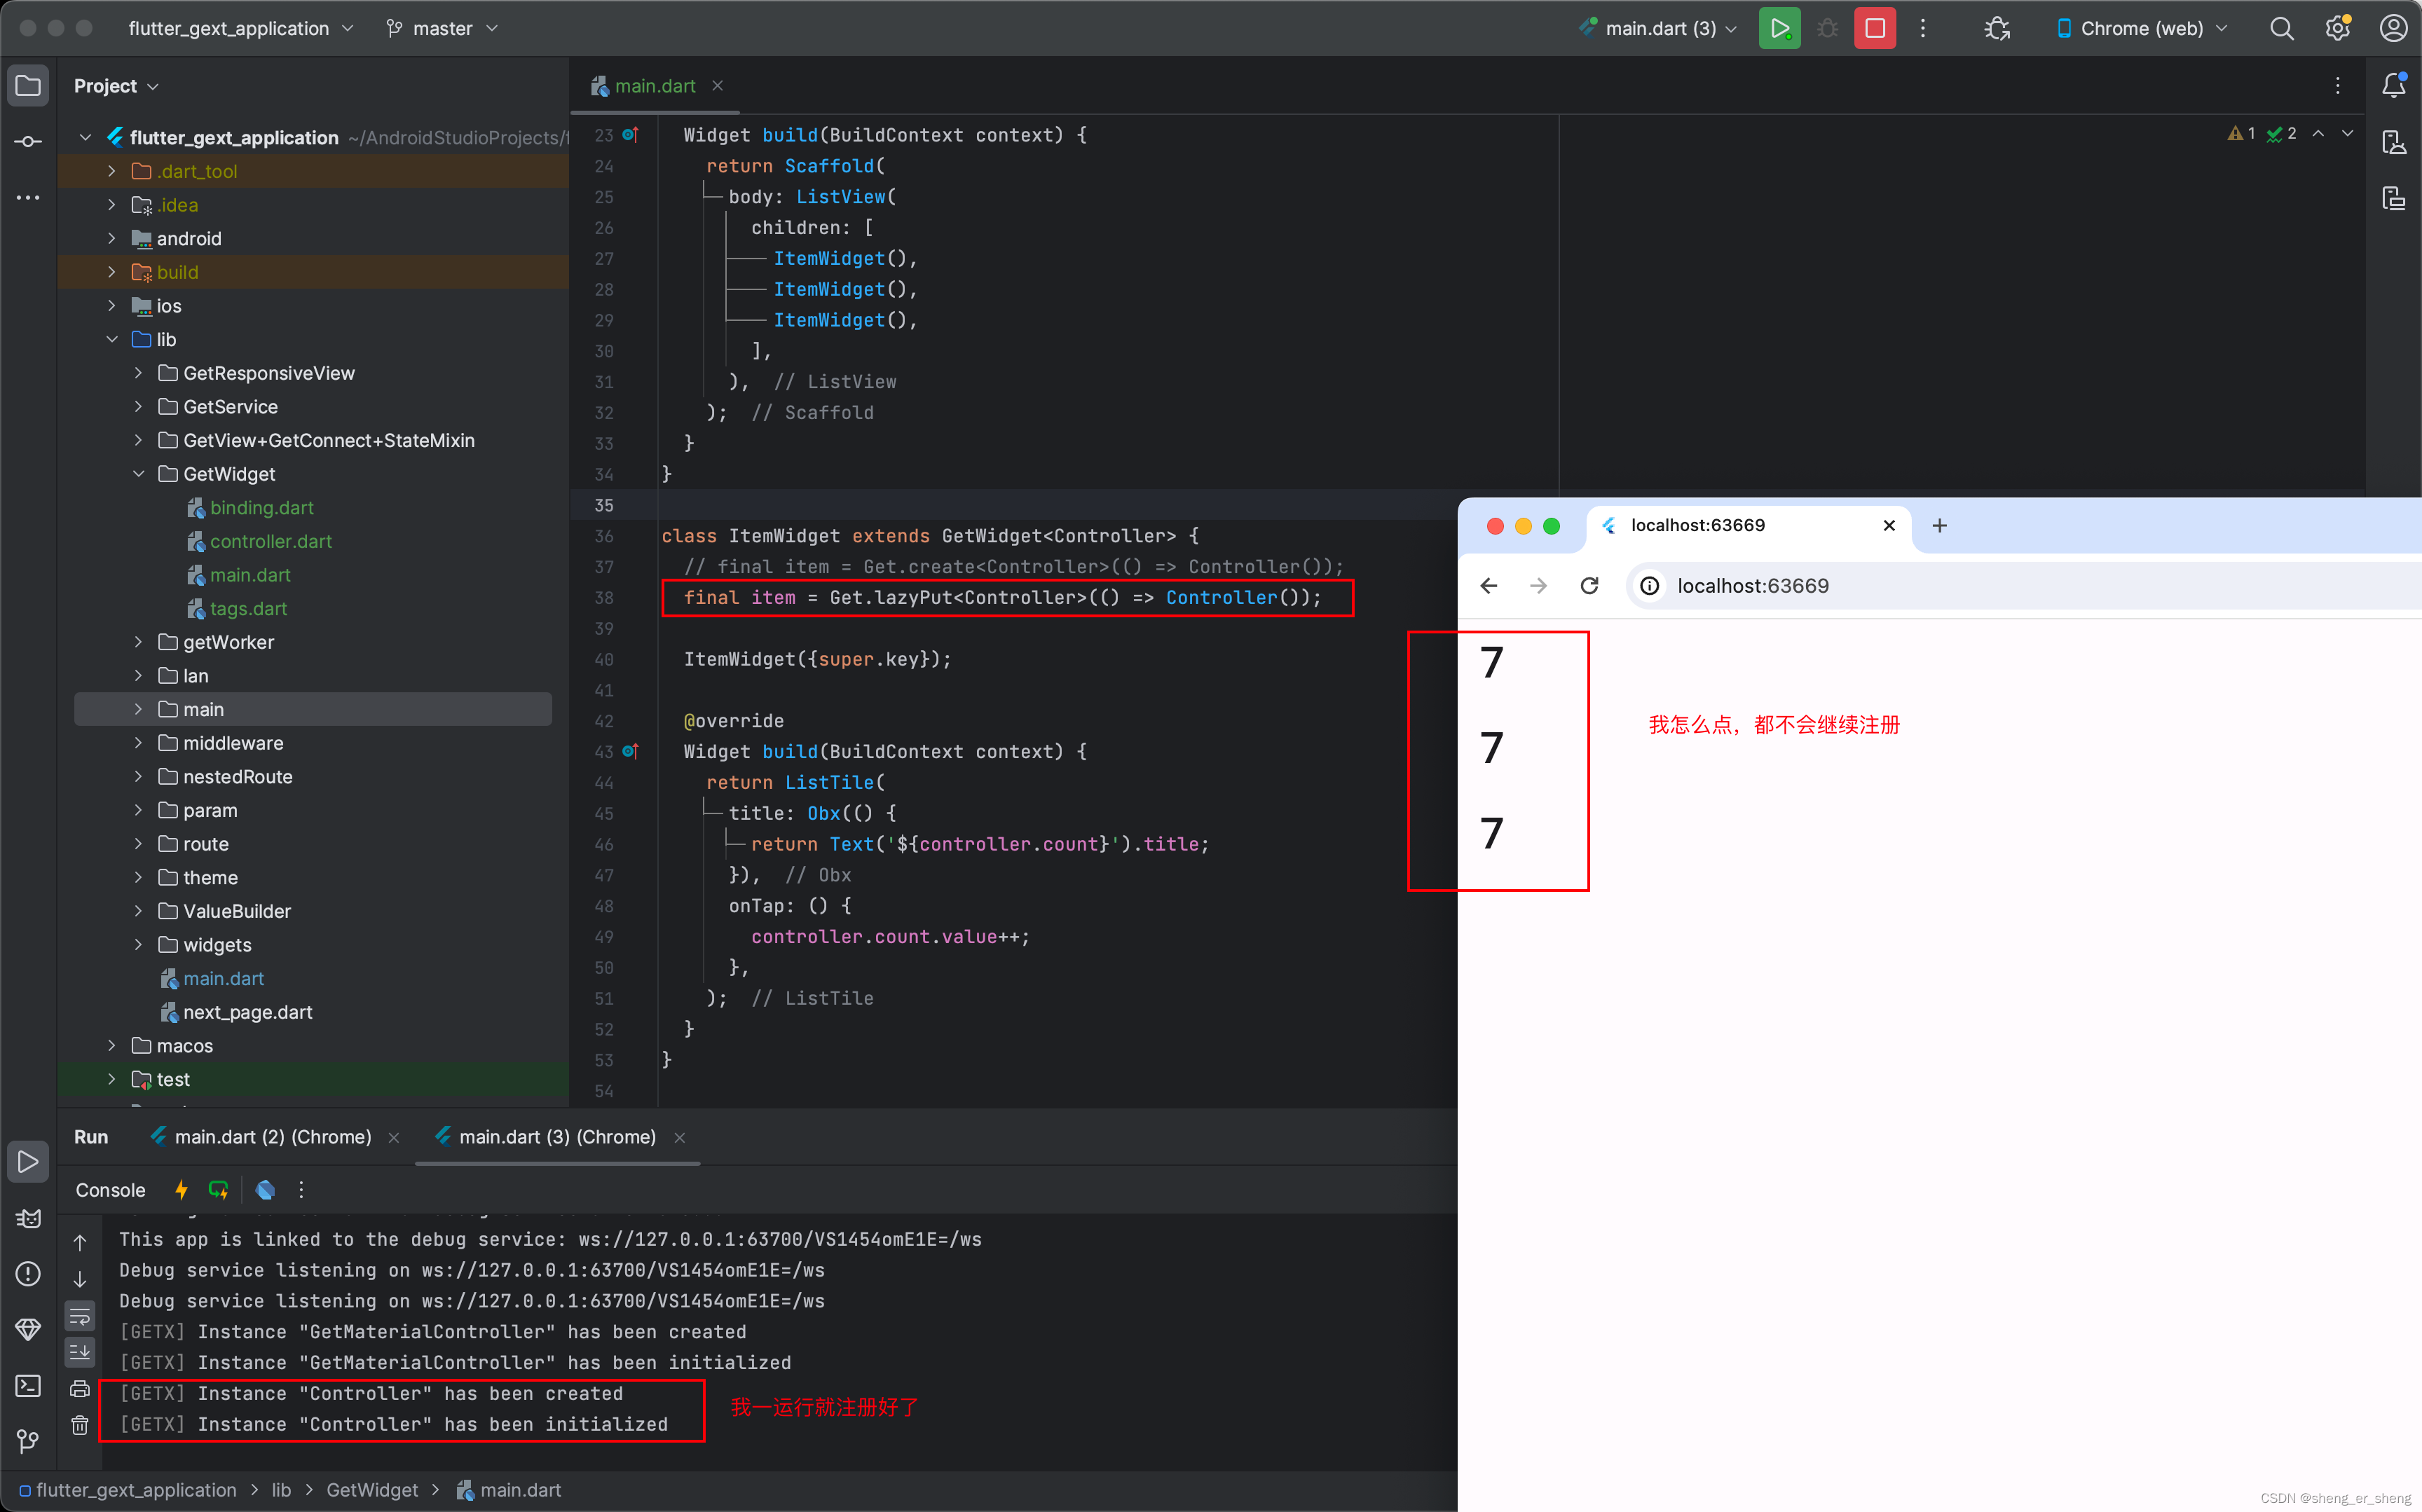 - Get.create + GetWidget 第二种我采用Get.create的方式去注册GetxController 配合GetWidget
Get.create ,注册的了新的实例

相关的官方文档
大致意思:每隔GetWidget都有自己的controller,在GetWidget中, 你可以放心使用Get.create
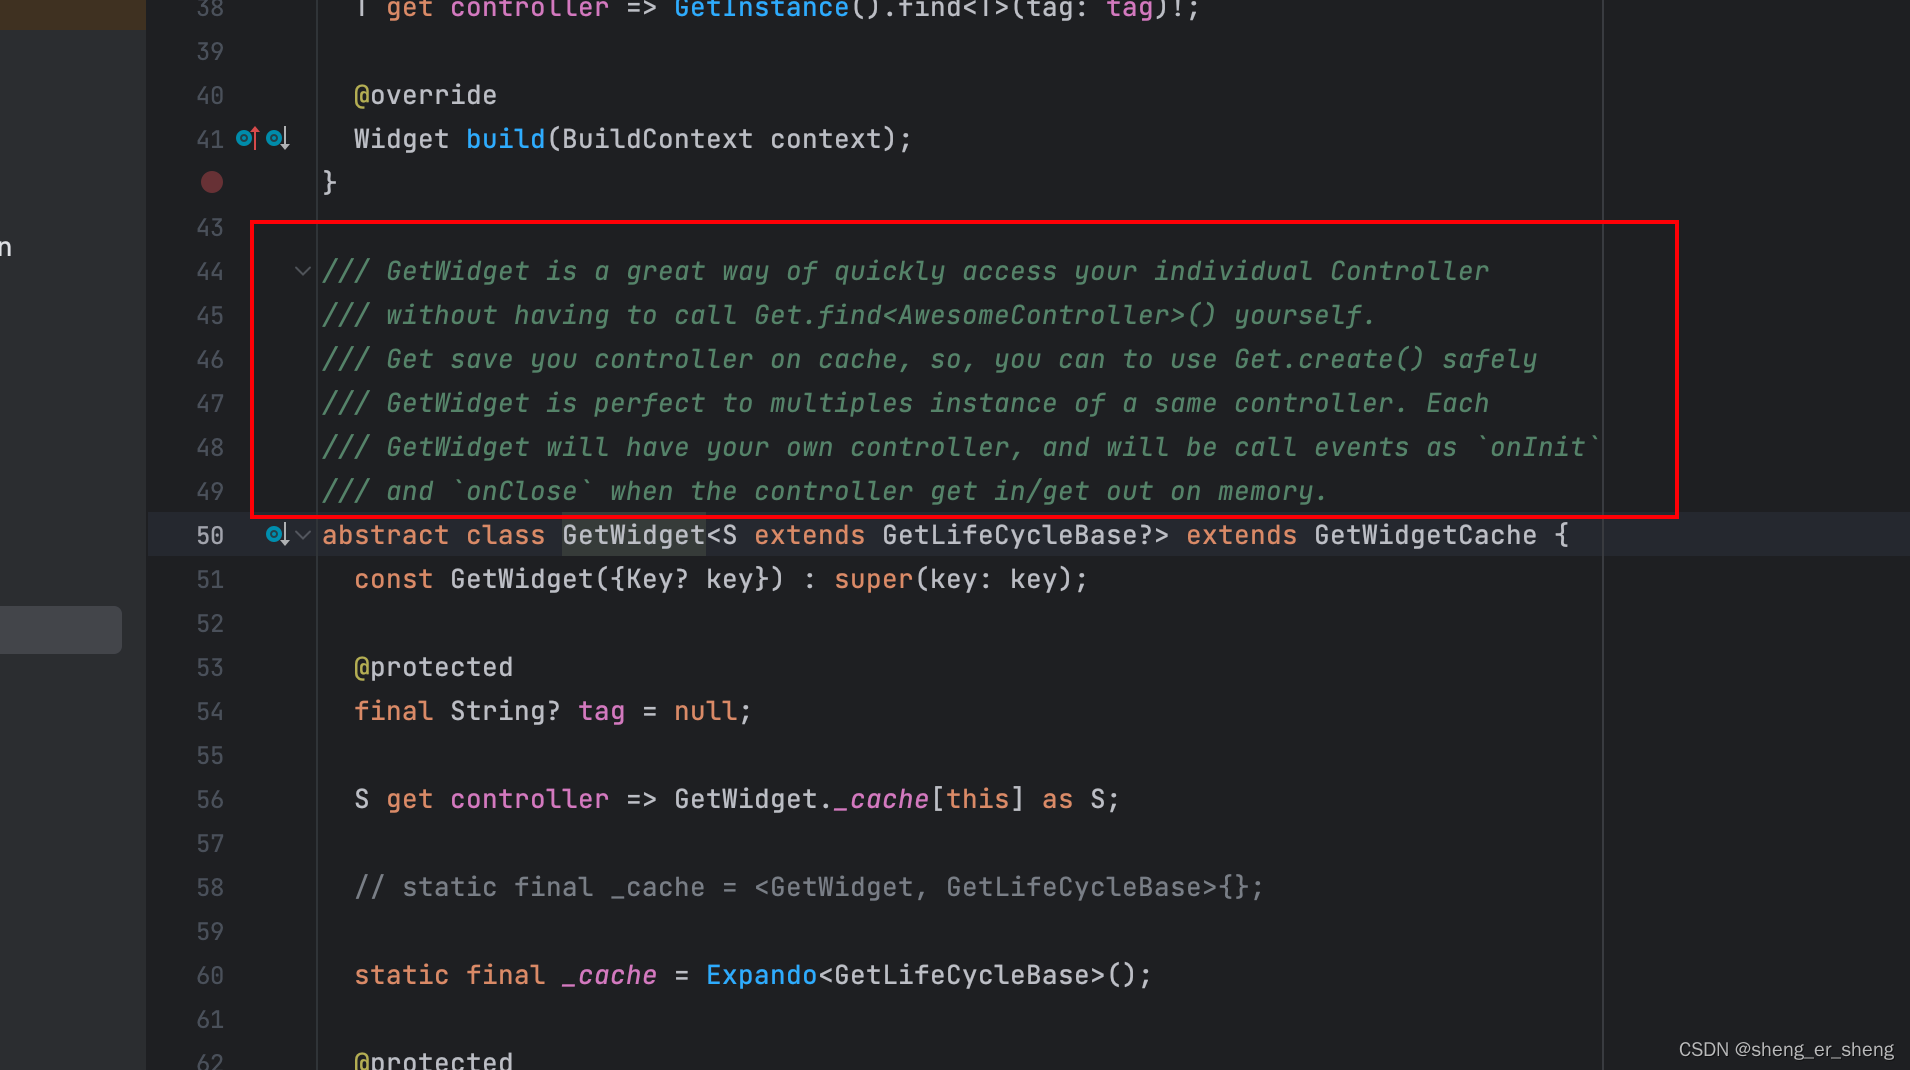
Get.create会实例一个新的controller。每次调用find,都会实例一个新的对象
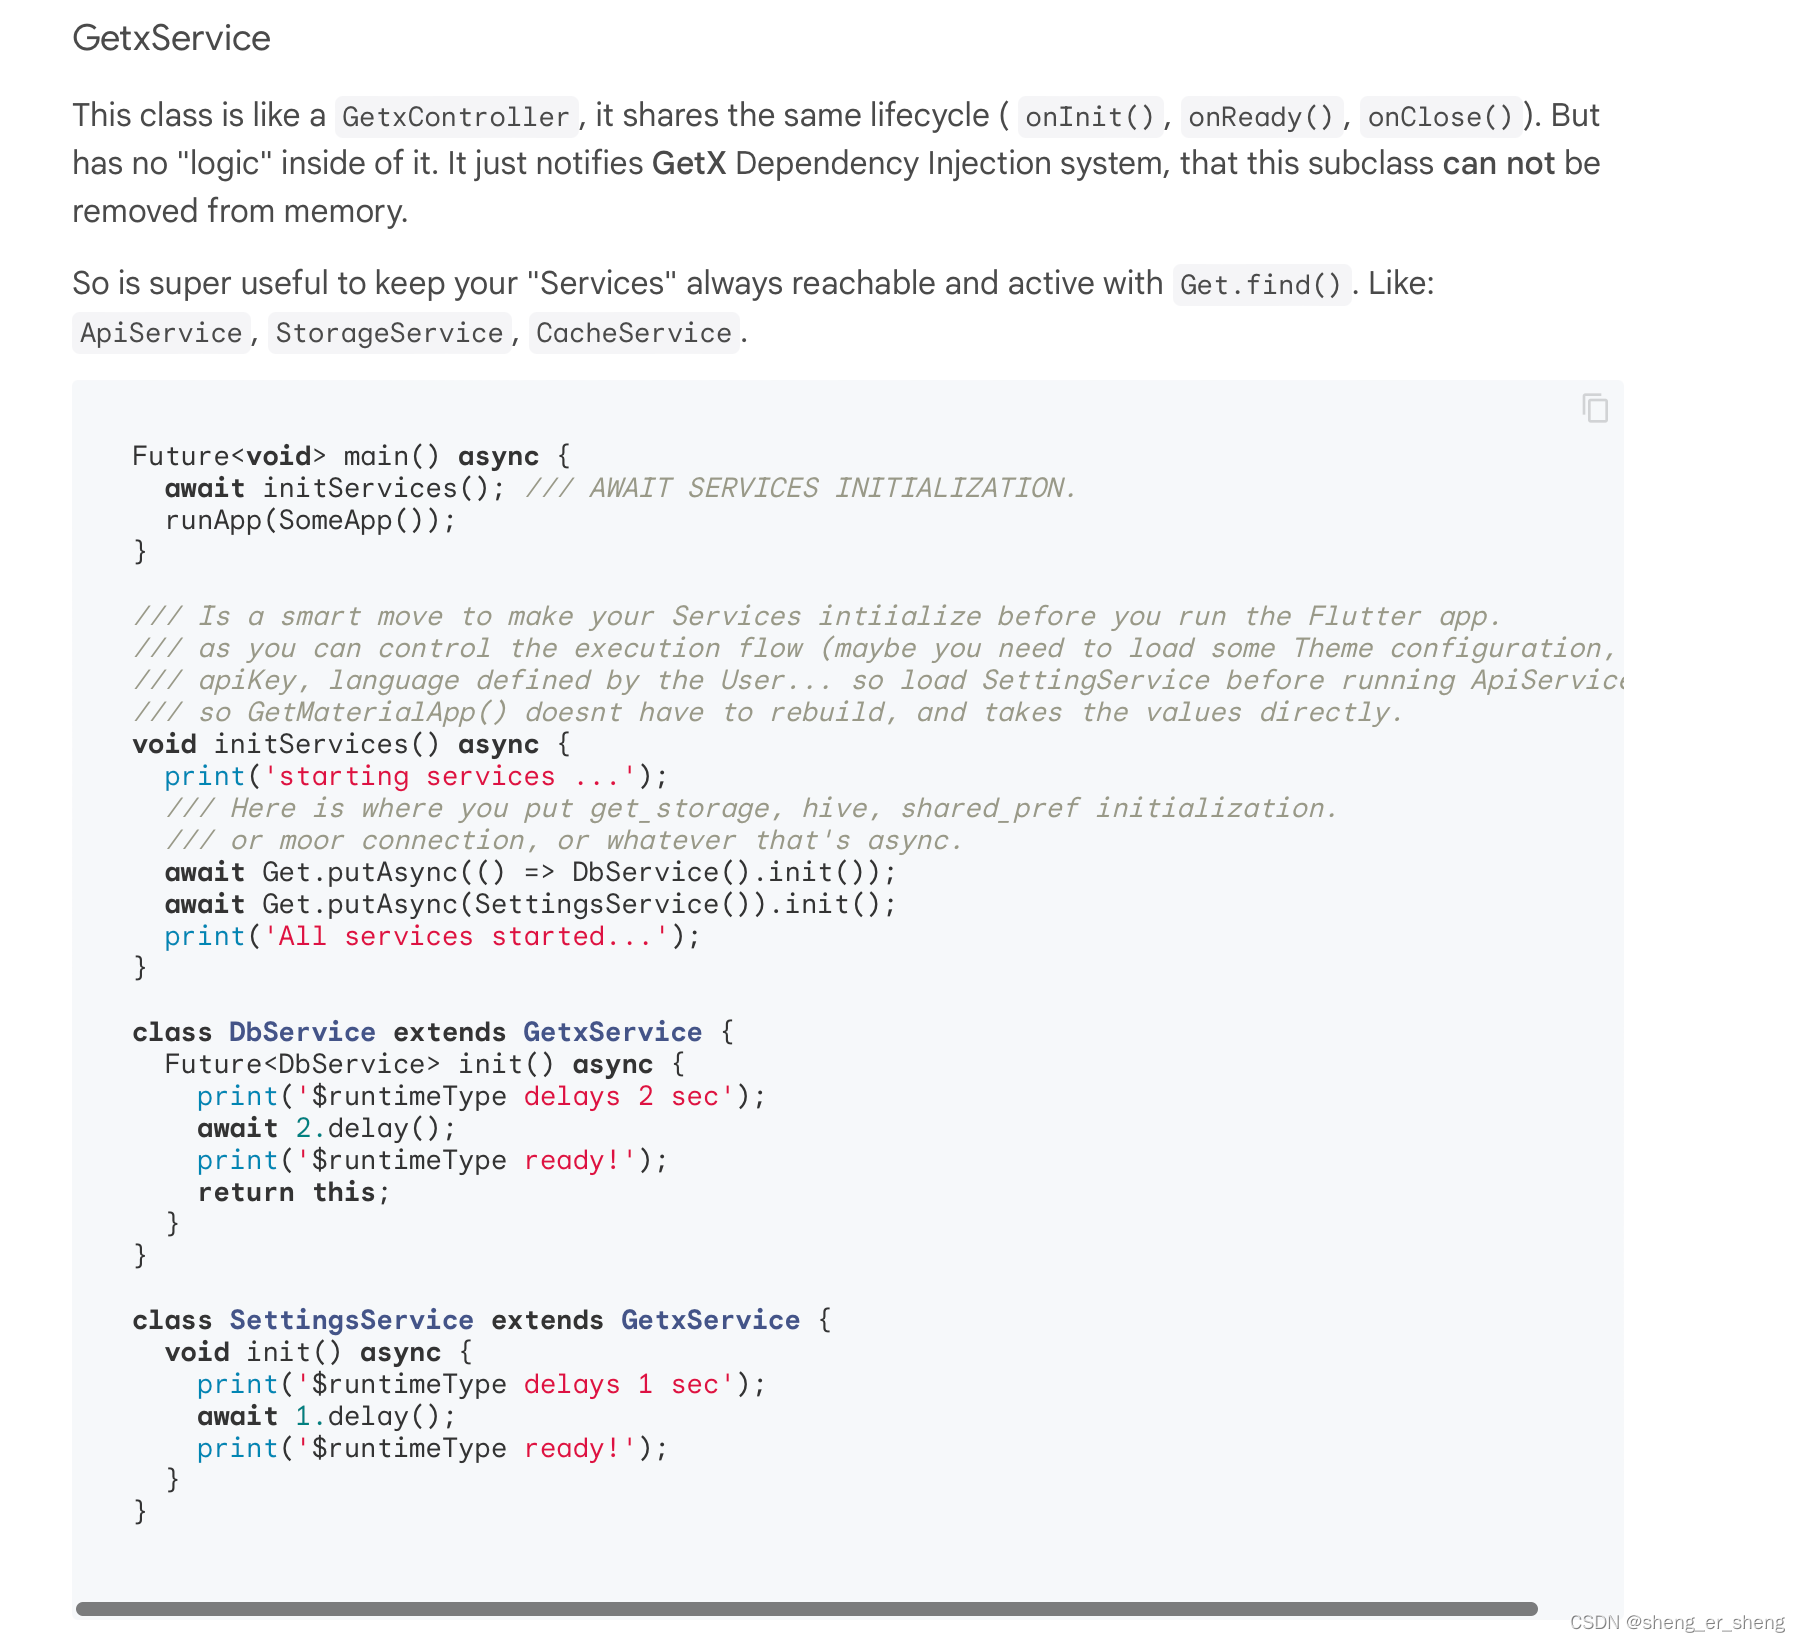
GetService
可以理解为GetxController的简化版本,也有它的生命周期。但是有个特性,在项目中总是要通过Get.find来找到它。比如:后端提供的接口api,存储数据,缓存等
这样看来,也就知道它为什么名字里带service
import 'package:flutter/material.dart';
import 'package:get/get.dart';
void main() async {
await initServices();
runApp(const App());
}
class App extends StatelessWidget {
const App({super.key});
Widget build(BuildContext context) {
return const GetMaterialApp(home: Home());
}
}
class Home extends StatelessWidget {
const Home({super.key});
Widget build(BuildContext context) {
return const Scaffold();
}
}
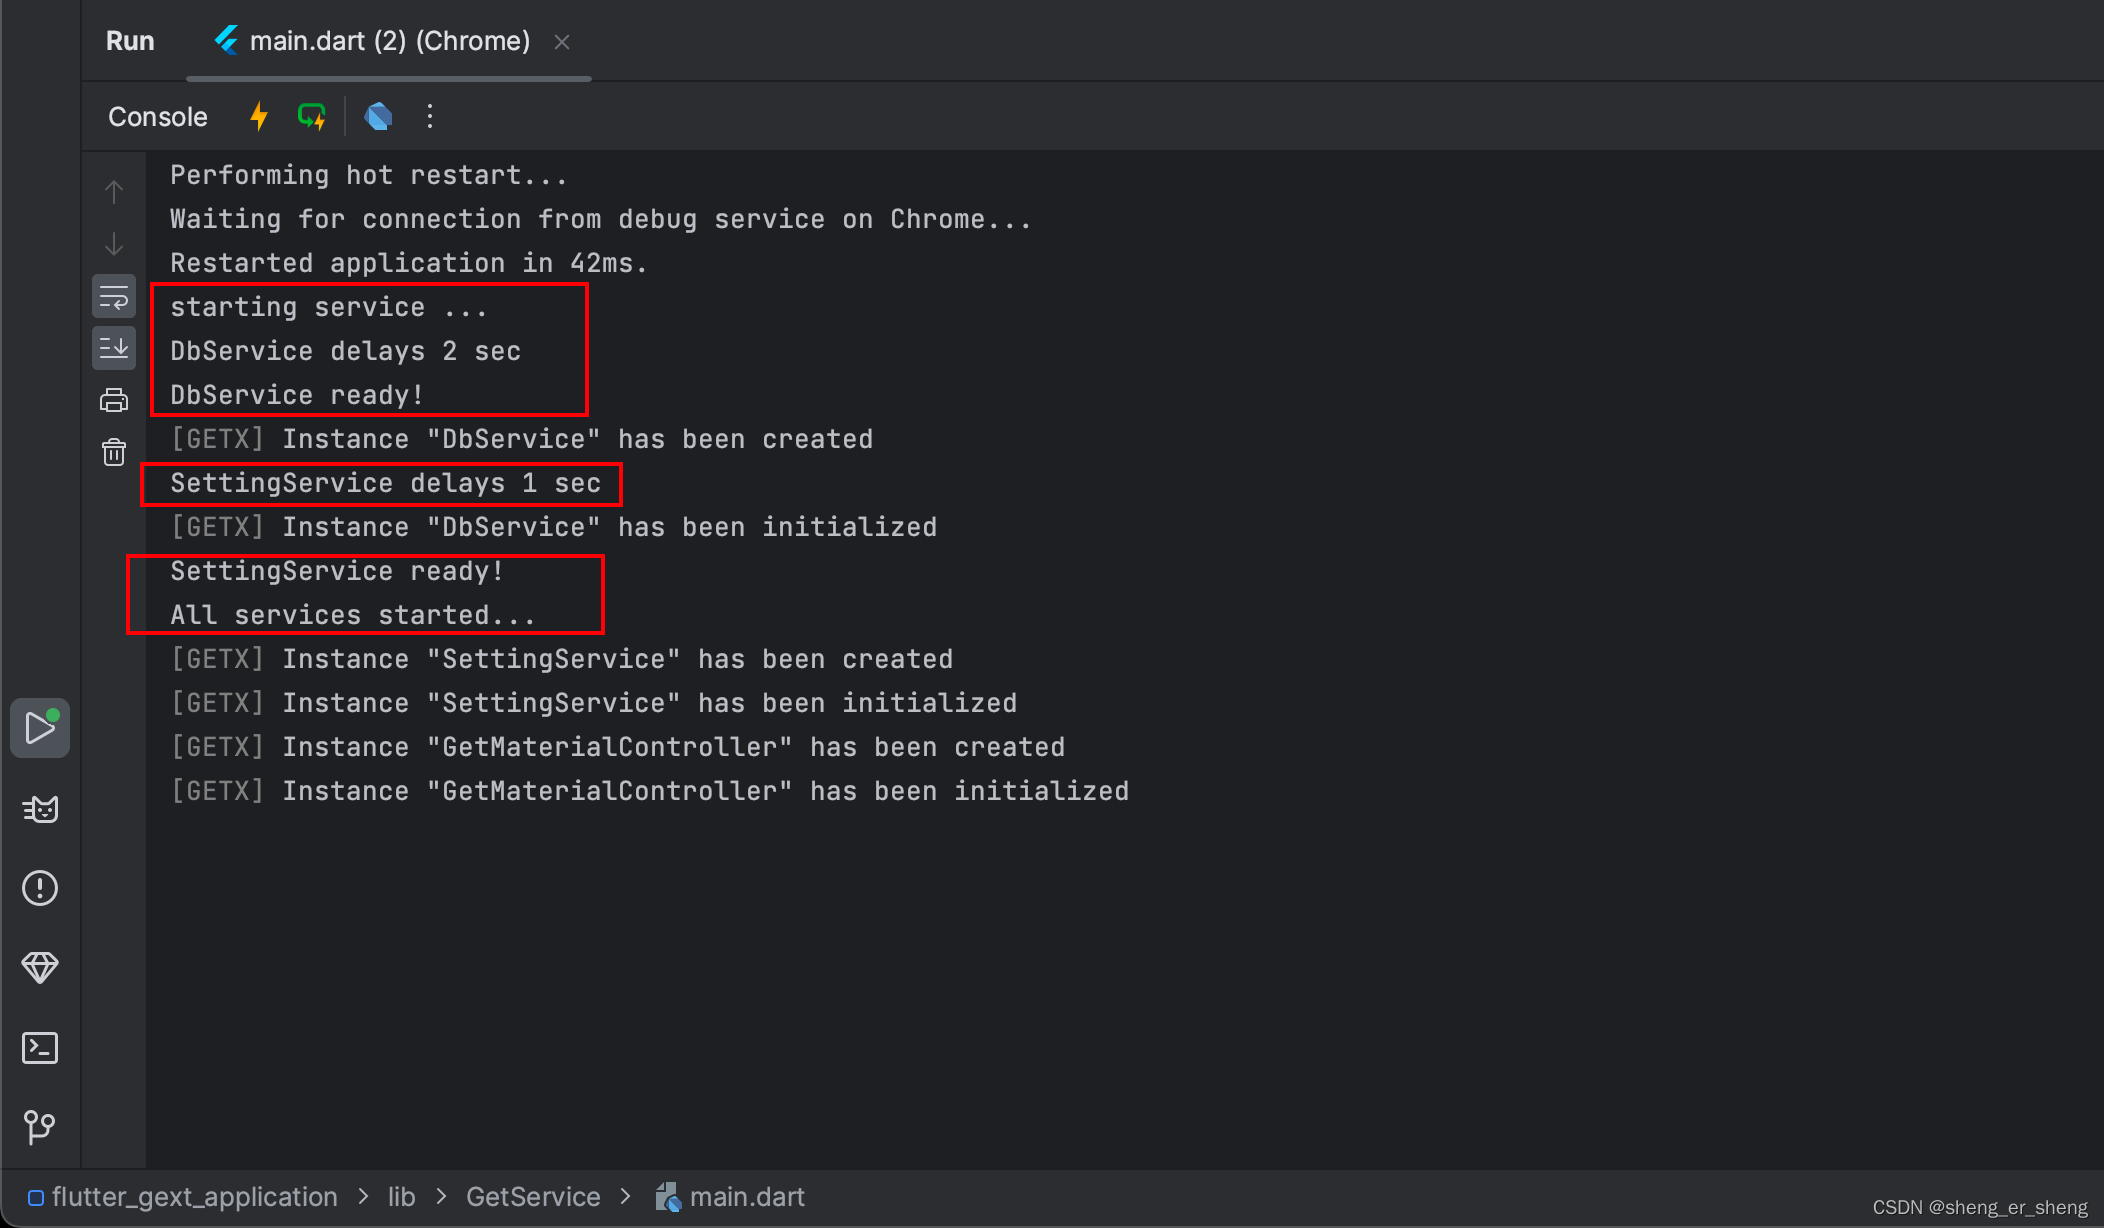
Future<bool> initServices() async {
print('starting service ...');
await Get.putAsync(() => DbService().init());
await Get.putAsync(() => SettingService().init());
print('All services started...');
return true;
}
class DbService extends GetxService {
Future<DbService> init() async {
print('$runtimeType delays 2 sec');
await 2.delay();
print('$runtimeType ready!');
return this;
}
}
class SettingService extends GetxService {
Future<SettingService> init() async {
print('$runtimeType delays 1 sec');
await 1.delay();
print('$runtimeType ready!');
return this;
}
}
响应式布局
响应式这件事不止布局,还设计各个方面。这里Getx是提供了GetResponsiveView来处理布局上的响应式
GetResponsiveView
- builder()
- 根据默认返回的屏幕宽度返回,一行到底要摆几个方块
class ResponsiveView extends GetResponsiveView<Controller> {
Widget builder() {
return Scaffold(
appBar: AppBar(title: ResponsiveViewSetting()),
body: GridView.builder(
gridDelegate: SliverGridDelegateWithFixedCrossAxisCount(
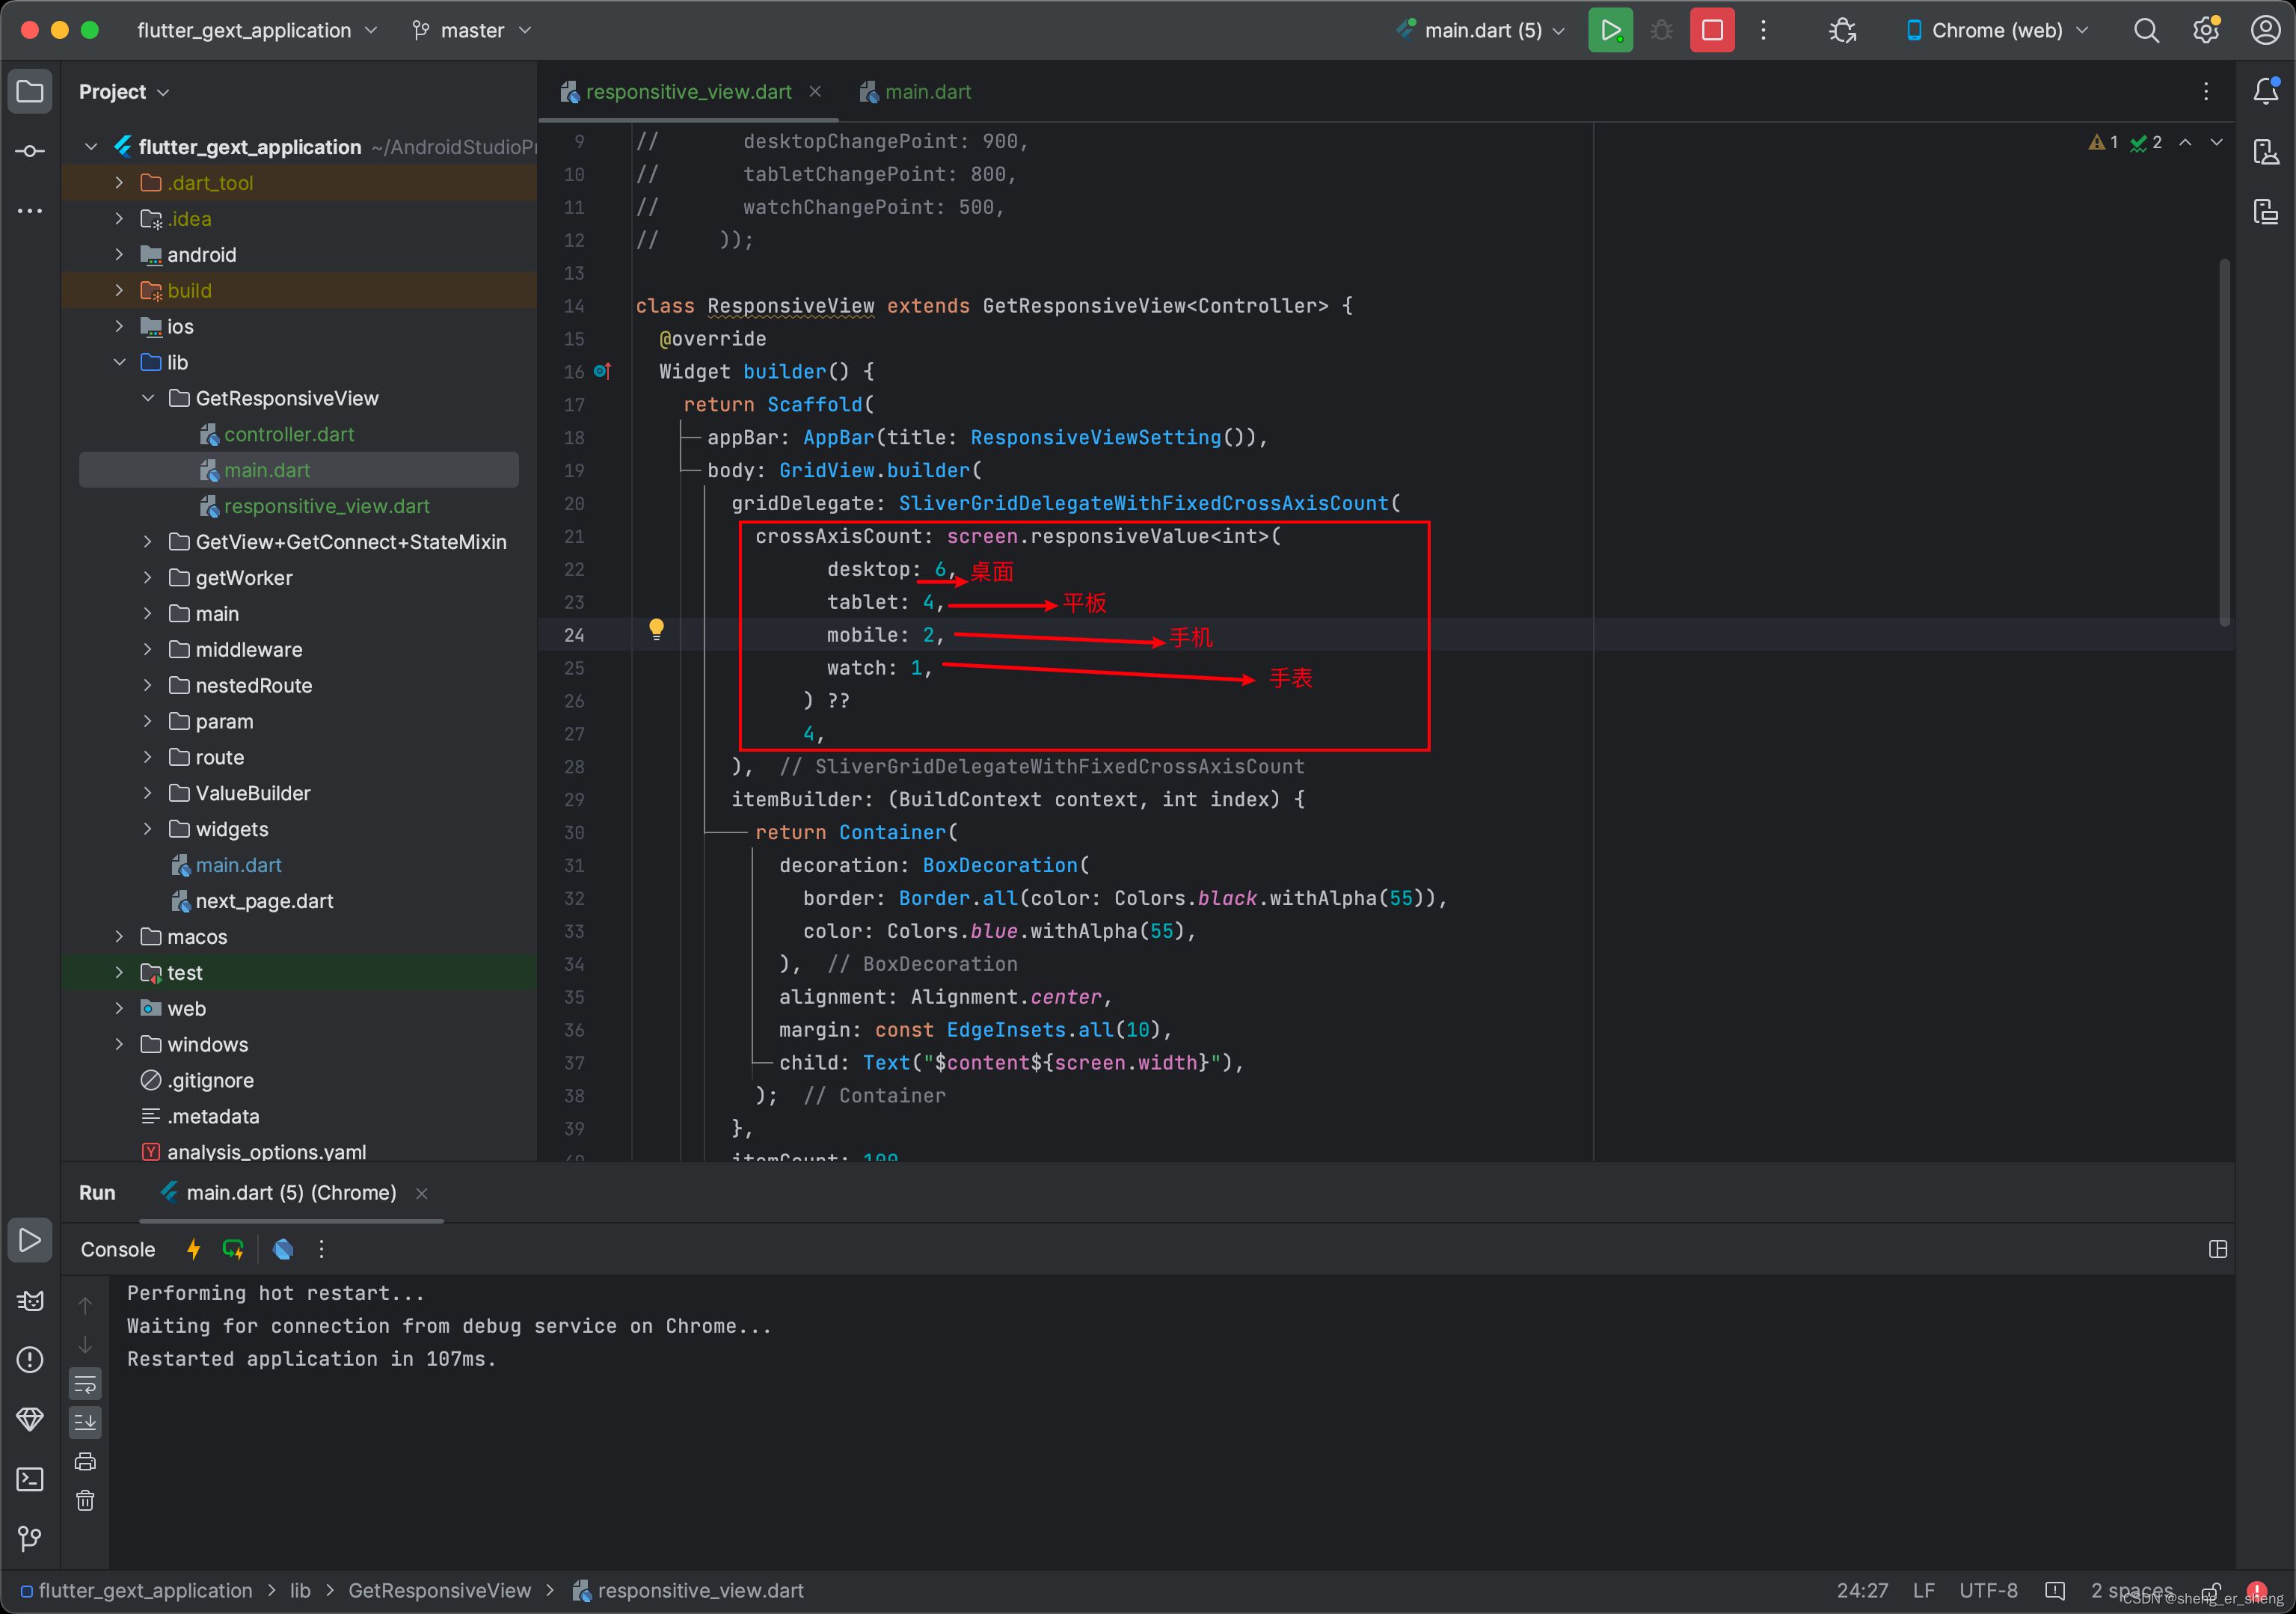
crossAxisCount: screen.responsiveValue<int>(
desktop: 6,
tablet: 4,
mobile: 2,
watch: 1,
) ??
4,
),
itemBuilder: (BuildContext context, int index) {
return Container(
decoration: BoxDecoration(
border: Border.all(color: Colors.black.withAlpha(55)),
color: Colors.blue.withAlpha(55),
),
alignment: Alignment.center,
margin: const EdgeInsets.all(10),
child: Text("$content${screen.width}"),
);
},
itemCount: 100,
),
);
}
String get content => screen.screenType == ScreenType.Desktop
? "桌面"
: screen.screenType == ScreenType.Phone
? "手机"
: screen.screenType == ScreenType.Tablet
? "平板"
: screen.screenType == ScreenType.Watch
? "手表"
: "无";
}
- alwaysUseBuilder
不使用build(),使用另外四个回调返回
- ResponsiveScreenSettings
自己定义手机该多宽,平板该多宽,桌面端该多宽
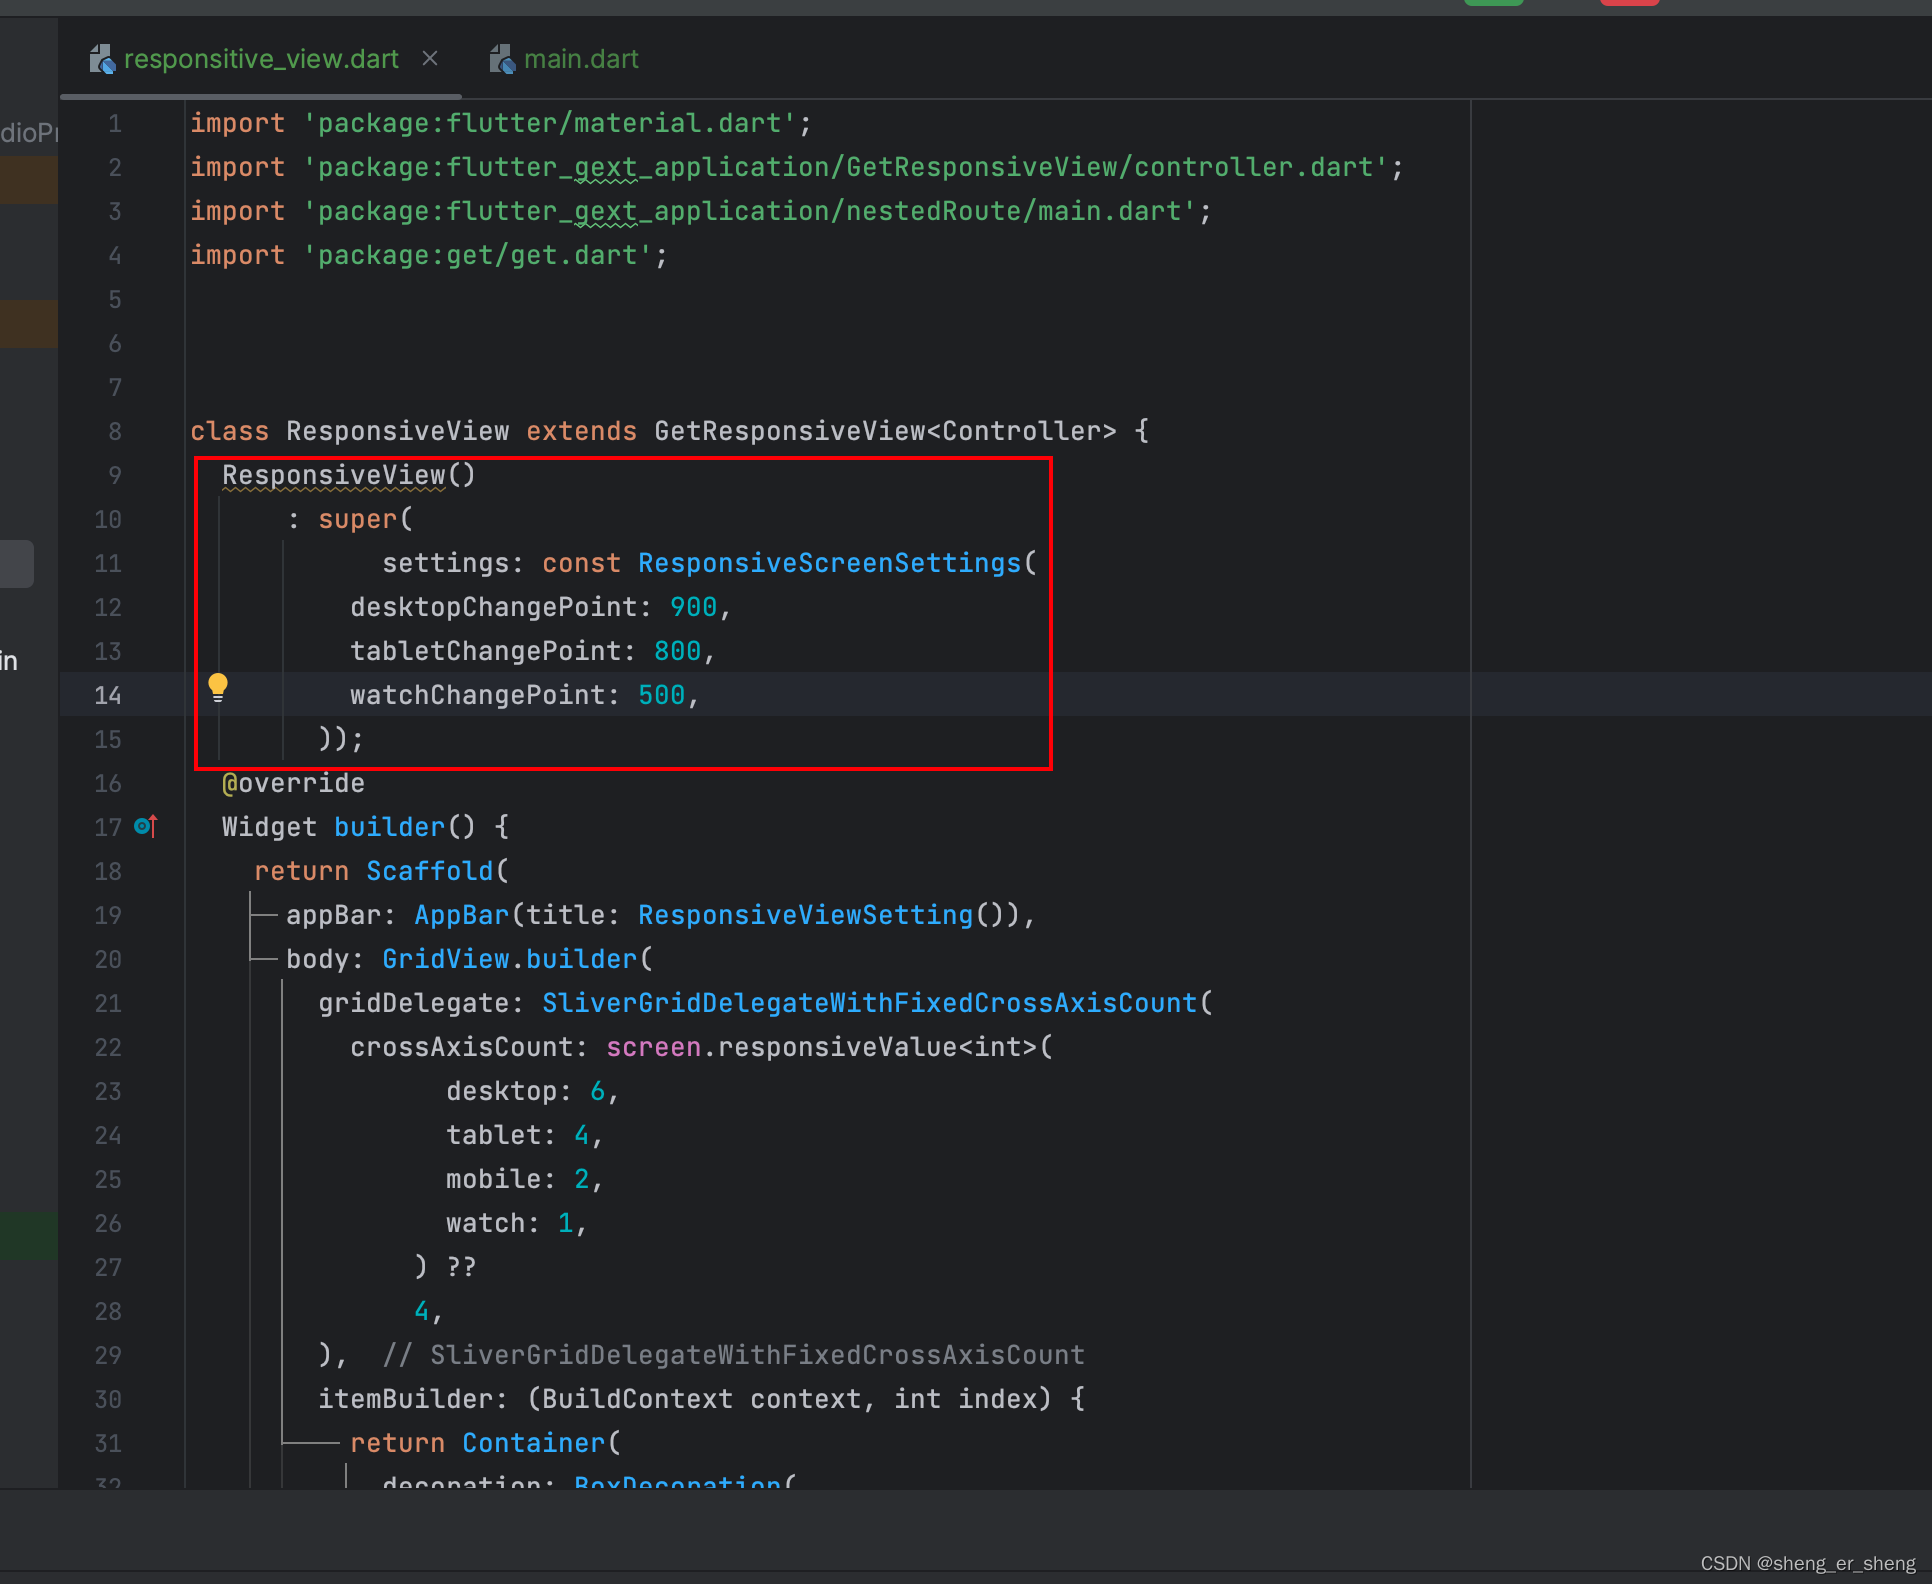
  ResponsiveView()
      : super(
            settings: const ResponsiveScreenSettings(
          desktopChangePoint: 900,
          tabletChangePoint: 800,
          watchChangePoint: 500,
        ));
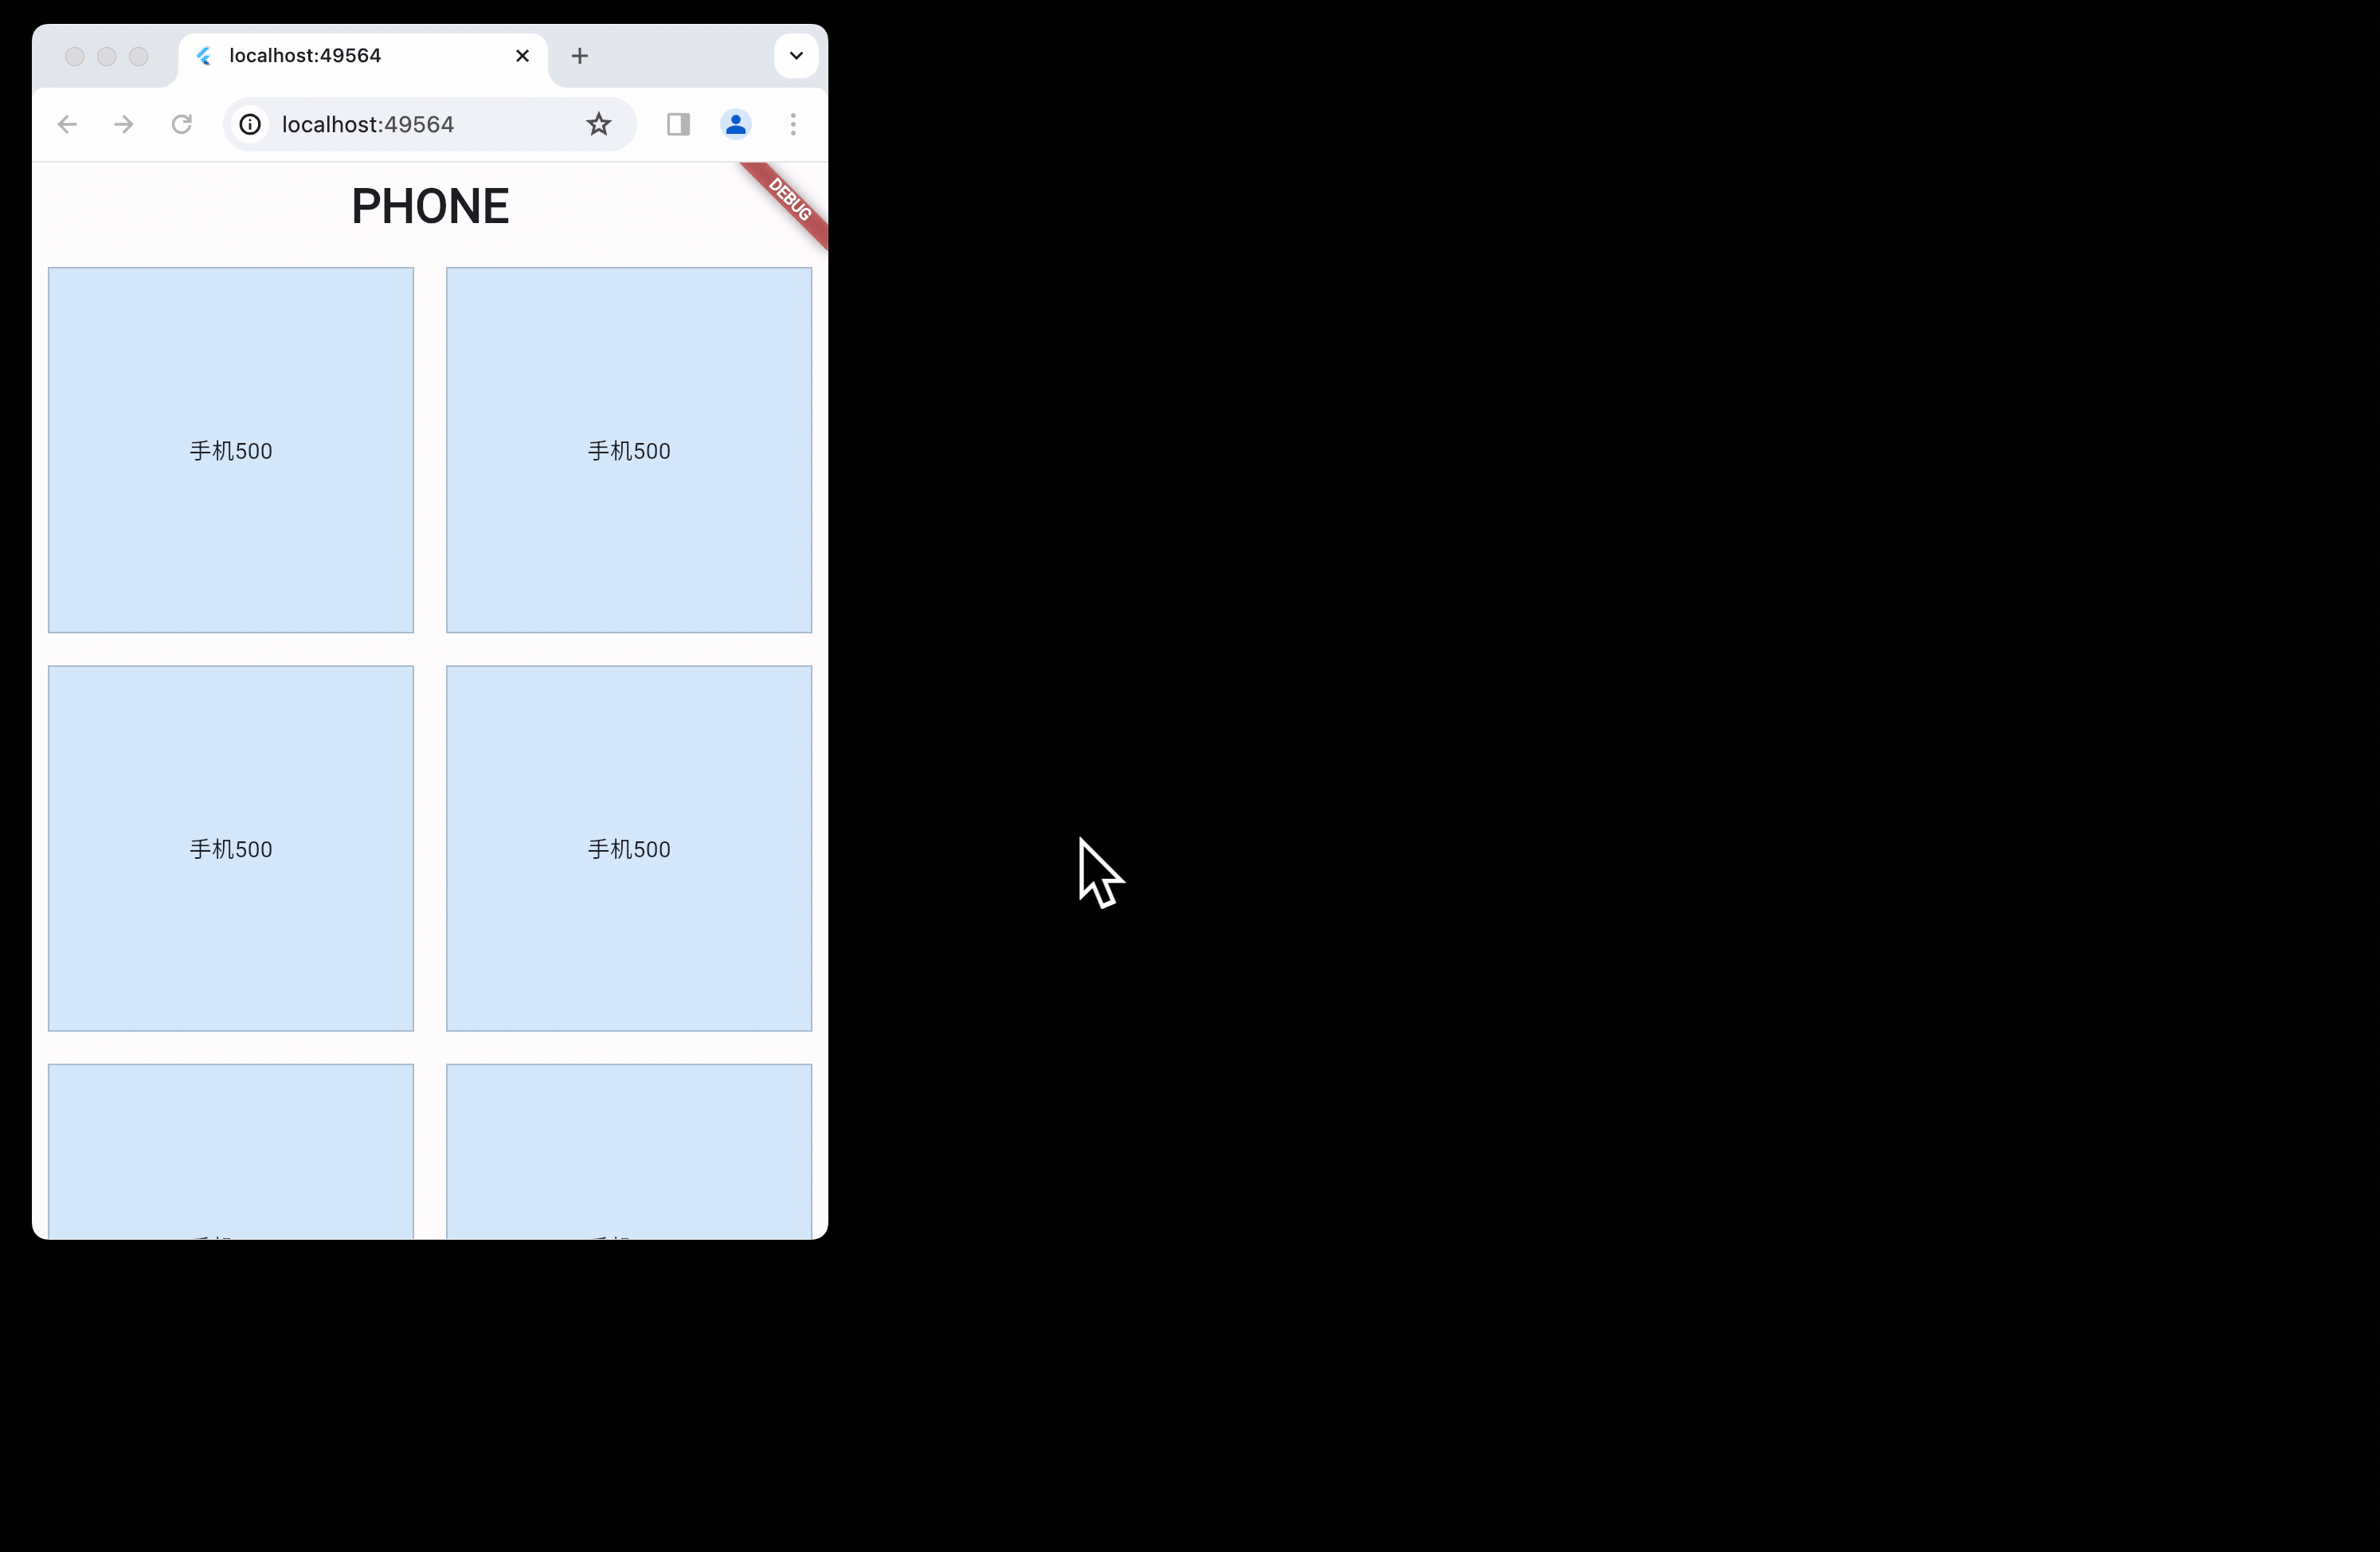
运行效果
import 'package:flutter/material.dart';
import 'package:flutter_gext_application/GetResponsiveView/controller.dart';
import 'package:flutter_gext_application/nestedRoute/main.dart';
import 'package:get/get.dart';
class ResponsiveView extends GetResponsiveView<Controller> {
// ResponsiveView()
// : super(
// settings: const ResponsiveScreenSettings(
// desktopChangePoint: 900,
// tabletChangePoint: 800,
// watchChangePoint: 500,
// ));
Widget builder() {
return Scaffold(
appBar: AppBar(title: ResponsiveViewSetting()),
body: GridView.builder(
gridDelegate: SliverGridDelegateWithFixedCrossAxisCount(
crossAxisCount: screen.responsiveValue<int>(
desktop: 6,
tablet: 4,
mobile: 2,
watch: 1,
) ??
4,
),
itemBuilder: (BuildContext context, int index) {
return Container(
decoration: BoxDecoration(
border: Border.all(color: Colors.black.withAlpha(55)),
color: Colors.blue.withAlpha(55),
),
alignment: Alignment.center,
margin: const EdgeInsets.all(10),
child: Text("$content${screen.width}"),
);
},
itemCount: 100,
),
);
}
String get content => screen.screenType == ScreenType.Desktop
? "桌面"
: screen.screenType == ScreenType.Phone
? "手机"
: screen.screenType == ScreenType.Tablet
? "平板"
: screen.screenType == ScreenType.Watch
? "手表"
: "无";
}
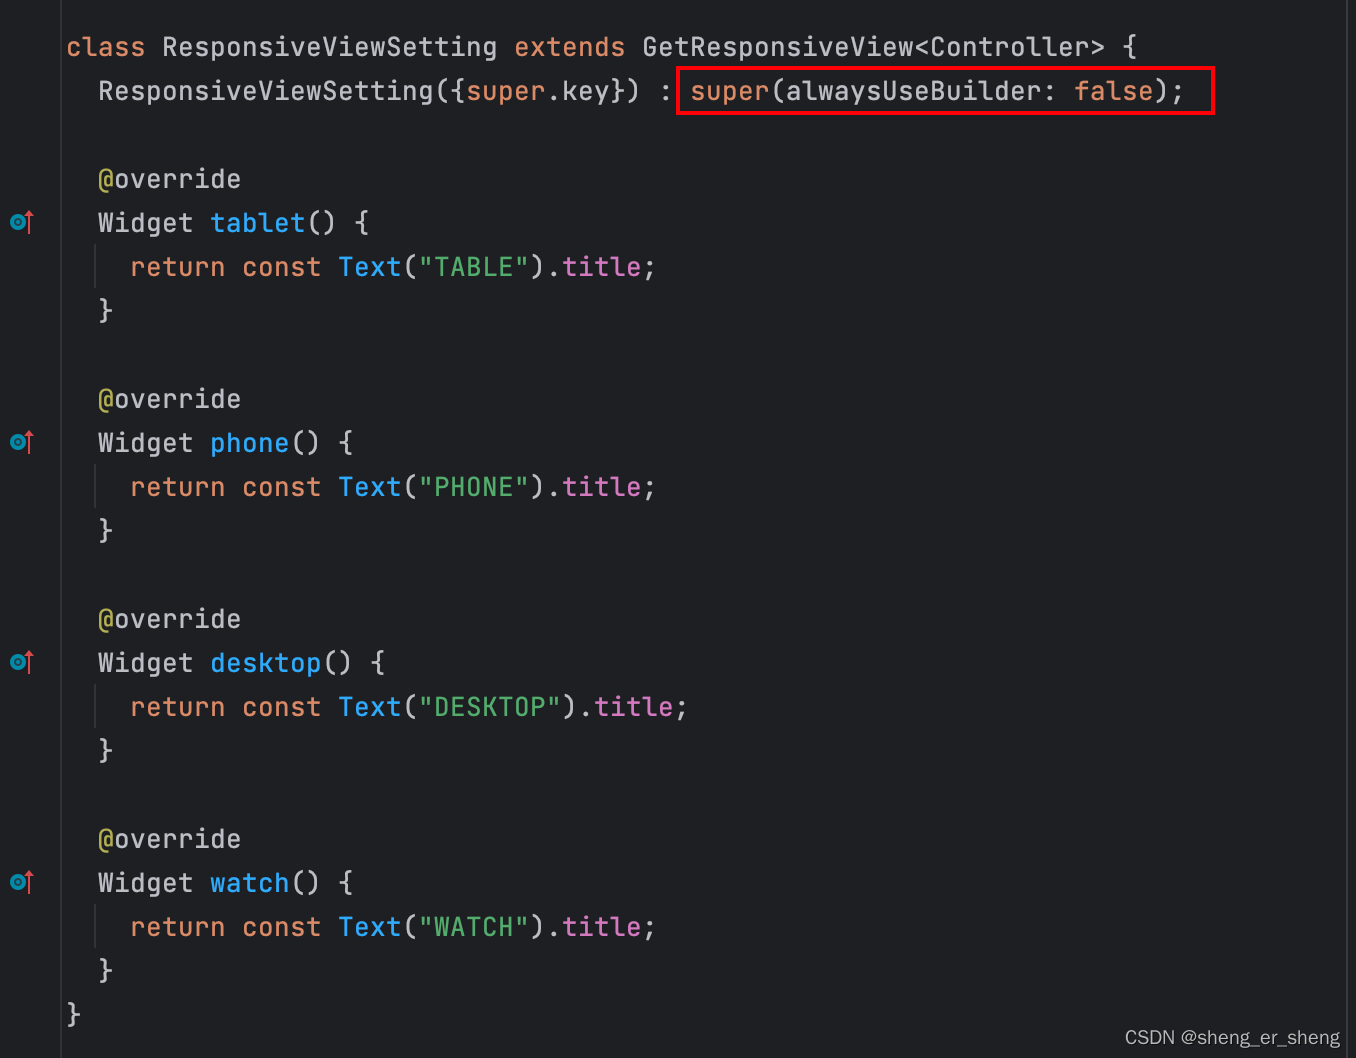
class ResponsiveViewSetting extends GetResponsiveView<Controller> {
ResponsiveViewSetting({super.key}) : super(alwaysUseBuilder: false);
Widget tablet() {
return const Text("TABLE").title;
}
Widget phone() {
return const Text("PHONE").title;
}
Widget desktop() {
return const Text("DESKTOP").title;
}
Widget watch() {
return const Text("WATCH").title;
}
}
void main() {
runApp(App());
}
class App extends StatelessWidget {
const App({super.key});
Widget build(BuildContext context) {
return MaterialApp(home: Home(),);
}
}
class Home extends StatelessWidget {
const Home({super.key});
Widget build(BuildContext context) {
return ResponsiveView();
}
}
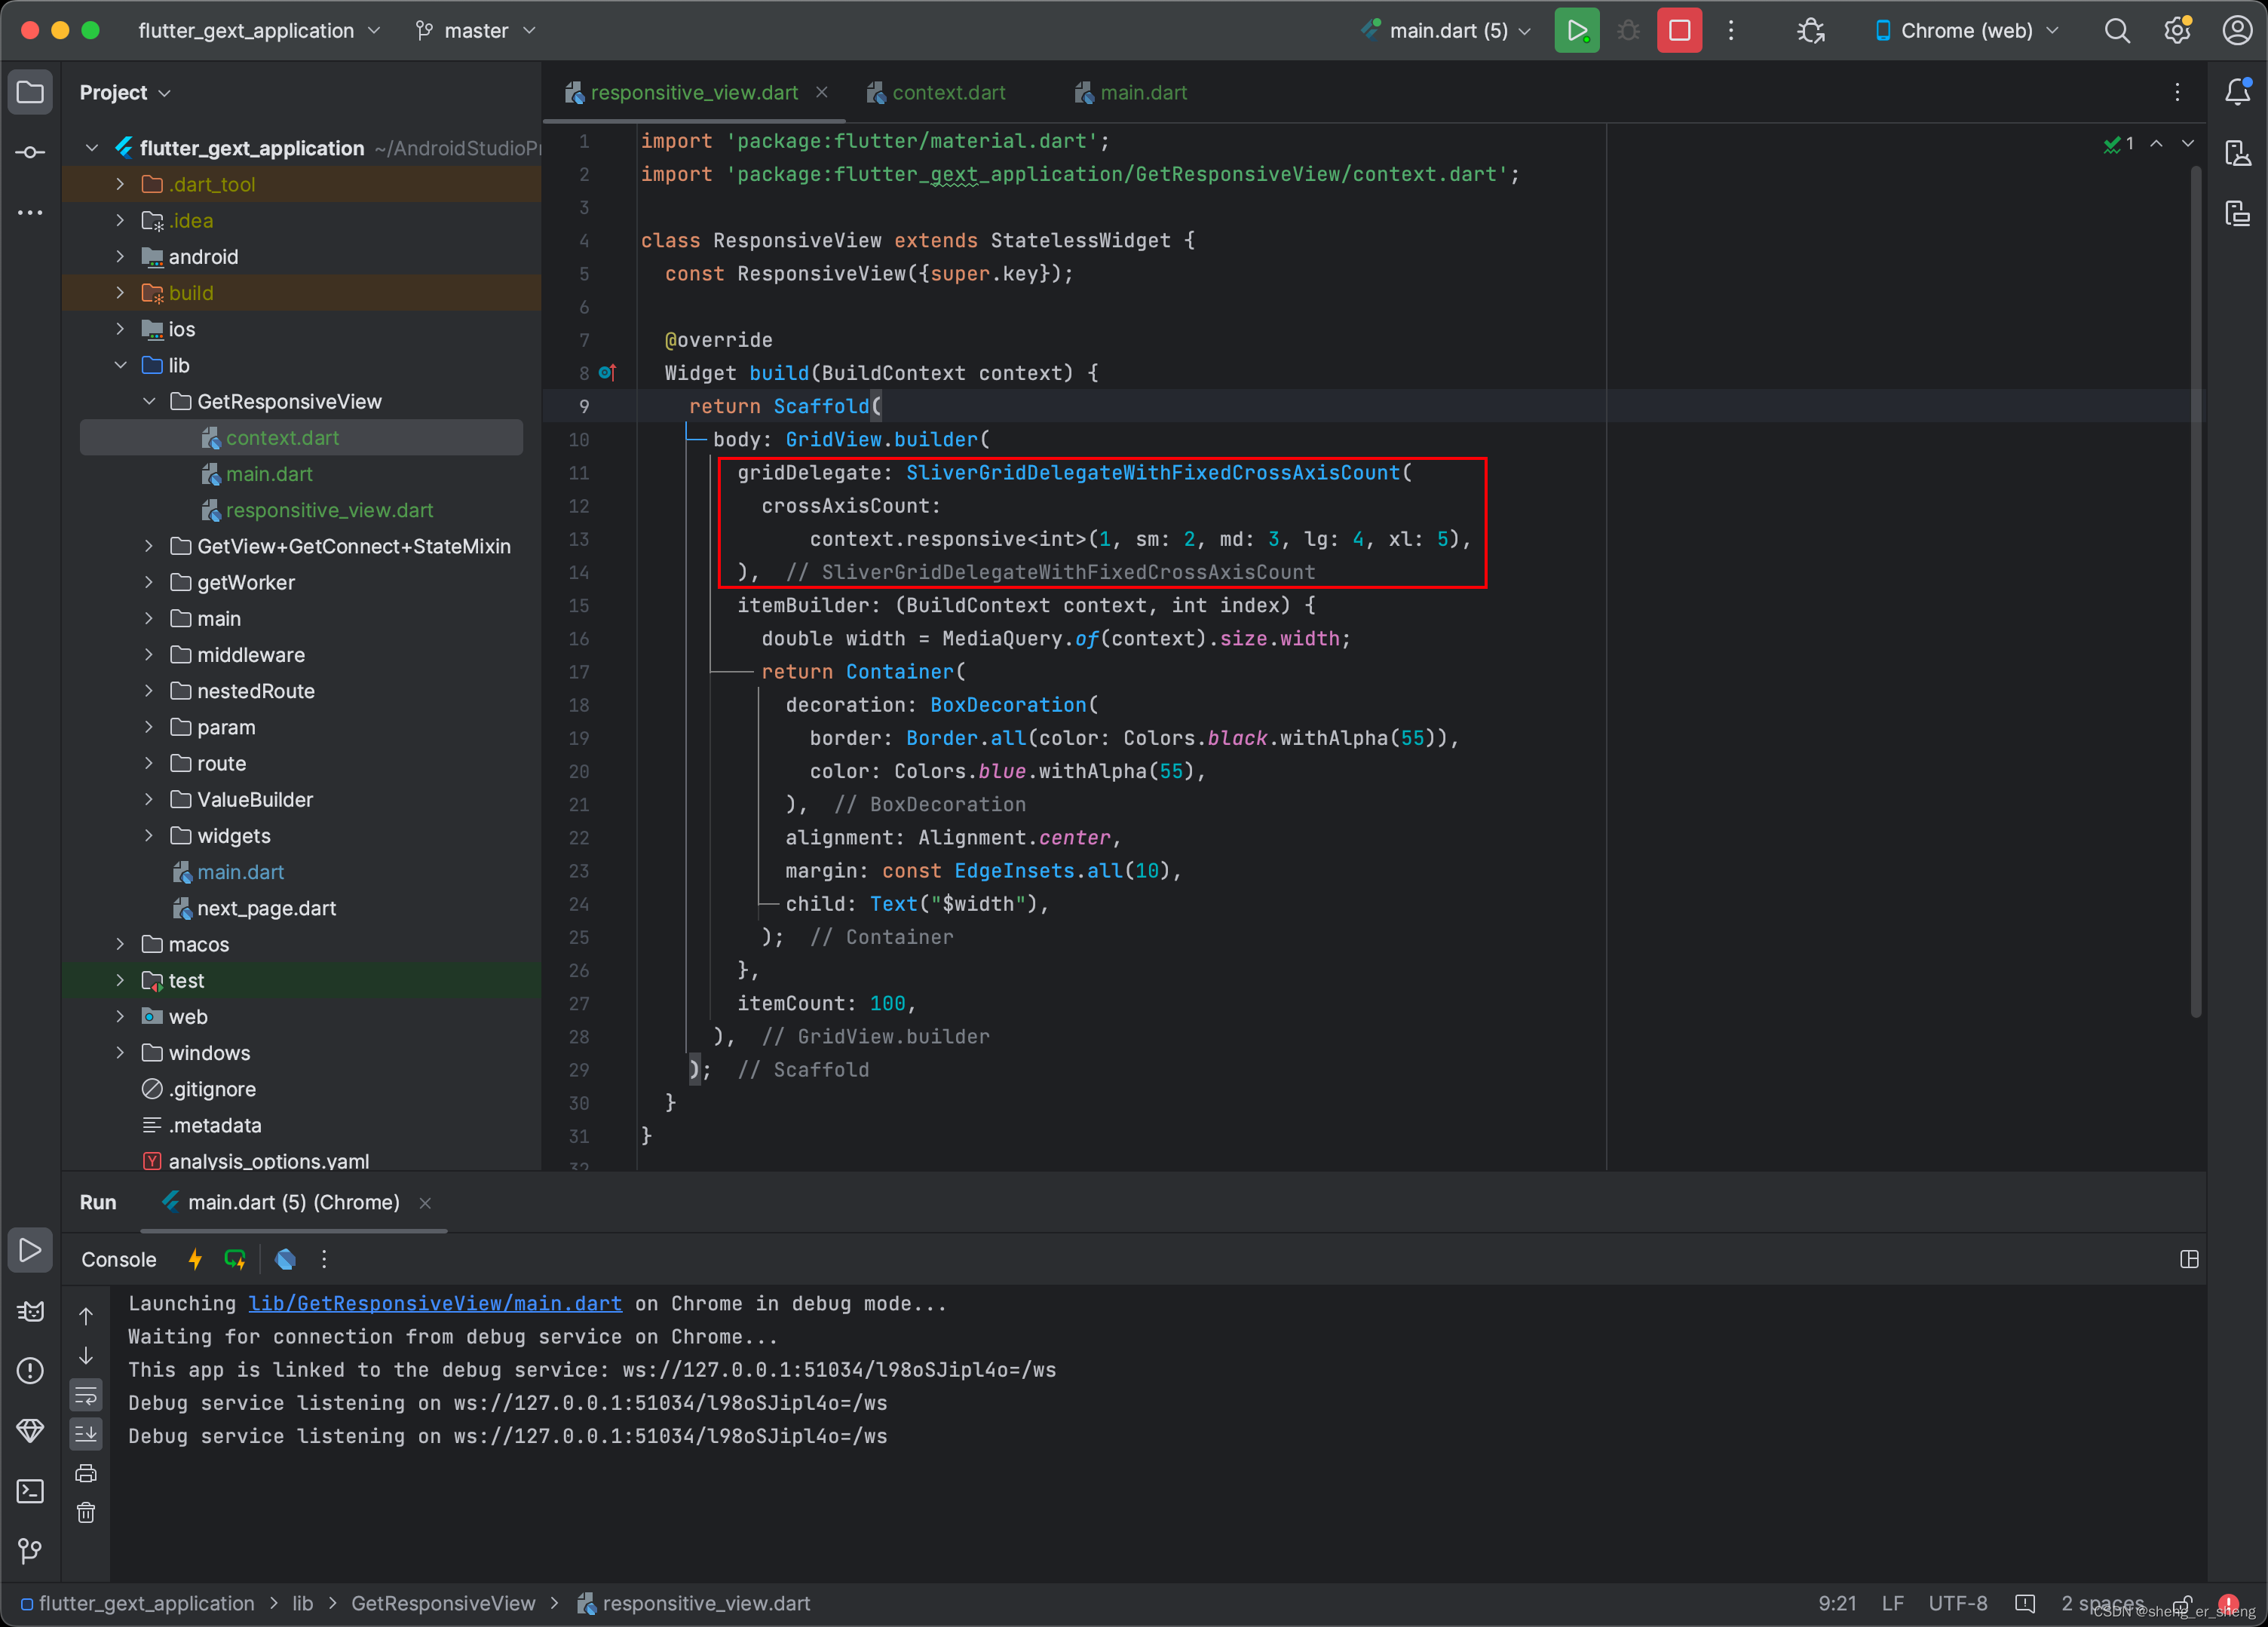
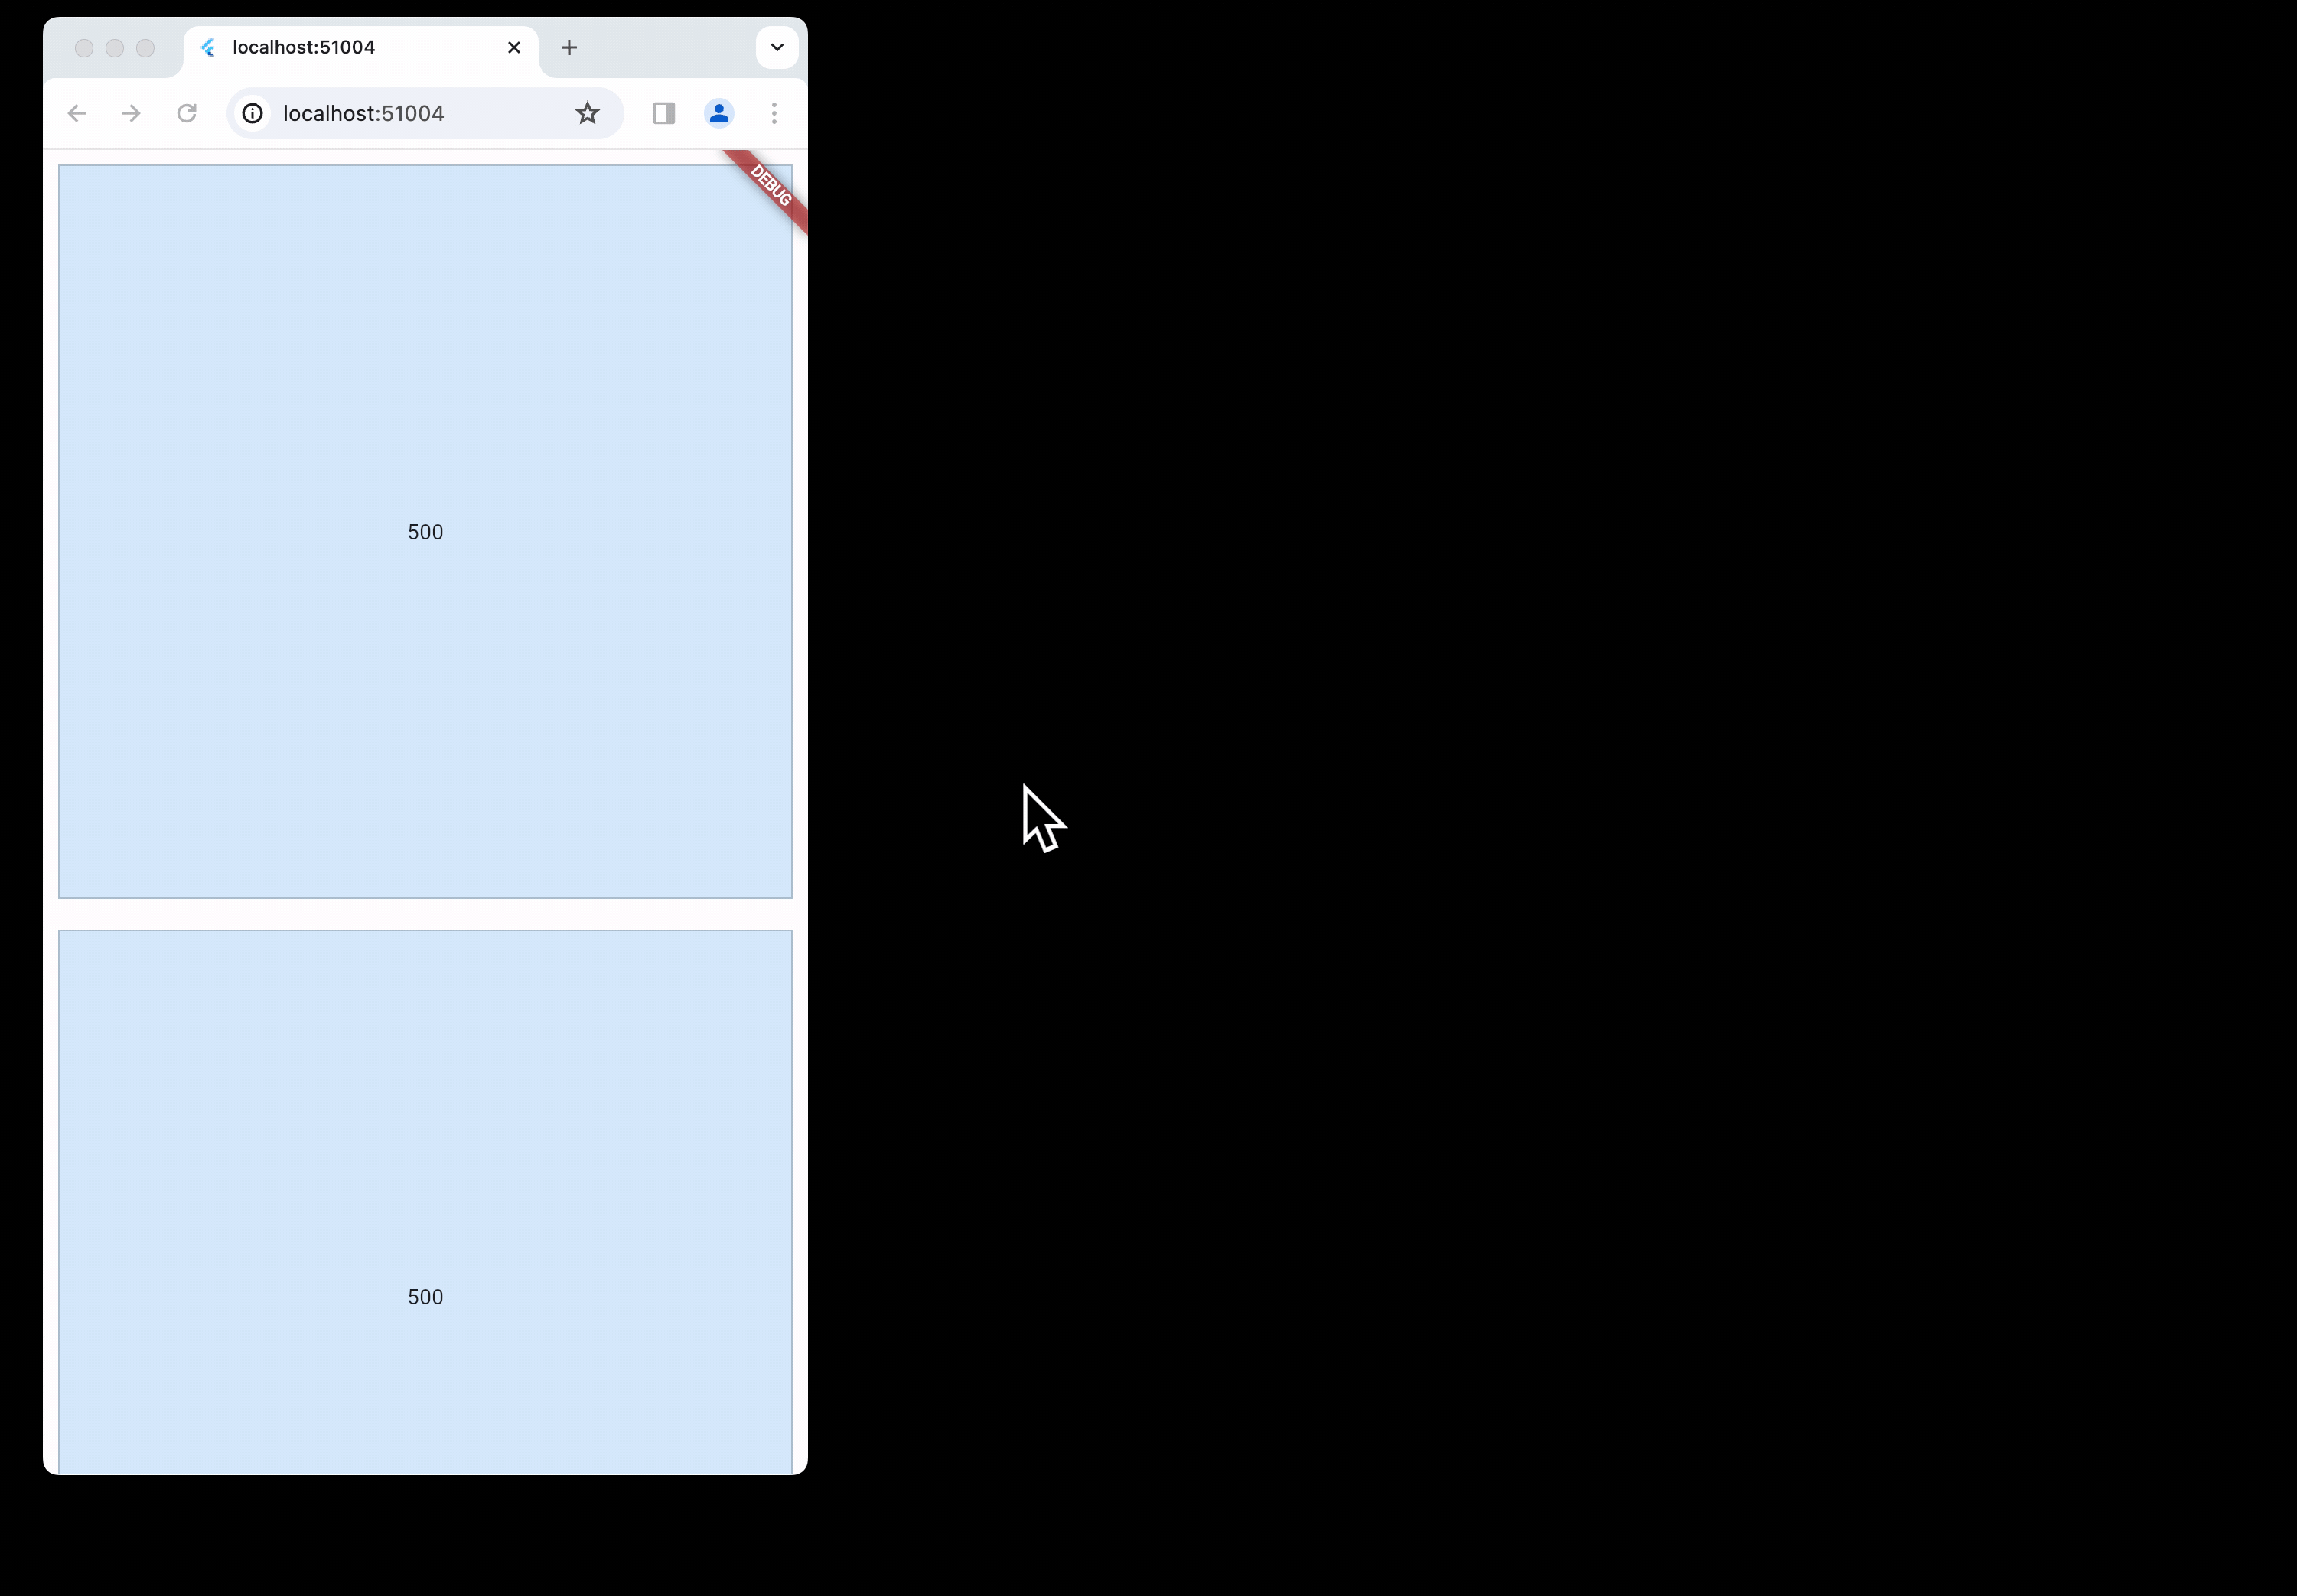
自定义响应式函数
Getx定义的GetResponsiveView多少有限局限性,所以可以自己对上下文做扩展,比如根据宽度来决定返回传入的泛型
这样不需要引入getx也能实现响应式
import 'package:flutter/material.dart';

/// 扩展 上下文BuildContext
extension Responsive on BuildContext {
  T responsive<T>(
    T defaultVal, {
    T? sm,
    T? md,
    T? lg,
    T? xl,
  }) {
    final wd = MediaQuery.of(this).size.width;
    return wd >= 1280
        ? (xl ?? lg ?? md ?? sm ?? defaultVal)
        : wd >= 1024
            ? (lg ?? md ?? sm ?? defaultVal)
            : wd >= 768
                ? (md ?? sm ?? defaultVal)
                : wd >= 640
                    ? (sm ?? defaultVal)
                    : defaultVal;
  }
}
import 'package:flutter/material.dart';
import 'package:flutter_gext_application/GetResponsiveView/context.dart';
class ResponsiveView extends StatelessWidget {
const ResponsiveView({super.key});
Widget build(BuildContext context) {
return Scaffold(
body: GridView.builder(
gridDelegate: SliverGridDelegateWithFixedCrossAxisCount(
crossAxisCount:
context.responsive<int>(1, sm: 2, md: 3, lg: 4, xl: 5),
),
itemBuilder: (BuildContext context, int index) {
double width = MediaQuery.of(context).size.width;
return Container(
decoration: BoxDecoration(
border: Border.all(color: Colors.black.withAlpha(55)),
color: Colors.blue.withAlpha(55),
),
alignment: Alignment.center,
margin: const EdgeInsets.all(10),
child: Text("$width"),
);
},
itemCount: 100,
),
);
}
}
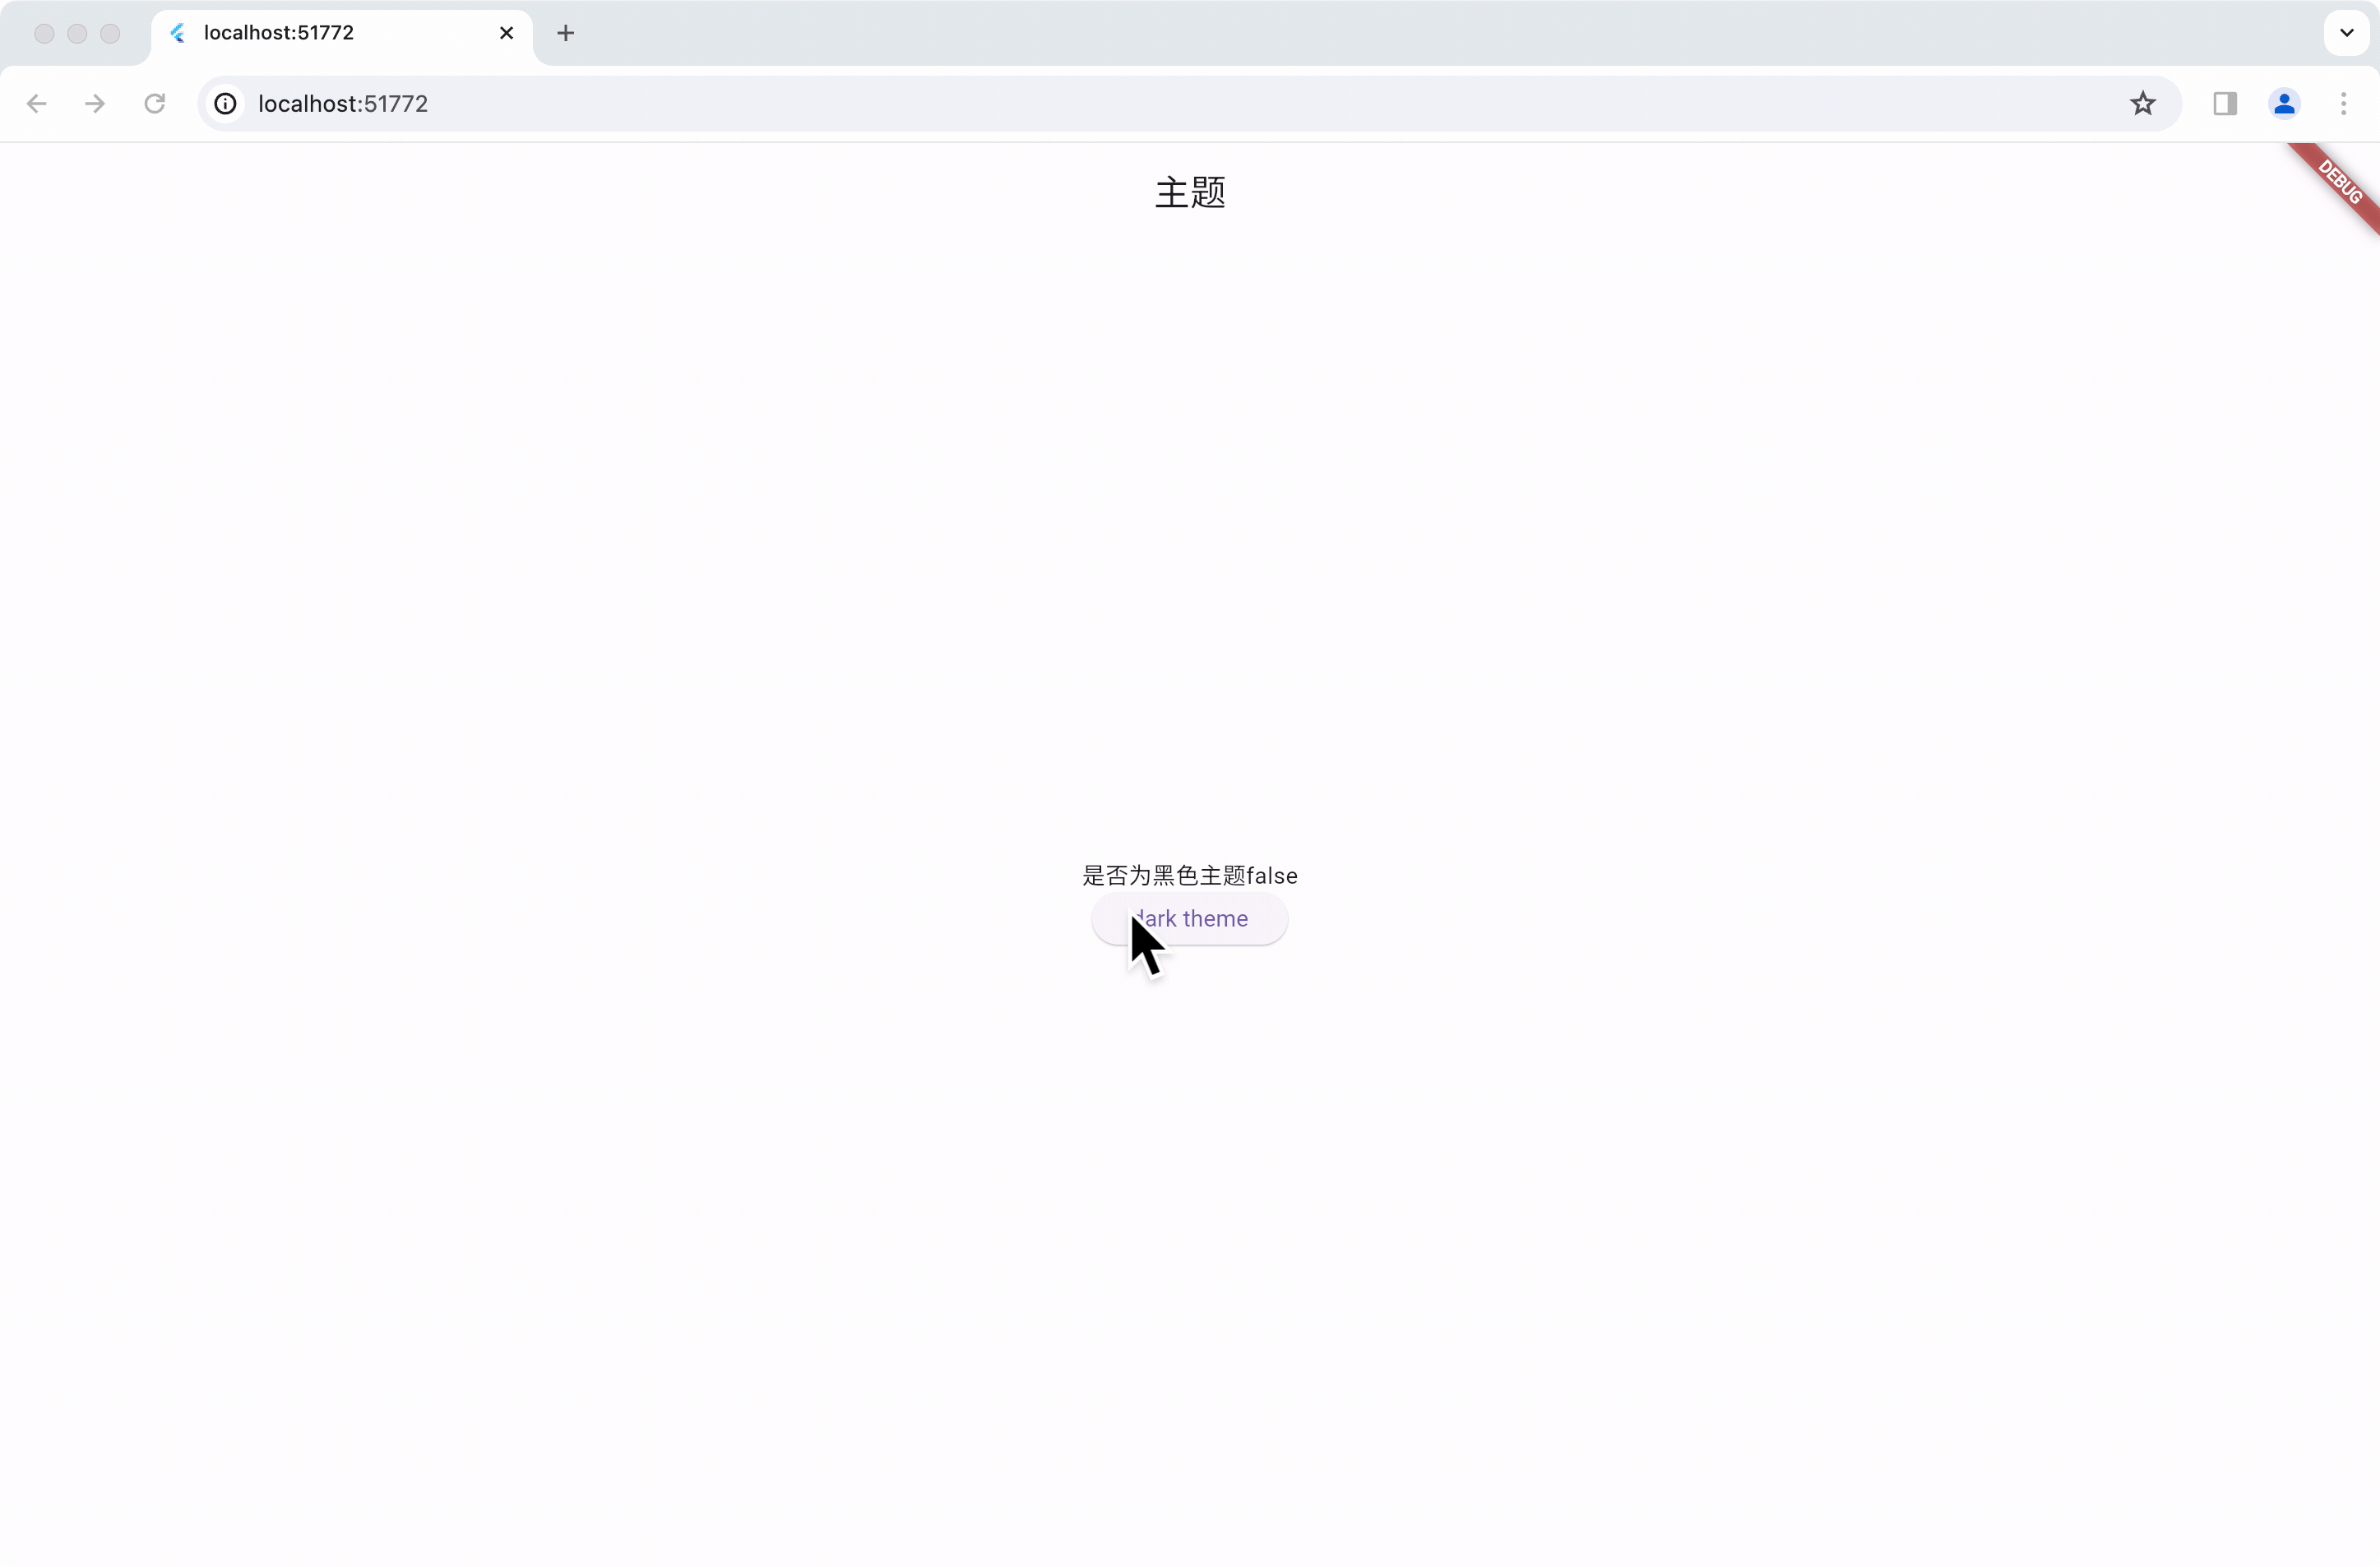
主题切换
import 'package:flutter/material.dart';
import 'package:get/get.dart';
void main() {
runApp(const App());
}
class App extends StatelessWidget {
const App({super.key});
Widget build(BuildContext context) {
return const GetMaterialApp(home: Home());
}
}
class Home extends StatelessWidget {
const Home({super.key});
Widget build(BuildContext context) {
return Scaffold(
appBar: AppBar(
title: const Text("主题"),
),
body: Center(
child: Column(
mainAxisSize: MainAxisSize.min,
children: [
Text("是否为黑色主题${Get.isDarkMode}"),
ElevatedButton(
onPressed: () {
Get.changeTheme(
Get.isDarkMode ? ThemeData.light() : ThemeData.dark());
},
child: const Text("dark theme"),
)
],
),
),
);
}
}
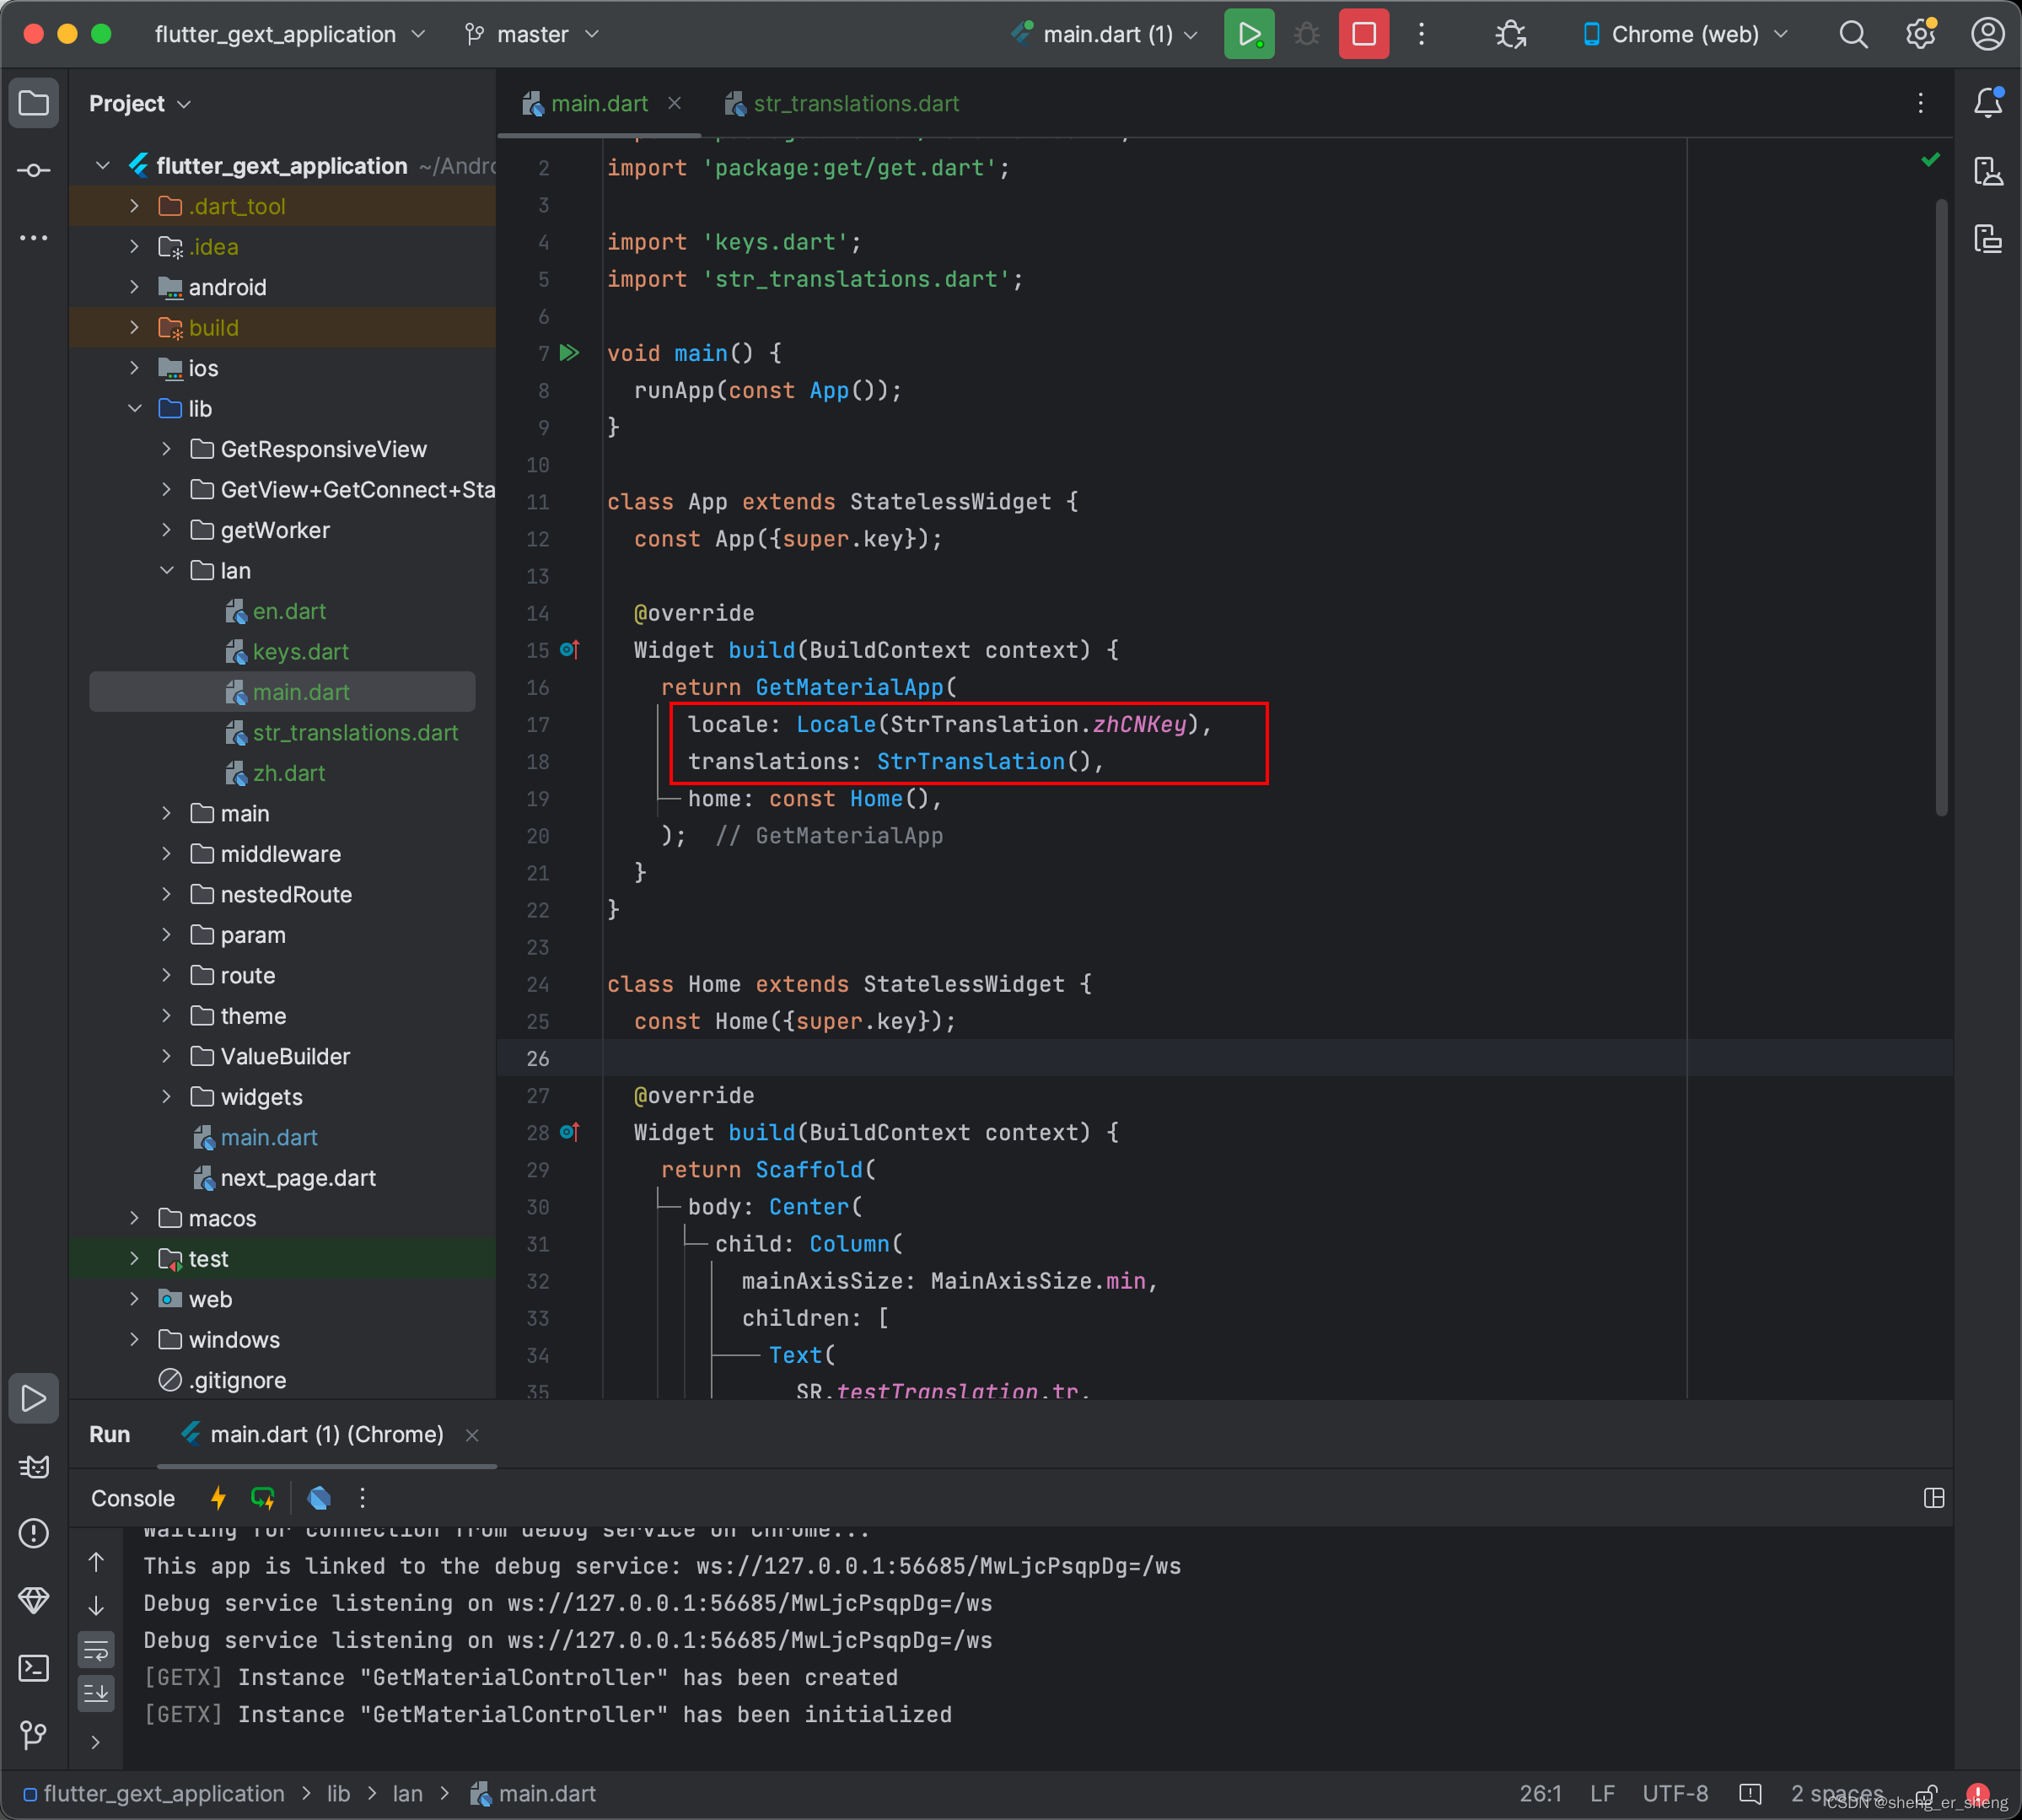
国际化语言翻译
首先需要一个Translation
import 'package:flutter/material.dart';
import 'package:get/get.dart';
import 'keys.dart';
import 'str_translations.dart';
void main() {
runApp(const App());
}
class App extends StatelessWidget {
const App({super.key});
Widget build(BuildContext context) {
return GetMaterialApp(
locale: Locale(StrTranslation.zhCNKey),
translations: StrTranslation(),
home: const Home(),
);
}
}
class Home extends StatelessWidget {
const Home({super.key});
Widget build(BuildContext context) {
return Scaffold(
body: Center(
child: Column(
mainAxisSize: MainAxisSize.min,
children: [
Text(
SR.testTranslation.tr,
style: const TextStyle(fontSize: 20),
),
Row(
mainAxisAlignment: MainAxisAlignment.spaceEvenly,
children: [
ElevatedButton(
onPressed: () {
Get.updateLocale(Locale(StrTranslation.zhCNKey));
},
child: const Text('中文'),
),
ElevatedButton(
onPressed: () {
Get.updateLocale(Locale(StrTranslation.enUSKey));
},
child: const Text('英文'),
)
],
),
],
),
),
);
}
}
import 'package:flutter_gext_application/lan/en.dart';
import 'package:flutter_gext_application/lan/zh.dart';
import 'package:get/get.dart';
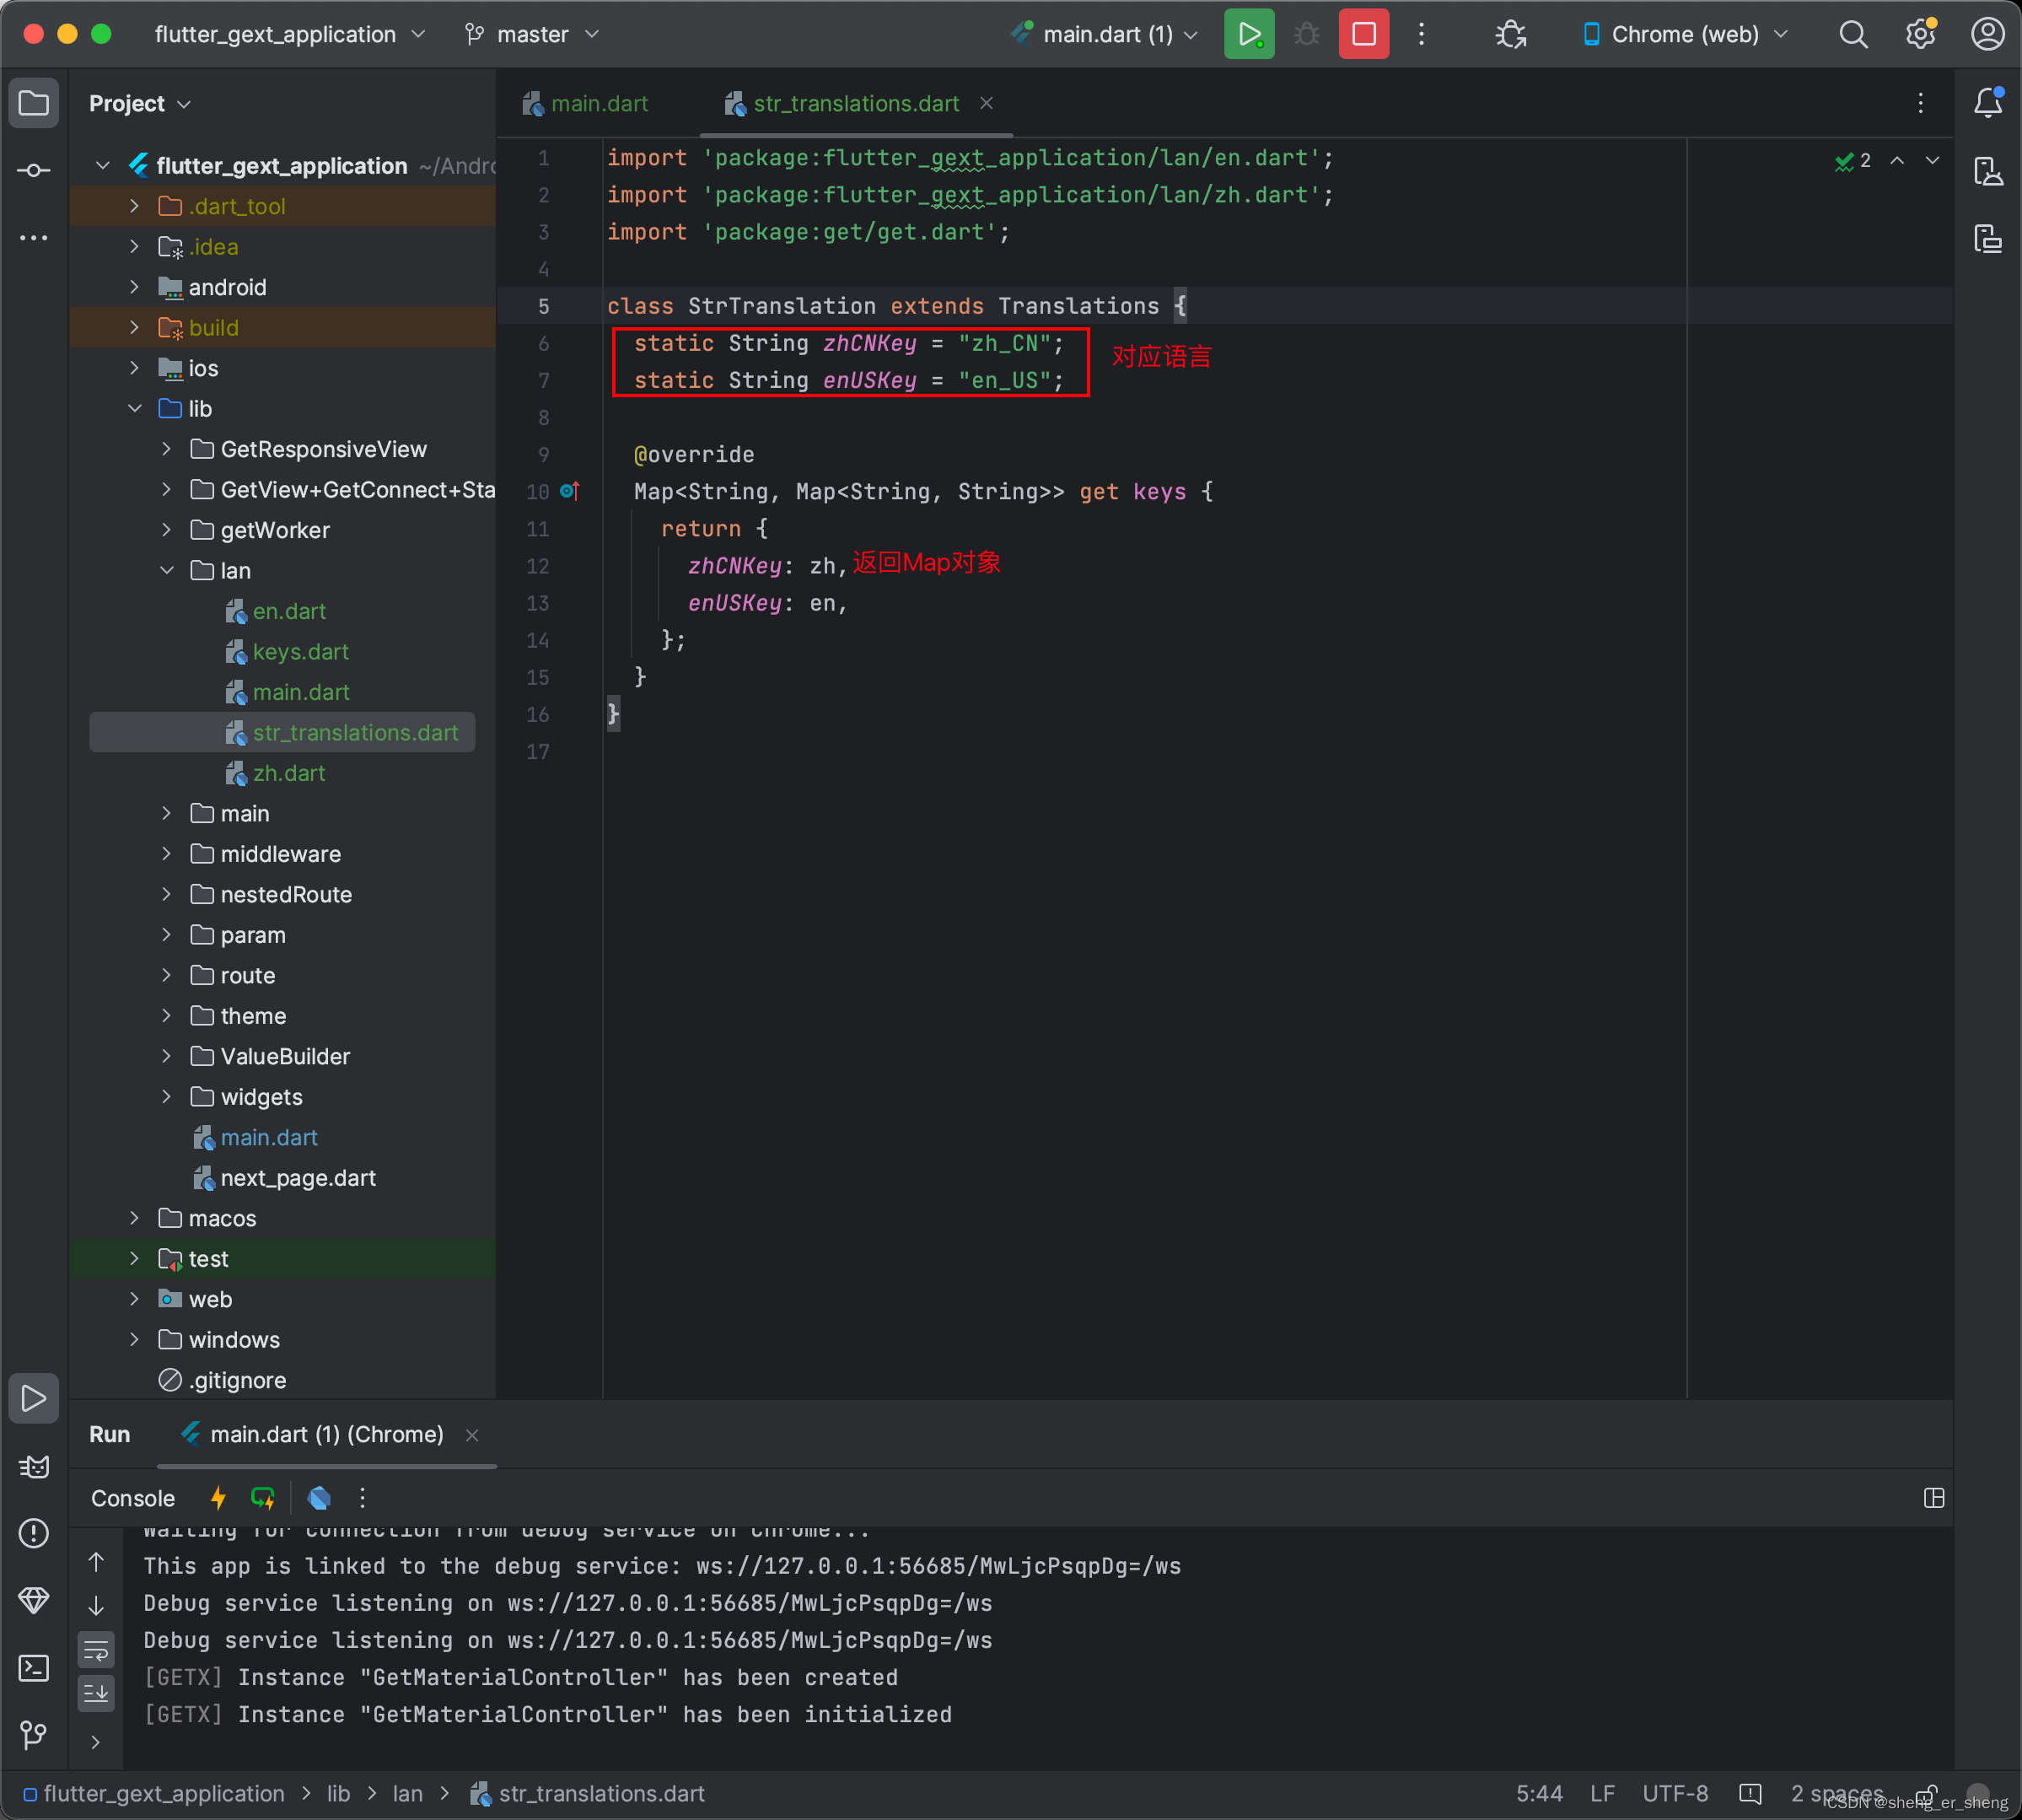
class StrTranslation extends Translations {
static String zhCNKey = "zh_CN";
static String enUSKey = "en_US";
Map<String, Map<String, String>> get keys {
return {
zhCNKey: zh,
enUSKey: en,
};
}
}
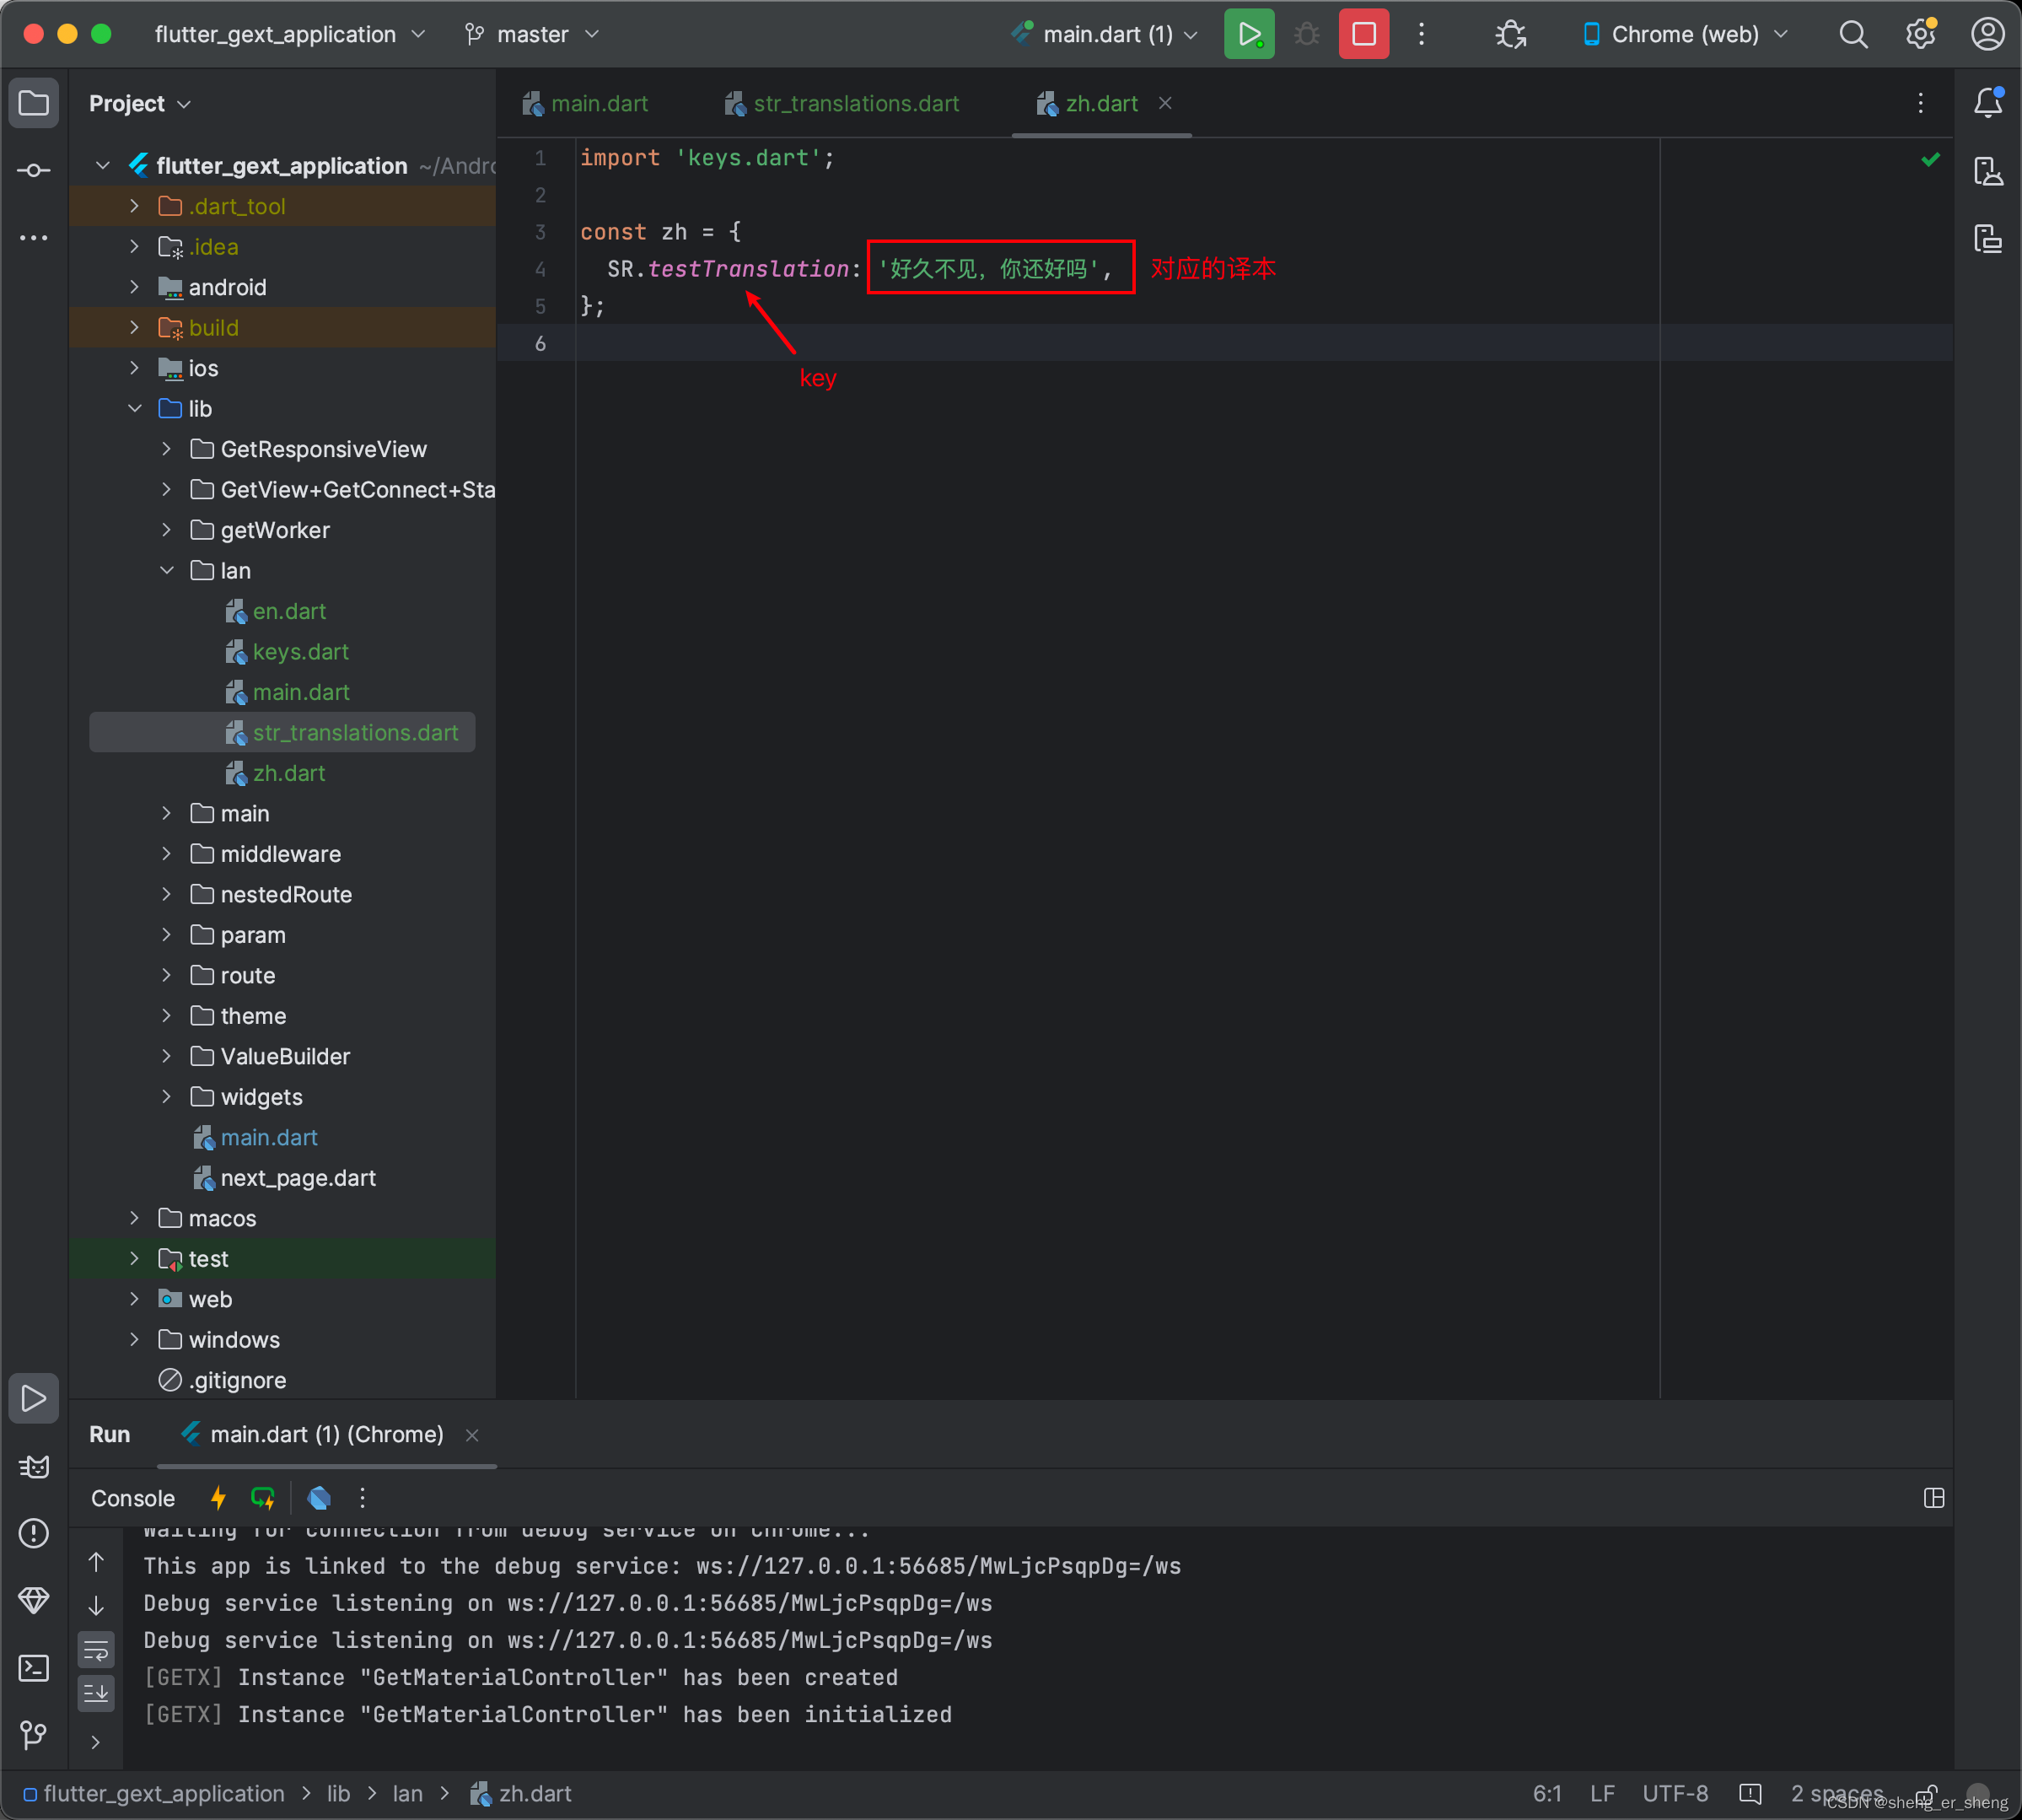
import 'keys.dart';
const zh = {
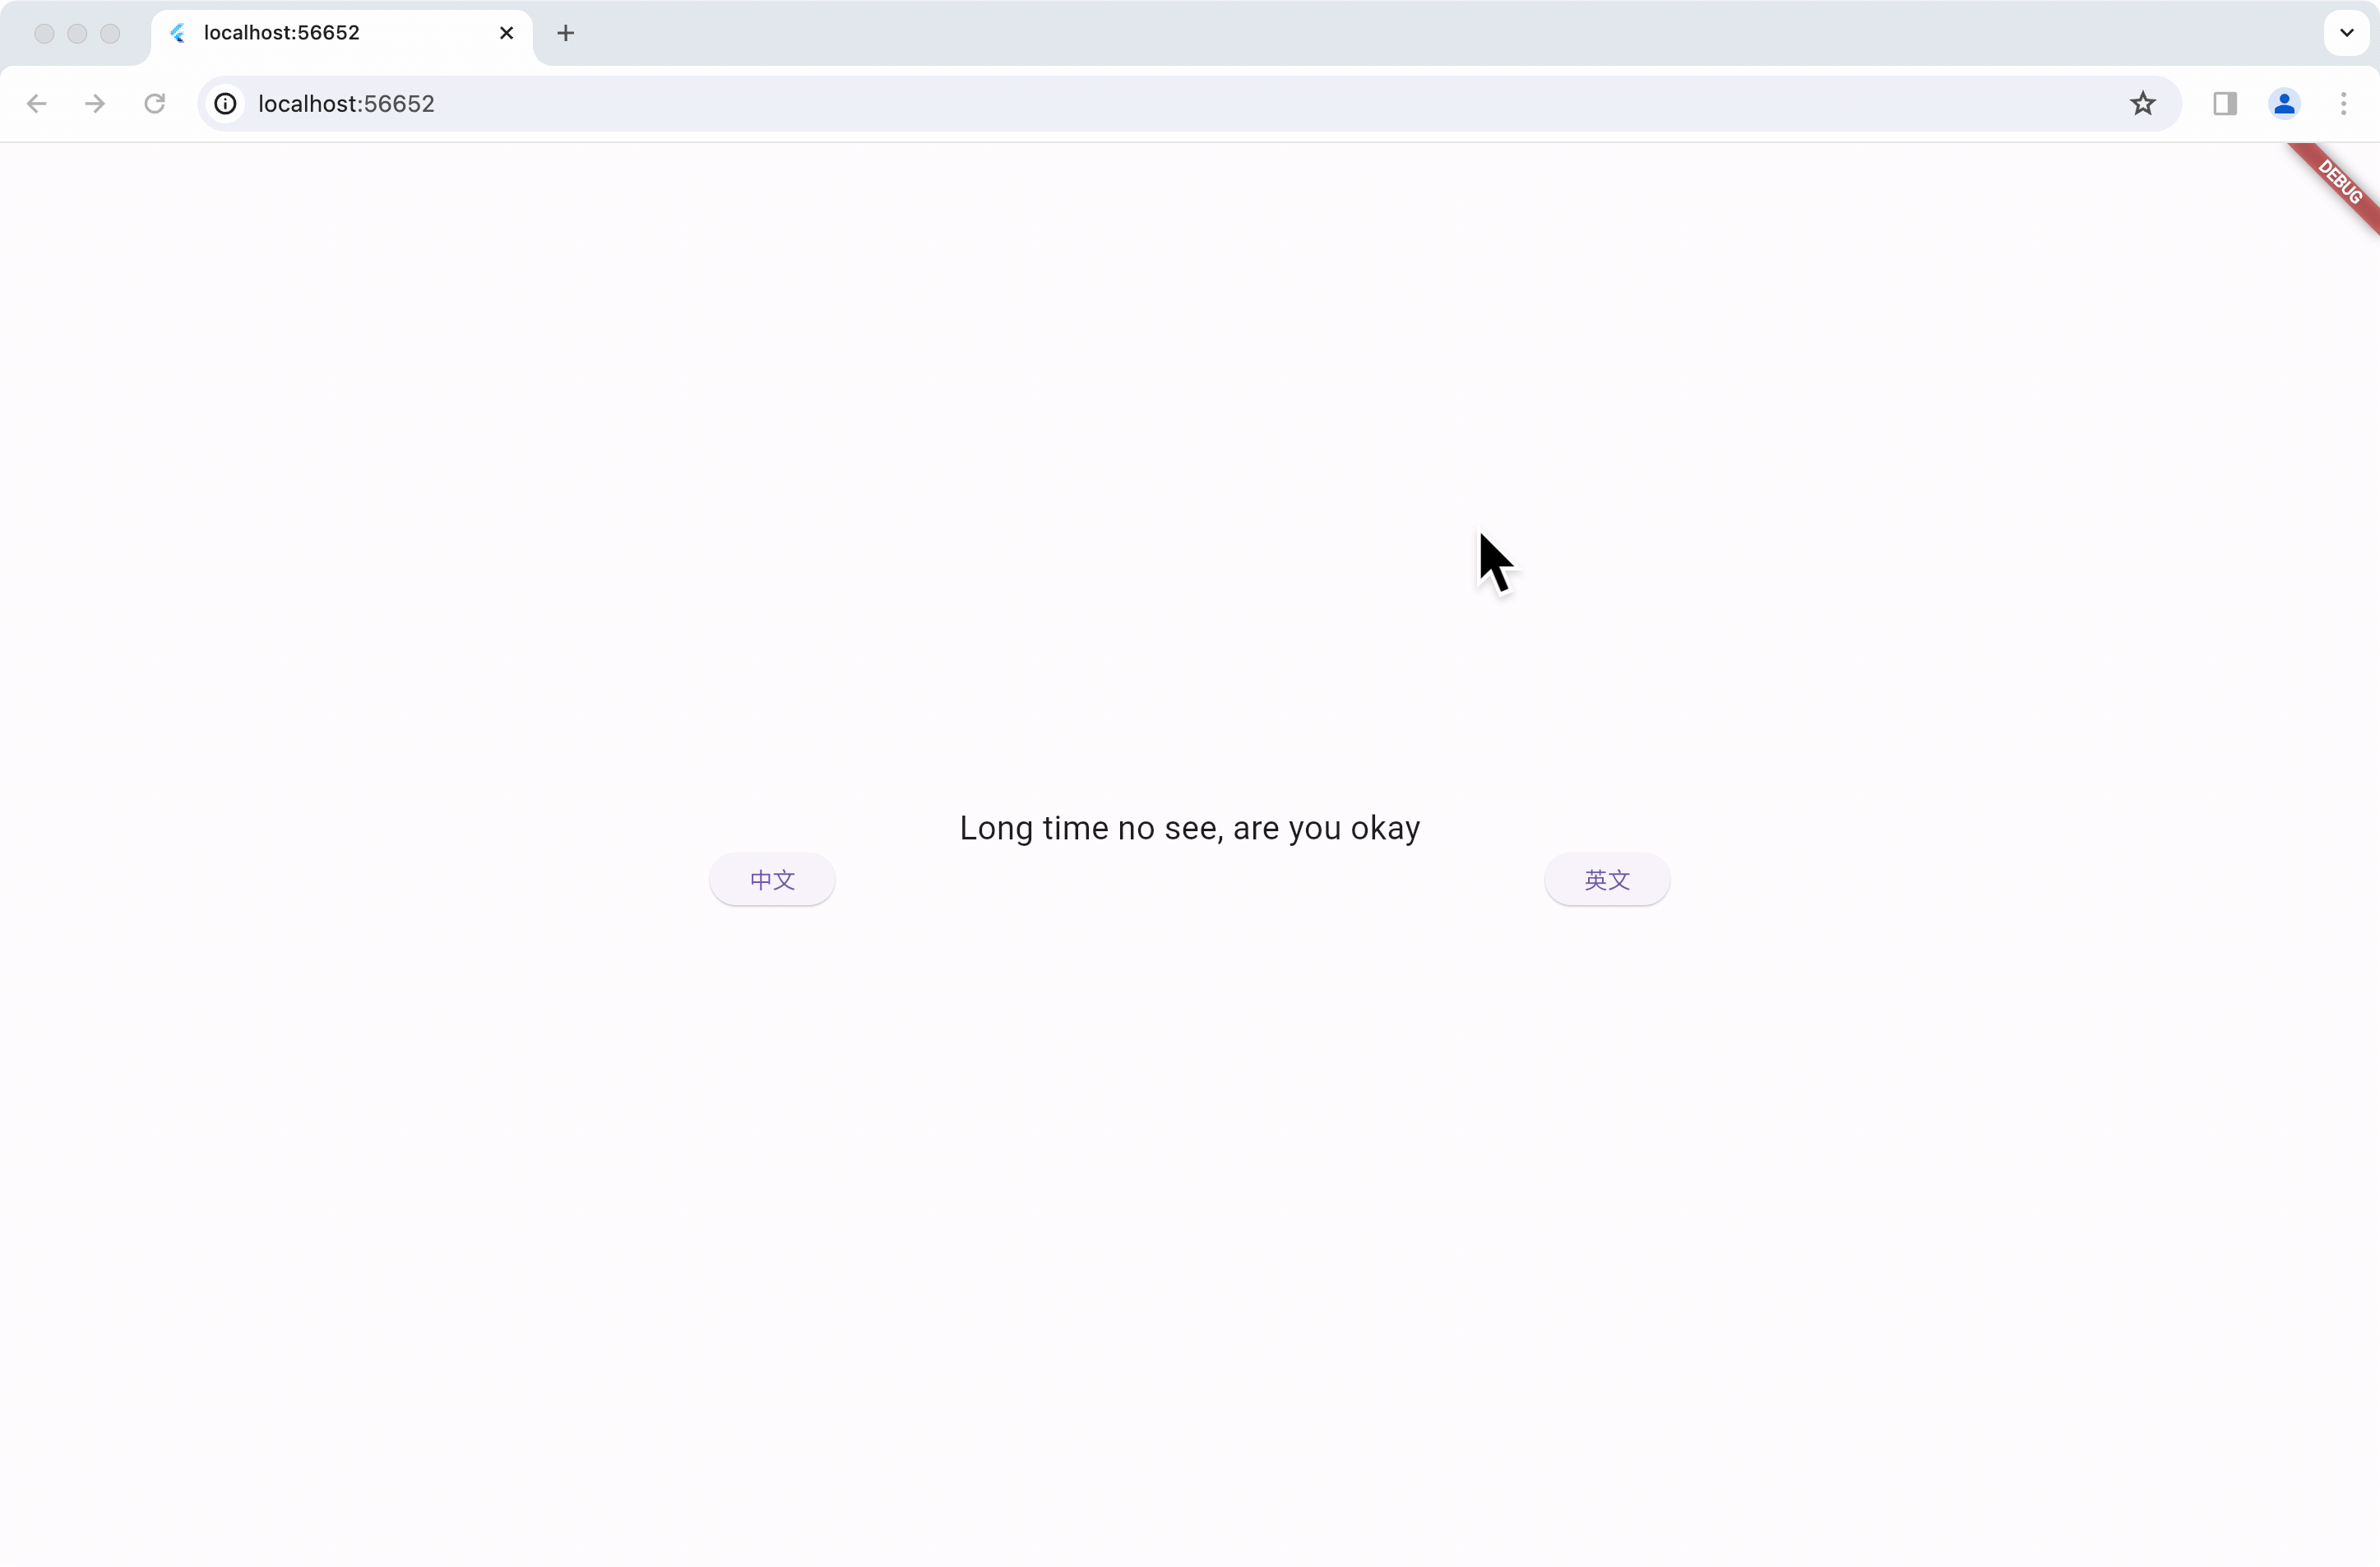
SR.testTranslation: '好久不见,你还好吗',
};
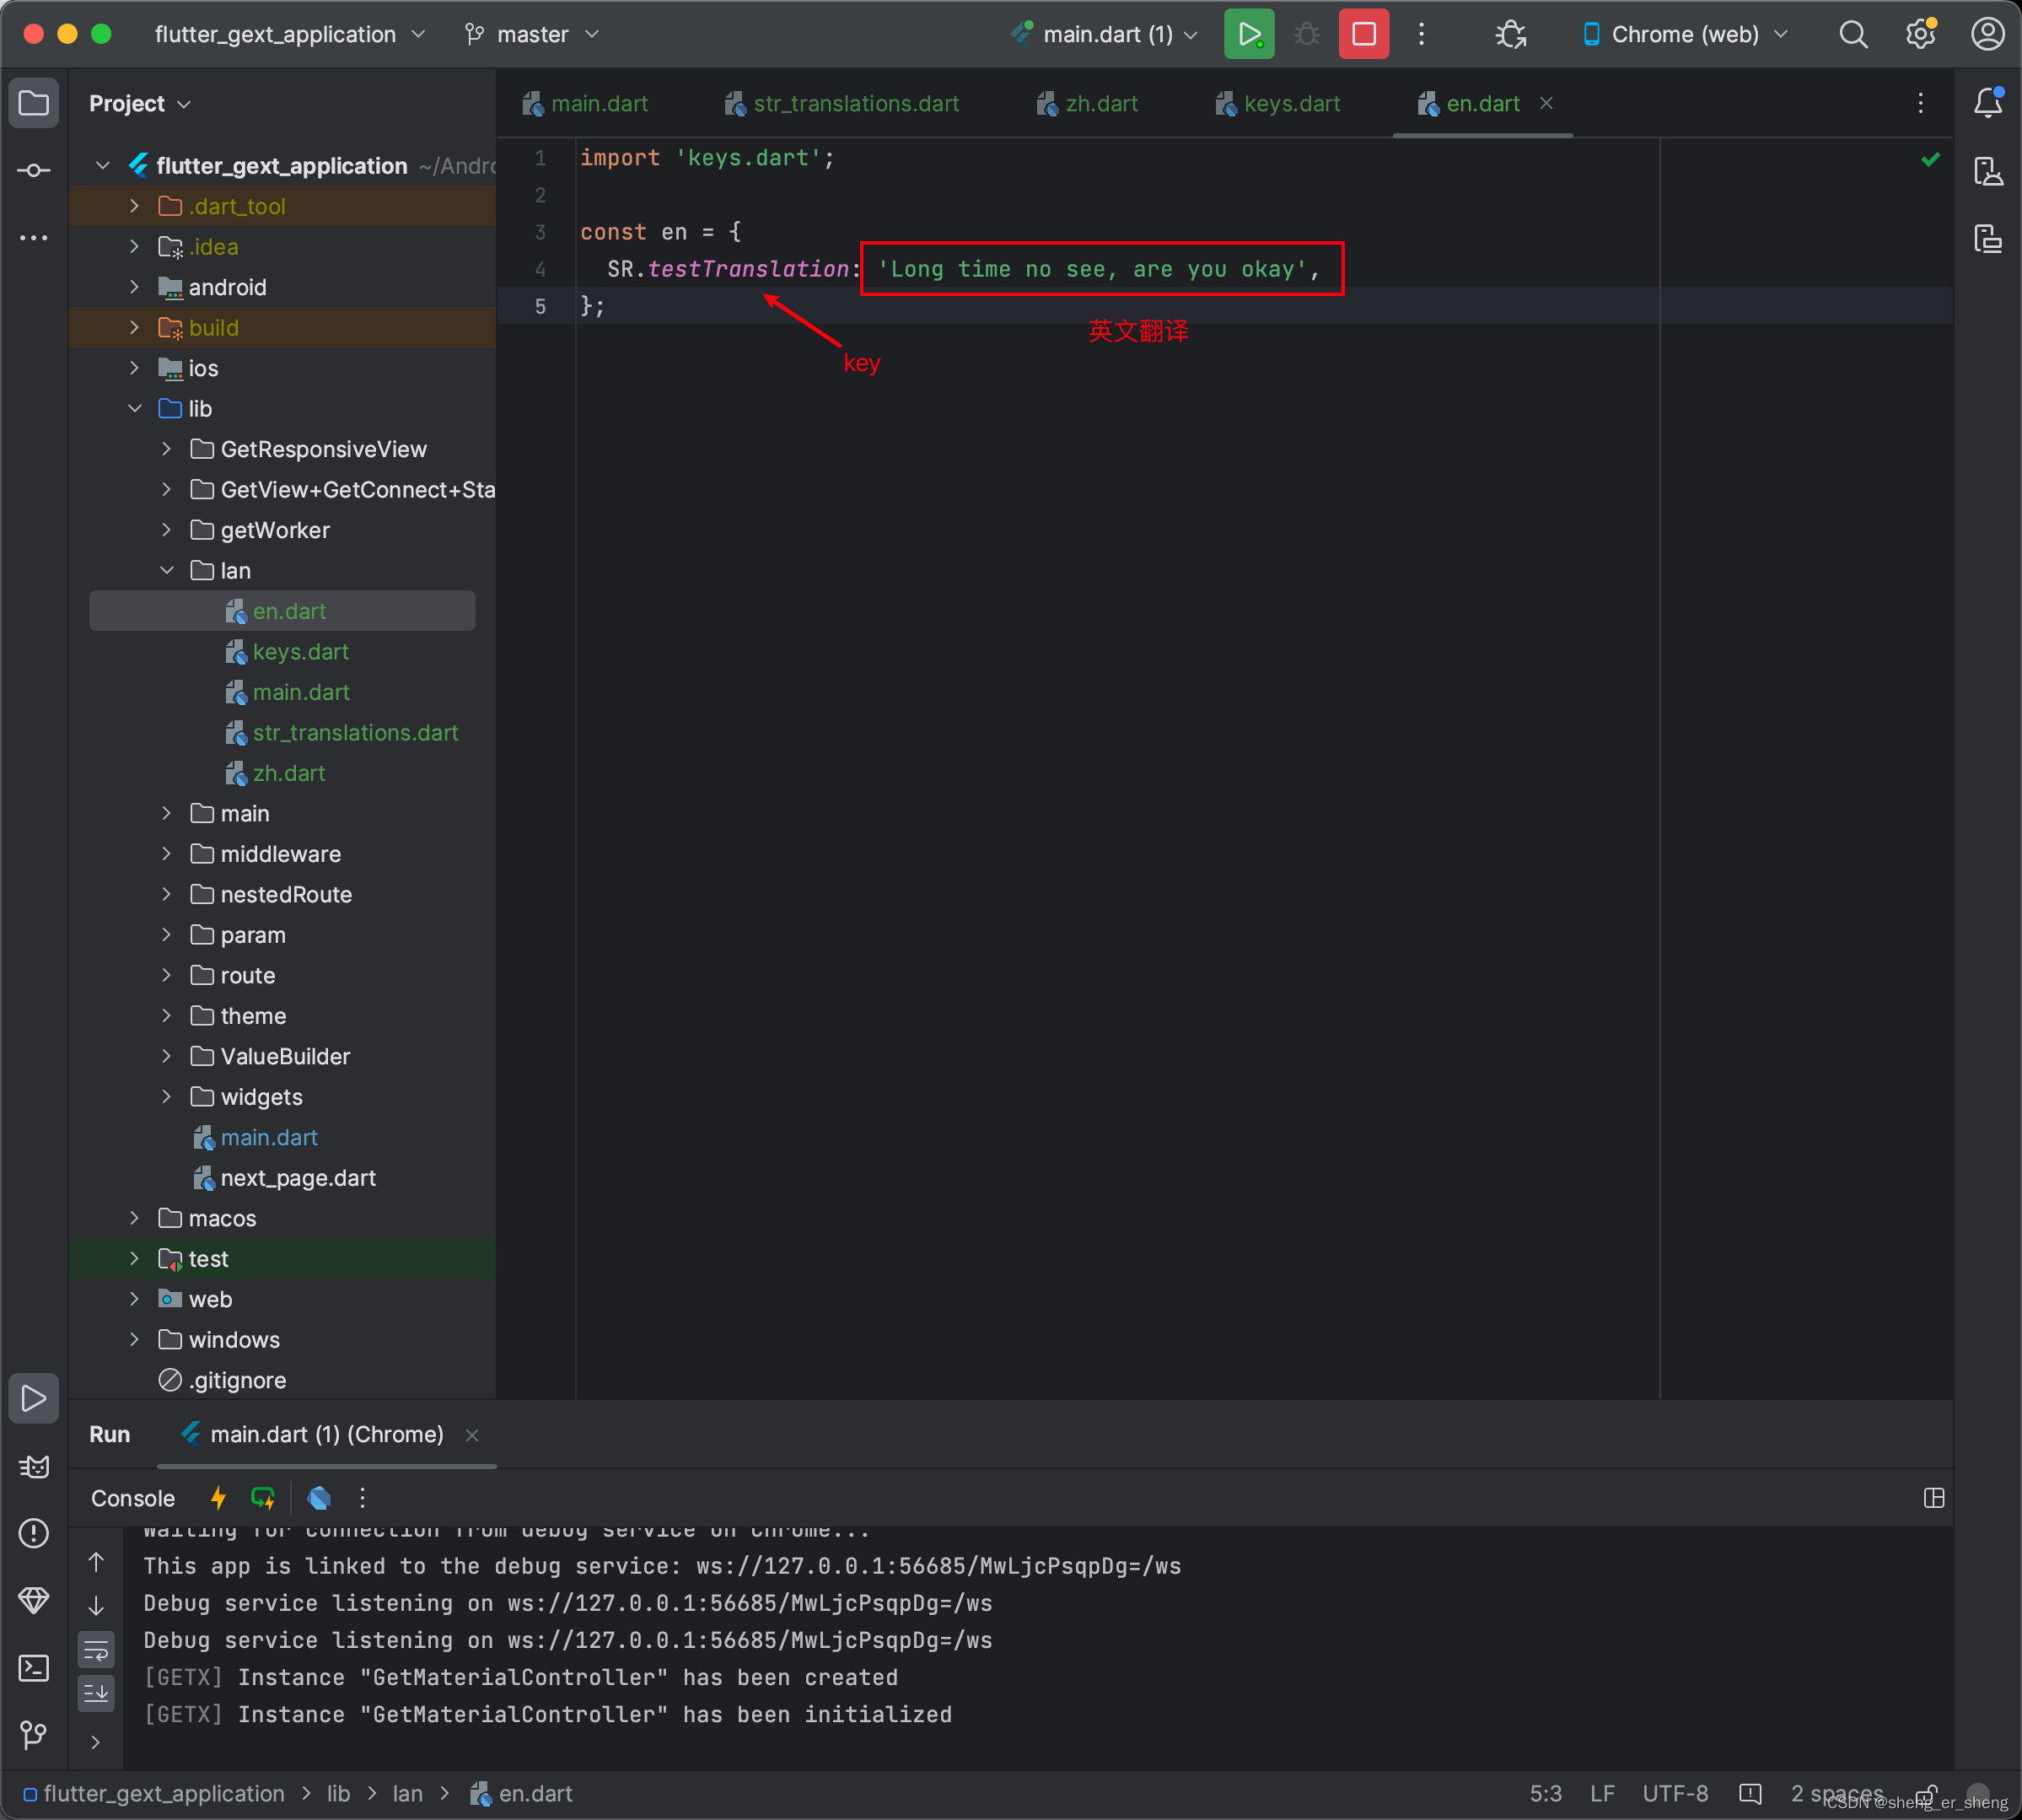
import 'keys.dart';

const en = {
  SR.testTranslation: 'Long time no see, are you okay',
};
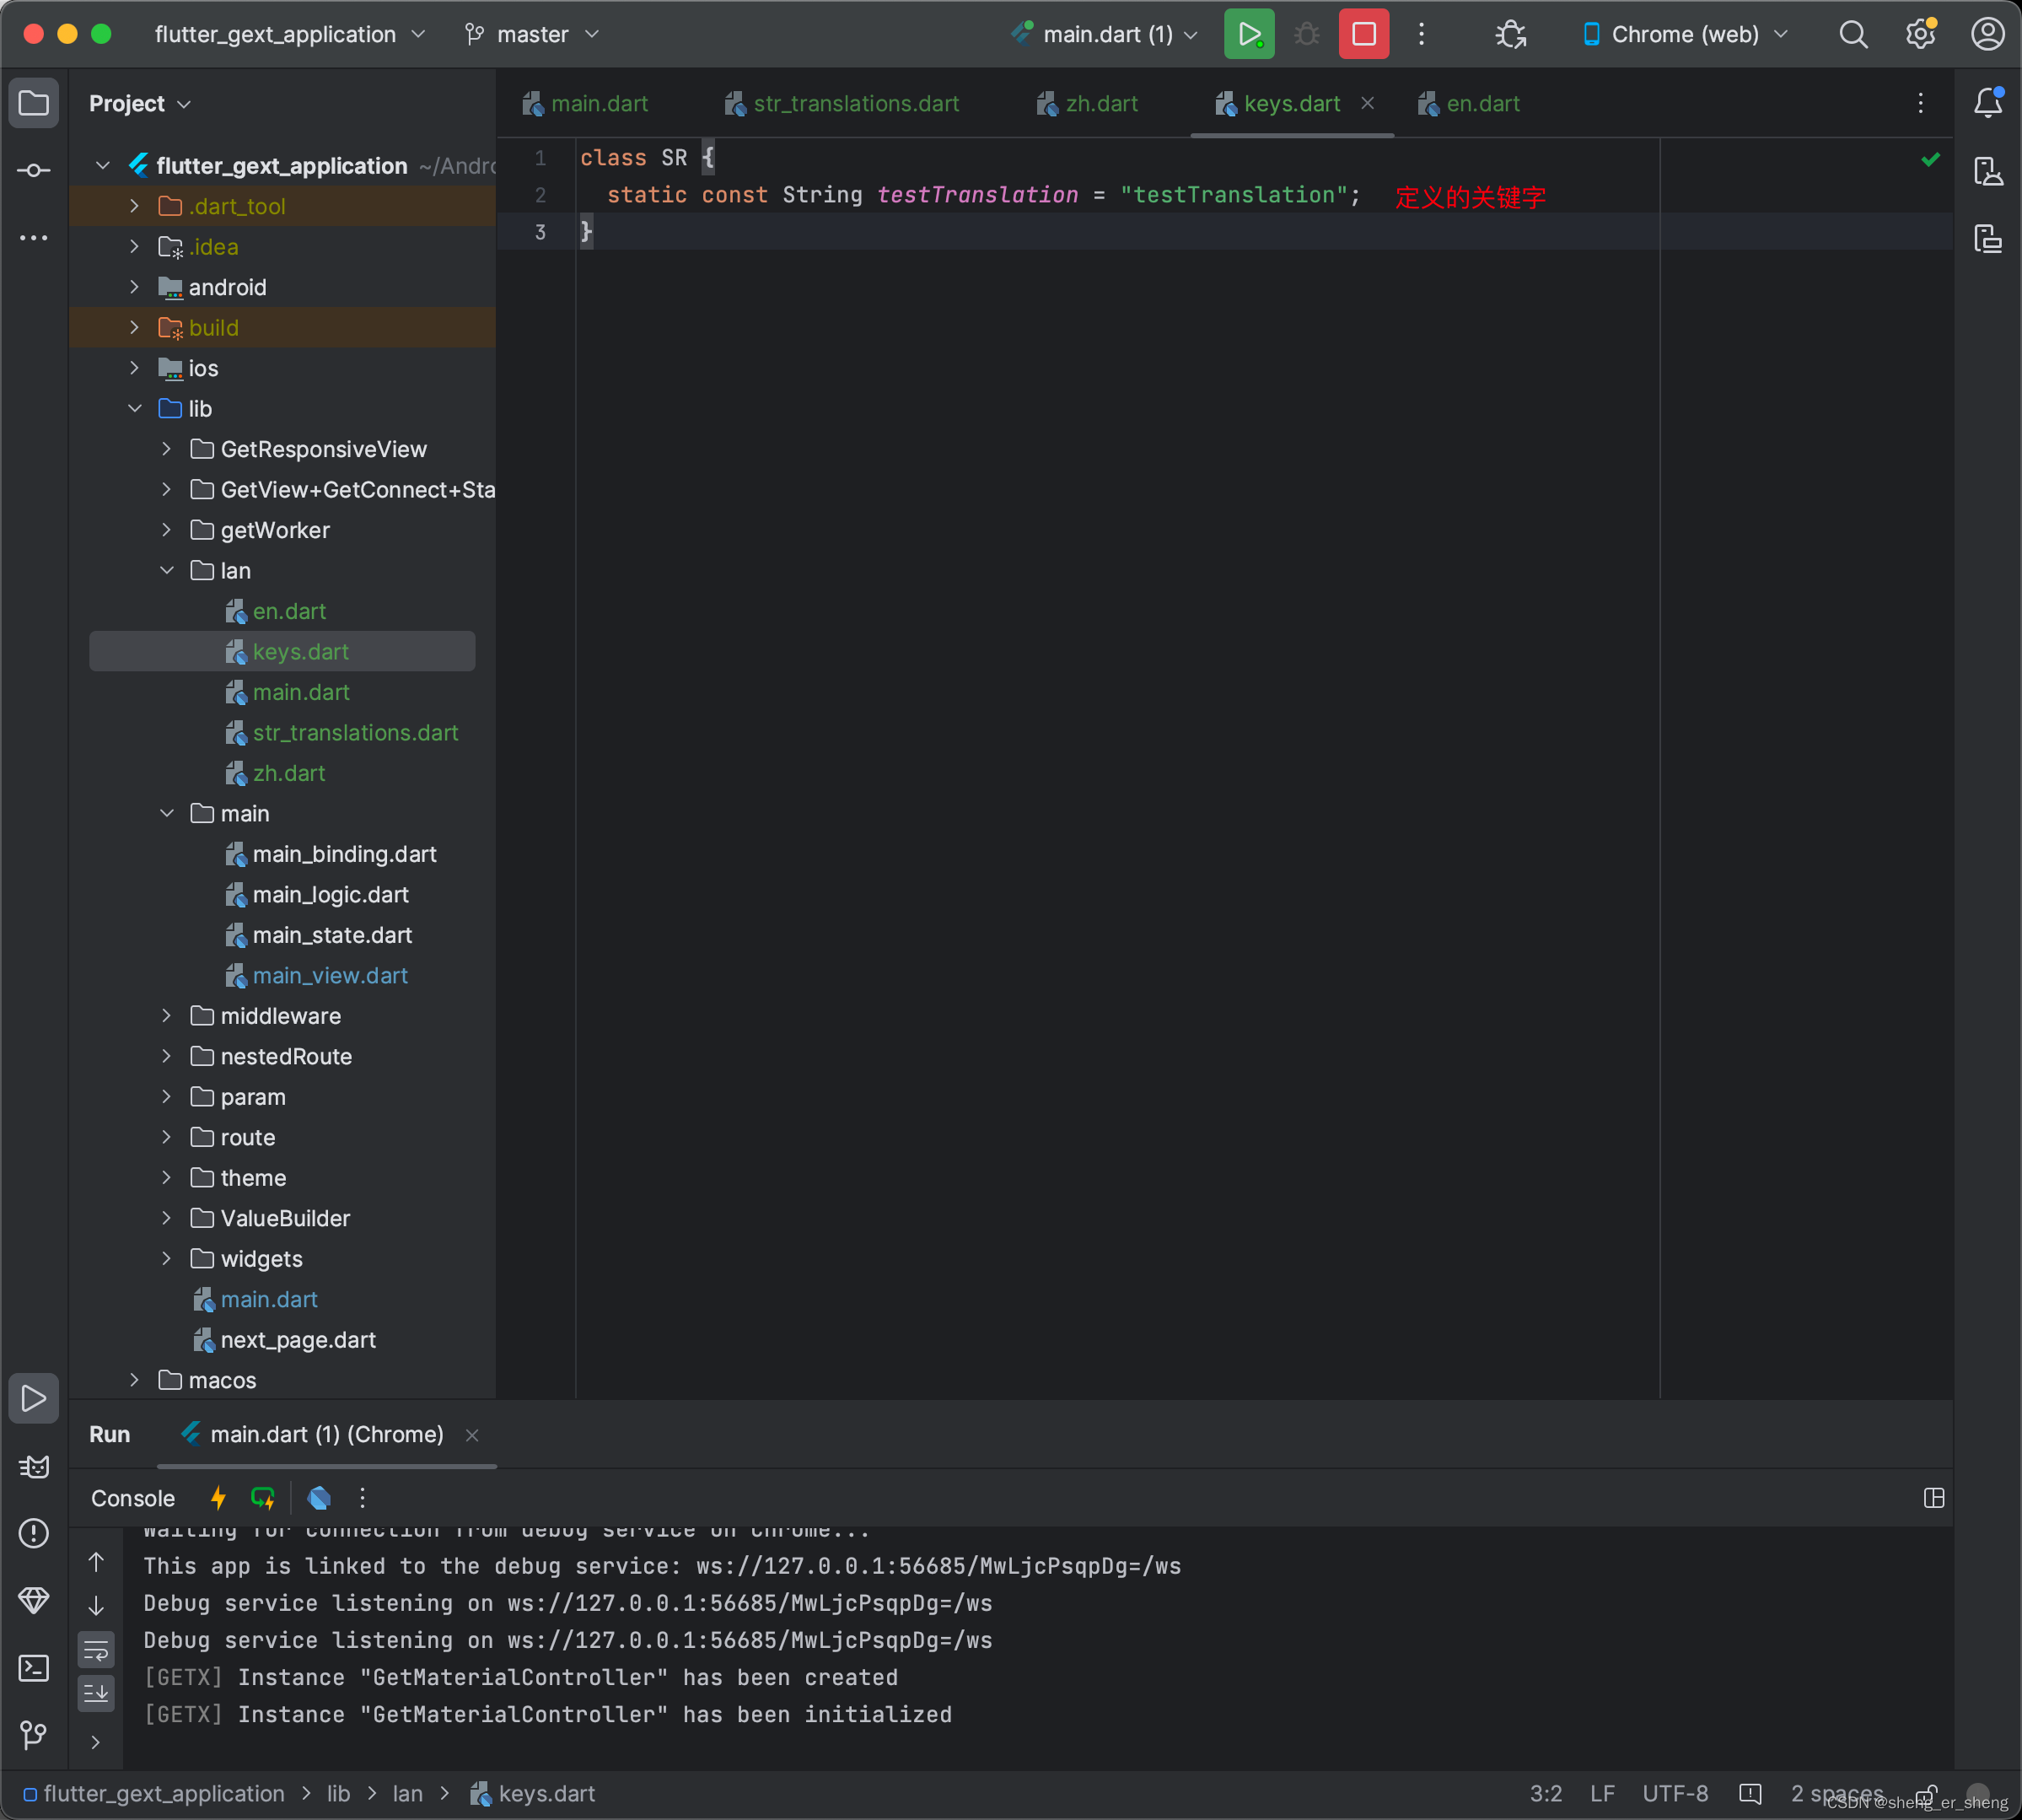
class SR {
  static const String testTranslation = "testTranslation";
}
运行
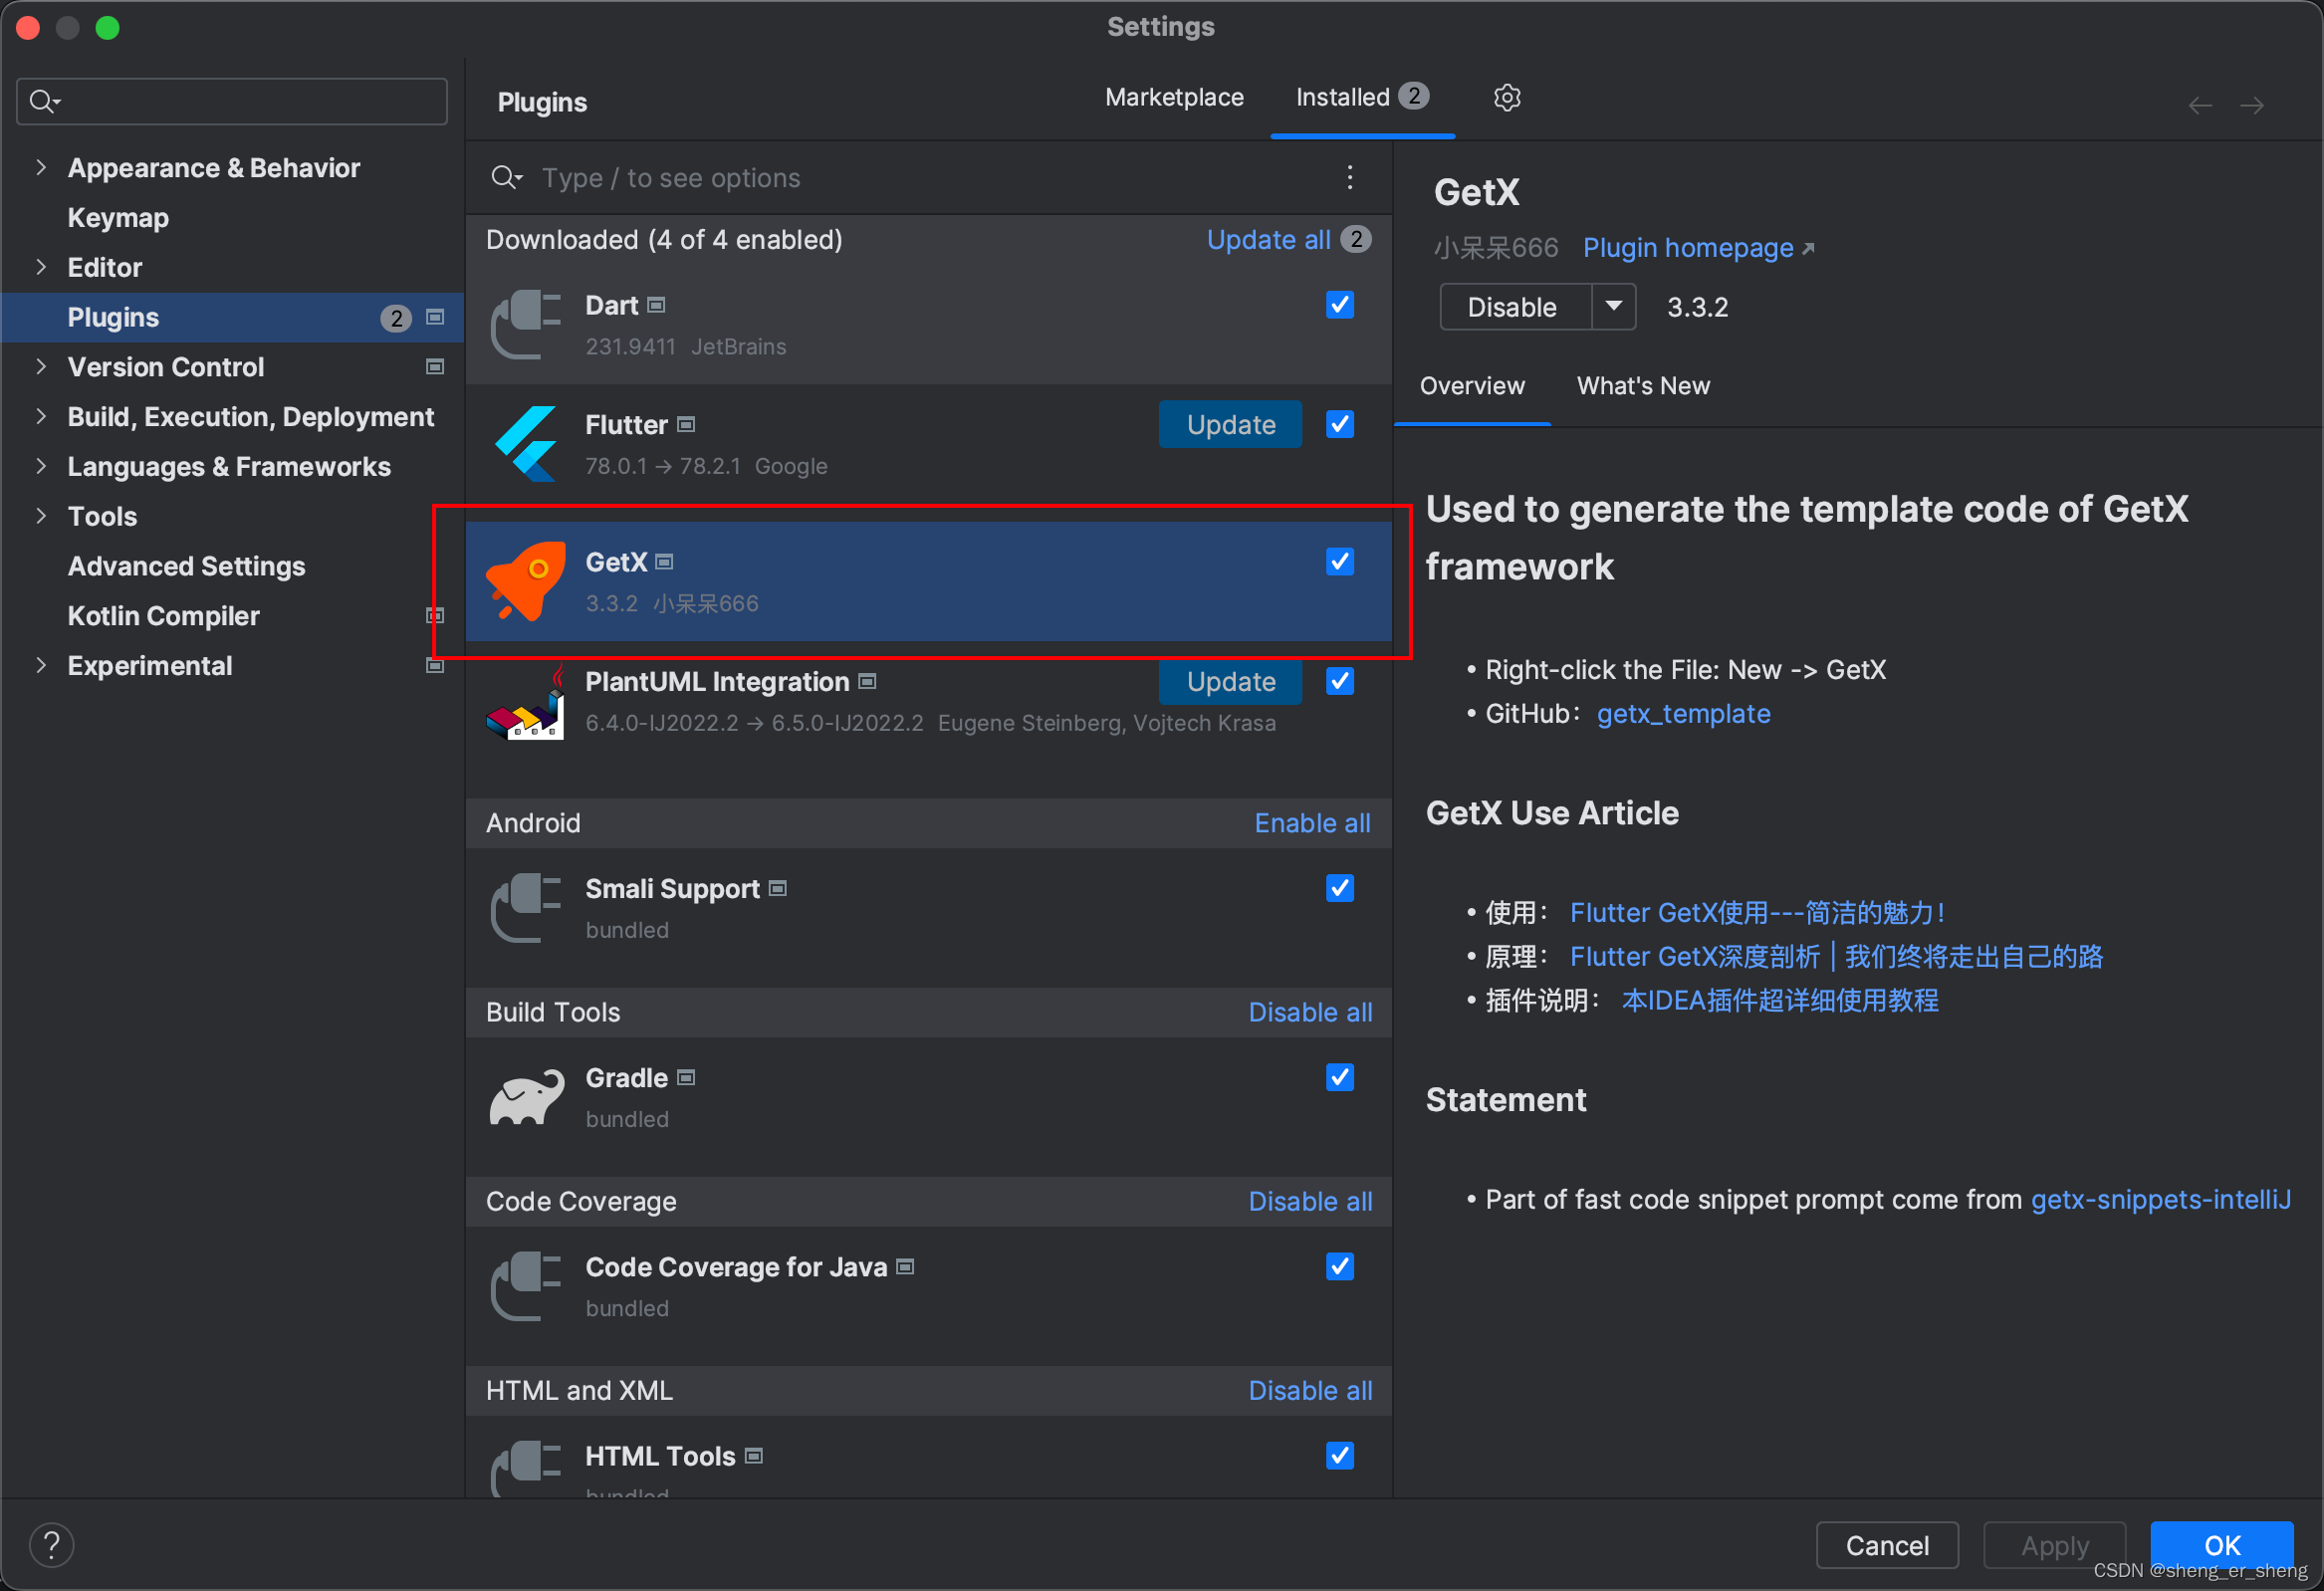
利用插件生成模板代码
挺好用的插件
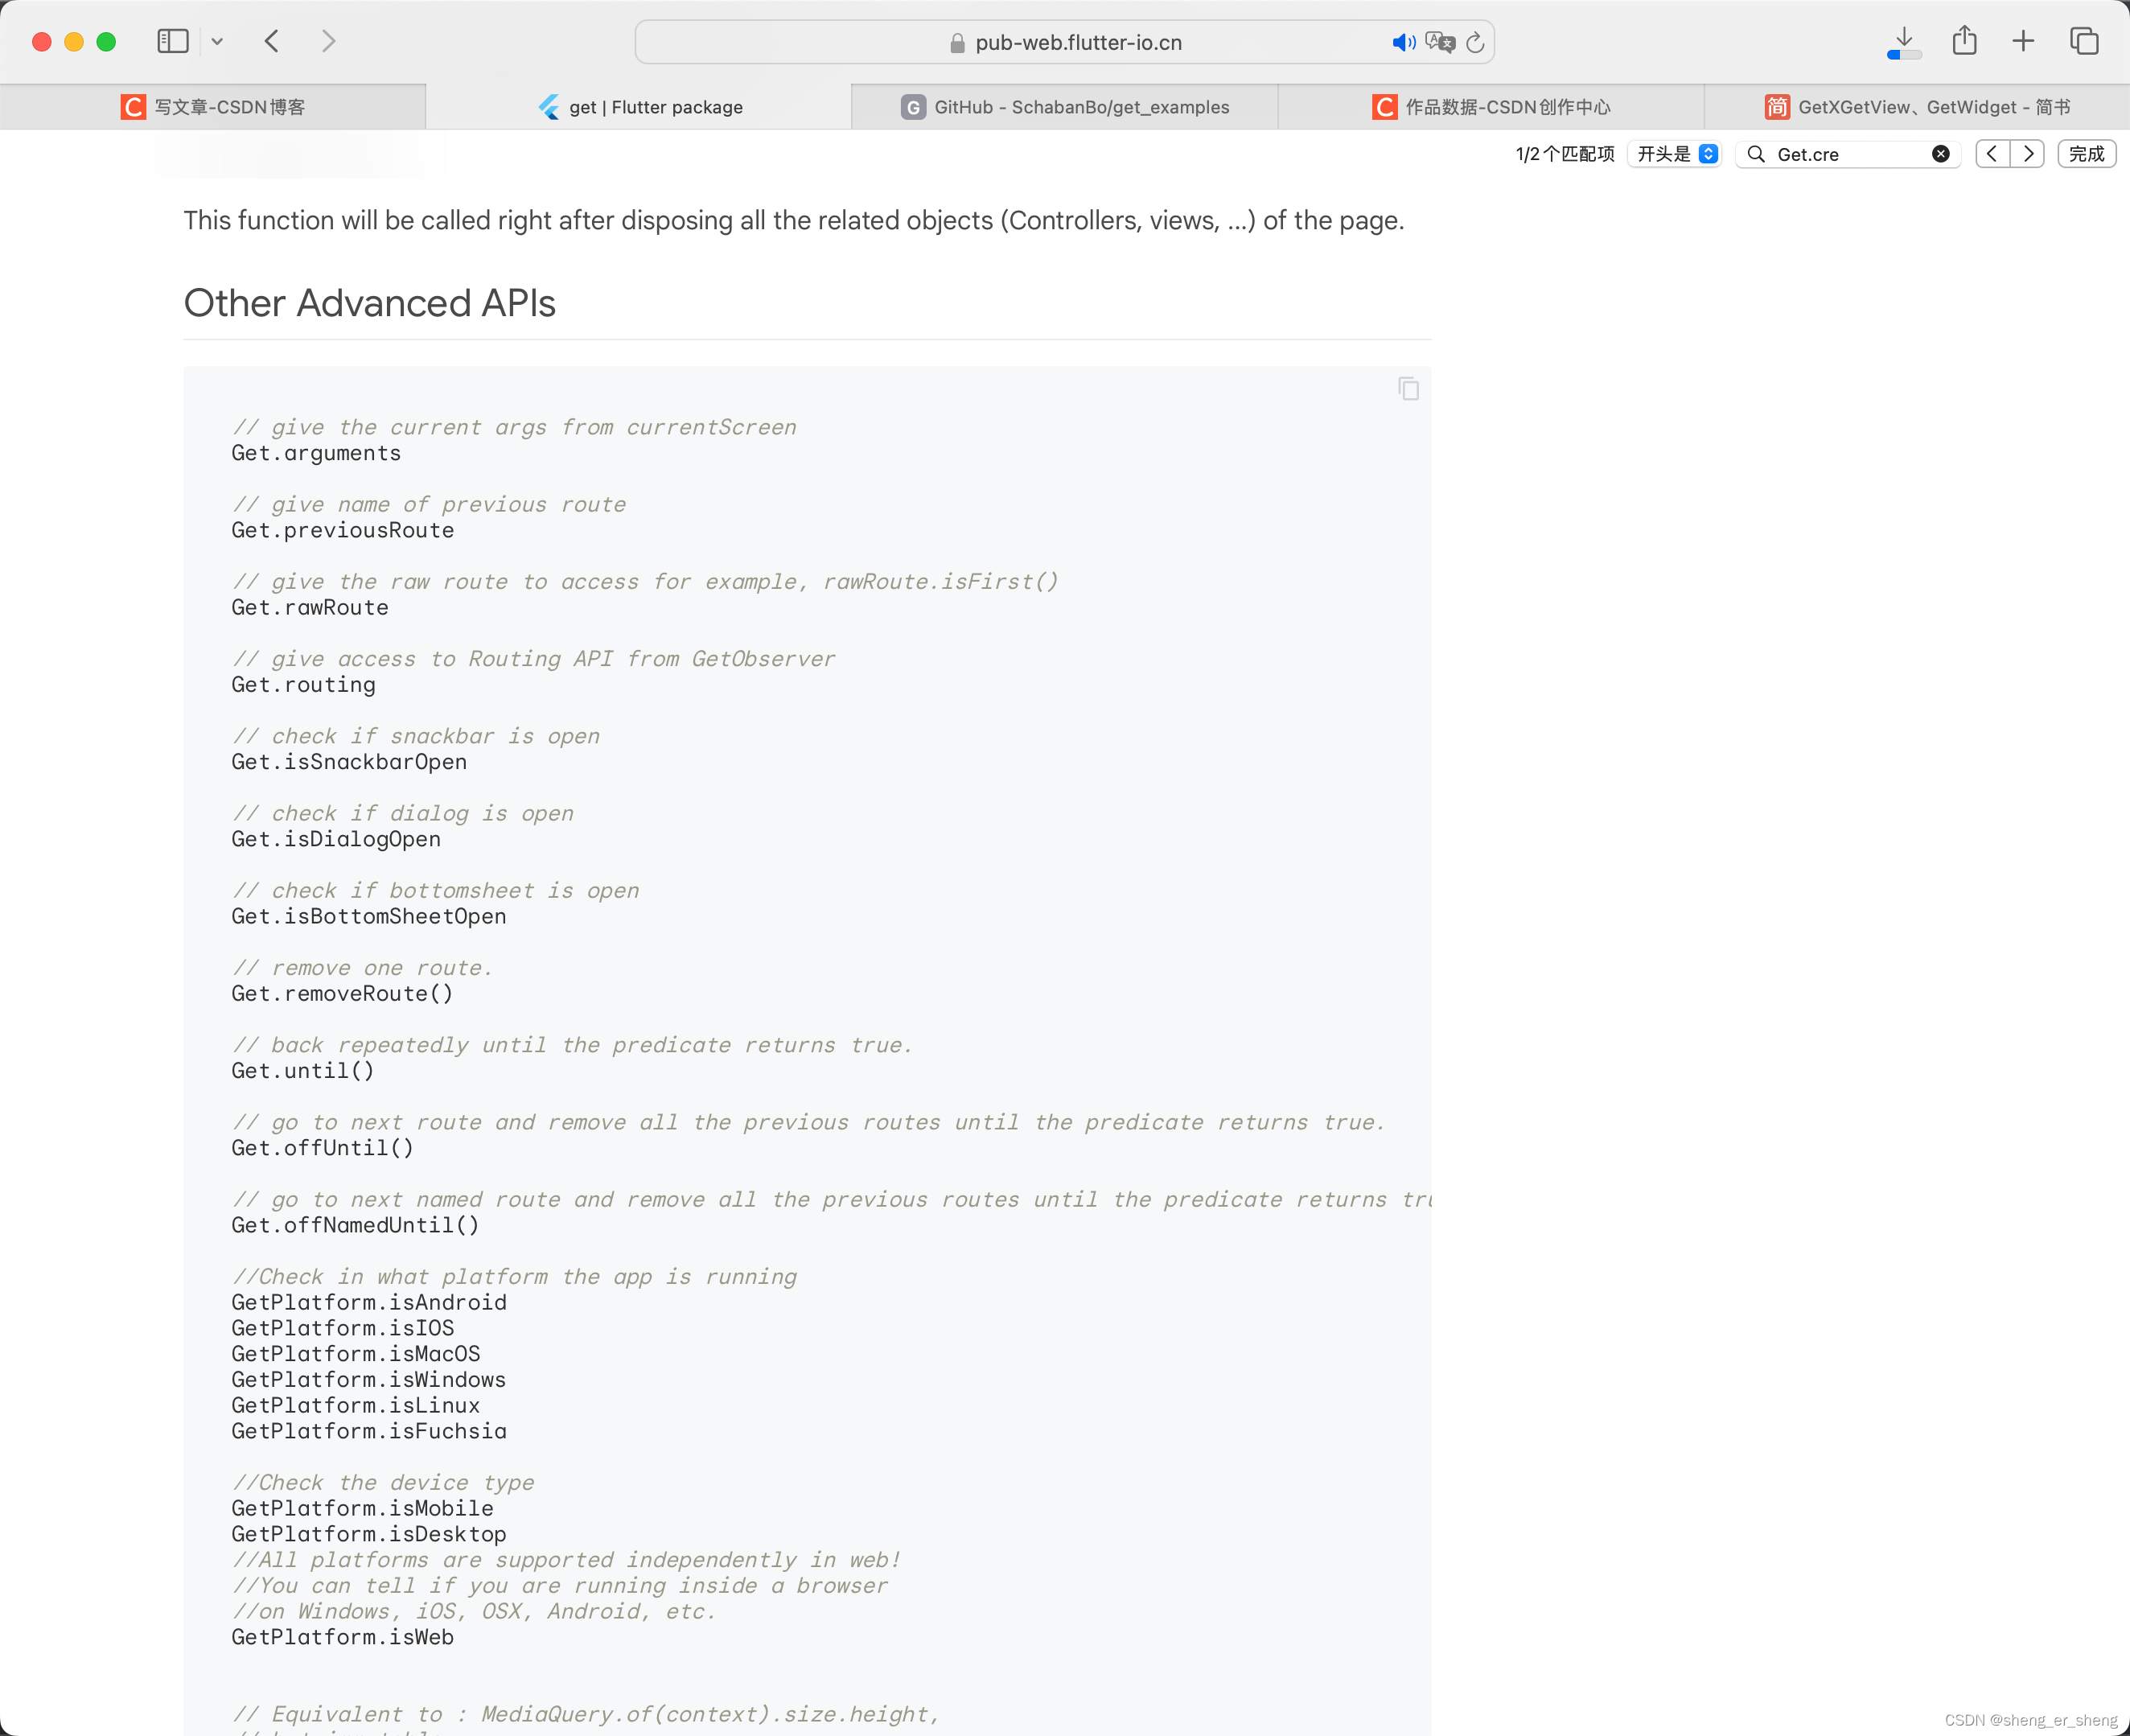
更多API
建议直接看这个文档
他喵的,终于写完了
点个关注呗


![[Linux][网络][网络编程套接字][一][预备知识][套接字地址结构]详细讲解](https://img-blog.csdnimg.cn/direct/ef72c238d27e4b11960efaa2e7075a8a.png)